


- bhavya gada
- No Comments
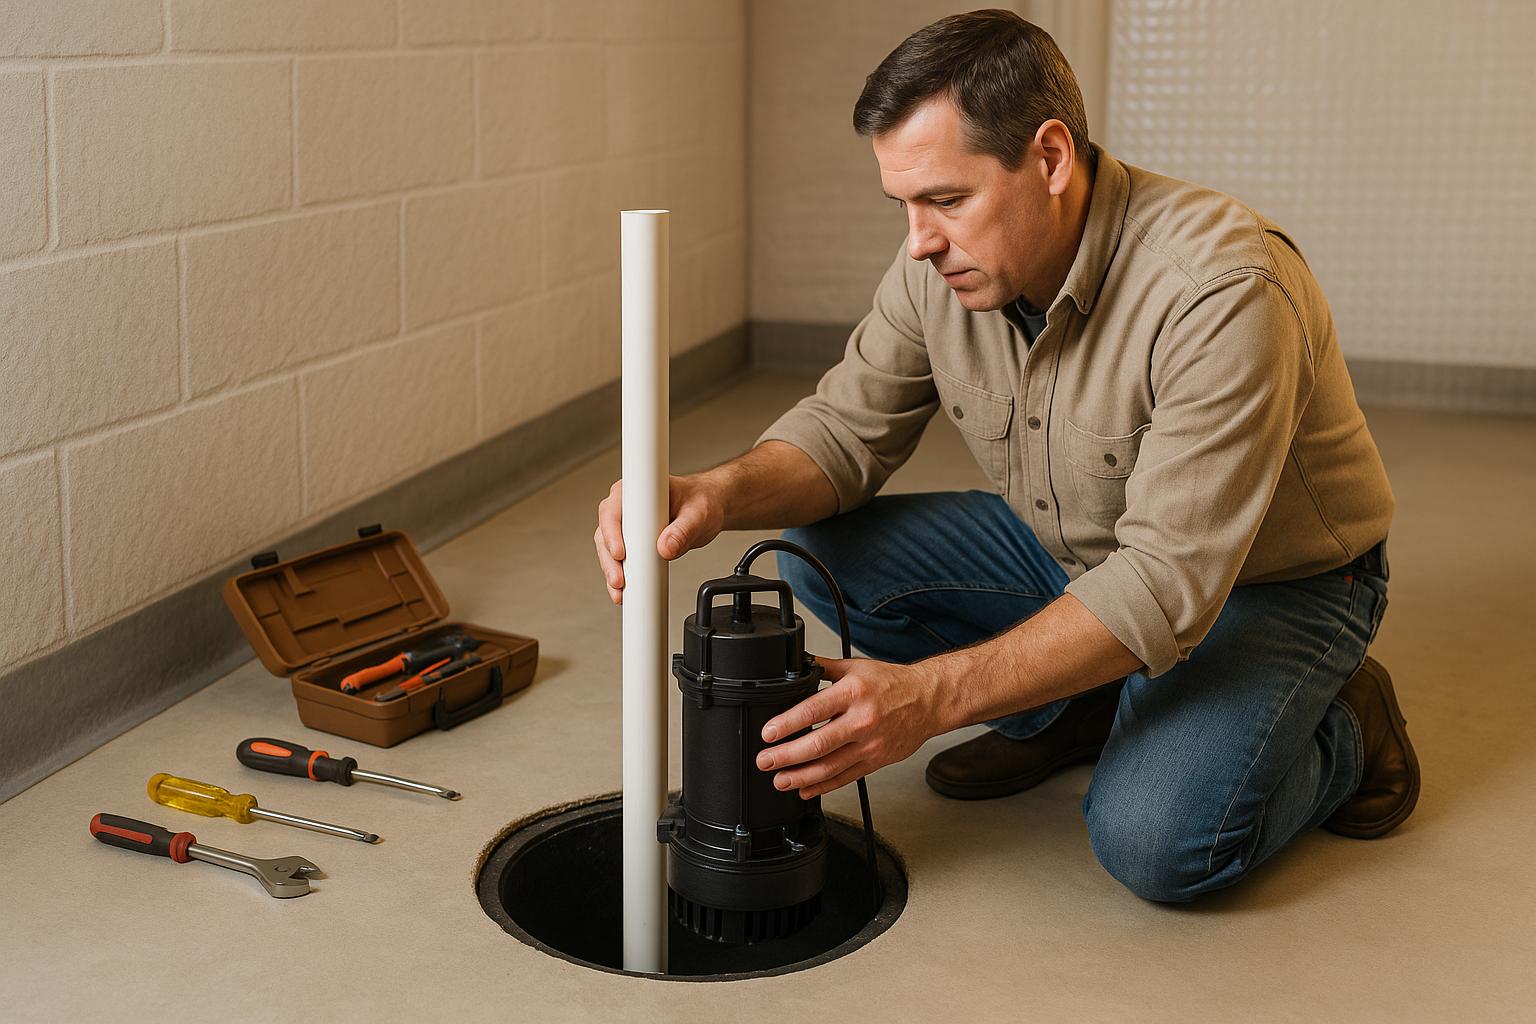
When installing a sump pump, avoiding common mistakes can save you from costly water damage and repairs. Here are the five most frequent errors homeowners make during installation:
- Wrong Pump Location: Placing the pump away from the lowest point in your basement reduces its effectiveness.
- Missing or Faulty Check Valve: Without a properly installed check valve, water can flow back into the sump pit, overworking the pump.
- Poor Discharge Pipe Setup: Discharge pipes placed too close to the foundation or improperly sloped can lead to water recycling back into your home.
- Float Switch Problems: Issues with float switch placement or type can prevent the pump from activating or cause it to run non-stop.
- Skipping Testing and Maintenance: Neglecting regular testing and upkeep increases the risk of failure during heavy storms.
Each of these mistakes can lead to flooding, structural damage, or pump failure. Proper planning, installation, and regular maintenance are key to keeping your basement dry and your sump pump running smoothly.
Avoid a Flooded Basement 5 Sump Pump Mistakes to Fix Today
1. Wrong Sump Pump Location
Even the most reliable sump pump won’t do much good if it’s installed in the wrong spot. With 14,000 homes across the United States facing water damage every day [1], finding the right location is crucial to keeping your Maryland basement dry and avoiding expensive repairs.
The sump pump should be installed at the lowest point of your basement. This ensures it can collect water from all directions. Ideally, it should also be near an exterior wall to make setting up the discharge pipe easier [2][3]. Don’t forget to factor in the soil composition around your foundation – water tends to pool near foundation footings, making these areas prime spots for intercepting water before it seeps into your basement [1].
Accessibility is another key consideration. Place the pump where it’s easy to inspect and maintain, preferably near plumbing and electrical connections to simplify setup and reduce expenses. Choose a location with a reliable power source but steer clear of placing it directly against walls or in tight corners, as this can restrict water flow and reduce efficiency.
For Maryland homeowners dealing with frequent storms or high water tables, getting the placement right can save you from the headache – and cost – of water damage.
If you’re unsure about the best spot for your sump pump or want expert advice on water management, Pro Landscapes MD is here to help. Up next, we’ll dive into why a properly functioning check valve is so important.
2. Missing or Faulty Check Valve
A missing or faulty check valve can lead to constant cycling and backflow issues in your sump pump system. This small but critical component stops water from flowing back into the sump pit once the pump shuts off. Without it, you could face continuous cycling and even the risk of flooding.
How to Spot Problems
Signs of a faulty or missing check valve include excessive cycling (more than 10 times an hour), unusual gurgling or banging noises, visible leaks, or cracks around the valve area [4] [5].
Proper Installation Tips
When installing a check valve, make sure the flow arrow points away from the pump. Position it 8–12 inches above the pump discharge, using the same length of straight vertical pipe to minimize turbulence [5] [7].
For areas like Maryland, where basements are prone to flooding, correct installation is particularly important. Spring-loaded check valves are quick to respond and can be installed in any orientation. Swing check valves, which are better at handling debris, usually require horizontal installation. Ball check valves are reliable for thicker fluids but may not seal as well under low back pressure [5].
Keeping Maintenance Simple
To make maintenance easier, use union fittings or quick-release clamps for easy removal and cleaning [7]. Regularly inspect the valve for leaks, moisture, or debris buildup [5]. You can also test the system by pouring water into the sump pit to ensure both the pump and check valve are working properly, with no backflow [6].
For more complicated drainage setups, seeking professional advice can save you from costly errors. Up next, we’ll dive into how poor discharge pipe configurations can compromise your sump system.
3. Poor Discharge Pipe Setup
If your discharge pipe isn’t set up correctly, it might recycle water back toward your home instead of directing it safely away. This pipe is designed to carry water away from your foundation, but an improper setup can lead to water pooling around your home – or worse, in your basement.
Common Discharge Pipe Mistakes
One of the most frequent mistakes is positioning the pipe too close to the foundation. Ideally, the discharge pipe should extend at least 10 to 20 feet away from your home [9]. Many people underestimate this distance, which can cause the discharged water to seep back into the soil surrounding the foundation, eventually making its way back into the sump pit.
Another common error? Using corrugated pipes. These are prone to collapsing under pressure and tend to trap debris, which can block water flow [11].
Real-World Consequences
Here’s an example: A homeowner used a shallow-buried, corrugated pipe for their sump pump discharge. Over time, water began pooling near the house, eventually seeping back toward the foundation. This created a cycle of water infiltration that the sump pump struggled to manage.
Proper Installation Guidelines
When designing your discharge pipe system, there are a few key points to keep in mind:
- Ensure the pipe has a continuous downhill slope to its exit point [13].
- The discharge point should be at least 15 feet from property lines near streets or sidewalks and 10 feet from side or backyard boundaries [14].
- Avoid using more than 20 feet of internal discharge piping, as this can strain your sump pump motor [9]. For longer distances, consider intermediate solutions or consult a drainage expert.
Maintenance and Inspection
Regular upkeep is essential to keep your discharge system working smoothly. After harsh weather, inspect the pipe for cracks or disconnections [10]. You can also test the system by pouring water into the sump pit to ensure it pumps out properly [12].
Professional Drainage Solutions
If your property has tricky grading or other challenges, professional help can be invaluable. Companies like Pro Landscapes MD offer services such as proper drain pipe placement, French drains, stormwater management, and grading adjustments to ensure your discharge system operates efficiently for years to come.
Poorly configured discharge pipes often contribute to larger drainage problems around your home. In the next section, we’ll delve into how float switch issues can cause your sump pump to fail when you need it the most.
sbb-itb-843f8be
4. Float Switch Problems
The float switch is a crucial part of your sump pump, acting as a sensor that turns the pump on or off based on water levels. If it fails, your sump pump might not activate when needed or could run non-stop, which risks overheating and damaging the motor. Spotting these issues early can save you from expensive repairs and water damage.
Understanding Float Switch Types
There are three main types of float switches:
- Horizontal Float Switches: These are the most common but can sometimes snag on the sump liner, causing them to stick [15].
- Vertical Float Switches: These operate along a guided rod, which minimizes the chance of malfunction. However, they require the sump pit to be properly sized [15].
- Diaphragm Float Switches: Using a pressure-sensitive diaphragm, these tend to be more dependable but come with a higher price tag [15].
Common Float Switch Failures
Float switches often fail due to mechanical wear from frequent use [17]. Vibrations can also cause the float to get stuck, preventing it from moving as it should [16]. These problems can lead to improper pump performance, motor burnout, and even basement flooding.
Proper Positioning Guidelines
To ensure your float switch works effectively, place it in a sump pit with a diameter of at least 14 inches (though 18 inches is preferred) [18]. The tether length and its attachment point are key to setting the pump’s activation level. Ideally, the starting point should be at least 6 inches below the floor’s surface to activate the pump at the correct water level [19]. Adjusting the tether length changes the pumping range, and it’s essential to keep the pump’s intake submerged during operation to prevent airlocks [19].
Installation and Testing Best Practices
Allow enough space around the pump for the float switch to move freely [20]. Use zip ties to secure the wiring to the discharge pipe [18]. After installation, test the system by filling the sump pit with water and manually moving the float to ensure it activates and deactivates the pump correctly [19].
Maintenance and Prevention
Regular maintenance is key to keeping your float switch in good working order. Clean the sump pump and pit to prevent debris from obstructing the float’s movement, and check the switch for signs of wear, corrosion, or damage. Replace it as needed [15][17]. Routine inspections and cleaning significantly reduce the risk of system failure and basement flooding [15].
For more persistent drainage issues or recurring float switch problems, professional help might be the best route. Companies like Pro Landscapes MD specialize in drainage solutions, including proper drain pipe placement and stormwater management systems, which can work alongside your sump pump for added reliability.
Float switch problems can escalate into larger system failures if left unchecked. Up next, we’ll explore how neglecting testing and maintenance can compound these issues.
5. Skipping Testing and Maintenance
Installing a sump pump and then forgetting about it is a gamble many homeowners take – one that can lead to disaster during heavy storms or spring flooding. Neglecting to test and maintain your pump regularly could leave you vulnerable to costly failures when you need it most. Consistent upkeep is the key to ensuring your pump is ready to perform in critical moments.
When maintenance is overlooked, the risks are significant. A pump that worked fine before might seize up due to debris buildup, corroded parts, or a clogged discharge pipe. If this happens during a storm, you could face water damage costing thousands of dollars.
Essential Testing Schedule
Keeping your sump pump in working order doesn’t require a lot of time, but it does demand regular attention. Every three months, pour about 5 gallons of water into the sump pit. The float should rise smoothly and activate the pump. Once the water is cleared, the pump should shut off automatically. If you notice any hesitation, strange grinding or rattling sounds, or the pump cycling on and off repeatedly, take action right away.
Clear debris from around the pump and check the exterior drainpipe for blockages like leaves or dirt. Inspect the electrical cords too. If your pump has dual cords, unplug both, then reconnect only the pump cord to ensure the motor runs properly.
Maintenance Requirements by Frequency
How often you maintain your sump pump depends on its workload and environment. Pumps handling washing machine water, for instance, should have their screens cleaned monthly to prevent soap and lint buildup.
- Every few months: Check that the pump is upright and stable, plugged into a GFCI outlet, and securely connected to the discharge pipe without leaks. Ensure the float switch moves freely, and keep the sump pit clear of debris.
- Annually: Remove the pump from the pit for a thorough cleaning. Inspect all components for wear or damage. Many experts recommend scheduling a professional inspection once or even twice a year – ideally in the spring and fall – to prepare for peak usage seasons.
Warning Signs That Demand Immediate Action
Pay attention to the signals your sump pump gives before it fails completely. Unusual noises such as rattling, grinding, or excessive vibrations could point to worn-out components or debris interference. If the pump cycles on and off too often or runs nonstop, it might have internal wiring issues or a malfunctioning switch.
Other red flags include visible rust, mold, or unpleasant odors around the sump area. These could indicate standing water, poor drainage, or deteriorating parts. Regular testing helps catch these issues early, extending the life of your pump. As Tom Scherer, an agricultural engineer with NDSU Extension Service, advises:
"If something doesn’t work right, fix it as soon as possible." [21]
The Real Cost of Neglect
Skipping maintenance might save a few bucks in the short term, but it could lead to much higher costs later. According to Fixr.com, professional sump pump maintenance typically ranges from $100 to $300. This includes cleaning, debris removal, valve checks, and clearing standing water. Compare that to the expense of repairing a flooded basement, which can easily climb into the thousands.
The average sump pump lasts about 7 years, but regular testing and cleaning can extend its life significantly, ensuring it’s ready when you need it most. For homes with ongoing water issues or complicated drainage problems, professional assistance might be the best route. Companies like Pro Landscapes MD offer services such as French drains, stormwater management, and grading solutions to complement your sump pump system and provide added protection.
Spending just a few minutes every few months on maintenance can save you from the headache and expense of basement flooding. It’s a small effort with big rewards.
Comparison Table
Getting a sump pump installation right can make all the difference in avoiding water damage and system failures. This table lays out the common missteps homeowners make, the correct way to handle each installation element, and the potential consequences of getting it wrong.
| Installation Element | Common Mistakes | Best Practices | Impact of Mistake |
|---|---|---|---|
| Pump Location | Placing the pump in a random corner, not at the lowest point, hard-to-reach areas, or too far from the discharge point [22] [8] | Position the pump at the lowest point in the basement, close to an exterior wall for easier maintenance [2] [1] | Poor water collection leaves the basement at risk of flooding [1] |
| Check Valve Installation | Skipping the check valve, installing it upside down, or using the wrong type | Use a properly oriented, spring-loaded, or swing check valve | Water can flow back into the pit, causing the pump to overwork and risk motor burnout |
| Discharge Pipe Setup | Ending the pipe too close to the foundation, failing to protect against freezing, or not maintaining a proper slope | Extend the discharge pipe at least 10 feet from the house, insulate exposed pipes, and ensure a slope of about 1/4 inch per foot | Water may flow back toward the foundation, freeze, or cause damage |
| Float Switch Position | Allowing the switch to hit the pit walls, tangled cords, or using an inappropriate switch for the pit size | Make sure the switch has enough clearance, secure cords properly, and select a switch that fits the pit dimensions | A faulty switch can prevent the pump from activating during high water levels, risking failure |
| Testing Schedule | Neglecting maintenance or ignoring early warning signs after installation | Test the pump every three months with a small amount of water and schedule an annual professional inspection; fix issues promptly | Lack of upkeep can lead to failure during storms, resulting in expensive repairs |
Each of these elements plays a crucial role in protecting your home from water damage. Proper installation and regular maintenance are key. For more complex drainage challenges, Pro Landscapes MD provides expert services in French drains, stormwater management, and grading across Maryland and Washington, DC.
Conclusion
Steering clear of these five common sump pump installation mistakes can save your home from water damage and expensive repairs. Did you know that water damage impacts about 14,000 people daily in the U.S., with the average homeowner claim surpassing $11,000? [23]. Installing a sump pump correctly is a much smarter investment compared to dealing with the aftermath of flooding. Beyond just keeping water at bay, a properly installed sump pump protects your foundation from water buildup that can lead to cracks and structural issues, reduces the risk of mold by controlling moisture, and helps maintain your property’s value through preventive care.
While the basic setup might seem straightforward, hiring a professional is essential, especially in regions prone to heavy rain or fluctuating groundwater levels. Professionals can evaluate your home’s specific requirements, ensure the pump is appropriately sized, and confirm that the installation meets local building codes.
For more complex drainage issues, Pro Landscapes MD provides expert services in French drains, stormwater management, and grading throughout Maryland and Washington, DC. Their tailored solutions tackle water problems at the source, delivering a thorough and effective approach to drainage.
Don’t forget to schedule regular professional inspections to identify potential problems early. Plus, many insurance providers offer discounts for professionally installed systems, giving you even more reason to ensure your sump pump is in top shape.
FAQs
Where should I install a sump pump in my basement for the best results?
To make sure water is collected and drained properly, the sump pump should be installed at the lowest point of your basement floor. Positioning it near an exterior wall or in a corner works well, as water will naturally flow toward these areas. It’s also wise to pick a low-traffic spot to prevent obstructions and allow for easy maintenance. If your home has perimeter drain pipes or footing drains, place the sump pump where these systems can channel water directly into the pit.
What are the signs of a faulty sump pump check valve, and how can I address them?
A malfunctioning sump pump check valve can lead to noisy gurgling or banging sounds, water leaking around the valve, water flowing back into the sump pit, or even excessive vibrations. These problems often arise from improper installation, debris accumulation, or internal damage to the valve.
To fix the issue, start by examining the valve for any cracks or signs of wear. Clear out any debris that might be obstructing its function, and double-check that it’s securely installed in the correct direction. If the valve is too damaged to fix, the best course of action is to replace it with a new one to ensure your sump pump operates as it should.
How can I properly set up my sump pump’s discharge pipe to prevent water from flowing back into my home?
To prevent water from cycling back into your home, it’s crucial to set up your sump pump’s discharge pipe correctly. Position the pipe so it directs water away from your home’s foundation, ensuring it slopes at least 1/4 inch per foot for effective drainage. Adding a check valve is a smart move to stop any backflow. Also, make sure the pipe’s outlet is at least 10 feet away from your house to keep discharged water from finding its way back into your basement or foundation.
Keep an eye on the system by checking regularly for leaks or clogs, and ensure all pipe connections are tightly sealed for smooth water flow. A well-installed system combined with routine maintenance goes a long way in keeping your home dry and safe from water damage.
Chat with Us