









- bhavya gada
- No Comments
If you change grades, add hardscape, or disturb soil in Maryland, I’d plan runoff before work starts. Even a small job can shift water toward a basement, driveway, neighbor’s yard, or low spot. And once runoff starts cutting through bare soil, the fix usually costs more than getting the layout right from day one.
Here’s the short version: I’d walk the site, measure slopes, map where water starts and ends, pick the right drainage controls, set temporary soil protection first, and check permit triggers early. Two numbers matter right away: 5,000 sq ft of land disturbance or 100 cu yd of soil can trigger erosion and sediment plan review, and 1 acre+ of disturbance can trigger a construction stormwater permit.
What this covers, in plain terms:
- Site review: low spots, downspouts, slope breaks, tree areas, septic parts, walls, and property edges
- Slope checks: yard grades, patio and walkway pitch, driveway fall, and the first 10 ft away from the house
- Drainage layout: flow arrows, discharge points, overflow routes, and limit of disturbance
- BMP selection: rain gardens, dry wells, French drains, permeable pavers, swales, and outlet stone
- Temporary controls: silt fence, check dams, mulch, blankets, and temporary seeding
- Work order: controls first, grading in stages, soil cover fast
- Inspections: weekly and within 24 hours after 0.25 inches of rain
- Permit check: state thresholds plus county review in places like Howard, Baltimore County, and Montgomery County
A few field targets stand out:
- Yards/planting beds: about 1% to 2%
- Patios/walkways: about 1.5% to 2%
- Driveways: about 1% to 3%
- First 10 ft from foundation: about 5% fall, or ~6 inches
- Flag slopes at 15%+ for added review
- Rain gardens: at least 2% of drainage area, with 6 inches or less of ponding
- Dry wells: about 1,000 sq ft of drainage area per unit, draining within 48 hours
The main point: I’d treat runoff planning as part of the build itself, not an add-on. That means water paths, soil cover, BMP placement, inspections, and permit thresholds should all be clear before the first shovel goes in.
This article boils that process down into a simple step-by-step plan for Maryland residential site work.
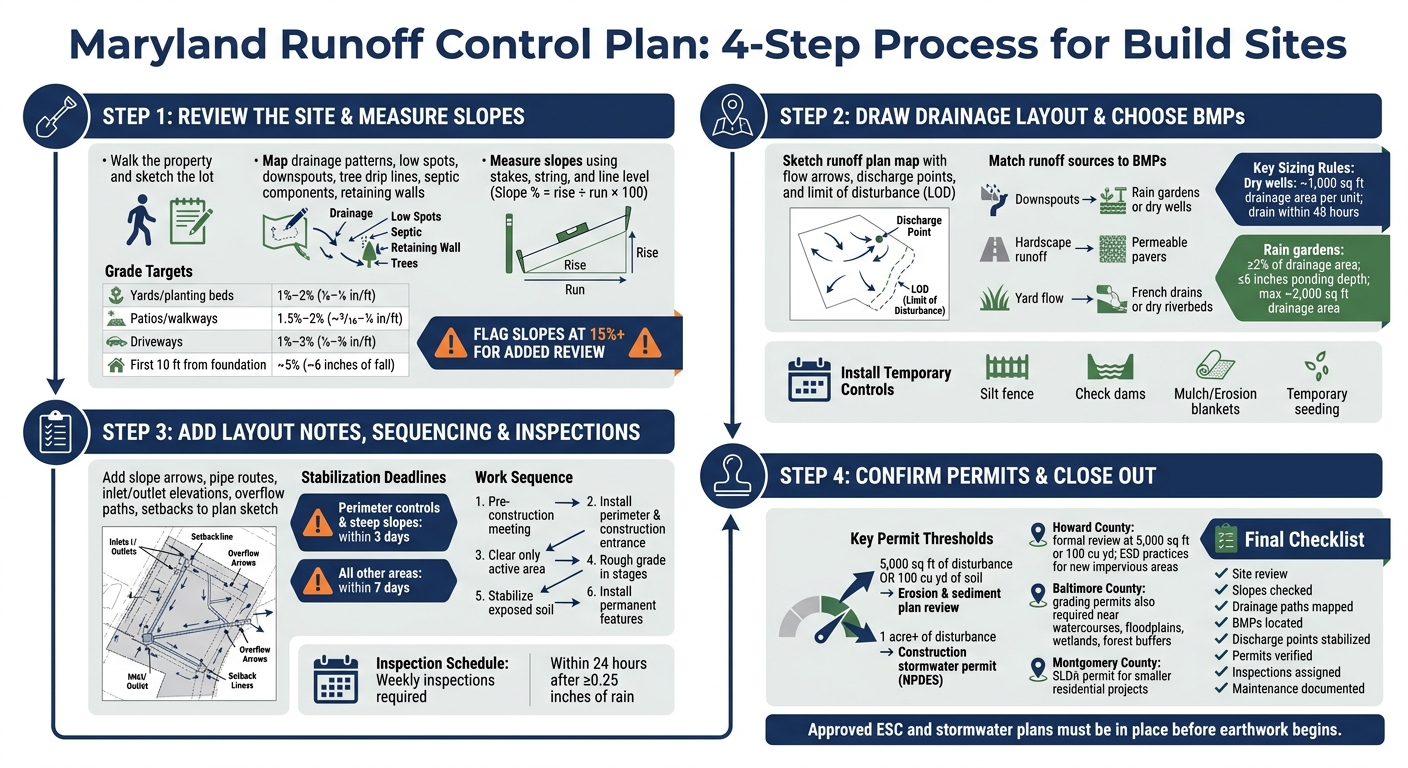
Maryland Runoff Control Plan: 4-Step Process for Build Sites
Stormwater & Erosion Control for Construction | Prevent Sediment Runoff | OSHA Outreach Courses
sbb-itb-843f8be
Step 1: Review the Site and Measure Slopes
Before you dig, regrade, or move a single shovel of soil, walk the property and sketch the lot. It doesn’t need to be fancy. A simple labeled drawing is enough to guide the rest of the work.
Map Drainage Patterns, Low Areas, and Sensitive Site Features
Start by showing where water begins, how it travels, and where it exits the lot. Mark every roof downspout and note whether it drains onto lawn, pavement, or right against the foundation. Add arrows along driveways, walkways, and patios so you can see which way water runs off those surfaces. Circle any low spots that hold water after rain, especially areas where grass stays thin, muddy, or worn out.
Add site features that can limit where runoff goes. That includes tree drip lines, retaining walls, wells, septic tanks and drainfields, stream buffers, property lines, and nearby structures. It also helps to mark compacted lawn near parking edges or along footpaths. Those spots often shed more water and drain poorly.
Check Grading Around the House and Hardscape Areas
You don’t need fancy survey gear for a basic slope check. Two stakes, a string, a line level, and a tape measure will do the job.
Set the stakes 10 feet apart. Level the string between them, then measure the vertical drop at the outer stake. That drop is the rise, and the 10-foot distance is the run.
Slope percent = rise ÷ run × 100. For example, 6 inches over 10 feet equals 5% slope.[5][8]
Use these grade targets when you compare lawn, patio, walkway, and driveway areas:
| Surface Type | Target Slope | Practical Equivalent |
|---|---|---|
| Yard and planting beds | 1%–2% | ⅛–¼ inch per foot |
| Patios and walkways | 1.5%–2% | ~3⁄16–¼ inch per foot |
| Driveways | 1%–3% | ⅛–⅜ inch per foot |
| First 10 ft from foundation | ~5% | ~6 inches of fall |
Flag Steep or Unstable Slopes Before Design Work
Once you’ve measured the slopes, flag any area at 15% or steeper for a closer look. Prince George’s County guidance says slopes of 15% or greater need added review.[4] Slopes around 3:1, or 33%, are usually the steepest practical limit for mowed areas. Anything steeper often needs stabilization or a retaining wall instead of simple regrading.[5][7]
Watch for warning signs on the ground too. Small rills, gullies, exposed tree roots on banks, slumping soil, surface cracks, or piles of soil at the bottom of a slope after storms all point to material already moving downhill. If you’re planning cuts or fills, mark those areas on the sketch as well. A new patio or driveway cut can steepen nearby ground and shift the way water flows.
These flagged spots should get first attention when you move into drainage controls and stabilization in Step 2. Use the sketch and slope checks to place flow paths and BMPs in the next step.
Step 2: Draw the Drainage Layout and Choose BMPs
Use the slope notes, low spots, and flagged steep areas from Step 1 to build your drainage layout. On a small residential lot, you don’t need a fancy site plan. A clear, labeled sketch usually does the job.
Sketch the Runoff Plan Map with Flow Paths and Discharge Points
Begin with what’s already there: property lines, the house footprint, existing vegetation, and current drainage routes. Then add the proposed work, such as new patios, driveways, walkways, and any grading changes. Draw arrows to show both existing and proposed flow directions, and mark the limit of disturbance (LOD). That line shows where erosion and sediment controls need to be installed.
Mark every downspout and note where it discharges now, whether that’s the lawn, driveway, street, or a storm drain. Then show where you plan to send that water instead. Label each discharge point where runoff leaves the disturbed area, and stabilize it with a rock apron, vegetated swale, or dry riverbed.
You should also flag the areas that must remain undisturbed, including tree protection zones, existing vegetation, and the steep slopes identified in Step 1. That sounds simple, but it helps avoid accidental damage once construction starts. Use the sketch to connect each flow path to the right control, and note where temporary protection needs to go first.
Select BMPs for Roof, Yard, and Hardscape Runoff
Once the drainage map is in place, pick controls based on where the water begins, where it gathers, and where it exits the lot. The basic idea is simple: match each runoff source to the BMP that fits it best. For example:
- Downspouts can drain to rain gardens or dry wells
- Hardscape runoff can go to permeable pavers
- Yard flow can be handled with French drains or dry riverbeds
A few sizing limits matter here. For dry wells, keep each one to about 1,000 sq ft of drainage area, and make sure it drains within 48 hours.[1] For rain gardens, size each one to at least 2% of its contributing drainage area, keep ponding depth at 6 inches or less, and limit each single-lot rain garden to a drainage area of about 2,000 sq ft.[6][10]
Temporary controls protect bare soil until the permanent BMPs are in place. Use silt fence, check dams, temporary seeding, mulch, and erosion blankets before or during grading so exposed areas don’t wash out in the meantime.
Compare Common BMPs for Maryland Yards
Use the table below to narrow down the best fit for each runoff source.
Permanent BMPs
| BMP | Best Placement | Soil Fit | Maintenance | Key Tradeoffs |
|---|---|---|---|---|
| French drain | Along foundation edges, downslope of patios or driveways | Moderate-to-permeable soils; avoid high groundwater | Inspect outlets, flush as needed | Space-efficient; can clog over time; must not direct water toward foundations |
| Dry well | Below downspouts; low points where roof runoff collects | Adequate infiltration rate; sufficient depth to groundwater | Inspect inlets, monitor infiltration | High infiltration benefit; may need engineering or permits; not visible once installed |
| Rain garden | Near downspouts or hardscape edges; away from foundations and septic | Loamy or sandy soils preferred; clay soils need amended fill and underdrain | Seasonal plant care, sediment removal | Aesthetic and ecological value; needs space; ponds briefly after storms |
| Permeable pavers | Driveways, walkways, patios with expected traffic | Best over permeable subgrade; base design can compensate | Vacuum sweeping, joint cleaning, weed control | Lowers runoff volume; higher upfront cost; performance depends on installation quality |
Temporary Construction Controls
| Control | Installation Timing | What It Controls | Basic Upkeep |
|---|---|---|---|
| Silt fence | Before any upslope land disturbance begins | Sediment in sheet flow from disturbed areas | Inspect after storms; repair tears; remove sediment buildup regularly |
| Check dams | After temporary channels or swales are graded | Velocity and sediment in concentrated flow within temporary ditches | Inspect for displacement; remove sediment buildup periodically |
| Sediment traps/basins | Early in construction, before major upslope grading | Sediment from larger disturbed drainage areas | Inspect embankments and outlets; remove sediment when storage is significantly reduced |
| Temporary seeding | As soon as an area will sit idle | Erosion on exposed slopes and flat areas | Monitor germination; reseed bare spots; maintain mulch until vegetation is established |
| Erosion control blankets | At or shortly after grading steep or erodible slopes | Erosion on steep areas; protects seed and soil surface | Inspect for slippage; repair anchoring; replace damaged sections after storms |
With the BMPs selected, the next move is to place them on the plan and add notes that help guide construction and inspection.
Step 3: Add Layout Notes, Work Sequencing, and Inspection Steps
Write Layout Notes That Prevent Drainage Mistakes
Once you’ve picked the BMPs in Step 2, the next job is simple: make the plan easy to build and easy to check in the field. Put the drainage notes right on the same sketch from Step 2 so crews and inspectors aren’t bouncing between pages.
Call out the details that tend to cause problems during installation:
- Slope direction arrows
- Existing and proposed finish grades
- Pipe routes
- Inlet and outlet elevations
- Overflow paths
- Outlet protection stone size and splash-pad details
- Stabilization timing for disturbed soil
- Setbacks from wells, septic components, footings, and property lines
Be plain about timing too. Write a 3-day stabilization deadline for perimeter controls and steep slopes, and 7 days for all other areas.[6] If any storm drains will be temporarily diverted or blocked during construction, note that on the plan. Also state that runoff cannot be concentrated onto neighboring property.
Sequence the Work So Controls Go In Before Major Disturbance
In Maryland, a practical build sequence starts with a pre-construction meeting. After that, install perimeter controls and the construction entrance before broad clearing or grading starts.[3][11]
Then move through the site in a controlled way: clear only the active work area, protect or isolate stockpiles, do rough grading in stages, and stabilize exposed soil as soon as possible. Final drainage features and permanent landscape projects come later.
This order matters. Once soil is disturbed, sediment can move fast during rain, especially on sloped Maryland lots where runoff reaches low points in a short distance. If the approved plan lets future stormwater areas work as temporary sediment traps during early construction, the sequence notes should say exactly when those areas stay protected and when they shift to final use.[13] The work sequence should line up with the controls shown on the drainage map.
Inspect Weekly and Within 24 Hours After 0.25 Inches of Rain
Maryland standards require inspections once each calendar week and within 24 hours after a storm event of 0.25 inches or greater.[15] That means inspection is not something you squeeze in when there’s time. It needs to be built into the job.
Each inspection should confirm that field conditions still match the approved layout. It should also check for sediment buildup, torn or undermined silt fence, rills on slopes, blocked pipes or inlets, standing water, stone tracked into the street, and failed seed, mulch, or blanket cover.[14][12] Also check that runoff has not started carving a new drainage path around the intended BMPs.
Keep a written record with the date, rainfall, locations checked, defects, photos, and corrective actions.
The table below assigns each BMP to a responsible party and shows what inspectors should watch for:
| BMP / Control | Inspection Frequency | Common Failure Signs | Responsible Party |
|---|---|---|---|
| Silt fence | Weekly + after rain | Gaps, tears, sagging, undercutting, sediment buildup | Contractor |
| Construction entrance | Weekly | Mud tracked offsite, displaced stone, ruts | Contractor |
| Storm drain inlet protection | Weekly + after rain | Blocked inlet, bypass flow, torn barrier | Contractor |
| Exposed slopes | Weekly + after rain | Rills, gullies, bare spots, sloughing | Contractor |
| Downspouts, pipes, and outlets | Weekly | Standing water, blockage, scour at outlet | Contractor |
| Permanent drainage features | After final acceptance | Sediment accumulation, erosion near outlets, plant failure | Owner |
Step 4: Confirm Maryland Permit Requirements and Close Out the Plan
Know the State and County Approval Points
With the drainage layout in place, the last step is to line it up with Maryland and county approval rules. In Maryland, approved erosion and sediment control plans must be in hand before any earthwork begins, and county rules may add extra review on top of that.[2][11] Use the site map, slope notes, and BMP locations from Steps 1 to 3 to confirm which approval path fits your project.
A grading or building permit can’t be issued until final ESC and stormwater management plans are approved.[21] And this is where local rules matter. One county may accept a smaller scope under a lighter review path, while another may want a more formal submittal. So don’t assume a basic site sketch will do the job.
| County | Local Approval Notes |
|---|---|
| Howard County | Formal review starts at 5,000 sq ft or 100 cu yd; county staff may also look for ESD practices on new impervious areas.[2][17][19] |
| Baltimore County | Grading permits are also required when work affects watercourses, floodplains, wetlands, habitat protection areas, or forest buffers.[9][16] |
| Montgomery County | Smaller residential projects may fall under a Small Land Disturbance Activity (SLDA) permit; larger single-family lot projects use a Sediment Control for Single Family Lot permit.[20] |
Projects that disturb 1 acre or more also need federal NPDES construction permit coverage.[19] Most single-lot residential jobs stay under that mark, but larger regrading work or multi-phase projects can cross it pretty fast.
Once you know the approval path, do one final pass so nothing slips through the cracks before construction starts.
Final Checklist Before Construction Starts
Use this last check to make sure the plan is complete:
- Site review done: slopes, drainage patterns, low spots, and sensitive areas such as streams, wetlands, and buffers are mapped
- Slopes checked: instability or erosion risk is flagged near driveways, patios, and foundation walls
- Drainage paths mapped: roof, yard, and hardscape runoff is routed to stable discharge points that avoid neighboring property and foundations
- BMPs selected and located: controls are chosen and marked on the site sketch for each runoff source
- Discharge points stabilized: vegetation, rock, or structural protection is confirmed at every outlet
- Permit thresholds verified: disturbed area and earthwork quantities are documented, and permits are obtained if required
- Inspections assigned: one person is responsible for weekly checks and post-storm reviews
- Maintenance responsibilities documented: who handles BMP upkeep after construction ends is listed, along with routine tasks like clearing inlets, checking vegetation, and monitoring settlement
Keep one file with the site map, threshold calculations, BMP locations, permits, and the maintenance schedule.[2][18][19]
FAQs
Do I need a runoff plan for a small backyard project?
Usually not in Maryland if your project disturbs less than 5,000 sq ft and moves less than 100 cubic yards of soil. In that case, an erosion control permit or plan usually isn’t required.
That said, rules can still kick in for work in sensitive areas. This often includes wetlands, floodplains, stream buffers, other protected zones, or projects that change an existing stormwater management facility.
If you’re not sure where your site falls, check your county’s rules before you start. A quick check now can save a headache later.
Which drainage solution fits my yard best?
The right drainage fix comes down to three things: your soil, your yard’s slope, and how much water you’re dealing with.
French drains work well when the problem is below the surface, like steady groundwater or soggy areas that just won’t dry out. Swales are better for surface runoff because they help move water across the yard in a controlled way.
If water rushes through one spot on a steep grade, or erosion is starting to wear things down, dry riverbeds can be a good fit. When the water volume is heavier, box and pipe systems can handle more flow.
Pro Landscapes MD can assess your site and tailor the right approach.
When do Maryland grading permits apply?
In Maryland, you need a grading permit if your project disturbs more than 5,000 square feet or moves more than 100 cubic yards of fill.
That rule also gets stricter in sensitive areas. If grading happens in places like wetlands, floodplains, watercourses, forest buffers, habitat protection zones, the Chesapeake Bay Critical Area, or historic districts, a permit is required no matter the project size.
There’s one more step that trips people up: no grading permit or building permit can be issued until the erosion and sediment control plan is approved. In plain English, that approval has to happen first.
Chat with Us