


- bhavya gada
- No Comments
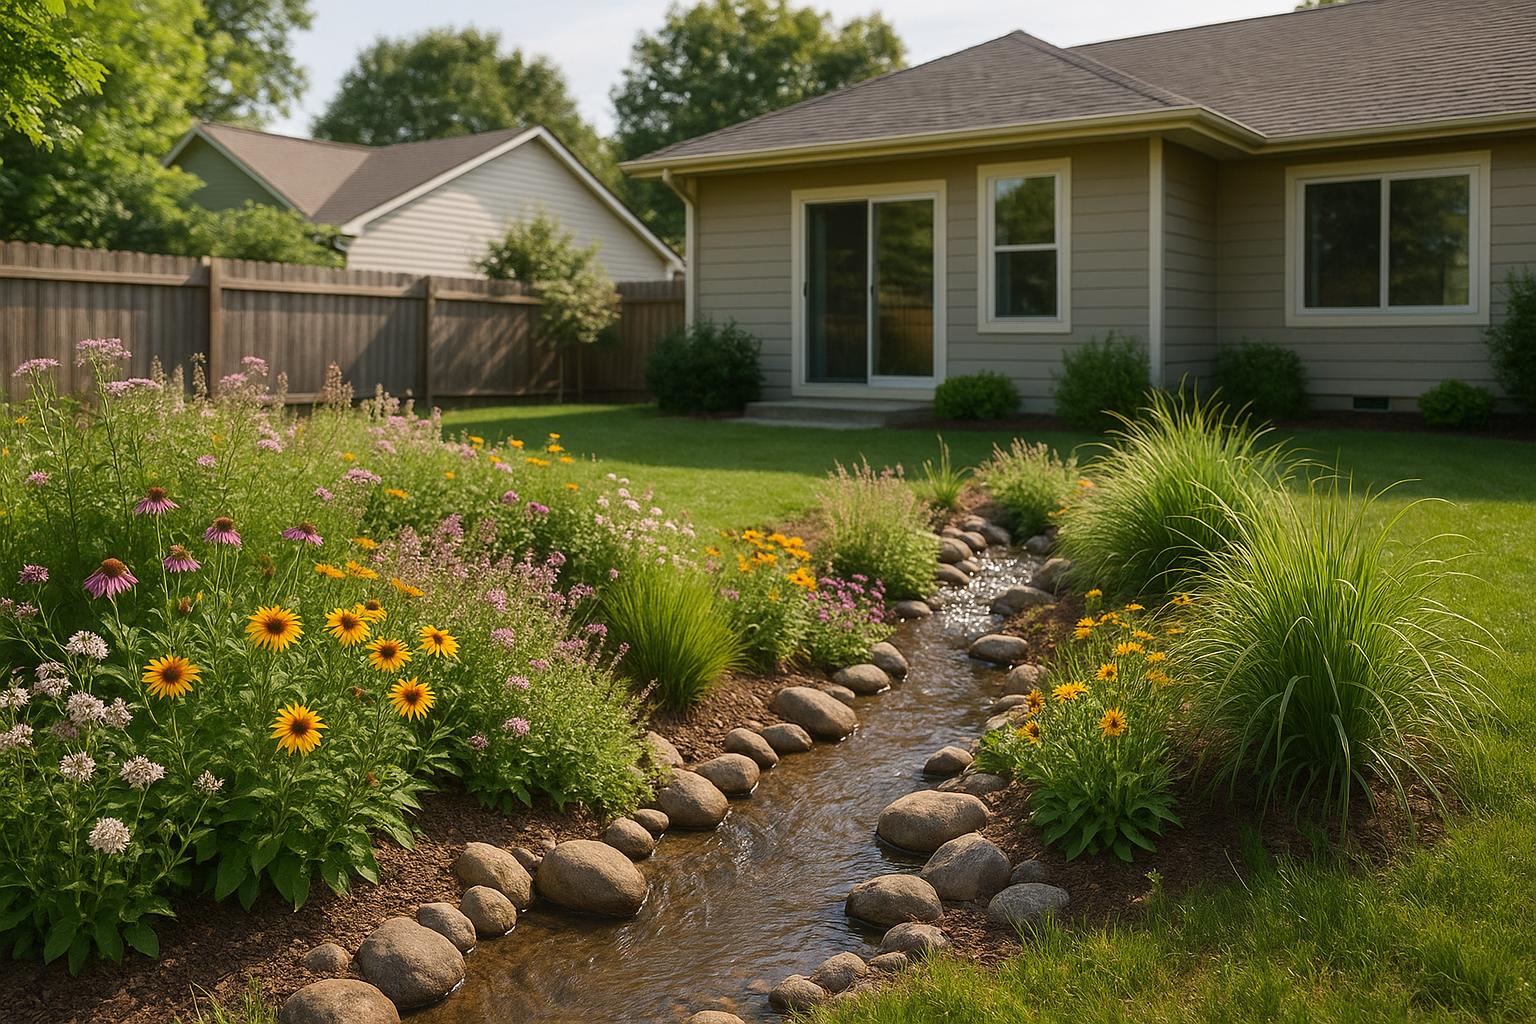
Bioswales are shallow, plant-filled channels designed to manage stormwater runoff while improving water quality. They guide water across your property, reduce flooding, and prevent erosion – all while adding visual appeal. Here’s a quick breakdown of what you need to know:
- Benefits: Control runoff, filter pollutants, prevent standing water, and support native plants.
- Planning: Assess your site for natural drainage paths, test soil absorption, and ensure compliance with local rules.
- Design: Use engineered soil, native plants, and proper slopes (4:1 or 3:1). Include an overflow drain for heavy rains.
- Construction: Excavate a shallow channel, layer soil, and plant vegetation. Stabilize with mulch and rocks.
- Maintenance: Inspect twice a year, clear debris, replace plants as needed, and monitor for erosion or drainage issues.
Costs range from $2,000 to $10,000, depending on size and complexity. Professional help can simplify the process, especially for challenging sites.
Site Assessment and Planning
Evaluating Your Property for Bioswale Suitability
Before you start digging, take some time to observe your property during and after rainfall. Look for areas where water naturally flows or pools – these are prime spots for a bioswale.
Use tools like a string level or topographic maps to map out your property’s drainage patterns. Mark the low points where water tends to collect, and plan to place the bioswale along these natural runoff paths. Be mindful to keep it away from your home’s foundation, septic systems, and large tree roots.
Next, test your soil’s ability to absorb water. Dig a 12-inch-deep hole and fill it with water, then measure how quickly it drains. Ideally, the soil should absorb water at a rate of 0.5 to 10 inches per hour. Sandy or loamy soils are ideal, but if you’re dealing with heavy clay, you might need to amend the soil or install an underdrain. For a more detailed analysis, consider using a soil test kit or sending a sample to your local extension service.
When designing the slope, aim for side slopes of 4:1 (or 3:1 if space is tight) and a longitudinal slope between 1% and 4%. Keep the bioswale at least 6 feet from your home, 5 feet from property lines, and 2 feet above the high water table. Once you’ve evaluated your site, check local regulations to ensure your design meets all requirements.
Understanding Local Regulations and Permits
Before moving forward, familiarize yourself with local zoning rules related to stormwater management, land disturbance, and setback requirements. Depending on where you live, you might need permits for activities like earthmoving, altering drainage patterns, or connecting to municipal stormwater systems. Some areas even offer incentives for installing green infrastructure like bioswales.
Your local government may also provide helpful design guidelines, covering everything from plant selection to soil composition and maintenance practices. And don’t forget: always "call 811 before you dig." This ensures underground utilities like gas lines, electrical cables, and water pipes are marked, helping you avoid costly mistakes or safety risks.
If your project involves connecting to public drainage systems or is located in a public right-of-way, expect additional permits and inspections. For guidance, consider consulting professional landscapers, such as Pro Landscapes MD, who are experienced with local regulations. Once you’ve gathered all the necessary site information and regulatory details, you’ll be ready to calculate the stormwater volume for your design.
Estimating Stormwater Volume and Design Capacity
Start by measuring the drainage area that will feed into your bioswale. For example, a 1,000-square-foot roof with 1 inch of rainfall produces about 625 gallons of runoff.
Design your bioswale to handle the "first flush" of stormwater – the initial runoff that carries the most pollutants. For residential projects, bioswales are typically sized to manage a 1-inch rainfall event, with the goal of capturing and infiltrating the water within 24–48 hours. This helps prevent mosquito breeding and reduces stress on plants.
Plan for 6–12 inches of standing water in the swale, with a total depth (including soil layers and mulch) of 21–39 inches. The bottom width should range from 2 to 4 feet, and the length will depend on your available space and the volume of runoff. Keep the side slopes at a 4:1 ratio, or 3:1 if space is limited.
If your property has complex drainage patterns or challenging conditions, a professional site evaluation can be a huge help. Companies like Pro Landscapes MD specialize in site assessments, drainage analysis, and custom bioswale designs tailored to the conditions in central Maryland and Washington, DC. Armed with accurate site data and stormwater calculations, you’ll be ready to finalize your bioswale design and choose the right materials.
Design and Material Selection
Creating a Bioswale Design Plan
Start by sketching a shallow, plant-filled channel that follows the natural flow of water on your property. A gently sloped channel helps slow stormwater runoff, allowing sediment to settle and water to soak into the ground. Keep the side slopes no steeper than a 3:1 ratio to minimize erosion. For steeper areas, consider adding check dams to further slow water flow and improve infiltration.
For a bioswale designed to handle runoff from a 1,000-square-foot roof, aim for dimensions around 20 feet long, 3 feet wide, and 1 foot deep. This should include space for ponding, mulch, and amended soil layers. Be sure to incorporate an overflow drain, raised about 6 inches, to manage heavy rain events effectively.
Once your design is ready, focus on selecting materials that promote water absorption and support plant health.
Choosing Soil Media and Plants
The soil mix you choose plays a huge role in how well your bioswale performs. Opt for engineered soil with no more than 5% clay. A good formula includes 60% sand, 20% compost, and 20% topsoil. This blend typically allows water to infiltrate at a rate of 5–10 inches per hour while providing enough nutrients to sustain plants. Avoid soils high in clay, as they can cause water to pool and limit infiltration.
When it comes to plants, go for native species with deep roots that can thrive in both wet and dry conditions. In Maryland, excellent options include switchgrass (Panicum virgatum), blue flag iris (Iris versicolor), and black-eyed Susan (Rudbeckia hirta). Group plants based on their water needs, placing those that prefer wetter conditions in the lowest part of the channel.
According to Pro Landscapes MD, "We prioritize eco-friendly solutions that conserve water, use native plants, and promote a healthy ecosystem in your outdoor space."
Erosion Control and Mulching
After selecting your materials, focus on erosion control to protect your bioswale during construction and its early growth phase. Spread a 3-inch layer of shredded hardwood or pine bark mulch across the channel. This helps retain moisture, suppress weeds, and reduce soil erosion. Avoid using pea gravel or small stones, as they can migrate into the soil and disrupt drainage.
For areas with higher water flow, such as inlets and outlets, use river rocks or cobbles (3/4 to 1 inch in diameter) to absorb energy and prevent channel scouring. During the first growing season, temporary measures like jute netting or coir logs can stabilize the soil while plants establish strong root systems. These can be removed after the plants have matured.
In high-flow sections, adding landscape fabric and hardware cloth can further prevent soil loss while maintaining water infiltration. If your property has steep slopes or complex drainage patterns, professional installation may be the best option. Companies like Pro Landscapes MD specialize in bioswale design and installation across central Maryland and Washington, DC, offering expertise in soil preparation, plant selection, and erosion control.
Lastly, define the edges of your bioswale with bender boards or natural stone. This not only helps maintain its shape and functionality but also prevents surrounding soil from washing into the channel over time.
Construction Checklist
Preparing the Site
Before starting any construction, make sure to call 811 to have utilities marked. This step is crucial for safety. Next, install sediment control devices along the downslope, mark boundaries using stakes and spray paint, and clear the area of turf, debris, and invasive plants. This creates a safe, open workspace where you can work without obstructions[5][6]. Regularly inspect these protective barriers, especially after rain, to ensure they are intact and functioning properly throughout the project.
Plan for adequate access to accommodate construction equipment and materials. Even smaller machines like mini excavators require enough space to operate efficiently. You’ll also need room to move soil, gravel, and planting materials. Strategically plan delivery spots for engineered soil media and other supplies to reduce unnecessary handling and avoid compacting the soil.
Once the site is prepared and cleared, you’re ready to move on to excavation and installation.
Excavation and Installation
With the site prepped, begin the excavation process according to your design plan. Dig a shallow, trapezoidal channel that is 1–2 feet deep and 2–4 feet wide, with side slopes at a 3:1 ratio. The channel should have a longitudinal slope of 1%-4%, and the total depth (including ponding, mulch, and soil layers) should range between 21–39 inches[5][3][6][2]. Be mindful of heavy equipment use to avoid compacting the soil.
Scarify the base of the channel with a rake to encourage water infiltration[6][3]. This step ensures water can move freely from the bioswale into the surrounding soil.
If your site has poor infiltration capabilities or local regulations require it, now is the time to install an underdrain system. Place a 4-inch perforated drain pipe at the base, surrounded by gravel or coarse aggregate, and connect it to an appropriate outlet[7]. Be sure to include cleanout and inspection ports for easy maintenance access[2].
Backfill the channel with engineered soil media, which should contain no more than 5% clay and be capable of infiltrating 5–10 inches of water per hour[3]. Add the soil in layers, compacting it lightly to avoid settling while maintaining the desired infiltration rate. Shape the soil to match your design’s specific contours and slopes.
To handle excess water during heavy rains, install overflow drains 6 inches above the soil surface. These drains direct surplus water to designated drainage areas, preventing flooding when your bioswale reaches its capacity[3][5].
Planting and Final Touches
Once the structural work is complete, it’s time to add the finishing touches. After shaping and settling the soil, plant native species, spacing them according to their mature size. Apply a 2–3 inch layer of shredded hardwood mulch, but make sure to keep it away from the crowns of the plants. Stabilize inflow and outflow points with rocks or splash pads to reduce water energy and prevent erosion[4][6][3][7].
Native plants with deep root systems are ideal for this type of project. They provide stability, enhance water absorption, and require minimal maintenance once established[4][6]. For areas where water flows into the bioswale, use river stones or cobbles (3/4 to 1 inch in diameter) to absorb the energy of flowing water and prevent channel erosion.
If your site has slopes steeper than 4%, consider adding check dams or weirs made from rock or soil. These structures help slow water flow and improve infiltration, ensuring the bioswale works effectively even on challenging terrain[5][2].
Finally, define the edges of your bioswale with bender boards or natural stones. This not only maintains the channel’s shape but also prevents surrounding soil from washing into your carefully designed system. Perform final grading to ensure water flows smoothly into and through the bioswale as intended, with no standing water outside the designated ponding area[6][5].
For homeowners in central Maryland facing complex drainage issues or steep terrain, professional services like Pro Landscapes MD can provide expert assistance. They specialize in bioswale construction, ensuring proper excavation, soil preparation, and seamless integration with your landscape.
sbb-itb-843f8be
Maintenance and Long-Term Care
Regular Inspections and Upkeep
Check your bioswale twice a year – once in the spring and again in the fall – and after heavy storms [3][8]. Rainfall and snowmelt can shift water flow patterns and impact plant health, so post-storm inspections are critical.
During these checks, remove any debris like leaves, trash, or branches that could block water flow. Look for signs of erosion, such as bare patches of soil, small gullies, or exposed plant roots [3][8]. If you notice standing water that lingers for more than 48 hours, it could signal drainage issues or compacted soil.
Pay close attention to the inlet and outlet areas of your bioswale. These sections handle the strongest water flow and are prone to blockages, displaced rocks, or the formation of unintended channels. Also, monitor plant health regularly. Native plants should appear healthy and grow steadily. Signs like brown patches, wilting under normal conditions, or sparse vegetation might indicate underlying problems.
Replenish the mulch layer every year or as needed. Mulch helps control erosion, retain moisture, and suppress weeds. If stones are part of your erosion control strategy, ensure they remain in place and aren’t buried under sediment.
Address any issues you discover promptly. The next section covers specific steps for managing plants and drainage.
Replacing Plants and Addressing Issues
Replace dead or unhealthy plants as soon as possible to prevent erosion [8]. When selecting replacements, stick to native species with deep root systems that can handle both wet and dry conditions. If you’re dealing with widespread plant disease, consult a local horticulturist for advice on treatment and replanting.
Drainage blockages often show up as standing water or reduced flow [2][3]. Start by clearing debris from inlets, outlets, and underdrain inspection ports. If the problem persists, compacted soil or root intrusion might be the culprit, requiring professional evaluation and repair.
Erosion should be tackled immediately by adding mulch or stones to exposed areas. In cases of severe erosion, regrading slopes or installing additional check dams can help slow water flow. Planting extra vegetation in eroded areas can also prevent future problems [8].
If sediment buildup starts clogging outlets or the channel, remove it manually, being careful not to disturb nearby plant roots. Excess sediment often points to upstream erosion, which will need attention.
For those in central Maryland facing recurring drainage challenges, professional services like Pro Landscapes MD can help. Their team of horticulturists has experience with local soils and can recommend the best solutions and plant choices for your situation.
Documenting Maintenance Activities
Keeping detailed records is key to ensuring your bioswale remains effective over time. Track dates, weather conditions, issues, and the actions you take [2][8]. This information helps you monitor performance and spot recurring problems.
Record important metrics like stormwater infiltration rates, plant survival rates, frequency of sediment removal, and instances of standing water [3][8]. Over time, these records can reveal trends. For example, if sediment removal becomes more frequent, it may indicate upstream erosion that needs attention.
Take photos during inspections to document gradual changes. These images can also be useful for insurance claims or regulatory compliance. When replacing plants, note the species, planting dates, and survival rates to guide future maintenance decisions.
Here’s a helpful table to organize your maintenance records:
| Maintenance Task | Frequency | Key Things to Document |
|---|---|---|
| Visual inspection | After storms, seasonally | Debris, erosion, plant health, standing water |
| Sediment removal | As needed | Amount removed, location, suspected cause |
| Plant replacement | As needed | Species, date, reason for replacement, survival rate |
| Mulch replenishment | Annually | Coverage area, material type |
Regular maintenance and thorough documentation will not only keep your bioswale functioning efficiently but also enhance the appearance of your property.
Rain Gardens And Bioswales: From Basics to Installation: K. Mousseaux
Conclusion
Building a bioswale at home involves four essential steps that come together to create an effective stormwater management system. It starts with site assessment and planning, which includes soil testing, evaluating drainage, and understanding local permits and regulations. Next is design and material selection, where the layout is determined, and materials are chosen. The construction phase follows, involving careful excavation, proper soil layering, and thoughtful planting. Finally, ongoing maintenance ensures the bioswale operates efficiently through regular inspections, debris clearing, and plant care. This step-by-step process not only simplifies installation but also ensures the system works effectively over time.
Bioswales offer numerous environmental benefits, such as reducing runoff and filtering pollutants [3]. They also contribute to groundwater recharge, support native plant life, and improve property aesthetics – all while relieving pressure on municipal stormwater systems.
For residential installations, costs typically range from $2,000 to $10,000, influenced by factors like size, materials, and site complexity [6]. While the initial investment might seem high, the long-term rewards include reduced flooding, better water quality, less erosion, increased property value, and improved curb appeal. Given these factors, seeking professional guidance can make a big difference.
Expert help ensures your bioswale is tailored to your property’s unique needs. Pro Landscapes MD specializes in comprehensive drainage solutions and stormwater management services in central Maryland and Washington, DC. Their team of skilled horticulturists provides support at every stage – from site evaluation and design to installation – ensuring compliance with local regulations and optimal performance.
"From initial design to final installation and ongoing maintenance, we offer comprehensive services to keep your landscape looking beautiful year-round." – Pro Landscapes MD [1]
Whether you’re tackling persistent drainage problems or embracing sustainable landscaping, a well-planned bioswale can transform how your property handles water. It’s a functional yet eco-friendly feature that not only benefits your home but also contributes to environmental health. A thoughtfully designed bioswale seamlessly combines practical drainage with environmental care, offering a sustainable solution for your landscape.
FAQs
What should I consider to determine if my property is suitable for a bioswale installation?
When evaluating whether your property is a good fit for a bioswale, keep these important factors in mind:
- Soil Type: Bioswales perform best in soils that drain well, like sandy or loamy types. If your soil is heavy with clay, it might need some extra work to improve drainage.
- Slope and Drainage: A gentle slope is perfect for channeling water into the bioswale. Steep slopes or areas prone to water pooling may not be suitable without adjustments.
- Space Availability: Make sure there’s enough room for the bioswale to handle runoff effectively without interfering with your existing landscaping.
- Runoff Sources: Look for spots where water tends to gather or flow, such as near driveways, rooftops, or pathways, to determine the most effective placement.
- Local Regulations: Always check with local authorities or your HOA to see if any permits or rules apply before starting the project.
For the best results – both in functionality and appearance – consulting a landscaping expert is a smart move. They can help design and install a bioswale that works seamlessly with your property.
What are the best plants to use in a bioswale for both beauty and effective water management?
Choosing the right plants for your bioswale is crucial for combining effective stormwater management with an appealing look. Opt for native plants that are well-suited to your local climate and can handle fluctuations between wet and dry conditions. Grasses, sedges, and wildflowers work particularly well – they not only filter water but also bring a touch of natural beauty to the space.
If you’re unsure where to start or want a polished result, reaching out to professionals in sustainable landscaping can be a smart move. They can help ensure your bioswale is both practical and visually pleasing.
What maintenance is needed for a bioswale, and how often should it be done to keep it working effectively?
Maintaining a bioswale takes some effort, but it’s essential for keeping it effective at managing stormwater and supporting a healthy environment. A few key tasks can make all the difference: removing debris, controlling weeds, and checking for erosion or blockages.
Start with debris removal – this should be done monthly or after heavy rainfall to avoid clogs that could interfere with water flow. Weeding, on the other hand, is usually a seasonal task. It helps maintain plant health and ensures the bioswale functions as intended.
At least twice a year, inspect the bioswale for issues like erosion, standing water, or sediment buildup. If you notice sediment piling up, it might need to be cleared out to restore proper drainage. Healthy vegetation is another critical piece of the puzzle. Regularly prune or replace plants to keep them filtering water efficiently and stabilizing the soil.
With consistent attention, your bioswale can remain a reliable, eco-friendly feature in your landscape for many years.
Chat with Us