


- bhavya gada
- No Comments
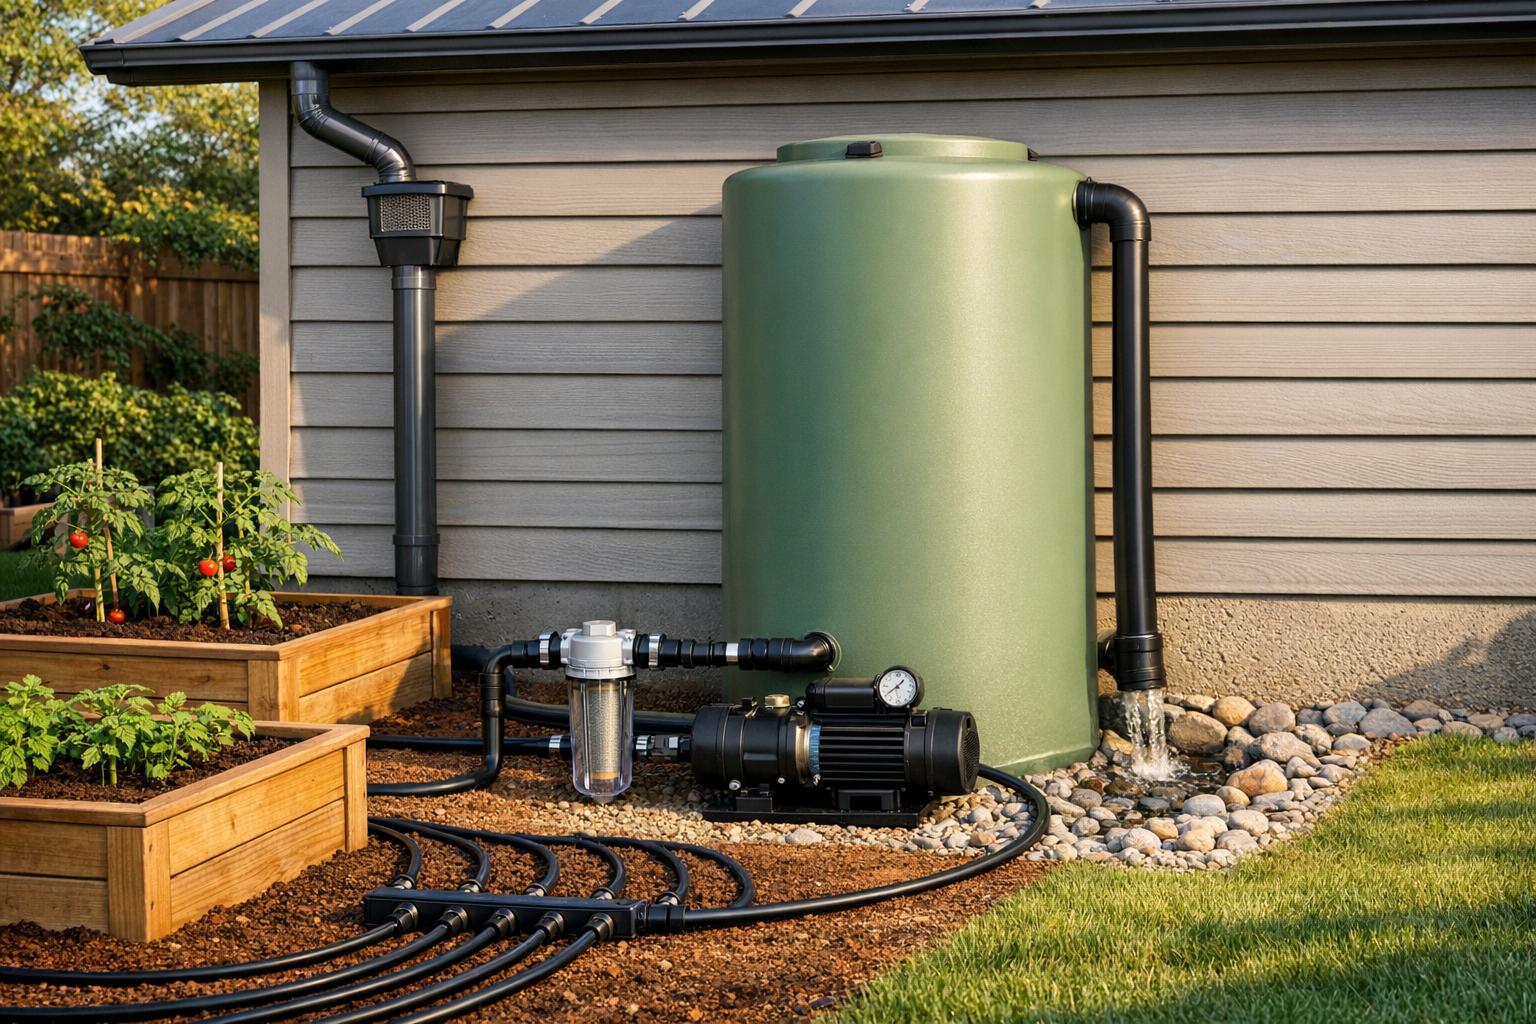
Connecting a cistern to your irrigation system helps you reuse rainwater for your garden, saving water and reducing utility bills. Here’s a quick breakdown:
- Why do it?
- Save money by replacing municipal water with rainwater.
- Manage stormwater runoff to prevent erosion and flooding.
- How it works:
- Water flows from the cistern to irrigation lines via gravity or a pump.
- Gravity systems are simple and low-cost but provide low pressure.
- Pump systems offer high pressure for sprinklers but require electricity.
- Steps to set it up:
- Prepare the cistern: Clean it, check for leaks, and ensure proper size.
- Install components: Add filters, diverters, and overflow systems.
- Choose a pump: Submersible for quiet operation or surface-mounted for easy maintenance.
- Connect to irrigation: Use proper piping and fittings for drip lines or sprinklers.
- Maintain filters: Clean regularly to prevent clogs and ensure smooth operation.
This system makes landscaping more efficient while reducing water waste. Whether you’re using a simple gravity-fed setup or an advanced pump-powered system, the process is straightforward and highly effective.
Update Video: How to Install a Cistern Pump
sbb-itb-843f8be
How Cistern-Irrigation Systems Work
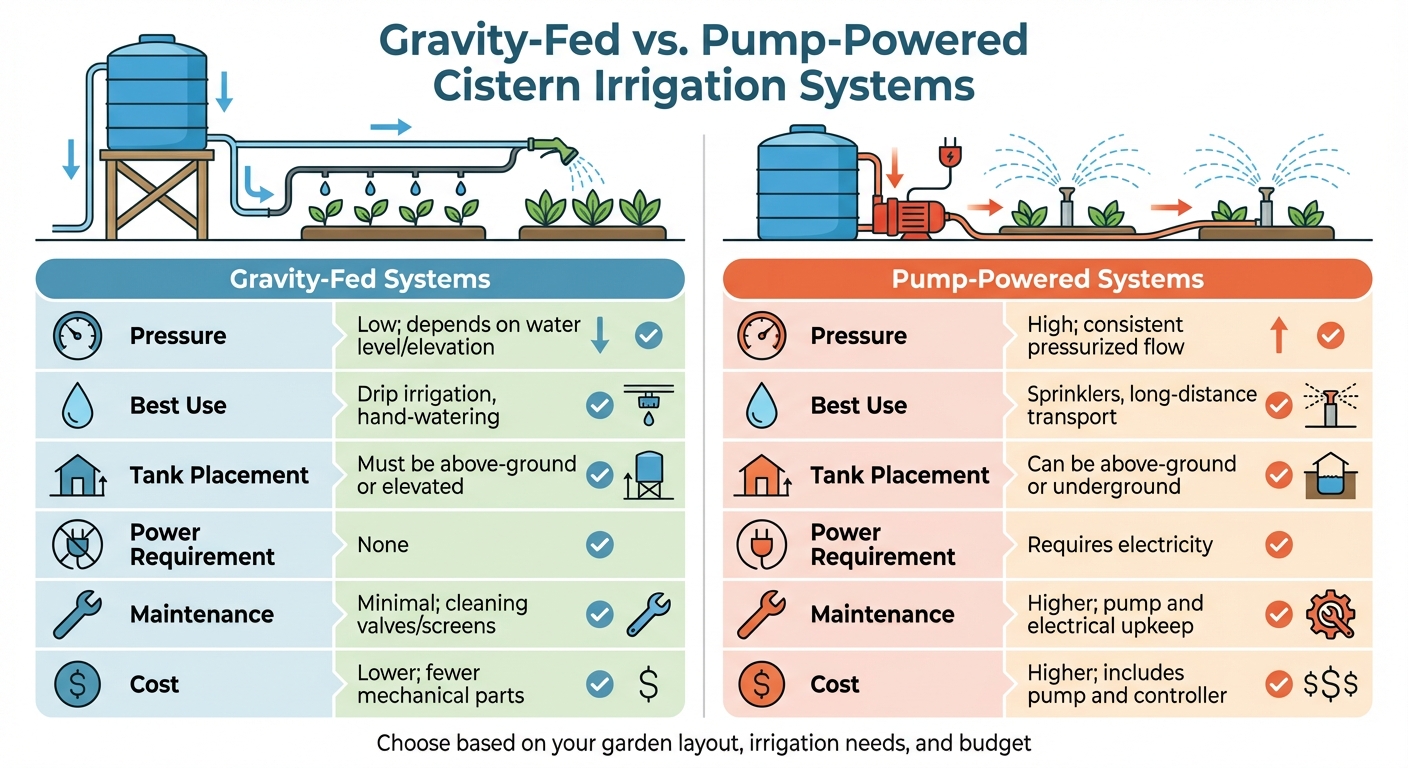
Gravity-Fed vs Pump-Powered Cistern Irrigation Systems Comparison
Water from your cistern reaches your irrigation lines either through gravity or with the help of an electric pump. Gravity-fed systems rely on the height of the water in the cistern to generate pressure, pushing water through the outlet pipe. This method works best when your cistern is above ground and your garden is on lower ground. To prevent sediment from clogging your irrigation lines, position the outlet pipe at least 6 inches above the bottom of the tank.
Pump-powered systems, on the other hand, use an electric pump to pressurize the water, making it ideal for longer distances or uphill flows. Pumps can either be submersible (placed inside the cistern for quieter operation) or surface-mounted (installed outside the tank for easier access during maintenance). Bulkhead fittings are used to ensure all outlet connections are watertight. Additionally, an overflow pipe near the top of the tank helps release excess water during heavy rainfall, protecting your foundation from potential erosion.
By understanding these two methods, you can decide which system aligns better with your landscape design and irrigation needs.
Gravity-Fed vs. Pump-Powered Systems
Each system has its strengths depending on your irrigation requirements:
- Gravity-fed systems are ideal for drip irrigation in raised beds or gardens located downhill. They don’t require electricity, making them low-maintenance; you’ll only need to clean valves and screens occasionally. However, the pressure they provide is low and varies based on the tank’s water level.
- Pump-powered systems offer consistent, high-pressure flow, making them suitable for sprinklers, standard garden hoses, or transporting water uphill. While they work with both underground and above-ground tanks, they come with higher upfront costs and require electricity to operate. Advanced systems can include WiFi controllers and pump start relays, allowing you to automate irrigation schedules based on timers or water levels.
| Feature | Gravity-Fed Systems | Pump-Powered Systems |
|---|---|---|
| Pressure | Low; depends on water level/elevation | High; consistent pressurized flow |
| Best Use | Drip irrigation, hand-watering | Sprinklers, long-distance transport |
| Tank Placement | Must be above-ground or elevated | Can be above-ground or underground |
| Power Requirement | None | Requires electricity |
| Maintenance | Minimal; cleaning valves/screens | Higher; pump and electrical upkeep |
| Cost | Lower; fewer mechanical parts | Higher; includes pump and controller |
Main Components of a Cistern-Irrigation System
A cistern-irrigation system is made up of several essential parts that work together seamlessly:
- Leaf screens and pre-tank filters: These remove debris like leaves and dirt before the water enters the cistern.
- First-flush diverter: This redirects the first 10 gallons of roof runoff – often containing pollutants like dust and bird droppings – away from the tank[3].
- Cistern tank: The main storage unit, typically made from materials like polyethylene, concrete, or fiberglass. It includes an access hatch for cleaning.
- Distribution system: Gravity systems use a passive drawdown valve, while pressurized systems rely on a pump and controller.
- Modern add-ons: Many setups now include WiFi tank gauges for remote water level monitoring and pump start relays to automate irrigation timing.
Understanding these components is key to selecting the right system and preparing for the installation and maintenance steps outlined later. These elements form the backbone of a successful cistern-irrigation system.
Step 1: Prepare Your Cistern for Irrigation
Getting your cistern ready is a key step to ensure it works effectively with your irrigation system.
Start by inspecting the cistern thoroughly. Check for cleanliness, structural soundness, and whether its size is appropriate for your roof. Look out for cracks, leaks, or unpleasant odors that might compromise water quality. If you’re using an older cistern that hasn’t been in use for a while, sanitize it with a diluted bleach solution if odors are present.
Make sure the cistern’s capacity aligns with your roof’s runoff potential. The math here is straightforward: 1 square foot of roof area produces 1 gallon of water[1]. For instance, a 500-gallon cistern connected to one downspout should ideally handle runoff from about 500 square feet of roof. As Urban Sustainability Solutions explains:
Size is important because an undersized cistern will overflow easier and cause water to pool around the foundation or increase erosion[1].
Before the first rain, clear out leaf filters and gutters to prevent debris from clogging your system. Once you’re confident your cistern is in good condition and the capacity is spot-on, you can move on to setting up its internal components.
Installing Internal Components
To get your cistern ready for irrigation, focus on installing the right internal fittings. Start with a first-flush diverter at the downspout. This device redirects the first 10 gallons of roof runoff, which often contains dust, pollen, and bird droppings, away from your cistern. This ensures cleaner water is stored for later use.
Next, add a passive drawdown device at the bottom of the cistern. This helps with gravity-fed drainage and makes it easier to winterize. Position the outlet carefully to reduce the amount of sediment entering your irrigation lines.
Lastly, make sure your cistern has a lockable access hatch at the top. This allows for periodic inspections, cleaning, and any necessary maintenance on components like submersible pumps or WiFi tank gauges.
Once these internal components are in place, the next step is to focus on protecting your cistern from overflows and freezing temperatures.
Setting Up the Overflow System
Install an overflow pipe near the top of your cistern to handle excess water. Direct the overflow discharge away from your home’s foundation to avoid potential damage.
Winterizing your cistern is also crucial. Urban Sustainability Solutions highlights the importance of draining water before freezing temperatures hit:
When winterizing your cistern, the main concern is not leaving water in the tank to freeze[1].
Use the passive drawdown device to fully empty the cistern before winter, and unplug any pump controllers or irrigation timers until spring arrives. This ensures your system remains in good shape for the next season.
Step 2: Choose and Install a Pump
Once your cistern is ready, the next step is selecting and installing a pump to ensure steady water pressure and smooth operation throughout the growing season.
Selecting the Right Pump
The choice between a submersible pump and a surface pump depends on your specific setup and needs. Submersible pumps are installed directly inside the cistern, making them quieter because the water absorbs the noise. On the other hand, surface pumps are positioned outside the tank, making them easier to access for maintenance but generally noisier and limited by suction depth.
| Feature | Submersible Pump | Surface Pump |
|---|---|---|
| Location | Inside the cistern tank | Outside the cistern tank |
| Noise Level | Quiet operation | Louder |
| Power/Head | Suitable for larger systems | Limited by suction depth |
| Maintenance | Requires tank access | Easily accessible for repairs |
When choosing a pump, think about your irrigation method. For low-pressure systems like drip irrigation in raised beds, you might get by with a passive system that uses the cistern’s internal water pressure. However, sprinklers and hose bibs demand a pressurized pump to deliver enough flow. Many modern setups also include a pump start relay and an irrigation timer or control box for automated watering. Some advanced systems even allow remote monitoring and management via smartphone apps, thanks to WiFi-enabled controllers and tank gauges.
Position your cistern near a power source and close to your garden or home to simplify plumbing, or consult with professional landscaping services for complex installations. Ensure the site is level and stable enough to support the weight of a full tank before making permanent connections.
Once you’ve chosen the pump, follow these steps to install it properly.
Installing the Pump
After selecting the right pump for your system, the installation process varies depending on whether you’re using a submersible or surface pump.
- Submersible Pump: Place the pump directly in the cistern water. Use a float-equipped flexible hose to draw water from the center of the tank, which helps minimize sediment intake. Add an inlet screen to the intake hose for extra protection against debris. Connect the pump to the cistern’s electrical supply.
- Surface Pump: Install the pump in a weather-protected area near an exterior outlet. Securely connect the suction line to the cistern outlet, ensuring all fittings are watertight to avoid air leaks.
For both setups, consider adding a pump start relay to automate operations via your irrigation timer. Devices like the Rain Bird WiFi Module can integrate with control boxes, letting you manage the system remotely.
If you live in a region with cold winters, proper winterization is essential. Before freezing temperatures set in, unplug the pump start switch and irrigation control box. Drain all exposed pipes and pumps to prevent ice damage.
Step 3: Connect the Cistern to the Irrigation System
Now that your pump installation from Step 2 is complete, it’s time to connect your cistern to the irrigation system. This step ensures water flows efficiently, without leaks, and at the right pressure.
Piping and Fittings for Water Flow
The type of piping you choose depends on your local conditions and how you plan to install it. PVC pipe certified to ANSI/NSF 61 standards is a solid choice for permanent installations, offering durability for irrigation purposes [5]. If you need more flexibility or are working in areas with potential freezing, polyethylene tubing is easier to install and better suited for colder climates.
Begin by connecting the cistern’s outlet pipe to the main irrigation line. When running pipes through the cistern wall, use pipe boots with a 4–6-inch overlap for a secure fit. Clean the surfaces thoroughly, apply 2-inch double-sided tape around the opening, and reinforce the seal with 4-inch single-sided tape and a continuous bead of polyurethane sealant. This method ensures a strong, leak-proof connection [4].
Once everything is connected, fill the cistern and check all connections for leaks [5]. Pay attention to the inlet and outlet pipes, overflow system, vent pipes, and pump connections. Identifying and fixing leaks at this stage is much easier than dealing with them later. If you’re using an underground cistern, consider adding a manway riser. This addition allows surface-level access to the pump and connections, simplifying future maintenance [5].
With all connections secure and leak-free, you’re ready to integrate the cistern with your irrigation system.
Connecting to Drip Irrigation or Sprinkler Systems
Once your piping is properly sealed, you can connect the cistern to your irrigation method of choice.
For drip irrigation, connect the cistern outlet directly to your drip lines. As Urban Sustainability Solutions explains:
Connecting drip irrigation will allow water to gradually drain across a raised flower bed or garden [1].
This setup is ideal for low-pressure systems and doesn’t require electricity, making it simple and efficient.
For sprinklers and standard hose bibs, you’ll need to connect your pump start relay to an irrigation timer. Devices like the Rain Bird WiFi Module allow you to manage everything remotely through a smartphone app [1]. The irrigation control box sends a signal to the pump switch, ensuring water flows only when your irrigation zones are scheduled to run. This helps prevent unnecessary pump operation, extending its lifespan. You can also install a WiFi tank gauge to monitor water levels remotely and ensure there’s enough supply before each irrigation cycle begins [1].
Step 4: Install and Maintain Filtration Systems
Once your cistern is connected to your irrigation system, the next step is to protect its efficiency and longevity with proper filtration. Without effective filtration, debris can clog your system, leading to damaged components and reduced performance. Filtration is essential to keep valves, emitters, and sprinkler heads free of blockages. As the Philadelphia Water Department highlights:
"Pretreatment of runoff from all inlets is required to keep sediment, leaves, contaminants, and other debris from the system. The purpose of pretreatment is to maintain functionality and cleanliness of pumps and to significantly cut down on maintenance by preventing organic buildup in the cistern." [2]
To achieve this, you can use several tools: gutter screens to catch large debris, first-flush diverters to redirect the initial flow of runoff (typically diverting 1 to 2 gallons per 100 square feet of roof area), and roof washers equipped with fine filters (down to 30 microns) to trap smaller particles. Additionally, all cistern inlets and vents should be fitted with 1/6-inch stainless steel mesh screens to keep out insects and small animals. [2]
Types of Filters for Irrigation Systems
The type of filter you need will depend on your irrigation setup. For instance:
- Sprinklers: Require at least 80 mesh filtration.
- Drip emitters: Need 120 mesh.
- Drip tape: Works best with 155 mesh.
When using cistern water, it’s crucial to install a large filter before the manifold and valves. This helps prevent particulate buildup that could lead to valve failure. There are two main types of filters to consider:
- Screen Filters: Ideal for inorganic debris like sand and sediment. These are easier to clean and maintain.
- Disc Filters: Better suited for capturing organic materials like algae and slime. While they trap finer particles, they often require disassembly for cleaning.
For water sources with heavy debris, opting for a larger filter with more surface area can reduce how often cleaning is needed. [6]
Filter Maintenance Tips
Keeping your filtration system in good shape ensures clean water, which is vital for efficient pump operation and the durability of your irrigation components. Here’s how to maintain your system:
- Regular Inspections: During the first year, inspect your system monthly. After that, check it quarterly.
- Clean Between Rain Events: Clear gutter screens and first-flush chambers to prevent clogs. Ensure first-flush chambers have accessible cleanouts to remove dust, pollen, and bird droppings.
- Annual Cleaning: Once a year, scrub and disinfect the interior surfaces of your cistern thoroughly.
- Odor Control: If stored water develops an odor in summer, a small amount of bleach can eliminate it without harming your plants.
- Winter Prep: Drain the system completely before freezing weather and disconnect electrical components like pump controllers to avoid damage.
- Sediment Prevention: Use a floating screened suction device at the pump intake to prevent sediment from being drawn up, extending the lifespan of both your pump and irrigation emitters. [2]
Conclusion
Linking your cistern to an irrigation system can lower utility bills and reduce dependence on municipal water supplies. By following these steps, you can create a practical water source that supports your landscape while promoting environmental conservation. As the Philadelphia Water Department explains:
Cisterns… decrease demand on the municipal water supply and water costs for the end user, when used as part of a rainwater harvesting system. [2]
In addition to saving money, cisterns help manage roof runoff, which can minimize erosion and prevent flooding. With a range of capacities available, there’s a cistern to fit nearly any project size [2].
While many systems can be installed by homeowners, more intricate setups might require professional help. Oversized or poorly installed systems can lead to overflow problems, causing water to pool near foundations or contributing to soil erosion.
Once your system is properly installed, it can make landscape maintenance much easier. For homeowners in Maryland looking to maximize their cistern’s efficiency, Pro Landscapes MD offers expert services in stormwater management, drainage solutions, and eco-conscious landscape design. Their team works with communities throughout Howard County, Montgomery County, Carroll County, Frederick County, Prince George’s County, and Baltimore County, helping property owners create attractive, water-efficient outdoor spaces.
FAQs
Do I need a pump, or can I use gravity?
If your cistern is positioned above the irrigation area, gravity might do the job, providing enough water flow naturally. But if the cistern sits lower or you’re aiming for stronger water pressure, a pump will probably be necessary. While gravity can handle basic setups, a pump offers reliable and steady water flow for more complex or pressure-demanding systems.
How do I size a cistern for my roof and garden?
To figure out the right size for a cistern, start by measuring your roof’s square footage to estimate how much rainwater you can collect. Next, evaluate your garden’s irrigation needs based on its size and the types of plants you’re growing. Be sure to take local rainfall patterns into account – this will help you understand how often the cistern is likely to refill. For larger gardens, cistern capacities can range anywhere from 100 gallons to several thousand gallons. Make sure the size aligns with your water usage and check for any local regulations or rebate programs that might apply.
What filtration is needed to prevent clogs?
To keep your cistern system running smoothly and prevent clogs, it’s essential to use filtration that captures debris and pollutants before water enters the tank. A leaf filter works great for keeping out leaves and larger debris, while additional filters can tackle smaller particles and contaminants. This not only improves water quality but also reduces the risk of blockages in the system.
Chat with Us