


- bhavya gada
- No Comments
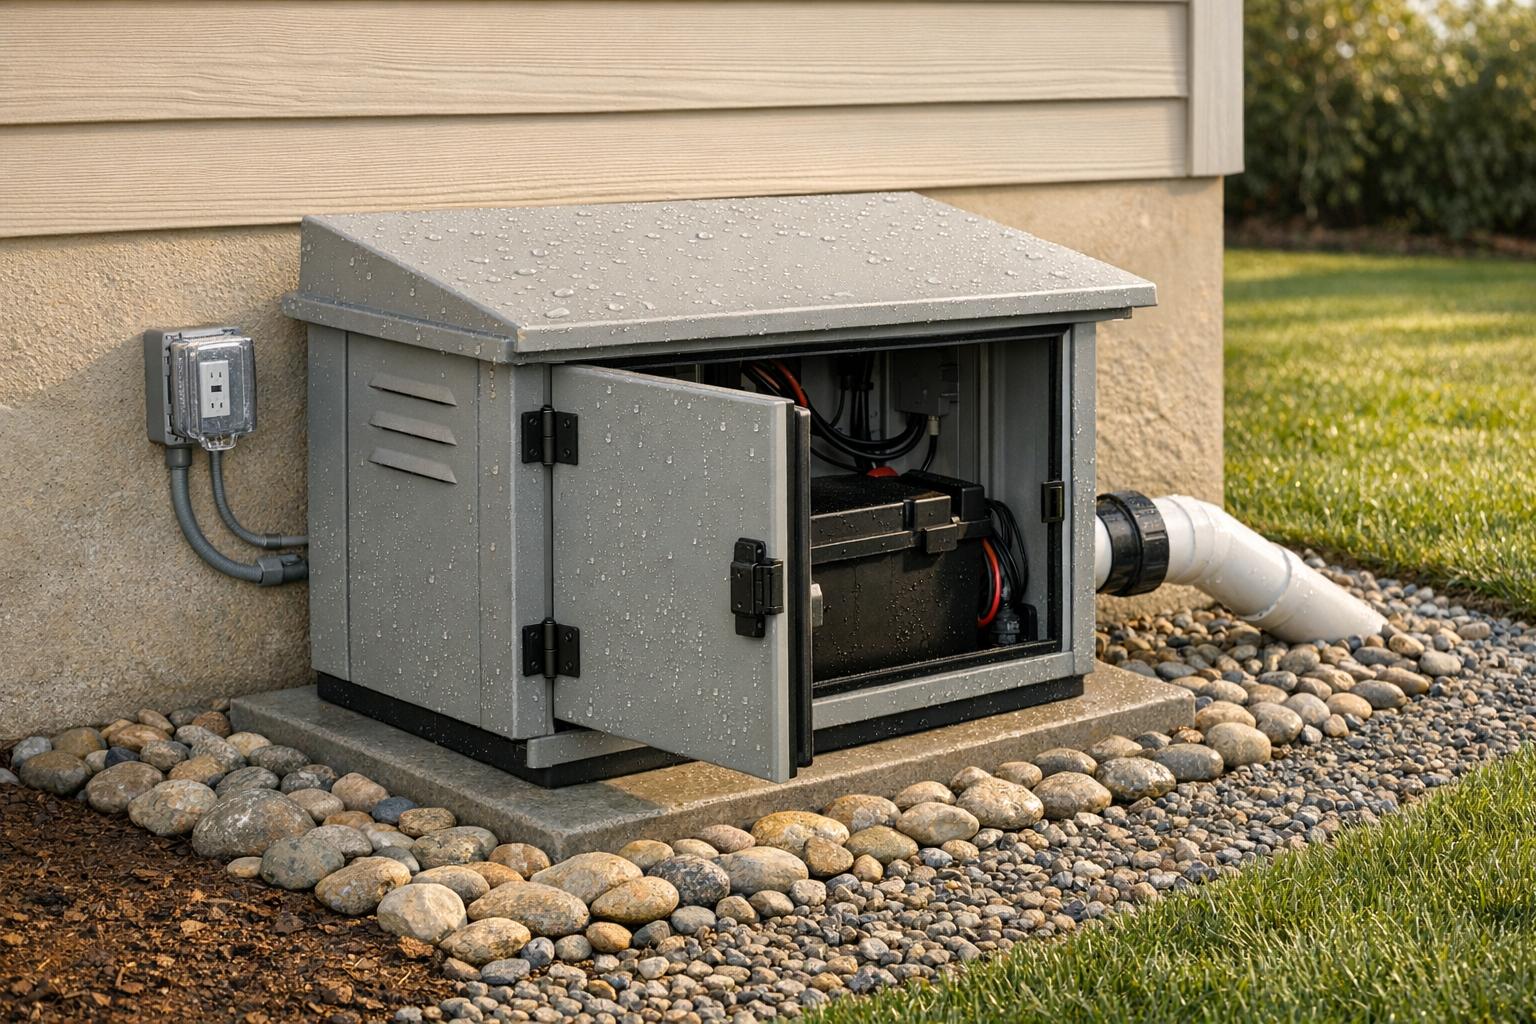
Outdoor sump pump enclosures protect pumps from weather, debris, and damage while improving functionality and durability. Without proper protection, pumps face risks like freezing, overheating, and corrosion, which can lead to costly repairs. A well-designed enclosure also reduces noise, deters animals, and prevents vandalism.
Key steps to design an effective sump pump enclosure:
- Site Assessment: Place the pump at the lowest point where water collects, away from your home’s foundation. Ensure proper drainage and compliance with local regulations.
- Material Selection: Use durable materials like aluminum for weather resistance and insulation to protect against extreme temperatures.
- Ventilation and Access: Include ventilation for airflow and removable panels or hinged doors for easy maintenance.
- Electrical Safety: Use NEMA-rated enclosures for electrical components and connect the pump to a GFCI outlet. Add alarms and backup systems for reliability.
- Aesthetic Integration: Blend the enclosure into your landscape with decorative designs, shrubs, or hardscaping.
Proper planning and materials ensure your sump pump operates efficiently and lasts longer, even in harsh conditions.
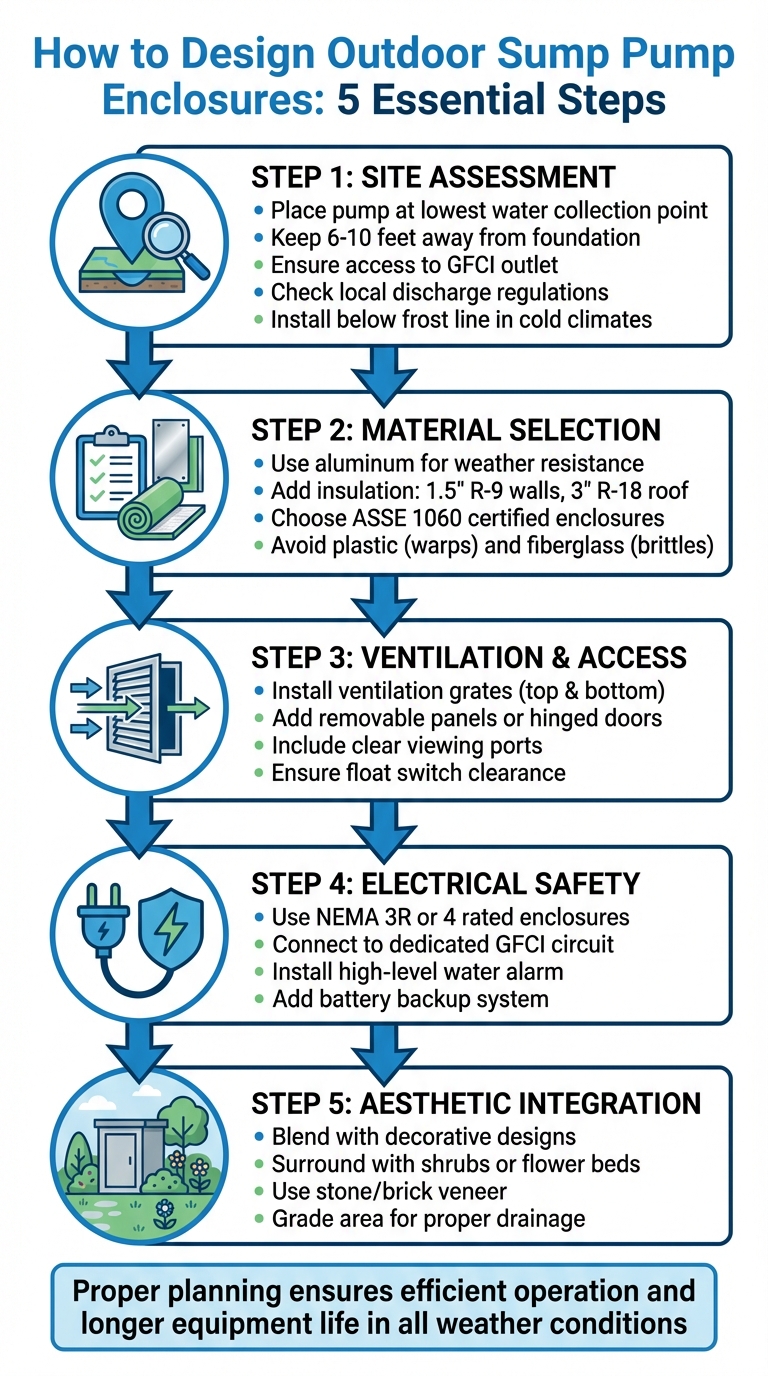
5 Key Steps to Design an Outdoor Sump Pump Enclosure
Backyard Sump Pump 101 [ Everything You Need To Know ]
sbb-itb-843f8be
Site Assessment and Planning
A detailed site assessment is key to designing an outdoor sump pump enclosure that works efficiently. Start by inspecting your property to find natural water collection spots. The sump pit should go at the lowest point in your yard where water tends to gather [5][8]. This placement helps the pump collect and redirect water effectively, keeping trouble spots dry. Also, consider the enclosure’s location in relation to your home and the necessary electrical safety measures.
Keep the enclosure a safe distance from your home’s foundation. The discharge point should be positioned 6 to 10 feet away from the foundation, and you’ll need access to a nearby GFI (Ground Fault Interrupter) outlet to ensure electrical safety [3][5].
Determine whether the water source is storm runoff or septic. Septic water cannot be discharged into a storm sewer or dry well; it must go into a sanitary sewer system [5]. To avoid issues, check with your local building department in Maryland to confirm the specific discharge regulations for your area [3].
When planning the size of the enclosure, consult your pump’s manufacturer to find out how much clearance is needed between the equipment and the enclosure walls [1]. For retrofit installations, dig a hole that is 6 to 10 inches larger than the sump liner to allow for gravel bedding [3]. In Maryland’s colder climate, make sure the pump is installed below the frost line to avoid freezing.
"Knowing your equipment’s brand and model, dimensions and the area around the equipment can help you make an informed decision on your unique enclosure needs." – Cary Wiley, Safe-T-Cover [2]
Finally, ensure there’s enough room for removable panels or hinged doors. This will make maintenance tasks much easier down the line [2][1].
Selecting Durable Materials
Choosing the right materials is key to ensuring your pump operates efficiently and lasts longer. Among the options, aluminum stands out as the go-to material for durability and all-weather protection. It resists UV rays and corrosion, making it a perfect fit for Maryland’s fluctuating climate, where hot summers and freezing winters can test any material’s limits [1]. Unlike plastic, which can warp under high heat, or fiberglass, which becomes brittle after prolonged sun exposure, aluminum holds up year-round without losing its structural integrity.
Cary Wiley, an enclosure expert, highlights aluminum’s resilience:
"Aluminum is ideal, because pumps also put off a large amount of heat that can melt and warp a plastic enclosure." – Cary Wiley, Enclosure Expert [1]
Select Weatherproof and Insulated Materials
Many high-quality aluminum enclosures come with 1.5" R-9 wall insulation and 3" R-18 roof insulation, which help regulate temperatures during power outages [1]. This insulation is particularly important for protecting the pump motor – the most expensive component – from extreme heat or freezing conditions that could lead to costly repairs. For installations requiring deeper setups, such as pits reaching 120 inches, precast concrete manholes provide additional natural insulation from the surrounding earth to prevent freezing [9]. Always confirm that your enclosure complies with ASSE 1060 certification standards, which ensure it meets requirements for structural integrity, drainage, and weather resistance [1].
Add Drainage and Debris Protection
Proper drainage is essential to keep your pump running smoothly. Lining your sump pit with 6–10 inches of gravel prevents clogging and allows water to drain effectively [3][8]. To further protect the system, wrap the pit’s exterior with landscape cloth to filter out mud and debris before it reaches the pump [5][11]. For the enclosure lid, opt for an airtight design with a built-in gasket and screws to block soil gases like radon from escaping [3]. Additionally, lids with air-sealing grommets for electrical wiring and discharge pipes help eliminate gaps where moisture or debris could sneak in [10].
Choose Proper Electrical Enclosures
Protecting your electrical components is just as important as safeguarding the pump itself. Use NEMA 3R or 4 rated electrical enclosures, which are specifically designed for outdoor use [5]. Ensure the pump connects to a GFCI outlet to enhance electrical safety [5]. For installations near residential areas, insulated aluminum enclosures offer an added benefit: they help reduce noise significantly compared to plastic or standard metal cages, while still providing robust protection for your equipment [1].
Building a Functional Enclosure
Excavate and Prepare the Site
Start by identifying the lowest point in your yard where water tends to collect [3][5]. Dig a pit that extends 6–10 inches beyond the dimensions of the sump liner. This extra space allows for proper bedding and backfill [3]. Add a gravel base at the bottom of the pit before placing the liner [3][5]. To prevent dirt from migrating into the system, line the pit with landscape cloth [5]. When positioning the liner, make sure its top rim sits slightly above the final grade. This small adjustment helps keep surface debris out of the system [8].
If you live in a colder region, like Maryland, it’s essential to ensure the pump is installed below the frost line, which can be as deep as 120 inches or more [9].
"As long as the sump pit is deep enough, it won’t freeze." – Bill Wichers, Green Building Advisor [9]
Once the pit is ready, you can move forward with installing the structural components.
Install Structural Components
To reduce vibrations, connect the standpipe to the pump using a flexible rubber coupling [8]. Install a check valve either directly on the pump or within the standpipe. This valve is crucial for preventing discharged water from flowing back into the pit, which helps extend the pump’s lifespan and avoids overflow [3][8]. When attaching perimeter drainage pipes to the liner, use inlet fittings with rubber gaskets to create a secure, leak-proof connection [8]. Additionally, make sure the float switch has enough clearance to operate without obstruction [7].
With the structural components in place, focus on designing openings that make maintenance simple and safe.
Design Safe and Accessible Openings
For easy maintenance or pump replacement, design your enclosure with removable roof panels or hinged doors [2]. If you’re working with a pit-style setup, opt for airtight, gasketed covers that are mechanically fastened. These covers help block soil gases like radon and keep debris out of the system [3]. For heavy-duty setups, such as those with a 150-pound precast manhole cover, use a manhole hook made from at least a ½-inch steel rod to safely lift and slide the cover [9].
Consider installing sump covers with clear viewing ports. These allow you to inspect water levels and pit conditions without breaking seals or removing the cover [3]. To protect the pump motor from theft or vandalism, use lockable, gasketed covers [1].
Ventilation and Aesthetic Integration
Add Ventilation for Airflow
Good airflow is a must for keeping your pump running smoothly. Without it, motors can overheat, and moisture can build up, leading to mold or even equipment failure [7]. To improve airflow, install ventilation grates or louvers at both the top and bottom of the enclosure [7][2]. For pumps that operate in high-heat or extreme-temperature conditions, adding exhaust fans can provide active ventilation [2][1]. Vent kits are another option – they help balance internal and external temperatures, which is especially useful during hot summer months to prevent overheating. Once you’ve got proper airflow, turn your attention to making the enclosure blend into its surroundings.
Improve Visual Appeal with Landscaping
Why settle for a plain enclosure when it can double as an attractive feature in your yard? Consider designing it to function as a decorative seating area, a potting bench, or even a utility bench [7][4]. To help it blend in, surround the structure with shrubs, flower beds, or tall potted plants [7][4]. Another idea is to use hardscaping – cover the enclosure with a decorative brick or stone veneer that matches the style of your home. This approach not only hides the enclosure but also ties it into the overall landscape design seamlessly [2][5]. Once the aesthetics are sorted, focus on ensuring the surrounding terrain works in harmony with your enclosure.
Grade the Surrounding Area
The location of your pump plays a big role in how well it functions. Place it at the lowest point where water naturally drains, directing it toward the collection area [12]. Make sure the discharge pipe slopes downward consistently so any leftover water can flow out completely. This prevents freezing and blockages during the colder months [12].
"Ensuring the discharge pipe has a downward slope helps any residual water flow out, reducing the risk of it freezing inside the pipe." – Rowan Guthrie, HomeServe [12]
Keep the area around the enclosure clear of leaves, mud, and debris to avoid clogs [12]. Additionally, aim the discharge pipe toward a storm drain or a safe drainage area far enough away to prevent water from flowing back toward the enclosure. Proper grading not only shields your foundation but also reduces the risk of basement flooding and keeps the soil around your home stable [12]. With ventilation, visual appeal, and grading all in place, you’re ready to move on to electrical and backup system installations.
Electrical Wiring, Alarms, and Backup Systems
Install Power and Alarm Systems
Your sump pump requires a dedicated electrical circuit to prevent disruptions caused by other appliances [6]. Most residential sump pumps operate on 115–120 V and consume between 700 and 2,300 running watts, with startup wattage reaching up to 1.5 times higher [6]. To ensure reliable power, consider having the pump hardwired directly to the power source. Always hire a licensed electrician for this task to ensure it meets local electrical codes [6].
When routing electrical lines through the pump enclosure, drill precise openings and use conduit to shield the wiring from weather and wear [9]. Adding a high-level water alarm is also a smart precaution. This alarm, equipped with a float switch positioned slightly above the primary pump’s switch, warns of potential overflows or pump failures [9]. After installation, manually test the alarm to confirm it’s loud enough to hear from inside your home [7].
Once the power and alarm systems are in place, it’s time to focus on backup solutions to keep the pump running during outages.
Add Backup Pump Provisions
To ensure your sump pump operates without interruption, even during power outages, consider installing a backup system. Power failures often coincide with heavy storms, which is exactly when you need your pump the most. A battery backup system can automatically activate if the primary pump loses power or malfunctions [7]. Place the backup pump in a location that’s easy to access for maintenance [7]. Make sure the float switch has enough room to move freely without hitting the enclosure walls or interfering with the primary pump [7].
"Keep the unit easy to reach to allow for quick checks and replacement. This ensures your backup pump works during a power outage."
– Tennessee Standard Plumbing [7]
For areas prone to frequent or extended power outages, a whole-house backup generator is an excellent option for maintaining continuous power to your primary pump [13]. If your pump enclosure is insulated with materials like 1.5″ R-9 panels for walls and 3″ R-18 panels for the roof, it can help maintain internal temperatures during outages, even when heaters are off [1]. Additionally, wrapping exterior discharge pipes can prevent freezing, which could otherwise lead to water backing up even when the pump is operational [7].
Consult Pro Landscapes MD for Custom Solutions

For seamless integration of your electrical, drainage, and landscaping needs, reach out to Pro Landscapes MD. They specialize in drainage solutions, including drain pipe installation, French drains, stormwater management, grading, and yard leveling. Their expertise ensures your sump pump enclosure fits perfectly into your landscape design while addressing water-related issues effectively. Visit prolandscapesmd.com to explore solutions tailored to your property’s requirements.
Conclusion
Designing a sump pump enclosure that balances functionality and style is essential for protecting your equipment and maintaining your yard’s appearance. Start by evaluating your site conditions and choosing sturdy materials like aluminum, which outperforms plastic or fiberglass in resisting UV damage and corrosion [1]. Incorporate proper ventilation, easy maintenance access, and insulation to shield the pump from extreme temperatures. Also, ensure that discharge pipes direct water at least 10 feet away from your foundation to prevent recycling water and causing soil erosion [4].
A well-thought-out enclosure not only safeguards your pump but also blends seamlessly into your landscape. Whether you prefer decorative faux rocks, rain gardens, or enclosures painted to complement your home, the focus should be on concealing the utility without compromising accessibility. Grading and drainage are equally critical to ensure water flows away from your property effectively.
Weather-resistant enclosures contribute to longer equipment life, fewer maintenance headaches, and dependable operation in any climate [1].
If you’re a Maryland homeowner looking for expert guidance, Pro Landscapes MD offers professional installation and personalized drainage solutions. From grading and stormwater management to French drains and yard leveling, their services ensure your sump pump system is seamlessly integrated into your landscape while complying with local building codes. Explore their tailored solutions for properties across Howard County, Montgomery County, Carroll County, Frederick County, Prince George’s County, and Baltimore County by visiting prolandscapesmd.com.
Investing in professional installation guarantees reliable performance and adherence to local regulations.
FAQs
Do I need a permit for an outdoor sump pump enclosure?
In most cases, you’ll need a permit to discharge sump pump water into public spaces, like rights-of-way or public property. For example, Montgomery County and Fairfax County require a right-of-way permit if you’re planning to connect to public infrastructure or discharge water onto public land. Make sure to review your local regulations to stay compliant with these requirements.
How do I keep my outdoor sump pump from freezing in winter?
To keep your outdoor sump pump running smoothly through winter, start by insulating the discharge pipe. Use foam insulation or pipe sleeves to shield it from freezing temperatures. For added protection, you can wrap the discharge line with heat tape, which helps prevent ice buildup. Make sure the discharge line is positioned to direct water well away from your foundation and allows for proper drainage. Also, keep an eye out for ice or blockages in the system to ensure it operates efficiently throughout the cold months.
What’s the best way to hide a sump pump enclosure in my yard?
To keep a sump pump enclosure out of sight, start by burying the discharge pipe underground. Extend it at least 10-12 feet away from your foundation and ensure it slopes toward natural drainage areas. Then, incorporate landscaping elements like decorative bricks, shrubs, or natural barriers to seamlessly blend the pump into your outdoor space. This approach maintains the pump’s functionality while creating a visually pleasing and safe environment.
Chat with Us