


- bhavya gada
- No Comments
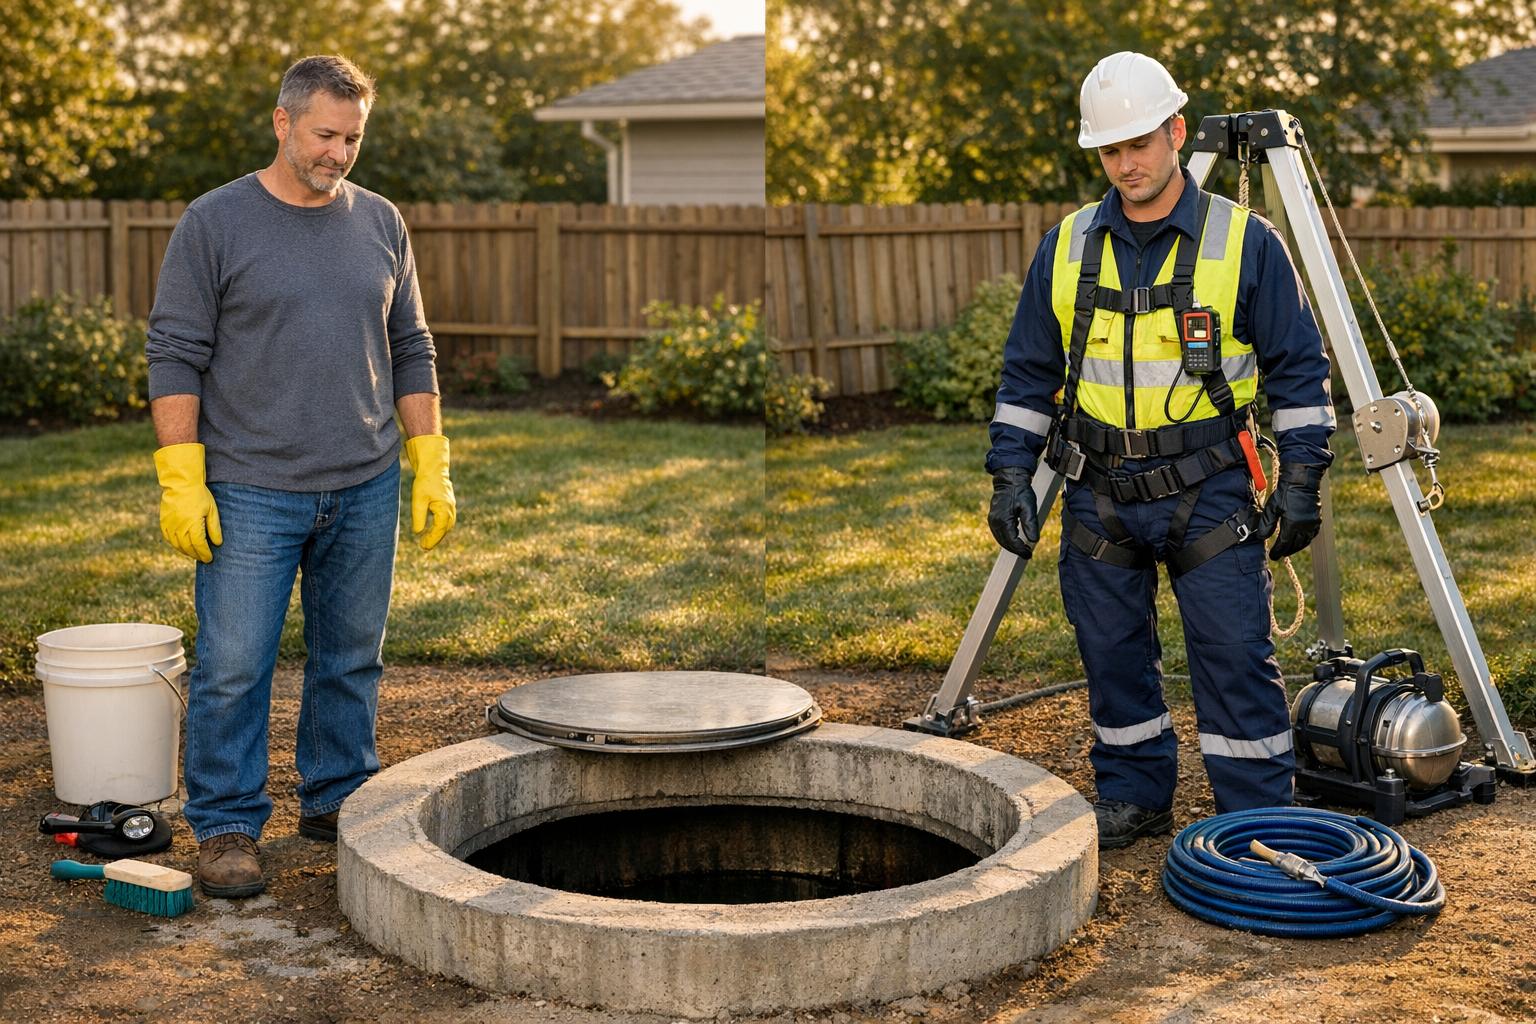
Cleaning your cistern is crucial to ensure safe, high-quality water. You can choose between DIY cleaning or hiring professionals, depending on your budget, system type, and safety concerns. Here’s a quick breakdown:
- DIY Cleaning: Lower cost, but requires time, effort, and safety precautions. Ideal for smaller, above-ground tanks. Tools like a utility pump, wet-dry vacuum, and bleach are essential.
- Professional Cleaning: Higher cost but offers deeper cleaning, safety, and faster results. Best for larger or concrete tanks, or when confined space entry is needed.
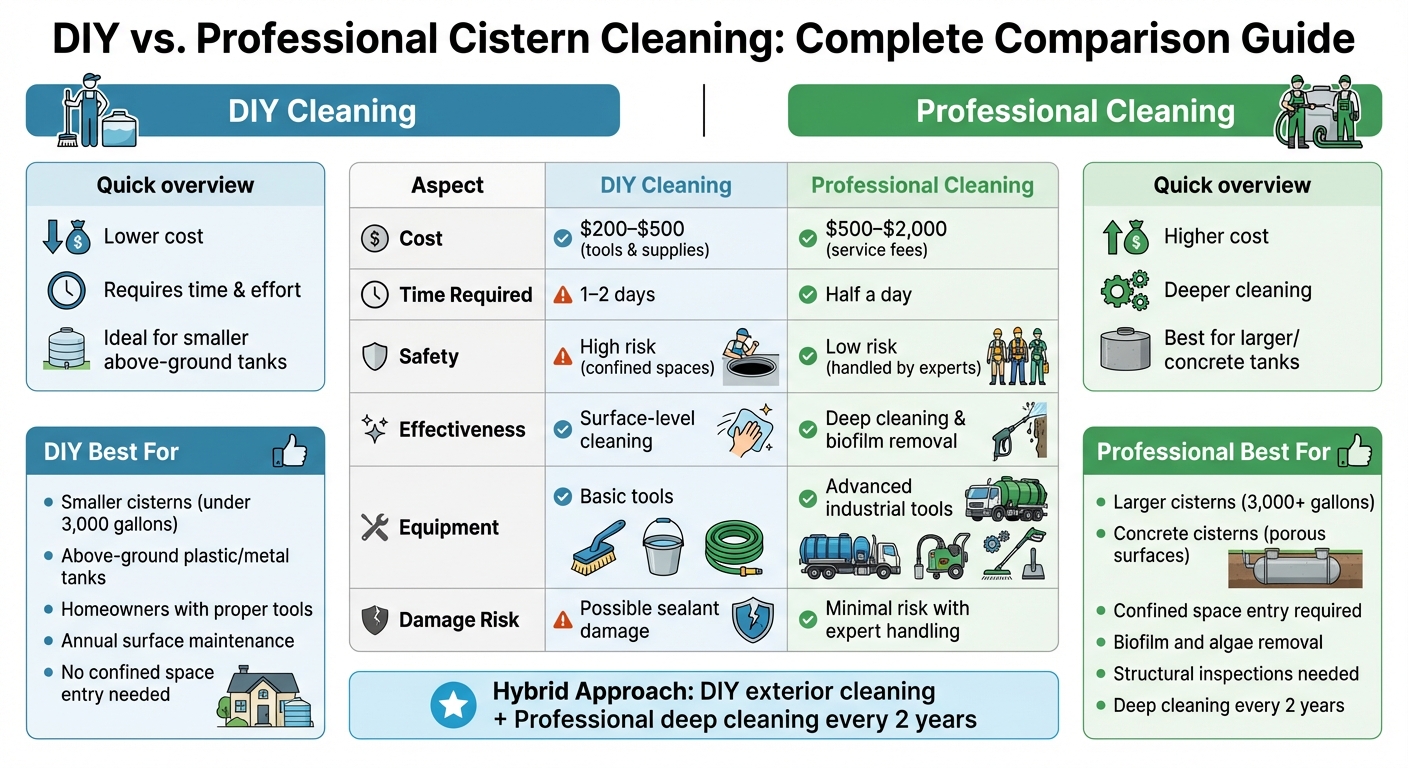
Quick Comparison
| Aspect | DIY Cleaning | Professional Cleaning |
|---|---|---|
| Cost | $200–$500 (tools & supplies) | $500–$2,000 (service fees) |
| Time Required | 1–2 days | Half a day |
| Safety | High risk (confined spaces) | Low risk (handled by experts) |
| Effectiveness | Surface-level cleaning | Deep cleaning & biofilm removal |
| Equipment Needed | Basic tools | Advanced industrial tools |
For smaller tanks, DIY can save money if you’re prepared and follow safety guidelines. For larger or complex systems, professionals ensure thorough cleaning and safety.
DIY vs Professional Cistern Cleaning: Cost, Time, and Safety Comparison
DIY Cistern Cleaning: Process and Tools
Step-by-Step DIY Cleaning Process
Start by turning off all external water sources and opening the cistern cover. Let it sit for 1–2 hours to allow oxygen levels to stabilize before proceeding [3].
Next, drain the tank using a utility pump or hose, directing the water away from your home’s foundation. Once drained, clean the exterior catchment areas and grates with a bleach solution. Inside the tank, remove large debris using a shovel, and use a wet-dry vacuum to clear out fine sediment. To disinfect, mix 1 cup of unscented liquid bleach (5%–8.25%) with 10 gallons of water and scrub the interior surfaces with a long-handled stiff brush [2]. Rinse thoroughly with clean water and pump out any remaining residue.
After rinsing, refill the cistern with potable water and add 3 cups of bleach per 100 gallons. Let the bleach solution sit for 12 hours, then drain it [2]. While the tank is empty, inspect for cracks and seal them using materials like hydraulic cement, Thoroseal, or a concrete patch. Once repairs are complete, drain any leftover disinfectant and refill the tank with clean water.
Having the proper tools on hand will make these steps easier and more efficient.
Tools Needed for DIY Cleaning
To tackle cistern cleaning, you’ll need the following tools:
- A ladder for easy access.
- A utility or electric pump for draining the tank.
- A long-handled stiff brush for scrubbing interior surfaces.
- Additional essentials like a shovel, 5- and 10-gallon buckets, a wet-dry vacuum, and a flashlight for inspecting sediment.
If using a pressure washer, always opt for a low-pressure setting to avoid damaging the cistern’s concrete sealant, which could lead to leaks [1]. Protect yourself by wearing safety gear such as safety glasses or goggles, heavy-duty gloves, waterproof boots, and a respirator or mask to guard against chemical fumes. Use unscented household liquid bleach for cleaning, and consider specialized products like Simple Green Oxy Solve Concrete Cleaner ($23.99) or Cistern Tank Bomb Cleaning Tablets ($19.97) [1]. Keep wrenches nearby for opening access hatches, and ensure any replacement materials are food-grade to maintain water safety.
Safety Considerations for DIY
While having the right tools is important, safety should always come first during cistern cleaning.
Cisterns are confined spaces where oxygen levels can drop dangerously low, and toxic fumes from cleaning agents may build up. Never enter a cistern alone – always have a second person present. As Claudia Henning from HomeSteady emphasizes:
"Have someone outside the tank monitor as you clean the cistern inside. They can be of immediate assistance if you are overcome by bleach fumes or there is a lack of oxygen in the tank." [3]
Ideally, anyone entering a confined space should have proper certification, as trapped gases and low oxygen levels pose serious risks [2]. To improve ventilation, leave the hatch open for 60–120 minutes before entering. When draining bleach-heavy water, direct it to street drains or areas far from vegetation to avoid harming plants. After completing the cleaning process, consider sending a water sample to a professional lab to ensure it’s free of microbial contaminants.
These steps outline an organized and safe approach to DIY cistern cleaning, offering an alternative to hiring professional services.
sbb-itb-843f8be
Professional Cistern Cleaning Services
How Professionals Clean Cisterns
Professional cistern cleaners bring expertise and industrial-grade tools to the table, starting with a critical safety step: verifying air quality inside the tank. This involves testing for low oxygen levels and toxic gases, which can pose serious risks in confined spaces – something beyond the scope of most DIY efforts [1][2].
Once the tank is deemed safe, professionals use high-powered equipment to tackle the cleaning process. High-capacity utility pumps ensure rapid drainage, while specialized wet-dry vacuums remove stubborn sludge and organic debris from the bottom – tasks that standard household tools simply can’t manage [1]. To clean the interior surfaces, they rely on low-pressure industrial washers, which scrub effectively without damaging the concrete sealant [1].
During cleaning, they also inspect the tank for cracks or worn seals, issues that are often overlooked in DIY cleanings. If they find problems, they can repair them on the spot using materials like Thoroseal, Hydraulic Cement, or professional-grade concrete patches [1]. For disinfection, professionals use precise methods like shock chlorination (typically 1 gallon of bleach per 1,000 gallons of water) or advanced ozone generators, which sanitize without relying on harsh chemicals [1].
To extend the time between cleanings, some professionals even install pre-treatment filters, such as Wisy Vortex or "leaf eater" screens, which help maintain water quality by filtering debris before it enters the cistern [1].
Benefits of Hiring Professionals
The methods professionals use come with several clear advantages, starting with safety. As Steffani Cameron from Hunker explains:
"If cleaning the tank requires climbing inside, authorities recommend this work be done by someone with confined space certification, as possible gases can be trapped inside or oxygen levels can be precariously low." [2]
Safety aside, professionals provide a deeper clean than most DIY efforts. Concrete cisterns are porous, meaning they can harbor harmful contaminants like E. coli, algae, and microbial biofilms that surface scrubbing alone can’t fully remove [2]. With their advanced tools and expertise, professionals ensure a level of disinfection that protects your water supply.
Another key benefit is time efficiency. What might take a homeowner an entire weekend – or longer – can be completed by professionals in a fraction of the time. They also handle the proper disposal of chlorinated water, ensuring it’s directed to street drains instead of areas like gardens, where it could harm plants [2].
Lastly, professionals excel at spotting hidden issues. They can identify structural problems, failing seals, or contamination sources that might go unnoticed until they lead to costly repairs. For concrete cisterns, experts recommend professional cleaning and disinfection every 10 to 20 years, depending on the quality of the installation [1]. This proactive approach helps ensure your system remains safe and functional for years to come.
How to clean a cistern
DIY vs. Professional Cistern Cleaning: Pros and Cons
Deciding between DIY and professional cistern cleaning means weighing factors like safety, cost, and how thorough the results will be. Each option has its advantages and drawbacks, and your choice can affect both your wallet and your well-being.
Safety is the most important consideration. Cleaning a cistern yourself can be dangerous because of confined spaces, exposure to toxic gases, and low oxygen levels. If you choose to go the DIY route, never work alone. On the other hand, certified professionals are trained to handle these hazards safely and efficiently[1][2].
Time is another factor. DIY cleaning requires 1–2 days because of necessary soak times and repeated cleaning cycles. Professionals, however, can complete the job in about half a day. Keep in mind that DIY cleaning is physically demanding – it involves tasks like hauling out sludge, scrubbing walls with stiff brushes, and using a wet-dry vacuum. It’s not for the faint of heart[1][2].
Another risk with DIY cleaning is improper tool use. For example, using a high-pressure washer incorrectly can damage the cistern’s sealant, potentially leading to leaks and expensive repairs. Professionals are trained to avoid such issues by using the right techniques[1].
Here’s a quick comparison to help you decide:
Comparison Table: DIY vs. Professional
| Aspect | DIY Cleaning | Professional Cleaning |
|---|---|---|
| Cost | Lower – mainly the price of supplies and tool rentals | Higher – includes service fees and specialized equipment |
| Time | Around 1–2 days (including a 12-hour soak) | Roughly half a day |
| Safety | High risk due to confined spaces and toxic gases | Lower risk – managed by certified experts |
| Equipment | Basic tools like brushes, wet-dry vacuums, and pumps | Advanced industrial tools and equipment |
| Effectiveness | Surface-level cleaning; bleach residue risk | Deep cleaning with biofilm removal and structural checks |
| Damage Risk | Possible sealant damage from improper techniques | Minimal risk with expert handling |
Choosing the right option depends on your priorities. While DIY may save money, professionals bring expertise, safety, and efficiency to the table.
Cost Considerations in Maryland
Maryland homeowners need to weigh several factors – cistern size, its current condition, and whether they opt for DIY or professional cleaning – to manage expenses wisely.
DIY Cost Breakdown
If you’re tackling cistern cleaning on your own, the initial investment can range from $200 to $500. This covers essential tools like a pressure washer, utility pump, wet-dry vacuum, shovels, buckets, and stiff-bristled brushes[1]. On top of that, you’ll need cleaning supplies such as unscented household bleach (with 5.25% to 8.25% sodium hypochlorite) and concrete cleaners or degreasers, which usually cost $15 to $65 per gallon[1].
The good news? Once you’ve purchased the equipment, the ongoing costs drop significantly. For future cleanings, you’ll only need to restock bleach and a few basic supplies. This makes DIY a budget-friendly option over time, especially for homeowners who plan to clean their cisterns regularly.
Professional Service Costs
Hiring professionals comes with a higher upfront cost, ranging from $500 to $2,000, depending on the cistern’s size and the complexity of the job. For example, cleaning a cistern under 3,000 gallons typically starts at $500, while specialized systems like Infiltrator cisterns can cost $800 or more[5]. Concrete cisterns, being porous, often require more labor-intensive cleaning, placing them at the higher end of the price range[2].
Additional charges may apply for extra services, such as sealing (around $700), EPA inspections (approximately $150), or emergency and weekend services (an extra $150). If your cistern is in a challenging location, mobilization fees can range from $1,800 to $2,400[5].
For those in Maryland looking for a seamless approach to water management, Pro Landscapes MD offers expert services across central Maryland. They ensure your cistern maintenance aligns with your property’s overall drainage and water systems.
When to Choose DIY vs. Professional Cleaning
Deciding between DIY and professional cleaning often comes down to your cistern’s size, material, and how complex its maintenance needs are.
Best Scenarios for DIY Cleaning
DIY cleaning works best for smaller, above-ground cisterns made of plastic or metal – especially when there’s no need to climb inside. If you already have tools like a pressure washer, utility pump, and stiff-bristled brushes, and you’re comfortable using bleach solutions, you can handle basic maintenance on your own. This is perfect for tasks like exterior cleaning and simple disinfection that don’t involve confined spaces.
For homeowners who feel confident, annual surface cleaning and sediment removal are manageable. Following the CDC’s disinfection guidelines, you can add 3 cups of household bleach for every 100 gallons of water, let it sit for at least 12 hours, and then drain it out [2].
A smart middle-ground approach is to handle routine exterior cleaning yourself and hire professionals for deep sanitation every two years. This keeps costs under control while ensuring thorough cleaning when needed most [4]. However, if your system is more complicated, professional help is often the safer choice.
When Professional Cleaning is Necessary
If cleaning requires entering the cistern, it’s time to call in professionals. Confined spaces can pose risks like low oxygen levels or trapped gases, which make DIY efforts unsafe [2].
Concrete cisterns, in particular, should be left to experts. The porous surface of concrete tends to harbor algae, E. coli, and biofilms more easily than plastic or metal tanks [2]. Professionals use advanced pressure washing tools and eco-friendly cleaning agents that can penetrate these surfaces far better than standard DIY methods [4]. To keep biofilm and sediment buildup under control, experts recommend cleaning concrete tanks at least once every two years [2].
If you notice water quality issues or structural damage, don’t wait – consult a professional right away [2]. These problems often require immediate testing, repairs, and deep cleaning that go beyond what DIY methods can handle. For Maryland homeowners, addressing these concerns quickly not only prevents costly repairs but also protects the quality of your water supply. Pro Landscapes MD specializes in drainage and water management solutions across central Maryland, ensuring your cistern maintenance aligns with your property’s overall drainage needs.
Conclusion
Keeping your cistern clean is essential for maintaining water quality and extending the life of your system. Regular cleaning not only ensures safe water but also helps avoid costly repairs down the line. Deciding between DIY cleaning and hiring professionals often depends on your cistern’s size, material, and complexity. Smaller, above-ground tanks are generally manageable for DIY cleaning, especially if you have the right tools and want to save on costs.
On the other hand, professional cleaning is a safer choice for larger or more complex systems, such as concrete cisterns with porous surfaces that can trap algae and bacteria. It’s especially important when confined space entry is required, as entering a cistern poses risks like low oxygen levels or trapped gases. Experts recommend that anyone entering such spaces have proper confined space certification for safety reasons [2].
A good approach is to combine regular DIY exterior cleaning with professional deep cleaning every two years. This balance can help keep costs manageable while ensuring your system is thoroughly maintained. Installing features like first-flush diverters can also reduce the frequency of deep cleanings by keeping debris out of the system in the first place [1].
If you’re a Maryland homeowner, incorporating cistern cleaning into your broader water management strategy can make a big difference. Pro Landscapes MD provides expert drainage and stormwater solutions across central Maryland, including services like drainage installation, French drains, grading, and overall water management. Their expertise ensures your cistern system works seamlessly with your property’s drainage infrastructure. Whether you choose the DIY route or professional services, make sure your cleaning plan fits your system’s needs and keeps your water safe.
FAQs
How often should my cistern be cleaned?
Cisterns typically need cleaning every 10 to 20 years. However, if you notice problems with water quality, you might need to clean them more frequently. How often you clean depends on factors like the condition of the cistern and how it’s being used.
Do I need to enter the cistern to clean it?
No, you typically don’t need to physically enter the cistern to clean it. Most cleaning involves draining the water and using tools like brushes or pressure washers to scrub the interior walls from the outside or through access points. However, if the cistern is older or has significant contamination, entering might be required. In such cases, it’s crucial to follow strict safety measures and consider hiring a professional to handle the job.
How do I know if my water needs lab testing after cleaning?
After cleaning, it’s a good idea to test your water in a lab if you’re concerned about bacterial contamination or other quality issues. This step is especially crucial if there are known health risks or if routine testing is recommended for your area or water system. Lab testing helps confirm that your water is safe to use and meets the necessary quality standards.
Chat with Us