


- bhavya gada
- No Comments
Proper downspout drainage is key to protecting your home from water damage. This guide covers everything you need to know about installing a system that directs roof runoff safely away from your foundation. Poor drainage can lead to costly issues like foundation cracks, mold growth, and soil erosion. Here’s a quick overview:
- Why It Matters: Just a few inches of rain on an average roof produces thousands of gallons of water. Without proper drainage, this water can damage your home’s foundation or create standing water that attracts pests.
- Key Steps: Install gutters, downspouts, and underground pipes with a slope to ensure water flows away from your foundation (minimum 10 feet).
- Tools and Materials: PVC pipes, shovels, levels, and splash blocks are essential. Optional upgrades like French drains or pop-up emitters can enhance performance.
- Local Considerations: Maryland’s clay-heavy soils and heavy rainfall make proper drainage especially important. Follow local rules to avoid fines or drainage issues.
How To Install Downspout Drain Underground Top 10 Do’s and Don’ts Built To Stand The Test Of Time
sbb-itb-843f8be
Tools and Materials You’ll Need
Before jumping into your project, make sure you have everything you need on hand. This will save you from those annoying mid-project runs to the hardware store. For cutting metal downspouts or PVC pipes to the right length, you’ll need a hacksaw or snips, and a metal file to smooth out sharp edges afterward [3][5]. A drill and screwdriver will come in handy for securing downspout adapters and brackets with sheet metal screws, while a measuring tape ensures precise sizing of sections [3][4].
Required Tools
To make your installation smooth, organize your tools for cutting, leveling, and assembly. Here’s a quick list of must-haves:
- Shovel or trencher: For digging the trench where the pipe will go.
- Rake or garden hoe: For backfilling once the pipe is in place.
- Level: This is crucial – any slight upward tilt can cause water to back up [3][4].
- Pliers: Useful for gripping and securing fittings.
- Crimper: Helps shape metal downspouts for a tight fit [3][5].
Here’s a tip from French Drain Man to simplify the process:
"A gentle yet effective slope is quickly established by attaching a 12″ extension and the French Drain Man’s ‘not quite 90’ fitting at the start" [4].
This technique ensures water flows smoothly away from your foundation right from the start.
Required Materials
With your tools ready, you’ll need materials designed to handle water efficiently and last for the long haul. 4-inch diameter PVC pipes are a solid choice – they handle large water volumes and resist clogs better than corrugated pipes [1][7]. You’ll also need:
- Elbows: To navigate corners.
- Sheet metal screws or rivets: For attaching adapters.
- Pop-up emitter or splash block: To safely discharge water and prevent soil erosion [1][7].
For long-term durability, Schedule 40 PVC is a great option because of its rigidity, though corrugated pipes can work well for DIY projects that need to curve around landscaping [7]. Protect your system by installing leaf guards or screens at gutter entry points to block debris. Additionally, applying copper sulfate along the trench before backfilling creates a barrier against tree roots that could clog the pipes [4][1].
Optional Upgrades
Once your basic system is set up, you can add a few extras to boost performance and reduce maintenance. For example, an inline catch basin traps debris like shingle gravel, making upkeep easier [4]. If you’re dealing with severe drainage problems, a French drain – using perforated pipes surrounded by gravel – can help manage groundwater along with roof runoff [4]. In areas where gravity isn’t enough to move water away, consider adding an outdoor sump pump [6].
For added stability and protection, surround your pipes with gravel bedding and wrap them in geotextile fabric. This prevents soil from clogging the system and is especially useful in areas with clay-heavy soil, like Maryland [7][1]. While these upgrades aren’t mandatory, they can save you from costly repairs down the line.
Planning Your Drainage System
Evaluating Your Property
Before breaking ground, take a close look at your property’s layout and conditions. Start by calculating your roof area to estimate the amount of water runoff you’ll need to manage. A good rule of thumb is to allocate 1 square inch of downspout cross-section for every 100 square feet of roof area [1]. Even a few inches of rain can generate thousands of gallons of runoff from an average roof [1].
Next, consider your foundation type to determine how far water should be discharged from your home. For homes with basements, water should be released at least 6 feet away. For crawl spaces or slab foundations, maintain a minimum clearance of 2 feet, while adhering to any property setback requirements [2]. Soil type also matters – expansive or collapsible soils require a professional evaluation by a certified hydrologist or engineer [1].
Pay attention to setback guidelines for water discharge:
- 5 feet from neighboring properties
- 10 feet from buildings
- 3 feet from sidewalks [2]
Additionally, keep water at least 10 feet away from retaining walls and avoid directing runoff toward septic systems or underground oil tanks [2].
Choosing Downspout Locations
Once you’ve assessed your property, shift your focus to placing downspouts strategically. Install them at the corners and low points of your gutter system, where water naturally accumulates. For effective water management during heavy rainstorms, space downspouts every 20 to 50 feet along the gutter [1]. Ensure the landscape area receiving the runoff is large enough – at least 10% of the roof area draining to it. For instance, if your roof is 500 square feet, the drainage area should cover at least 50 square feet [2].
Avoid routing downspouts across walkways, patios, or driveways [2]. Also, confirm that the ground at the discharge point slopes away from your home. This is especially important in areas like Frederick County, Maryland, where heavy rainfall can lead to foundation and basement issues if water isn’t directed properly [6].
Setting the Correct Slope
To ensure proper drainage, maintain a steady downward slope. The standard guideline is a 1/4 inch drop per foot of pipe length [9]. To calculate the total drop, multiply the pipe’s length in feet by 0.25 inches. For example, a 20-foot pipe would need a total drop of 5 inches (20 × 0.25 = 5) [9].
Here’s a handy DIY tip: attach a 1-inch wood block to one end of a 4-foot level. When the bubble aligns with the block at the downstream end, you’ve got the right slope [8]. Be cautious not to overdo the slope – if it’s too steep, water may flow too quickly, leaving debris behind and increasing the risk of clogs [9]. Also, never connect your downspout drain directly to a perforated foundation drain, as this could push roof water into the soil near your foundation [1].
| Pipe Length | Total Drop at 1/4" Slope | Total Drop at 1/2" Slope |
|---|---|---|
| 10 ft | 2.5 inches | 5.0 inches |
| 20 ft | 5.0 inches | 10.0 inches |
| 30 ft | 7.5 inches | 15.0 inches |
| 50 ft | 12.5 inches | 25.0 inches |
With these steps – evaluating your property, selecting optimal downspout locations, and setting the correct slope – you’ll be ready to move on to the installation phase.
Installation Steps
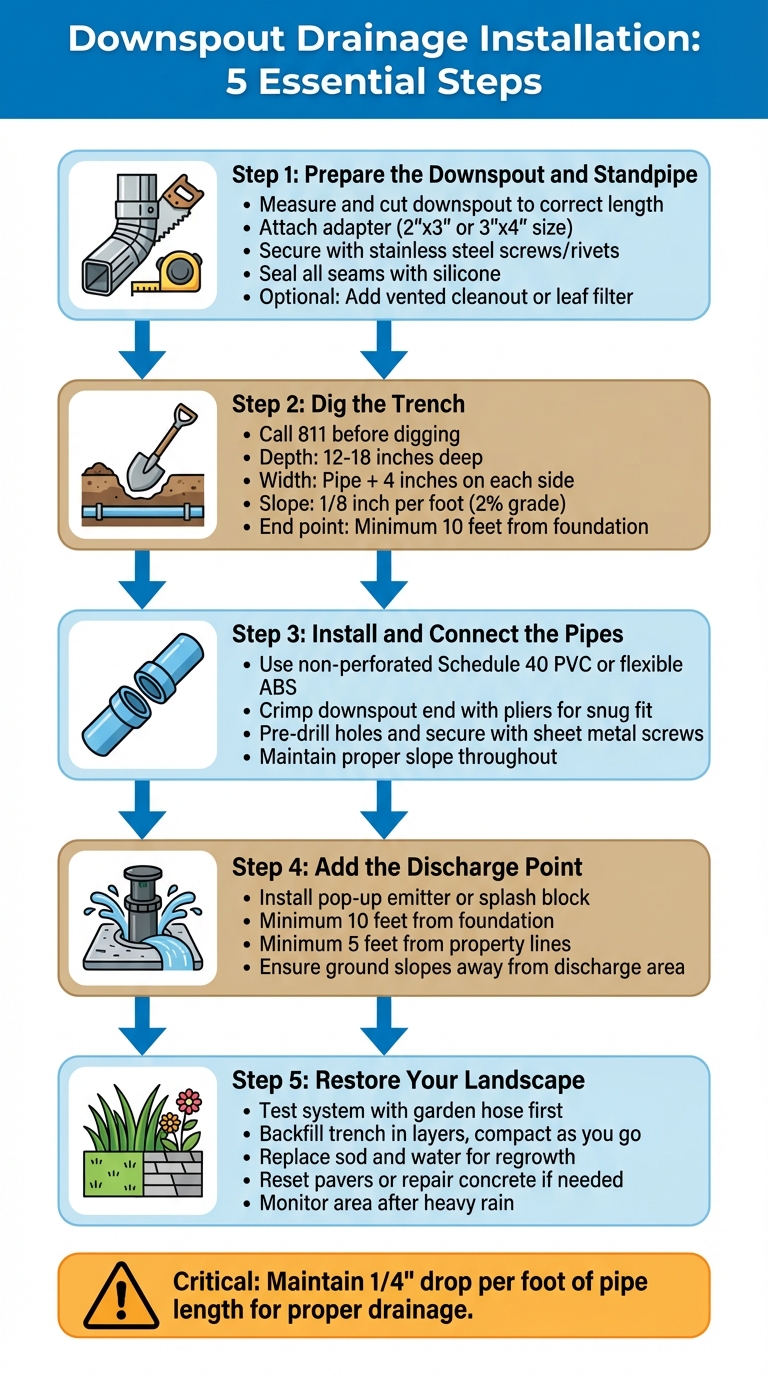
5-Step Downspout Drainage Installation Process Guide
Step 1: Prepare the Downspout and Standpipe
Start by checking that your existing downspout is securely attached to your home. Measure the height needed for the adapter and elbow, then cut the downspout to the correct length using a hacksaw or tin snips.
If you’re disconnecting from an old sewer system, immediately seal the existing standpipe with a plastic or rubber plug to block debris and water. Then, attach a downspout adapter to transition from the rectangular downspout to the round drainage pipe. Most residential downspouts are either 2"x3" or 3"x4", so select an adapter that fits your size.
Secure the adapter and elbow with stainless steel screws or rivets, placing fasteners on both sides of the connection. Seal all seams with silicone or gutter sealant to create a watertight connection. For extra protection, consider adding a vented downspout cleanout or leaf filter at the house level to catch shingle gravel and debris. If you skip the cleanout, installing an inline catch basin within the first 10 feet of the pipe can provide access for future maintenance.
Step 2: Dig the Trench
With the downspout ready, the next step is to create a trench for the drainage pipe. Before digging, call 811 to mark underground utility lines. Dig the trench 12 to 18 inches deep to protect the pipe from surface pressure and freezing. Make it wide enough to fit the pipe with about 4 inches of space on each side for gravel backfill.
Maintain a slope of 1/8 inch per foot, or aim for a 2% slope for better performance. To check the slope, drive stakes at both ends of the trench, tie a string between them, and use a level to measure the drop. Use a pickaxe to start the trench and a hand trowel to smooth the bottom, ensuring it’s even to prevent debris buildup.
"The farther your buried downspout is from your home, typically, the more fall you’re going to get. That means that you’re going to empty the downspout line and it’s not going to hold a lot of water."
– Robert Sherwood, Owner, French Drain Man [10]
Make sure the trench ends at a discharge point at least 10 feet from your foundation. If you encounter tree roots, try to dig under them instead of cutting through large roots, which could harm the tree.
Step 3: Install and Connect the Pipes
For the drainage system, use non-perforated Schedule 40 PVC or flexible ABS pipe. Smooth-walled pipes are ideal because they allow better water flow and are easier to clean. Before attaching the elbow to the cut downspout, crimp the downspout end slightly with needle-nose pliers to ensure a snug fit.
Pre-drill holes and secure the connection with sheet metal screws to create a tight, leak-proof seal. As you lay the pipe in the trench, maintain the slope you established during digging to ensure proper drainage.
Step 4: Add the Discharge Point
Install a pop-up emitter at the end of the drainage line to release water safely away from your property. These spring-loaded outlets open when water flows and close when it stops, keeping debris out of the pipe. Ensure the discharge point is at least 10 feet from your foundation and 5 feet from property lines.
Alternatively, you can use a standard pipe extension with a splash block to direct water away and prevent soil erosion. Make sure the ground slopes away from the discharge area to avoid pooling or backflow toward your home.
Step 5: Restore Your Landscape
Once your drainage system is in place, restoring your landscape completes the process. Test the system with a garden hose to ensure it works properly, then backfill the trench in layers, compacting as you go to prevent settling. If you dug through a lawn, replace the sod and water it to encourage regrowth. For garden beds, add fresh topsoil and mulch to blend with the existing landscape.
If the trench crosses hardscape areas like patios or walkways, you may need to reset pavers or repair concrete. Compact the soil thoroughly before replacing any hardscape materials to prevent future sinking. Keep an eye on the area for a few weeks after installation – especially after heavy rain – to ensure the ground settles evenly and the drainage system performs as expected.
Maryland Regulations and Expert Advice
Once your drainage system is installed, it’s crucial to ensure it complies with Maryland’s regulatory standards.
Local Drainage Rules
Maryland has strict rules about downspout drainage. For example, discharging rainwater into sanitary sewers, public storm drain systems, or road rights-of-way is prohibited in areas like Anne Arundel County [12]. According to the Anne Arundel County Code §13-2-206: "A person may not empty, discharge, or cause or allow to be emptied or discharged from premises occupied by the person, directly or indirectly, to or on any county road a liquid other than rainwater flowing in its natural course" [12].
Additionally, Maryland law mandates that discharge points must be at least 10 feet from property lines near streets, sidewalks, or neighboring properties to allow proper infiltration into the soil [12][14]. Discharging water onto sidewalks or roadways is also banned due to safety concerns like icing and hydroplaning risks [12][14]. The Maryland Plumbing Code specifies that drainage pipe sizes cannot decrease in the direction of water flow, and cleanouts are required for storm drainage systems, except for subsurface drains [13]. In some towns, such as North Brentwood, a permit (around $100) is necessary to connect a private drainage system to a municipal infiltration trench [14].
Tips for Better Results
To achieve the best performance while adhering to these regulations, consider these practical tips. Redirecting downspouts to permeable areas like lawns, rain gardens, or rain barrels can help reduce stormwater runoff and prevent pollutants from entering waterways [15]. The University of Maryland Extension emphasizes: "Downspout redirection is an affordable way to slow down and soak in stormwater runoff" [15].
Here are a few guidelines to keep in mind:
- Downspout sizing: Allow at least 1 square inch of downspout cross-section for every 100 square feet of roof area.
- Spacing: Place downspouts every 20 to 50 feet along gutters to handle heavy rain effectively [1].
To meet code requirements, use non-perforated Schedule 40 PVC or flexible ABS pipes for lateral piping to prevent leaks near the foundation. Maintain a slope of at least 5/8 inch per foot (5% slope) for underground pipes to ensure proper drainage [1]. Installing leaf guards or screens can keep debris out of the system, while splash blocks at discharge points can help control soil erosion [1]. Avoid connecting solid gutter drain pipes directly to perforated foundation drains, as this can lead to foundation saturation and structural damage [1].
Professional Installation Services from Pro Landscapes MD

If you live in central Maryland – covering areas like Howard County, Montgomery County, Carroll County, Frederick County, Prince George’s County, and Baltimore County – Pro Landscapes MD offers expert drainage solutions designed to meet Maryland’s strict regulations. Their services include downspout drainage installation, French drains, stormwater management, grading, and yard repair, all tailored to address water-related challenges effectively.
Pro Landscapes MD ensures compliance with local codes, including the Maryland Plumbing Code’s requirements for pipe sizing, slope, and material selection. Their team’s expertise helps protect your property from water damage while meeting all county-specific ordinances.
Conclusion
Installation Process Review
A well-installed downspout drainage system is key to protecting your foundation by directing roof runoff away from your home. Start by assessing your property’s slope and planning the best route for water to flow safely. Follow the detailed steps outlined earlier to ensure every component performs as intended.
Keep in mind: discharge points should be positioned at least 5 feet away for surface drains or 10 feet away for underground systems [1].
When to Hire a Professional
Once you’ve reviewed the installation process, assess whether your project requires professional help. While many drainage systems can be handled as DIY tasks, some situations demand expert knowledge. Properties with steep slopes exceeding 10%, limited landscaped areas compared to roof size, or persistent pooling despite basic drainage measures are clear signs you need professional input [2][11]. Additionally, homes built on expansive or collapsible soils should be evaluated by certified specialists to avoid foundation damage or cracking [1].
For homeowners in central Maryland, Pro Landscapes MD offers specialized drainage services. They cater to areas like Howard, Montgomery, Carroll, Frederick, Prince George’s, and Baltimore Counties. Their team ensures compliance with Maryland’s regulations, focusing on proper pipe sizing, slope adjustments, and discharge point placements. They’re also equipped to handle complex systems, including French drains, dry wells, and advanced stormwater management solutions.
Take Action Now
Now that you have a clear roadmap for tackling drainage issues, it’s time to take action. Addressing these problems sooner rather than later can save you from expensive repairs in the future. Proper drainage safeguards your foundation, prevents soil erosion, eliminates standing water (which can harm your lawn and attract pests), and enhances the overall health of your outdoor space. Whether you choose to handle the project yourself or enlist professionals like Pro Landscapes MD, acting promptly ensures a safer, more functional environment for your home. Don’t wait – secure your foundation and protect your property today.
FAQs
How do I know if my yard has enough slope for a buried downspout?
To determine if your yard has the right slope for a buried downspout, check that the ground slopes gently and consistently away from your home’s foundation. A good rule of thumb is a 1-inch drop in elevation for every 5 feet of horizontal distance. You can use a level and a measuring tape to measure this accurately. If the slope isn’t adequate, you might need to regrade the area or consider installing additional drainage options.
What’s the best way to prevent clogs in an underground downspout drain?
To keep underground downspout drains clear and functioning, focus on both proper setup and regular upkeep. Start with pipes that are appropriately sized and installed at a slope to guide water away – at least 5 feet from your foundation or 10 feet into an underground system. Regular inspections are key; check for and clear out debris like leaves, dirt, or other obstructions. Ensuring the pipes are sloped correctly allows water to flow efficiently, which helps minimize the risk of clogs.
Do I need a permit in Maryland for downspout drainage work?
In Maryland, permits are typically not needed for installing downspout drainage systems unless the project involves significant modifications or connections to municipal stormwater systems. That said, it’s always a good idea to review local regulations or consult with local authorities to make sure you’re following any specific rules.
Chat with Us