


- bhavya gada
- No Comments
Applying polymeric sand to your patio is a straightforward way to create durable, weed-resistant joints between pavers. It prevents erosion, reduces maintenance, and enhances stability. Here’s a quick overview of the process:
- Clean and Dry the Surface: Remove all debris and ensure the pavers and joints are completely dry.
- Inspect Joints and Pavers: Check for proper joint dimensions (at least 1 inch deep, 1/8–4 inches wide) and fix any loose or damaged pavers.
- Spread and Sweep Sand: Pour polymeric sand over the surface and sweep it into the joints evenly.
- Compact and Refill Joints: Use a plate compactor to settle the sand, refilling as needed for full joint coverage.
- Remove Excess Sand: Clear loose sand from the paver surface using a broom and leaf blower.
- Water Activation: Lightly mist the joints with water to activate the polymer binders, ensuring even saturation without overwatering.
- Allow to Cure: Let the sand set for 48–72 hours, avoiding foot traffic, rain, or heavy use during this time.
How To (Properly) Polymeric Sand a Paver Patio | (Techniseal)
Preparation Before Applying Polymeric Sand
Getting your surface ready is the key to ensuring polymeric sand works as it should. Cleanliness and dryness are essential before you even open a bag of sand.
Clean and Dry the Patio Surface
A clean surface lays the groundwork for proper sand adhesion. Start by sweeping the patio thoroughly with a hard-bristle broom to clear away loose debris, leaves, and dirt. This step also helps expose joints that may need extra attention.
For the joints, use a pressure washer or a vacuum to remove any old sand, dirt, or debris. Clean down to the bedding layer to allow the polymeric sand to settle and bond effectively[1][3]. Keep in mind that moisture can activate the sand’s polymers too soon, leading to clumping and poor bonding[1][3]. After cleaning, confirm that both the pavers and joints are completely dry. If needed, use a leaf blower to speed up drying, especially in shaded or damp areas[1][3].
Check Joints and Pavers
Before you move forward, inspect the joints and pavers carefully. Proper joint dimensions are critical – most polymeric sand products require joints that are at least 1 inch deep and between 1/8 and 4 inches wide, depending on the product[1][2].
As you walk the patio, look for cracked or loose pavers that need to be replaced. Uneven joint depths or damaged pavers can weaken the sand’s performance, so it’s important to address these issues now. Pay special attention to areas where pavers meet walls, steps, or other hardscape features, as these spots often collect more debris.
Once you’ve inspected and fixed any issues, you’re ready to gather your tools and start the application process.
Gather Required Materials and Tools
Having all the necessary tools ready will save time and make the process smoother. Here’s what you’ll need:
- Hard-bristle broom for sweeping
- Plate compactor (or vibratory plate) for settling the sand
- Leaf blower to remove excess dust
- Pressure washer or shop vacuum for cleaning joints
- Water hose with a shower nozzle for gentle activation
- Safety gear, such as gloves and eye protection[2][3]
Check the weather forecast too. You’ll need dry conditions for at least 24 to 48 hours after applying the sand, as rain or high humidity can disrupt curing[4][2]. The ideal temperature for application is between 40°F and 90°F (4°C to 32°C)[4][2].
With a clean surface and the right tools, you’ll be ready to move on to applying the polymeric sand in the next steps.
Step-by-Step Guide to Applying Polymeric Sand
Now that your patio is prepped and ready, it’s time to apply the polymeric sand. By following these steps carefully, you’ll ensure a smooth, long-lasting finish.
Spread Sand Evenly Across the Surface
Begin by pouring the polymeric sand directly onto the paver surface. Focus on working in sections no larger than 10′ x 10′ at a time, especially for larger patios[1]. Pour enough sand to cover the section, then use a hard-bristle broom to sweep it evenly across the area. Even distribution is key – uneven gaps can lead to weak spots and settling issues, which could affect the patio’s durability[2]. You can make adjustments later if necessary.
Sweep Sand Into Joints
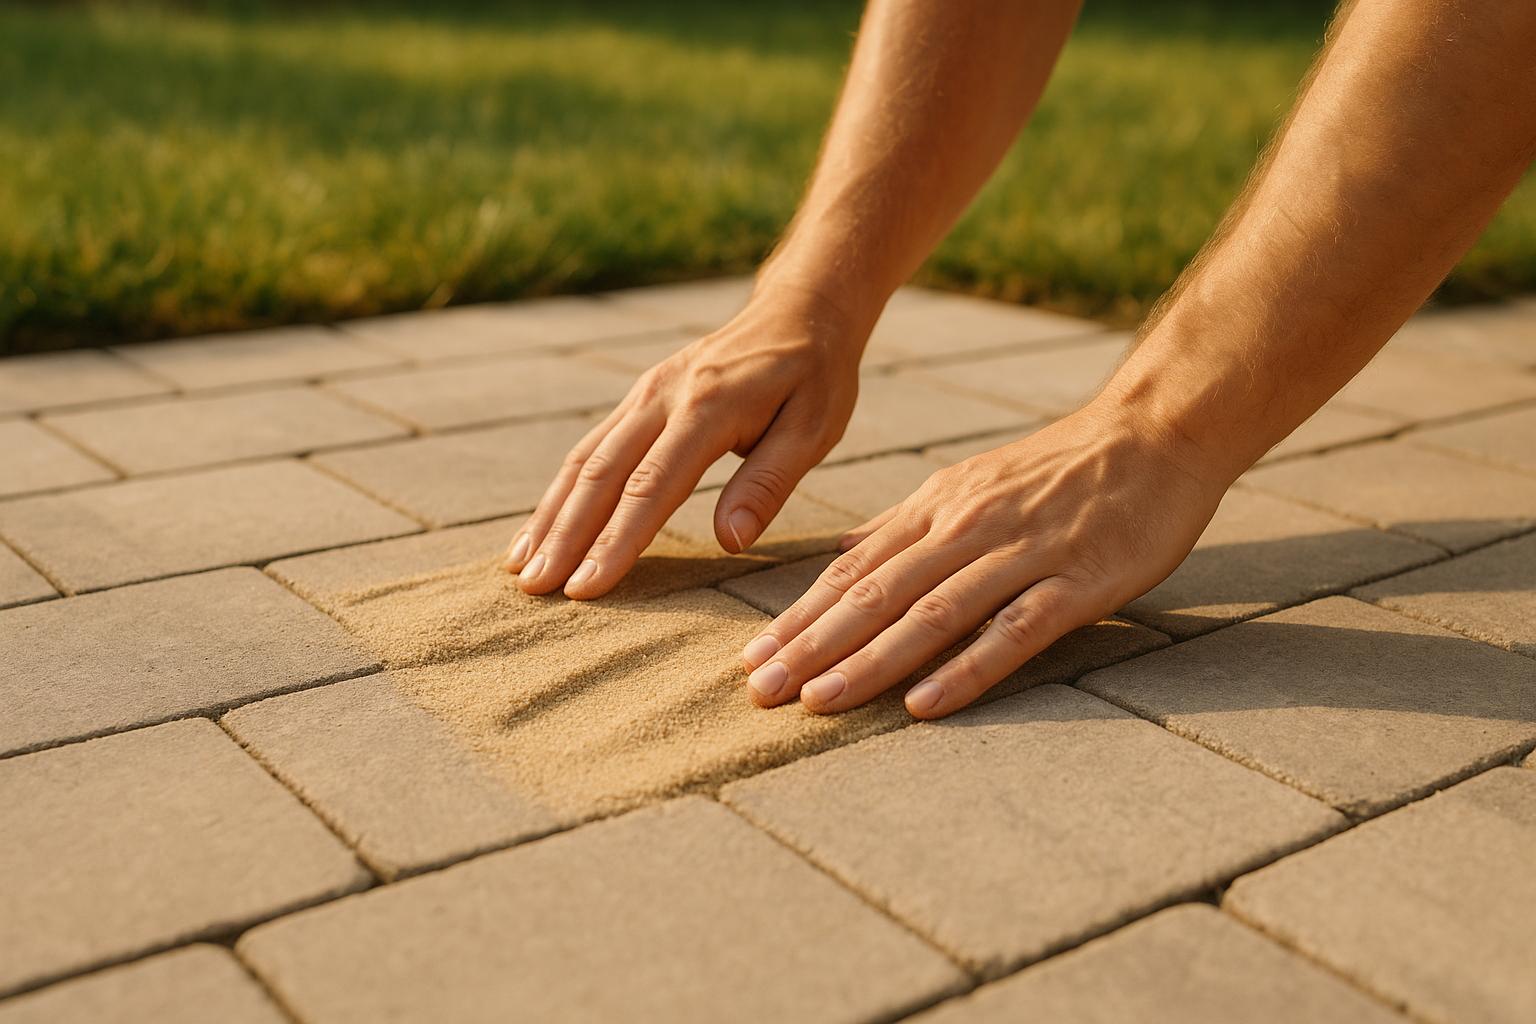
Once the sand is spread, sweep it into the joints from multiple directions. The goal is to fill each joint completely, leaving a 1/8-inch gap below the paver surface or the bottom of the bevel for beveled pavers[5]. For edges and tight spaces, use a small dustpan and brush or a hand broom to carefully work the sand into the joints without spilling it onto nearby surfaces[3]. If you’re dealing with irregular joints, a broom handle or similar tool can help push the sand in. For debris stuck in narrow gaps, tweezers can come in handy.
Before moving on, double-check that all joints are fully filled.
Compact and Refill Joints
To compact the sand into the joints, use a plate compactor with a urethane pad to protect the pavers[5]. Slowly run the compactor over the section in overlapping rows, ensuring even compaction. You’ll notice the sand level dropping as it settles into the joints. After the first pass, repeat the process of sweeping and compacting until the joints are completely filled. Most patios require at least two or three rounds to achieve proper joint fill. If you’re working with large pavers or natural stone where a plate compactor isn’t suitable, a brush and rubber mallet can be used to settle the sand instead[4].
Keep in mind that one bag of polymeric sand typically covers about 85 square feet[4]. For example, a 200-square-foot patio with standard joints will usually need 4–6 bags (50 lbs each)[3]. It’s smart to have extra bags on hand, as wider or deeper joints may require more sand than you initially estimated.
Water Activation and Final Steps
Once your polymeric sand is compacted and the joints are filled, it’s time for water activation. This step ensures the polymers bind properly, creating a solid, weed-resistant surface.
Remove Excess Sand
Before you start watering, make sure to clear any loose sand from the surface of the pavers. Use a hard-bristle broom and a leaf blower to remove sand, especially from textured surfaces and beveled edges where it tends to gather. This step is critical – any leftover sand can create a hazy film once it gets wet. The goal is to leave the surface completely clean and free of visible sand residue. With the surface prepped, you’re ready to activate the bonds by adding water.
Water the Joints Carefully
The way you water the joints is crucial to the success of your installation. Attach a shower nozzle to your hose – avoid using a jet stream setting, as it can displace the sand. Work in manageable sections, about 200 square feet at a time, starting at the bottom of any slope and moving upward[2].
Lightly shower a 10′ x 10′ section with water, then continue for 30 seconds until the joints stop absorbing it[2]. You’ll know it’s time to stop when water begins pooling on the surface[2]. Be careful not to overwater, as this can wash away the polymers and leave stains[1]. On the other hand, using too little water creates a hard surface layer while leaving the bottom soft – this can cause the joints to fail over time[1]. Remember, once the polymer starts setting, you can’t go back to add more water, so precision is key[1].
For areas larger than 200 square feet, stick to working in 10′ x 10′ sections. This prevents water from drying in one area while you’re still working on another. After fully saturating the joints, let the polymers begin to set.
Allow Proper Curing Time
Once the water activation is complete, the area needs time to cure. Keep vehicles off the surface for 48 to 72 hours[2]. During this period, limit foot traffic as much as possible, and avoid placing furniture or heavy objects on the patio. If you’re working in a high-humidity environment, the curing process may take longer, so be sure to check the weather before starting your project. Rain during this time can weaken the joints and compromise their stability.
While the wait might feel long, it’s a crucial step for ensuring the long-term durability and weed resistance of your polymeric sand. Skipping or rushing this phase can lead to premature failure and costly repairs later on.
sbb-itb-843f8be
Maintenance and Troubleshooting Tips
A well-kept polymeric sand patio can serve you well for years. But like any outdoor surface, it needs regular care and occasional fixes to stay in great shape. Here’s how to keep your patio looking its best and functioning properly.
Regular Maintenance for Long-Lasting Results
From spring through fall, make it a habit to inspect your patio every month. Look for signs of erosion, cracks, or gaps in the joints. After storms or heavy foot traffic, take a closer look to catch any early signs of damage.
Keep the surface clean by sweeping away debris regularly. This prevents staining and discourages weed growth. Use a broom or a gentle leaf blower instead of high-pressure tools, which can harm the sand joints. For stubborn debris stuck in the joints, a shop vac can come in handy.
Avoid pressure washers when cleaning your patio. The forceful water stream can wash away the sand and weaken the structure. Stick to gentler cleaning methods to protect your patio’s integrity.
Stay on top of weed removal. While polymeric sand is excellent at blocking weeds, it’s not foolproof. Remove any weeds as soon as they appear to stop roots from taking hold and damaging the joints.
Common Problems and How to Fix Them
If you notice hollow joints or gaps, start by clearing out the loose sand down to the base of the pavers. Clean the area thoroughly, then reapply and compact fresh polymeric sand.
For areas showing signs of erosion, remove the loose sand, clean the base, and refill with new sand. Compact it properly to ensure stability. Cracks in the joints can also be fixed by clearing the damaged area, adding fresh sand, and activating it with water. Be sure to follow the curing instructions carefully.
A white, milky residue on the surface might appear if too much water was used during application or repairs. This happens when the polymers rise to the surface. To avoid this, apply water lightly and in a controlled manner.
If the sand doesn’t harden properly – where the top layer sets but the bottom stays soft – it’s likely due to insufficient water during activation. In this case, remove the affected sand and reapply with the correct watering technique.
When tackling repairs, work in small sections and give the repaired areas 48–72 hours to cure fully. For larger issues, like widespread erosion or joint failures, there could be underlying problems such as poor drainage or settling. In these cases, it’s best to call in a professional to assess and fix the situation.
Local Expertise: Why Choose Pro Landscapes MD

Taking on a DIY polymeric sand project can be satisfying, but tapping into professional expertise ensures your patio’s longevity. With the right skills, professionals can apply polymeric sand correctly, making sure it holds up beautifully for years.
Professional Patio Installation and Maintenance
At Pro Landscapes MD, the team brings a strong educational background in landscape design and horticulture to the table, setting them apart in the hardscaping world. This foundation equips them with the technical know-how needed for flawless polymeric sand application.
"Our team’s formal training in landscape design and horticulture sets us apart."
Their hardscaping services aim to create patios built to last. By using top-tier materials and following best practices – like meticulous cleaning, precision compaction, and careful water activation – they prevent common issues such as uneven settling.
"Our hardscaping services provide structure, durability, and lasting beauty to your landscape, using high-quality materials and expert craftsmanship to create stunning outdoor features."
Pro Landscapes MD doesn’t just stop at installation – they also offer maintenance services. Whether it’s a minor touch-up or full joint restoration, their team is ready to handle any polymeric sand maintenance needs that come up over time.
Serving Central Maryland Communities
Pro Landscapes MD focuses on serving central Maryland, covering counties like Howard, Montgomery, Carroll, Frederick, Prince George’s, and Baltimore.
This local expertise allows them to tackle challenges specific to Maryland’s climate. They understand how seasonal changes, rainfall, and freeze-thaw cycles can impact polymeric sand performance. Plus, their familiarity with local soil types and drainage patterns helps them recommend the best base preparation and sand application techniques for long-lasting results.
Being based in the area also means homeowners can rely on quick responses for maintenance and repair needs. Whether it’s storm damage, settling, or everyday wear, Pro Landscapes MD provides timely, professional service tailored to the unique conditions of each property.
Commitment to Quality and Customer Satisfaction
Pro Landscapes MD has built a reputation for their attention to detail and dedication to delivering on promises. Customers frequently praise their work, from initial installations to ongoing maintenance.
"They came through with everything promised. I love the stacked stones we placed around our trees and flowerbed."
Their services cover design, installation, and maintenance, ensuring that polymeric sand applications remain structurally sound. With years of experience in landscaping, hardscaping, and drainage solutions, they bring reliable expertise to every project.
Pro Landscapes MD also takes an eco-conscious approach by incorporating environmental pavers and choosing materials that reduce environmental impact. They balance durability and aesthetics with sustainable practices, helping homeowners create stunning outdoor spaces that are also environmentally responsible.
With a full range of services – from custom patio designs to ongoing maintenance – Pro Landscapes MD becomes a trusted partner for all outdoor needs. This continuity guarantees that polymeric sand applications are always handled by professionals who understand the original installation, ensuring lasting results and peace of mind.
Conclusion: A Durable and Beautiful Patio with Polymeric Sand
Using polymeric sand the right way can turn your patio into a long-lasting and visually appealing outdoor space. The process involves several critical steps: thorough cleaning, careful application and compaction, removing excess sand, and controlled water activation. Each step plays a key role in creating secure joints that keep your pavers in place while maintaining a polished, uniform appearance.
Allowing the sand to cure for 48–72 hours is essential. This curing period ensures the polymer forms strong bonds, protecting your patio from weeds, insects, and washout – especially important given Maryland’s heavy rains. Skipping this step could compromise the durability of your patio, so patience is crucial.
When activating the polymer with water, work in small sections to achieve even saturation. Over-saturating large areas can lead to issues like surface staining or polymer separation, which are difficult to fix once the material begins to set. That initial water application is your one chance to ensure the sand performs as intended for the long haul.
For those seeking precision and peace of mind, professional installation is a smart choice. Pro Landscapes MD brings expertise in landscape design and maintenance, tailoring their approach to Maryland’s unique weather and drainage challenges. Their attention to detail ensures your patio not only looks great but also holds up against years of heavy use and harsh conditions.
Whether you tackle the project yourself or hire professionals, polymeric sand is well worth the investment. It enhances your patio’s structural integrity, reduces upkeep, and boosts its overall appeal, creating an outdoor space you’ll enjoy for years to come.
FAQs
What should I do if it starts raining while polymeric sand is curing?
If rain starts during the curing process of polymeric sand, quick action is crucial to avoid complications. While light rain might not be a major issue, heavy rain can wash away the sand or interfere with its ability to bond properly. The best solution? Cover the area with a waterproof tarp to shield it from excessive moisture. Make sure the tarp is securely fastened to stay in place, even in windy conditions.
After the rain passes, take a close look at the joints to check for any damage or shifting. If you notice any issues, you might need to reapply the polymeric sand in the affected spots and repeat the curing steps. For the best results, always refer to the manufacturer’s instructions for handling rain during the curing period.
How can I tell if I’ve used too much or too little water when activating polymeric sand?
When working with polymeric sand, getting the right amount of moisture is crucial. The joints need to be evenly dampened, but overdoing it can cause problems. Using too much water might wash the sand out of the joints or leave a hazy film on the pavers. On the flip side, too little water means the sand won’t set properly, leaving the joints loose and vulnerable to erosion.
To get it right, lightly mist the surface in several passes. This gradual approach allows the water to soak in evenly, activating the binding agents without flooding the joints or causing puddles.
How can I tell if my patio needs new polymeric sand or maintenance?
If you spot gaps, cracks, or signs of wear in the joints between your patio pavers, it might be time to refresh the polymeric sand. These problems can weaken the stability of the pavers and let water seep through, which could lead to more serious damage over time. Taking care of these issues early helps preserve both the look and durability of your patio.
Chat with Us