


- bhavya gada
- No Comments
A rain garden is a simple yet effective way to manage stormwater runoff, prevent flooding, and improve water quality on your property. By channeling rainwater from surfaces like roofs and driveways into a shallow, planted area, you can reduce erosion, filter pollutants, and create a thriving habitat for wildlife – all while enhancing your yard’s appearance.
Key Steps to Build a Rain Garden:
- Choose the Right Location: Look for areas where water naturally pools after rain, but avoid spots near your home’s foundation or where drainage is poor.
- Determine the Size: Measure the runoff area (e.g., roof or driveway) and ensure the rain garden is large enough to handle about 90% of the water.
- Prepare the Soil: Test drainage, and if needed, amend the soil with a mix of sand, compost, and topsoil for better water absorption.
- Shape the Basin: Dig a shallow depression (4–10 inches deep), create a berm to hold water, and add a spillway for overflow.
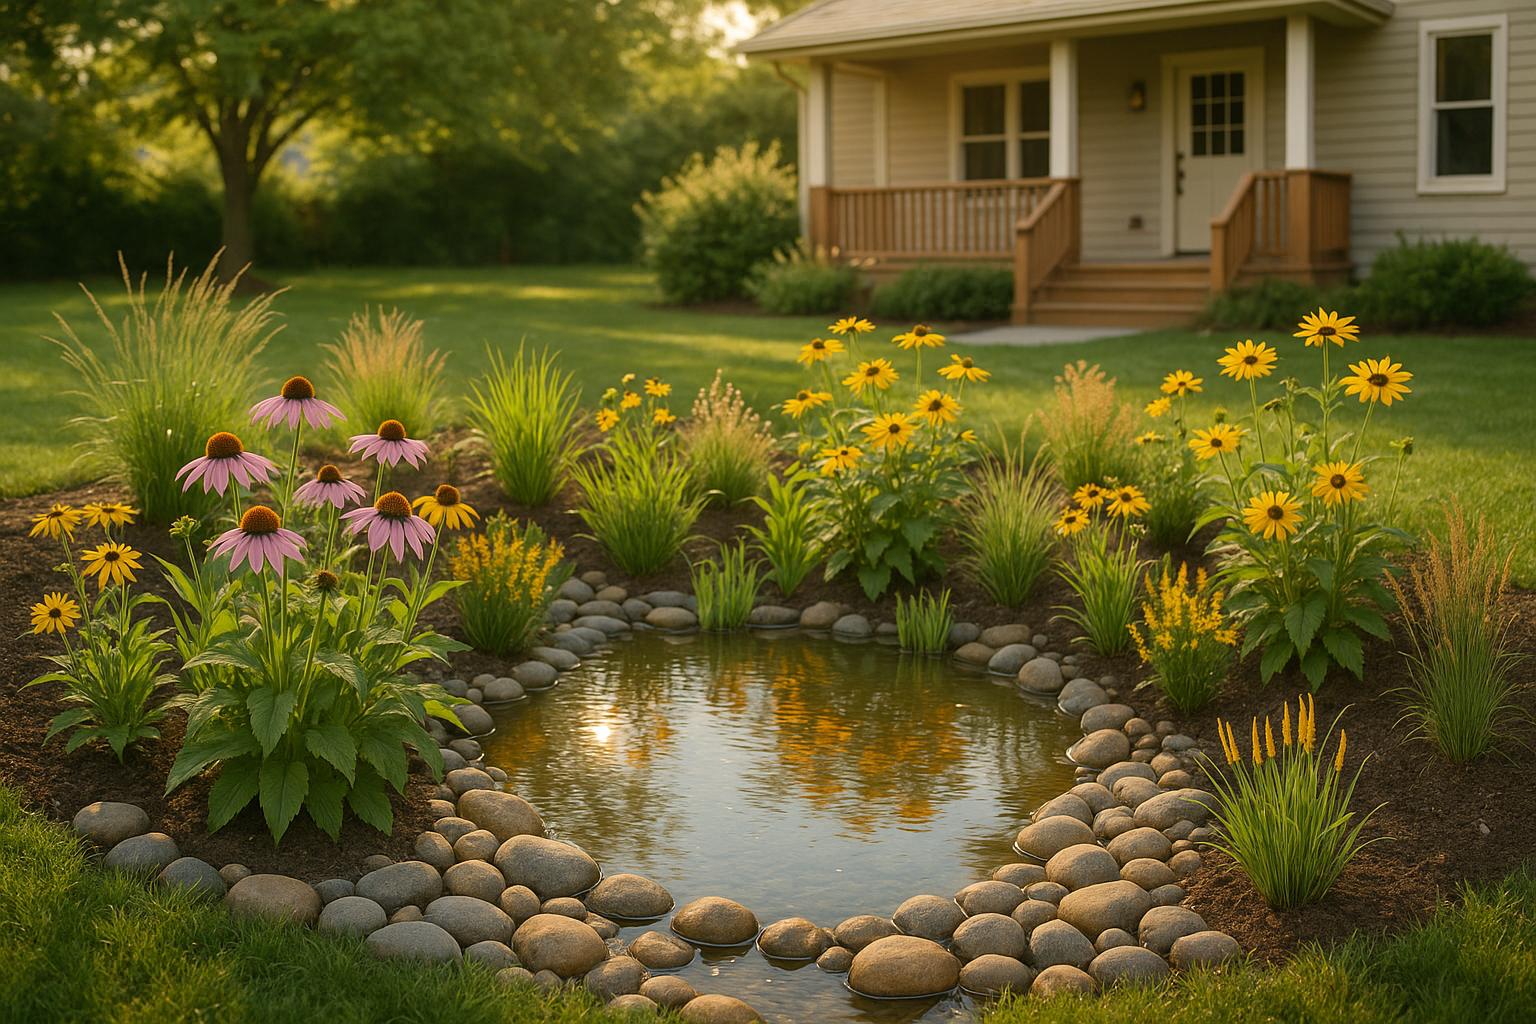
- Select Native Plants: Use Maryland-native species suited to wet and dry cycles, like Purple Coneflower, Joe-Pye Weed, and Eastern Redbud.
- Plant and Mulch: Arrange plants based on water tolerance, add mulch to retain moisture, and water regularly until plants establish roots.
Maintenance Tips:
- Check for erosion and sediment buildup after storms.
- Weed regularly and refresh mulch every 1–2 years.
- Replace struggling plants with better-suited options.
- Amend soil if drainage issues persist.
Rain gardens are a practical way to manage runoff while supporting local ecosystems. With proper planning and care, you can create a functional and attractive feature that benefits both your yard and the environment.
How to Build a Native Plant Rain Garden – A Step-by-Step Tutorial
Planning Your Rain Garden
Careful planning is key to creating a rain garden that works effectively and lasts for years. Start by selecting the right location and determining the appropriate size.
Choosing the Right Location
The location of your rain garden plays a crucial role in how well it performs. Ideally, you want a spot that collects runoff from hard surfaces like roofs, driveways, and sidewalks, while also allowing water to drain naturally without leaving puddles behind[1].
Take a look at your yard during or right after a rainstorm. Look for areas where water naturally flows or pools temporarily before soaking into the ground – these are often perfect spots for a rain garden because they align with your property’s existing drainage patterns.
Keep the garden at least 10 feet away from your home’s foundation to avoid water damage[3]. A gentle slope of 2–10% is ideal; it helps collect runoff without causing erosion[3]. Avoid placing the garden in the lowest point of your yard, as you’ll need space for water to overflow during heavy rains.
Before finalizing the location, test the soil’s drainage. Dig a 6-inch-deep hole and fill it with water. If the water hasn’t absorbed into the ground within 24 hours, the spot may not be suitable, particularly if the soil is heavy with clay[3].
Also, take into account existing features like tree roots, underground utilities, and property boundaries or easements. Don’t forget to call 811 before digging to have utilities marked – this service is free and typically required by law[1].
Once you’ve chosen the best spot, it’s time to figure out the size of your rain garden.
Sizing Your Rain Garden
Proper sizing ensures your rain garden can handle the runoff it’s designed to manage. Aim to capture and infiltrate about 90% of the runoff from the areas feeding into the garden[4]. To do this, you’ll need to calculate how much water flows from those surfaces.
Start by measuring the total square footage of the impervious surfaces that will drain into the garden, such as your roof (using its footprint, not the sloped area), driveway, and patios.
If you’re working with an existing yard, space limitations might influence the size of your rain garden[4]. While new construction gives more flexibility, even a smaller rain garden can still make a big difference.
Design the garden to have a maximum ponded depth of 6 inches, with an overall depth of at least 2.5 feet. This ensures safety and provides enough soil volume for water to soak in effectively[4].
Building Your Rain Garden
Once you’ve mapped out the location and size of your rain garden, it’s time to bring it to life. The process unfolds in three steps: shaping the basin, enhancing the soil, and planting.
Digging and Shaping the Basin
Start by marking the garden’s perimeter. Remove the grass carefully, saving the topsoil, and dig to a depth of 4–10 inches. Make sure the bottom is flat to allow water to absorb evenly[5][6]. This initial excavation lets you confirm the size and placement before fully committing.
For a natural look and to reduce erosion, shape the sides with a gentle slope rather than sharp edges. If your rain garden is on a slope, use the dug-out soil to build a berm – a raised barrier on the lower side of the garden that helps retain water[5]. To make it stable, compact the soil by pressing it down firmly. Aim for a berm base that’s at least 2 feet wide and a top that’s 1 foot wide, with the peak standing 6 inches higher than the garden’s maximum water level[5].
Don’t forget to create a spillway. This small dip in the berm, lined with permeable weed fabric and filled with stones, will safely direct overflow during heavy rains[6].
Improving Soil and Adding Mulch
Most soils need a little help to meet the water absorption demands of a rain garden. If your earlier drainage test showed slow water infiltration, you’ll need to amend the soil with a mix of 50% sand, 25% compost, and 25% topsoil[7].
Dig an additional 6 inches and refill the area with this soil mix[7]. This step ensures your garden can handle drainage effectively. After adding the amended soil, run another infiltration test to confirm the improvement[7].
Organic compost is a must. It not only boosts water infiltration but also supports healthy plant growth. UC Master Gardener Maggie Mah emphasizes:
"You will need plenty of organic compost to amend the soil, which is essential for increasing infiltration and promoting plant growth"[8].
For an extra boost, consider adding mycorrhizae, a live mushroom soil additive (not to be confused with mushroom compost). This helps create beneficial relationships between plant roots and soil organisms[10].
The benefits of proper soil preparation are clear. In Santa Fe, a seven-year study of rain gardens next to a parking lot showed that amended soil retained enough moisture to support plants year-round, despite only 14 inches of annual rainfall[9].
Once the soil is ready, add a layer of mulch to help retain moisture and suppress weeds. Now, your garden is ready for the final step – planting.
Planting and Watering
The layout of your plants should follow the natural water flow within the garden. Divide the space into three zones: water-loving plants in the center, moderately tolerant ones in the middle, and drought-tolerant varieties along the edges[11].
A great example comes from Maplewood, Minnesota. Their rain garden features native sedges and lady ferns in the center, red twig dogwood in the middle, and native shrubs like evergreens or deciduous varieties on the outer edges[11].
Plant densely to reduce weeds and stabilize the soil[12]. Space plants closer than usual – about 25% closer – and group them in clusters of 3–5 for a cohesive canopy effect[12].
Spring and early fall are the best times to plant, giving roots a chance to establish before extreme weather arrives[12]. During the first growing season, water the garden regularly to help plants develop strong roots that can handle both wet and dry conditions.
When choosing plants, think about texture, color, and how they’ll look throughout the year. Repeating certain plants or colors can create a unified, polished appearance[12].
sbb-itb-843f8be
Selecting Native Plants for Maryland’s Climate
Maryland’s diverse landscapes support a range of native plants that are naturally suited to handle the state’s weather extremes, from heavy rains to dry spells. These plants are well-adapted to Maryland’s hot, humid summers and unpredictable rainfall, making them perfect for rain gardens that face both flooding and drought conditions.
Native plants bring more than just resilience to the table. They’re easier to maintain, resist pests, and need very little watering once they’ve settled into your garden[15]. Specifically for rain gardens, these plants enhance water absorption, cut down on runoff, and promote biodiversity[16]. If you’re looking to make your garden more robust and eco-friendly, focusing on native species is a great place to start.
In September 2023, the University of Maryland Extension launched an educational campaign to encourage the use of native plants over invasive species. The campaign spotlighted plants like Blazing Star (Liatris spicata), New York Ironweed (Vernonia noveboracensis), and Butterfly Weed (Asclepias tuberosa) – all excellent for attracting pollinators. This initiative not only raised awareness about the negative impact of invasive plants on local ecosystems but also spurred interest in native plant nurseries.
When choosing plants, consider Maryland’s varied eco-regions, from mountains to coastal plains. Match your selections to your garden’s conditions, including sun exposure, soil moisture, and soil type[15].
Recommended Plant Types
Maryland’s native plants are well-suited for efficient water management, making them ideal for rain gardens. Deep-rooted grasses and sedges thrive in areas where water collects, while flowering perennials add vibrant color and support pollinators throughout the growing season.
To maximize pollinator activity, opt for plants that bloom at different times of the year. Pollinators like bees, butterflies, beetles, and hummingbirds are essential, with about 80% of flowering plants and over three-quarters of staple crops relying on them[14]. Top Maryland natives for pollinators include Purple Coneflower (Echinacea purpurea), Wild Bergamot (Monarda fistulosa), and Joe-Pye Weed (Eutrochium fistulosum)[14].
Shrubs and small trees can add structure and year-round interest to your garden. For example, Eastern Redbud (Cercis canadensis) produces stunning spring blooms before its leaves appear, and New Jersey Tea (Ceanothus americanus) offers late-season flowers when other plants have stopped blooming[14].
If your rain garden is near roads treated with de-icing salts, prioritize salt-tolerant species to ensure long-term success[16]. With careful plant selection, you can create a garden that’s both functional and beautiful.
Using a Multi-Layer Planting Design
A layered planting design not only enhances the visual appeal of your garden but also boosts its ecological benefits. By arranging plants at varying heights, you mimic the structure of natural plant communities and create a more diverse habitat.
Start with groundcover plants to stabilize the soil and fill in gaps. These low-growing species, such as native sedges, are particularly effective in areas where water tends to linger. They also help suppress weeds.
Mid-height perennials form the core of your garden’s design. Plant them in clusters of three to five for a stronger visual impact and to attract more pollinators[14]. Choose plants with overlapping bloom times to ensure a steady supply of color and nectar throughout the growing season[15].
Taller shrubs and small trees add structure and create habitats for birds and beneficial insects. They also provide nesting and overwintering spots. Leave dead plant stalks standing through winter, as many native bees and insects use the hollow stems for shelter[15].
When arranging your plants, consider their water tolerance. Place water-loving species in the center of the garden, moderately tolerant plants in the middle, and drought-tolerant varieties along the edges. Mixing different leaf textures, flower shapes, and plant forms will create a dynamic landscape that supports a variety of wildlife. Including host plants for caterpillars alongside nectar plants for adult butterflies can further increase your garden’s ecological value[15].
To find the best native plants for your area, check out tools like the Rain Garden app (available for iPhone, with an Android version in development)[2]. You can also explore resources from the University of Maryland Extension, Maryland’s Department of Natural Resources, and the Maryland Native Plant Society for more localized recommendations[13].
Maintaining and Troubleshooting Your Rain Garden
Keeping your rain garden in top shape ensures it works efficiently throughout Maryland’s seasons, from heavy spring rains to the dry heat of summer and the freeze-thaw cycles of winter. Regular care not only helps with stormwater management but also keeps your garden looking vibrant. Spotting and addressing problems early is key to keeping it thriving. Here’s how you can maintain and troubleshoot your rain garden effectively.
Regular Maintenance Tasks
- Keep an Eye on Water Flow: During heavy rain or after storms, check for signs of erosion or sediment buildup. If you notice overflow, reinforce inlets with rocks or add extra soil to manage the flow.
- Stay on Top of Weeding: Pull out weeds regularly, roots and all, to prevent regrowth. The best time? Right after a rain when the soil is soft. This helps your chosen plants grow without competition.
- Water When Needed: For the first two years, water deeply but less often during dry periods. This encourages deep root growth, helping plants access water even in droughts.
- Refresh Mulch: A 2- to 3-inch layer of mulch helps retain moisture and suppress weeds. Refresh it every couple of years, but keep it away from plant stems to avoid rot or pests.
- Prune for Plant Health: Remove dead growth and spent blooms to encourage new growth. Trim shrubs in late winter or early spring based on their specific needs.
- Update Your Planting Plan: Track any changes to your plants, like substitutions or new additions, to ensure your rain garden continues to function as intended. This also helps you identify which plants thrive best in your garden’s conditions.
Routine care goes a long way, but sometimes issues crop up that need extra attention.
Solving Common Problems
- Dealing with Poor Drainage: If water lingers for more than 48 hours, it’s time to amend the soil. Mix in sand, topsoil, and compost to improve drainage. Avoid fine sand as it can compact and block water flow.
- Replacing Struggling Plants: Stick to the "right plant, right place" rule. Swap out plants that aren’t thriving for ones better suited to your garden’s sunlight, soil, and moisture levels.
- Fixing Erosion Problems: Erosion can disrupt your garden’s shape and function. Stabilize the area by planting vegetation with strong roots and use rocks or stones to slow water at entry points.
- Managing Sediment Build-Up: Check for excess sediment, especially near inlets, and clear it out as needed. If the buildup is severe, you might need to excavate and replace the affected soil.
- Addressing Plant Health Issues: Regularly inspect your plants for signs of disease or pests. Remove and replace any affected plants to prevent problems from spreading.
If you’re facing persistent drainage problems or utility-related challenges, it might be time to call in the experts. Pro Landscapes MD specializes in solutions like French drains, stormwater management, and drainage repairs to help you maintain both the beauty and functionality of your landscape.
Conclusion: Transform Your Outdoor Space with a Rain Garden
Creating a rain garden is more than just a landscaping project – it’s an investment in both your property and the environment. These gardens help manage stormwater runoff, protect local waterways, and add a touch of natural beauty with native plants that flourish in Maryland’s climate. This guide provides the essential steps to get you started on building a resilient and visually appealing rain garden.
While the outlined steps give you a solid starting point, tailoring them to your specific site is crucial for long-term success. Rain garden techniques continue to improve as we learn from hands-on experiences. What works flawlessly in one area might need adjustments elsewhere, so understanding your site’s unique characteristics is vital.
Before diving in, make sure to conduct essential pre-checks like testing soil percolation and pH, marking utilities by calling 811, and ensuring your garden meets proper depth and slope requirements. If your site has a slope greater than 12%, consulting with a professional landscaper is highly recommended [17]. A little preparation upfront can save you a lot of trouble down the road.
For those looking for expert assistance, services like Pro Landscapes MD specialize in stormwater management and native plant selection. Their experience in landscape design and construction ensures your rain garden functions efficiently from the start. Plus, their expertise in drainage solutions can make a big difference for homeowners across central Maryland.
Whether you’re ready to break ground or need help with planning and design, a rain garden is a meaningful way to embrace sustainable landscaping. With careful preparation, quality materials, and expert guidance when necessary, you’ll create a stunning garden that not only enhances your property but also contributes to a healthier ecosystem for years to come.
FAQs
Why should I use native plants in my rain garden, and how do they make it more effective?
Using native plants in your rain garden comes with plenty of perks. For starters, they naturally attract and support local wildlife – think pollinators, birds, and helpful insects – by offering them food and shelter. Since these plants are already suited to the local climate and soil, they’re tougher, need less care, and thrive with minimal effort.
But that’s not all. Native plants bring real muscle to your rain garden. Their deep root systems work wonders by holding onto water in the soil, cutting down on runoff, and keeping erosion at bay. Plus, they act like natural filters, helping to clean pollutants from stormwater, which leads to cleaner water and healthier ecosystems. By planting native species, you’re not just building a rain garden – you’re making a meaningful impact on the environment.
How do I figure out the right size for a rain garden to handle stormwater runoff on my property?
To determine the right size for your rain garden, you’ll need to figure out how much runoff it needs to handle. A common guideline is to design the garden to manage around 0.75 inches of rain from any impervious surfaces, like roofs or driveways, that drain into it. For a quick estimate, divide the total impervious area by 10 if your garden will have a ponding depth of 3 inches, or by 20 if the depth will be 6 inches. Most residential rain gardens typically range from 100 to 300 square feet in size, with depths between 4 and 8 inches, depending on the site conditions and the amount of water it needs to manage.
Other factors, such as soil type, slope, and drainage capacity, are equally important when deciding the size and placement of your garden. If you’re unsure about these details, reaching out to a professional landscaper can help ensure your rain garden is both functional and seamlessly blends into your yard.
What are the most common maintenance challenges for rain gardens, and how can they be resolved to keep them functioning effectively?
Rain gardens can sometimes encounter problems like weed growth, clogged soil, and unhealthy plants. To keep things running smoothly, make it a habit to pull weeds regularly, use mulch to prevent new ones from sprouting, and keep an eye out for signs of drainage trouble, like erosion or water pooling. Ensuring the soil stays loose and well-balanced is also crucial for good water absorption.
It’s a good idea to check your rain garden during and after rainstorms to catch any issues early. The plants you choose play a big role in its success, so go for native species that thrive in your area and keep an eye on them for signs of stress or disease. With consistent upkeep, your rain garden can stay both functional and visually appealing for years to come.
Chat with Us