


- bhavya gada
- No Comments
Managing stormwater runoff is essential to protecting your property and preventing water damage. Poor drainage can lead to foundation issues, soil erosion, and even pollution of nearby waterways. The good news is you can address these problems by making thoughtful landscape adjustments. Here’s how:
- Assess Your Property: Identify water flow patterns and problem areas during rainstorms. Check for pooling near foundations and test soil drainage.
- Grading: Ensure land slopes away from your home (1 inch per foot for the first 10 feet) to redirect water effectively.
- Native Plants: Use deep-rooted, water-tolerant species like Switchgrass or Swamp Milkweed to stabilize soil and slow runoff.
- Permeable Surfaces: Replace impervious surfaces with permeable pavers or porous asphalt to allow water absorption.
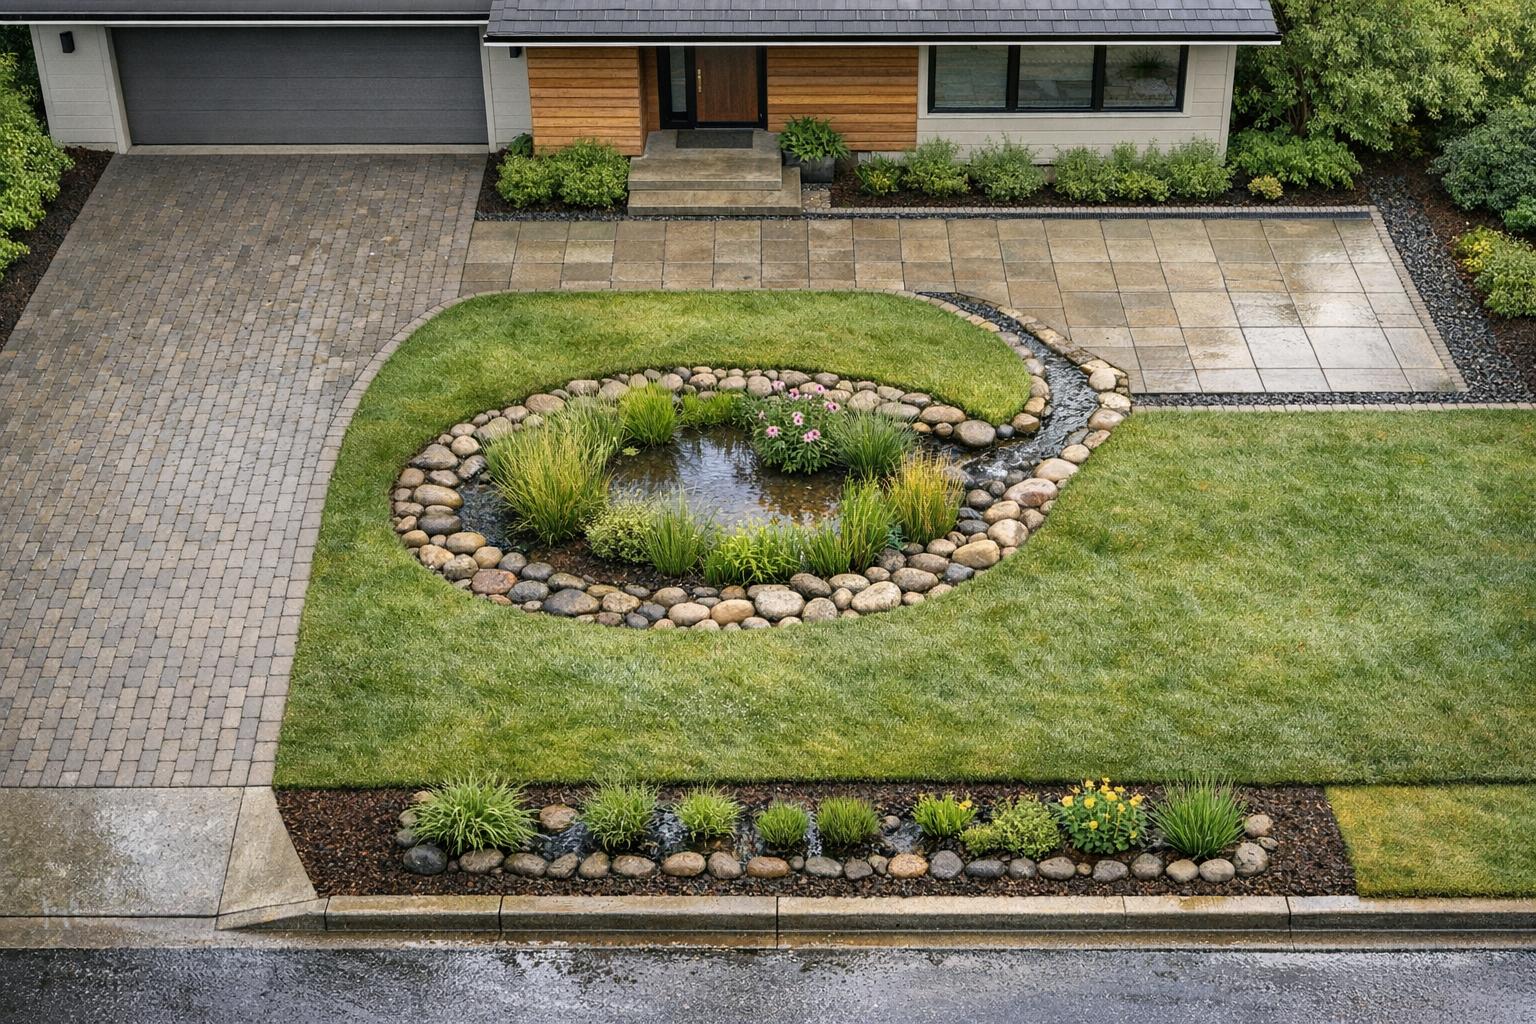
- Drainage Features: Install solutions like French drains, rain gardens, or bio-swales to capture and filter runoff.
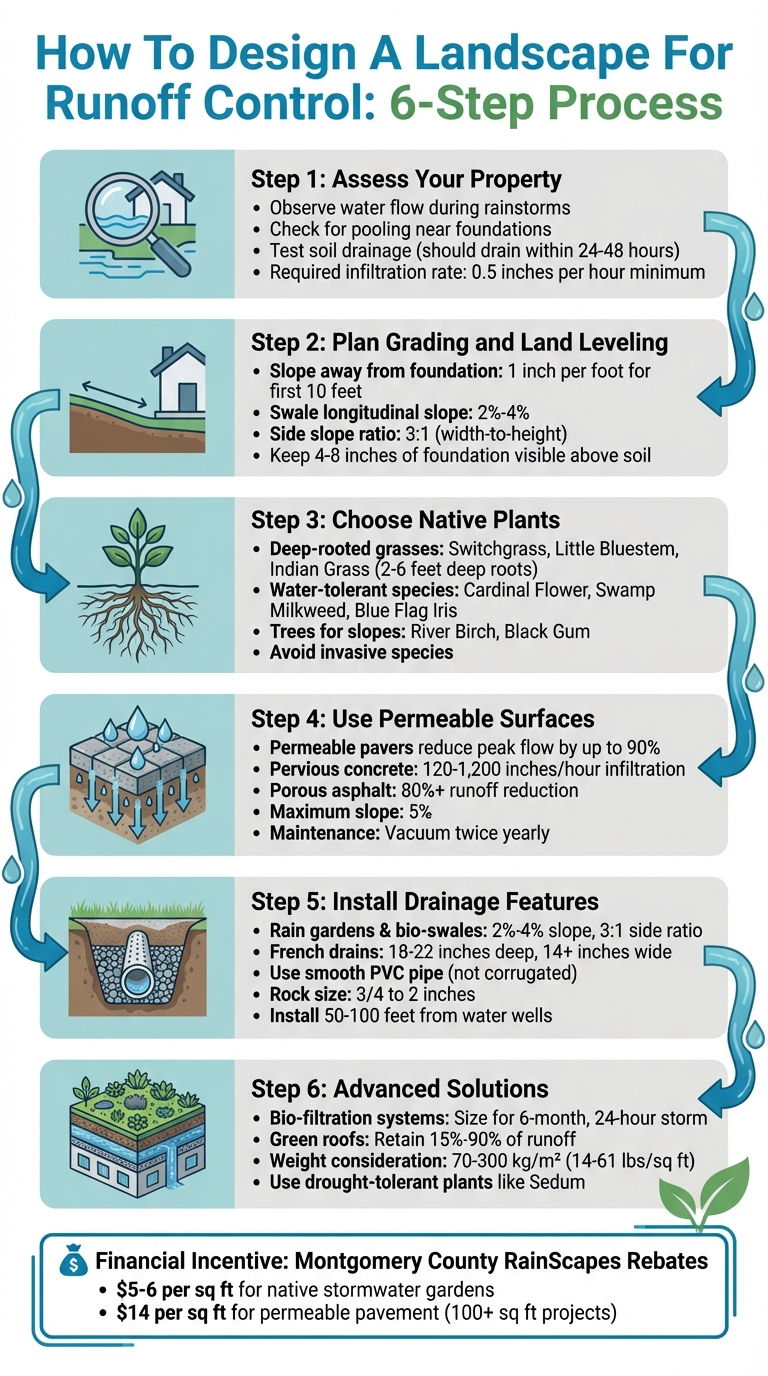
6-Step Landscape Design Process for Stormwater Runoff Control
How to Design Your Yard Drainage System [ AVOID LANDMINES ]
sbb-itb-843f8be
Step 1: Assess Your Property’s Runoff and Soil Conditions
Understanding how water behaves on your property is the first step in addressing drainage issues. This is essential because the right solution depends on the specific conditions of your yard. For example, a flat yard that slopes toward your house will need very different fixes compared to a sloped property with sandy, fast-draining soil.
Identify Runoff Patterns and Problem Areas
The ideal time to observe water flow is during a rainstorm. Watch how water moves across your property. Does it form streams across your lawn, collect in low spots, or rush toward your house’s foundation? Pay close attention to areas where puddles linger long after the rain stops.
Impervious surfaces like concrete driveways, patios, and walkways are also key contributors to runoff. These surfaces block water from soaking into the ground, directing it elsewhere. Check the grading around your home, too. If the ground is flat or slopes toward your foundation, this can lead to serious drainage problems.
Don’t overlook your property boundaries. Water flowing from neighboring lots often pools along property lines or at the bottom of natural slopes. During dry weather, these problem areas might not be obvious. Look for signs like soggy soil near your foundation, damp basements or crawlspaces, or patches of grass that struggle to grow due to constant wetness.
Mapping out these water flow patterns helps you understand where interventions are needed and sets the stage for evaluating your soil’s drainage capabilities.
Evaluate Soil Compaction and Drainage Capacity
Your soil’s ability to absorb water plays a big role in determining what kind of drainage solution you’ll need. Start by observing how long water stays on your lawn after a storm. As Catherine Neal, a Landscape and Nursery Horticulture Specialist, explains:
"Small residential rain gardens… should not hold water for more than 24-48 hours after a storm" [2].
If puddles linger beyond this timeframe, it could mean your soil is compacted or has a clay layer that blocks water from draining properly.
To measure your soil’s drainage capacity, focus on the top 8 inches where most plant roots are found. Effective natural drainage systems, like swales, require soil with an infiltration rate of at least 0.5 inches per hour [1]. Dense, compacted soil – often caused by heavy foot traffic, construction equipment, or urban development – slows absorption and increases runoff speed. For more complex drainage problems, consulting a certified hydrologist can provide expert guidance.
Step 2: Plan Grading and Land Leveling
After assessing your runoff and soil conditions, the next step is to reshape your landscape through grading. This process is key to managing stormwater effectively – it ensures water flows away from your home instead of toward it.
Create Gentle Slopes for Water Redirection
One of the most important rules for grading is to slope the ground away from your foundation. The International Residential Code (IRC) recommends a minimum slope of 1 inch per foot for the first 10 feet extending from your home[5]. This helps protect your foundation and prevents water from seeping into basements. As garden designer Amy Fedele from Pretty Purple Door explains:
"Proper grading can move the water away from your home so that you don’t get flooding and all sorts of other foundation issues." [4]
This principle also applies to drainage features like swales – shallow, vegetated ditches designed to channel water. For swales, aim for a longitudinal slope of 2% to 4% from the entry to the exit[1]. Slopes below 2% can cause water to stagnate, while side slopes should not exceed a 3:1 width-to-height ratio to ensure stability and allow vegetation to grow.
To measure your slope, use tools like stakes, string, and a line level, or a laser level for larger areas. Before digging, always call 811 to mark underground utility lines. Use "cut and fill" techniques to adjust slopes, and compact the soil with a hand tamper for small spaces or a gas-powered plate compactor for larger areas. Properly graded land not only safeguards your foundation but also improves your property’s ability to handle stormwater.
Avoid Steep Gradients
While creating a slope is crucial, overly steep gradients can lead to problems. Fast-moving water can erode topsoil and carve out gullies in your yard[1].
In areas with heavy clay soil, you can use a steeper slope of 2–3 inches per foot near the foundation, but transition to gentler grades beyond the initial 10 feet. For properties with steep terrain that can’t be regraded safely, terracing – creating flat sections at different heights – is a practical solution. Terracing typically costs between $2,100 and $9,300[3].
When grading near your home, keep 4 to 8 inches of the foundation visible above the soil line to prevent rot and water damage[4]. If you’re raising the grade near basement windows, install or extend window wells to keep the soil 2–3 inches below the window opening. Once grading is complete, cover exposed soil with grass seed or erosion blankets to stabilize the area. After the first rainfall, inspect for any settling and make adjustments as needed.
Step 3: Choose Native Plants and Vegetation
Once the grading process is complete, it’s time to focus on landscape projects using native vegetation to help manage runoff effectively. Native plants are naturally suited to Maryland’s climate and soil, making them a low-maintenance option that also prevents erosion. By selecting the right species, you can strengthen the benefits of proper grading, as these plants stabilize the soil and slow down water flow.
Select Deep-Rooted Plants for Erosion Control
Deep-rooted plants are key to keeping the soil in place and preventing erosion. Native grasses like Switchgrass, Little Bluestem, and Indian Grass are excellent choices. Their fibrous root systems can grow anywhere from 2 to 6 feet deep, creating a natural web that holds the soil steady during heavy rainstorms. The National Park Service highlights their effectiveness:
"Native grasses and sedges are particularly effective due to their fibrous roots that grab and hold the soil, keeping it from washing away" [11].
Sedges, such as Pennsylvania Sedge, provide an added benefit with their lateral root systems that stabilize the soil horizontally. This makes them a great option for shady areas where traditional grasses may not thrive. For sloped areas, consider planting trees like River Birch or Black Gum to ensure long-term stability. If there are already established trees on a slope, planting small plugs can protect the existing root systems [6]. Above ground, the foliage and stems of these plants help slow water flow and reduce the impact of raindrops on the soil [10].
Focus on Water-Tolerant Native Species
For areas prone to saturation, water-tolerant plants are essential. Species like Cardinal Flower, Swamp Milkweed, and Blue Flag Iris thrive in wet conditions [7]. Shrubs such as Buttonbush and Winterberry work well along wetland edges, while trees like Bald Cypress can handle standing water.
If you’re looking for quick ground coverage, fast-germinating plants like Black-eyed Susan, Partridge Pea, or Virginia Wildrye are excellent options [9]. For more long-term stabilization, consider Butterfly Milkweed, which has a deep taproot. However, keep in mind that it grows slowly [9].
To make this approach more affordable, programs like Montgomery County’s RainScapes Rebates Program offer financial incentives of $5 to $6 per square foot for installing native "stormwater gardens" [8]. Lastly, avoid invasive species like English Ivy and Periwinkle, as they can outcompete native plants and fail to provide the same ecological benefits [12].
Step 4: Use Permeable Surfaces and Hardscaping
Once you’ve tackled grading and planted native vegetation, it’s time to address hard surfaces that often cause water to run off your property. These surfaces can increase the risk of flooding and carry pollutants into storm drains. By incorporating permeable hardscaping, you can manage runoff more effectively. These materials allow water to soak into the ground, mimicking how nature handles rainfall.
Install Permeable Pavers for Driveways and Walkways
Permeable pavers are a smart choice for areas like driveways and walkways. They allow rainwater to pass through small gaps or the material itself, directing it into an underlying stone reservoir. This reservoir temporarily holds the water, letting it naturally seep into the surrounding soil.
"PICP systems can achieve peak flow reductions of up to 90% and are especially effective in areas with high pedestrian use" [13].
Other materials, like pervious concrete, can infiltrate stormwater at rates between 120 and 1,200 inches per hour. Similarly, porous asphalt, combined with a stone reservoir, can reduce runoff by over 80% [13]. If you’re in Montgomery County, Maryland, check out the RainScapes Rewards Rebate program, which offers $14 per square foot for permeable pavement retrofits on projects of at least 100 square feet [15].
When choosing materials, consider the specific needs of your project. For example:
- Permeable Interlocking Concrete Pavers (PICP): Great for driveways and patios that need to handle vehicle traffic.
- Grid Pavers (like Turfstone): These allow grass to grow through their openings, offering stability and high water permeability.
Keep in mind that the installation site should have a slope of no more than 5% to prevent shifting and ensure proper water management [13].
Maintenance is key to keeping these systems effective. Vacuum the surface twice a year to clear out sand and debris that can clog the pores. Avoid sealing pervious concrete or porous asphalt, as this blocks water infiltration. During winter, skip the sand and salt for ice control – these can clog the system. Instead, use blowers for snow removal rather than plows to protect the surface [13].
Pair these permeable surfaces with additional drainage features for even better results.
Combine Hardscaping with Drainage Solutions
Permeable surfaces are most effective when combined with a well-thought-out drainage plan. The stone reservoir beneath the pavers is a good start, but areas with heavy clay soils may need extra help. Adding an underdrain pipe to the reservoir can carry filtered water to a stormwater system [14].
Between 2014 and 2016, the USGS tested this method at the Madison Streets Division East Office in Wisconsin. They used a lined system with drain tiles to measure how well it managed water quality and quantity. The results showed that these systems significantly reduced sediment-bound pollutants, even under heavy sediment loads [14].
If your property has limited infiltration capacity, you can line the system with an impermeable membrane. This setup captures all runoff and routes it to a designated drainage point. You can also include surface inlets or overflow grates to handle heavy storms that exceed the pavement’s capacity, preventing localized flooding [14].
For best results, ensure there’s at least 3 feet of undisturbed soil between the bottom of the stone reservoir and the bedrock. Installations should also be at least 50 to 100 feet away from water supply wells to maintain safe filtration [13].
Pro Landscapes MD specializes in creating integrated systems that combine permeable paver installations with drainage solutions. Serving central Maryland, they design driveways, walkways, and patios that work seamlessly with French drains and stormwater management systems. Their approach ensures your hardscaping not only looks great but also helps control runoff effectively.
Step 5: Install Drainage Features for Water Management
Once you’ve tackled grading, chosen plants, and added permeable surfaces, it’s time to install drainage features to manage water effectively. These systems are designed to capture, filter, and redirect stormwater, preventing flooding and erosion. The right setup will depend on your property’s size, soil conditions, and the volume of water you need to handle. These features complement the earlier steps, creating a more efficient stormwater management system.
Build Rain Gardens and Bio-Swales
Rain gardens and bio-swales are shallow, vegetated areas that trap runoff, allowing it to seep into the ground while filtering out pollutants.
Swales are ideal if you have enough space for their trapezoidal shape. For best results, ensure the slope runs between 2% and 4%. Slopes under 2% can cause water to pool, while those over 4% risk erosion [1]. To maintain stability and support plant growth, aim for a gentle 3:1 width-to-height side ratio. The soil should allow water to infiltrate at a rate of at least 0.5 inches per hour [1].
When planting along a swale, choose hardy, water-tolerant grasses like red fescue or reed canary grass. These grasses help filter water and remove pollutants [1]. Avoid planting trees or large shrubs nearby, as their roots can disrupt the swale’s function. During construction, make sure the first 8 inches of soil are well-draining and avoid compacting it to preserve its absorption ability [1].
Bio-swales take this idea a step further. They incorporate a perforated pipe buried in rock beneath the vegetation, combining natural filtration with enhanced drainage. Alkaline soils in bio-swales are particularly effective at removing metals from stormwater [1]. However, swales and bio-swales aren’t suitable for areas where flow rates exceed 5 cubic feet per second [1]. For higher flow rates, consider pairing these features with systems like French drains.
Install French Drains and Dry Riverbeds
French drains are underground systems designed to collect and redirect surface water, making them a great choice for areas with limited space or high water volumes. Install them in trenches 18 to 22 inches deep and at least 14 inches wide [1][16]. Use smooth PVC pipe instead of corrugated pipe, as it resists clogging from sediment buildup [1]. Wrap the perforated pipe in an 8-ounce landscape filter fabric and surround it with clean rock (3/4 to 2 inches in size) to prevent soil from clogging the system [1]. These drains are especially effective near foundations or areas prone to water pooling, helping to prevent issues like basement flooding [16].
Dry riverbeds, also called rock channels or rip rap, offer a surface-based solution. They slow down runoff, giving water time to soak into the soil while reducing topsoil erosion [16]. These features are particularly effective when paired with swales to handle overflow [16][17]. Adding vegetation along the edges can further reduce erosion and improve water filtration [16].
Pro Landscapes MD specializes in installing French drains and dry riverbeds throughout central Maryland. Their drainage inspections, priced at around $200, can often be credited toward your project cost [17]. To keep your drainage systems functioning properly, schedule regular maintenance to remove debris and ensure smooth water flow [17].
Step 6: Advanced Solutions for Runoff Control
When standard drainage methods fall short – particularly in areas with severe runoff issues or limited space – advanced systems can offer effective alternatives. These solutions, like engineered bio-filtration systems and green roofs, are designed to handle large volumes of water while maximizing space efficiency.
Consider Bio-Filtration Systems
Engineered bio-filtration systems take traditional bioswales to the next level by incorporating multiple filtration layers and integrated piping. These systems combine vegetation, soil, and gravel with a perforated pipe at the base. The pipe, wrapped in rock and fabric, directs excess water to a drywell or storm sewer [1].
To design an effective bio-filtration system, size it to manage runoff from a 6-month-frequency, 24-hour storm [1]. If heavy metal removal is a concern, opt for alkaline soils in the filtration layers. Ensure the soil has an infiltration rate of at least 0.5 inches per hour and avoid compacting it during construction to maintain its absorption capacity. For added control, consider using berms – compacted earth ridges across slopes – to slow water flow and minimize erosion [1].
If ground-based systems aren’t suitable, other eco-friendly solutions can help tackle runoff challenges.
Explore Green Roofs and Other Eco-Friendly Options
Green roofs offer an innovative way to manage runoff, especially in urban settings. Acting like a sponge, these roofs capture and absorb rainwater, reducing runoff by 15% to 90% through vegetation and evapotranspiration [19]. As the US EPA explains:
"Green roofs have a layer of plant material that absorbs water like a sponge. They capture water when it rains, slowly releasing it through evaporation and plant use" [18].
For example, in Southern Ontario, green roofs can retain around 50% of annual rainfall, even accounting for winter snow and thaw cycles [20].
Before installing a green roof, consult with a licensed professional to ensure your building can handle the additional weight. Extensive green roofs typically add 70 to 300 kg/m² (approximately 14 to 61 pounds per square foot) to a structure [20]. Installation involves several layers, including a waterproof/root-repellent membrane, insulation, a drainage layer, filter fabric, a lightweight growing medium, and vegetation [19][20]. For best results, choose hardy, drought-tolerant plants like Sedum, which require minimal nutrients [19][20]. During the first 1–2 years, provide regular irrigation to establish roots, and inspect the roof twice a year to clear debris and remove any tree seedlings that could damage the waterproof membrane [20].
For expert guidance on implementing these advanced runoff control measures, consider consulting Pro Landscapes MD. Their team specializes in drainage solutions and sustainable landscaping, helping you manage stormwater effectively while enhancing your property’s aesthetic appeal.
Conclusion
Managing runoff effectively begins with tackling the specific drainage challenges of your property. Start by grading your land so it slopes away from your foundation. Use vegetated swales with a 3:1 width-to-height ratio and a longitudinal slope of 2%-4%, and consider installing French drains at least 18 inches deep to enhance drainage capacity [1]. These steps create a solid base for a well-functioning landscape.
Beyond grading and drainage, choosing the right plants plays a key role. Opt for deep-rooted, water-tolerant species like red fescue or reed canary grass to improve filtration and prevent erosion [1]. Combine these with permeable hardscaping options, such as paver driveways or walkways, to slow down runoff and protect your foundation from damage.
For more complex situations, advanced solutions like bio-filtration systems or green roofs can provide additional protection. Without proper measures, runoff can overwhelm your property and contribute to broader environmental issues like watershed pollution.
FAQs
How do I know what runoff fix my yard needs?
Take a close look at your yard to spot any problems like pooling water, soil erosion, or too much runoff during storms. These issues can signal trouble with how your yard handles stormwater. Once you’ve identified the problem areas, think about solutions that fit your landscape. Options like rain gardens, infiltration systems, or bioswales can help manage water effectively.
Choosing plants that are native to your area or well-suited to your yard’s conditions can make a big difference. These plants not only absorb water better but also help filter it naturally. The key is to match your solution to the specific runoff issue you’re dealing with. This way, you can create a plan that works well and lasts over time.
When should I use a French drain vs a rain garden?
A French drain is a practical solution for quickly moving water away from trouble spots like building foundations or low-lying areas. It works by using a perforated pipe surrounded by gravel, which helps channel surface or groundwater away efficiently.
On the other hand, a rain garden serves as a landscaped basin designed to temporarily hold rainwater, giving it time to seep into the soil. This approach not only helps manage runoff but also enhances water quality and creates a haven for local wildlife.
Will permeable pavers work with clay soil?
Permeable pavers can be used with clay soil, but their performance largely hinges on the soil’s ability to absorb water. Since clay soils generally have slower infiltration rates, this can reduce how well the system works. To address this, you can test the soil’s infiltration rate and take steps like amending the soil or incorporating a drainage layer. These adjustments can help manage runoff more effectively and make the paver system function better.
Chat with Us