


- bhavya gada
- No Comments
Preventing basement flooding starts with proper window well drains. These systems channel water away from your foundation, protecting against leaks, foundation damage, and mold. This guide explains the tools, materials, and steps needed for installation, as well as the importance of maintenance to ensure long-term functionality.
Key Takeaways:
- Why Install Drains? They prevent water from pooling near windows, reducing risks of leaks, structural damage, and mold.
- Tools Needed: Shovels, measuring tape, pipe cutters, and more for precise installation.
- Materials Required: Perforated PVC pipes, gravel, landscape fabric, and durable window well liners.
- Installation Steps: Dig, install drainage pipes, secure liners, and test the system.
- Maintenance Tips: Regularly clear debris, replace compacted gravel, and inspect for clogs or damage.
For Maryland homeowners, using weather-resistant materials like galvanized steel liners and polyurethane sealants ensures durability in the region’s fluctuating climate. If DIY seems overwhelming, hiring professionals like Pro Landscapes MD can save time and ensure compliance with local codes.
How To Add Drainage To A Window Well-Preventing Leaks
Tools and Materials Required
Getting everything ready beforehand makes the installation process smoother and saves you from unnecessary trips to the store.
Required Tools
Digging tools: For most digging tasks, a standard spade shovel will do the job. However, a trenching shovel, with its narrow blade, is ideal for creating precise channels for drain pipes. If you’re dealing with compacted soil or roots near foundation areas, a mattock or pickaxe will come in handy.
Measuring and leveling tools: Proper measurements and leveling are key to ensuring your drainage system works as intended. A 25-foot measuring tape is usually sufficient for residential window wells. Use a 4-foot level to maintain the correct slope for water flow, while a string line and stakes help you mark the drainage path accurately.
Cutting and fitting tools: To modify and connect pipes, a PVC pipe cutter is your best bet for clean cuts, though a hacksaw can work as an alternative. Channel lock pliers are useful for gripping and twisting fittings securely, and a utility knife will help you cut landscape fabric and other materials to size.
Additional hand tools: A wheelbarrow or garden cart makes it easier to move gravel and soil. Protect your hands with work gloves, and use a hand tamper to compact gravel layers, ensuring a stable base for the pipes.
Required Materials
Drainage pipes and fittings: For the main drain line, opt for 4-inch perforated PVC pipe, which is well-suited to handle heavy rainfall in areas like Maryland. Solid PVC pipe connects this section to your home’s existing drainage system or a daylight outlet. You’ll also need 90-degree elbows for direction changes and pipe couplers for secure connections.
Gravel and aggregate: These materials support the pipes and facilitate drainage. Use 3/4-inch crushed stone for the bedding layer and pea gravel for backfilling around the window well. For a typical residential project, plan on needing 2-3 cubic yards of material, depending on the window well’s size and depth.
Filtration and protection materials: To prevent clogging, wrap gravel areas with drainage-rated landscape fabric or geotextile cloth, which blocks soil while allowing water to pass through.
Window well components: For a complete installation, you’ll need a galvanized steel or plastic window well liner to replace damaged ones or provide structure for new setups. Use polyurethane sealant to create watertight connections between the drain system and your foundation drains.
Maryland-Specific Material Options
Climate-appropriate materials: Maryland’s weather demands durable materials. Schedule 40 PVC pipe is a great choice, as it can handle the state’s temperature swings from winter lows of 20°F to summer highs above 90°F. It also complies with local building codes for residential drainage.
Steel window well liners: In the Mid-Atlantic region, galvanized steel liners with powder coating are a better choice than plastic alternatives. They resist corrosion caused by Maryland’s humid summers and road salt used during winter, lasting 15-20 years compared to the 8-12 years typical of plastic liners.
Local aggregate options: Save money and support local efforts by using crushed concrete from Maryland quarries, which costs around $25-30 per cubic yard compared to $35-45 for virgin stone. This recycled material works just as well for drainage.
Cold-weather sealants: Maryland’s fluctuating temperatures require sealants that stay flexible in cold weather. Polyurethane-based sealants perform well down to -20°F, preventing cracks during winter. Standard silicone sealants, which become brittle below 32°F, are less reliable for this region.
Step-by-Step Installation Process
Now that you’ve gathered all the necessary tools and materials, it’s time to begin. If your project involves large window wells, consider having someone assist you. Follow these steps to help protect your basement from water damage.
Step 1: Prepare the Installation Area
Before you dig, call 811 to have underground utilities marked. This ensures you won’t accidentally hit gas, electrical, or water lines during excavation.
Measure your basement window to choose the right size for your window well. The well should be 6 inches wider than the window and 8 inches taller. Mark the area for installation, extending 4 to 5 inches beyond the well’s dimensions on all sides.
When digging, create a hole that allows the top of the window well to sit about 3 inches above ground level. Make sure the hole extends 8–12 inches below the bottom of the window sill to leave room for a gravel drainage base. In colder climates, dig deeper to minimize the risk of frost heave during winter.
Wear protective gear while digging, and keep some of the excavated soil nearby for backfilling later.
Step 2: Install the Drainage Base
Dig a trench for the drainage system that’s at least 16 inches deep and 16 inches wide, and make sure it extends at least 10 inches below the top of your foundation footing. Slope the trench slightly to allow water to flow toward the discharge point.
Line the trench with filter fabric, leaving extra material to wrap around the drainage assembly later. Add a 6-inch layer of washed gravel (sized between ½ and ¾ inch, free of silt or sand) to create a stable base for drainage.
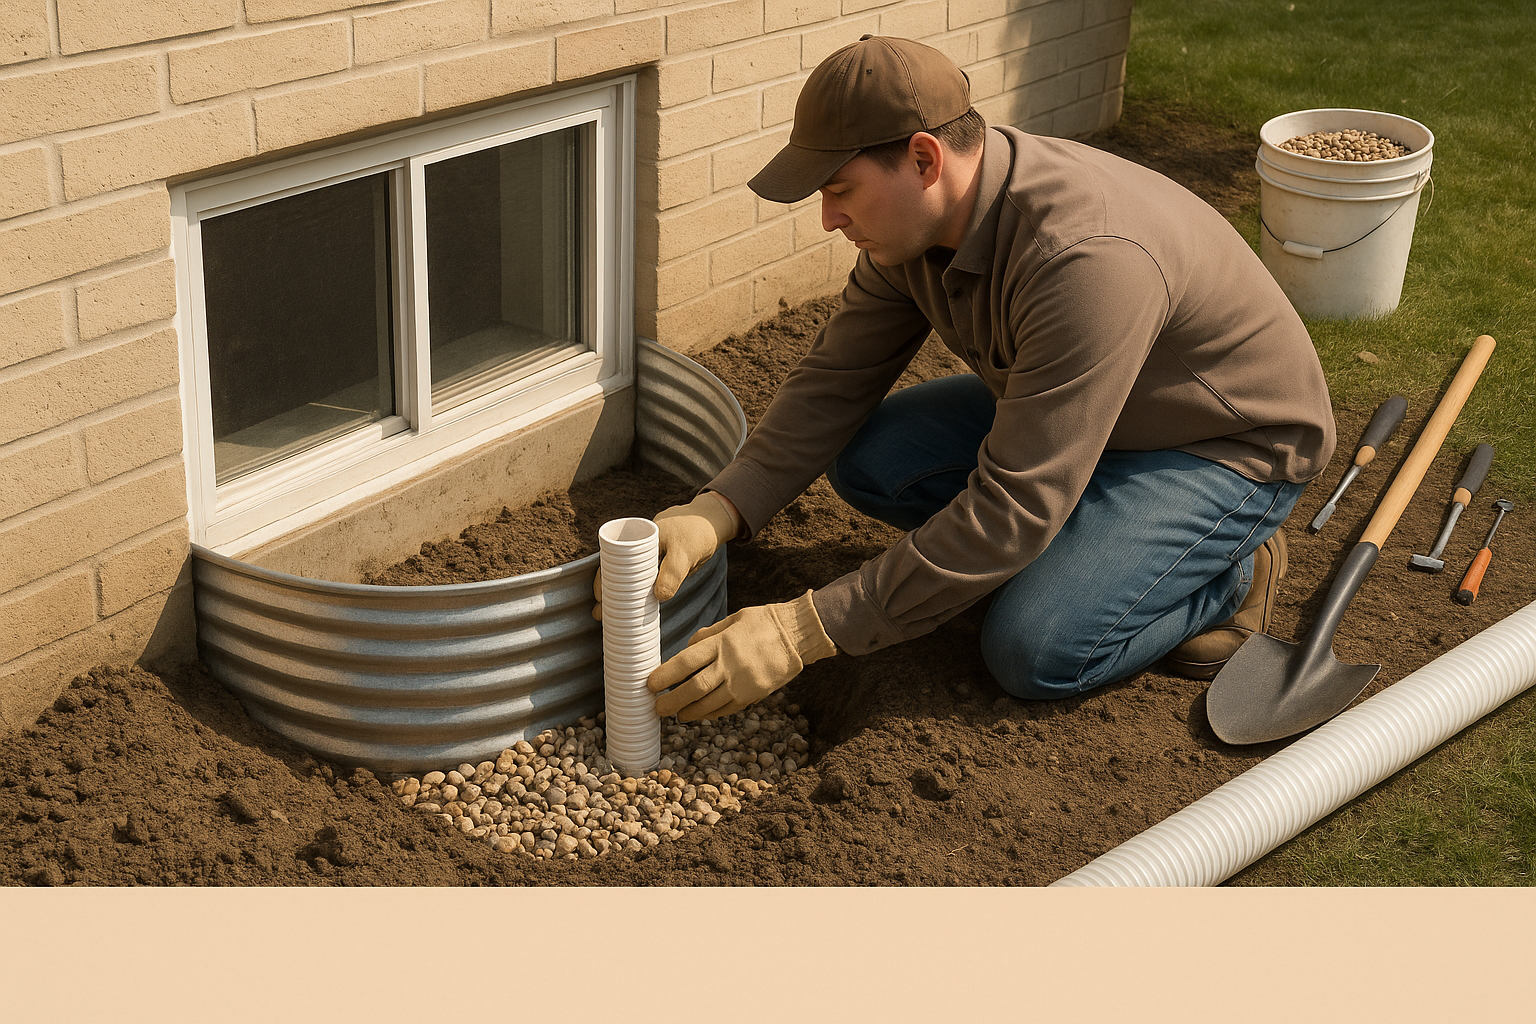
Step 3: Install and Connect the Drain Pipe
Once the drainage base is ready, it’s time to install the drain pipe.
Place a 4-inch perforated PVC pipe in the gravel bed with the perforations facing down. This setup allows water to flow into the pipe while keeping debris out.
Connect the perforated pipe to a non-perforated pipe that leads to your chosen discharge point. Ensure all connections are secure for effective drainage. Common discharge options include routing the pipe to daylight (at least 10 feet from your foundation), connecting it to a drywell or storm sewer (if permitted locally), or directing it to a sump pit with a pump system.
"If the window wells need to be piped, they should be piped to daylight or to a drywell in separate independent piping." – Richard A. Hetzel [2]
Cover the pipe system with another 6-inch layer of washed gravel, and wrap the entire assembly in filter fabric for added protection against debris.
Step 4: Install the Window Well Liner
Place the liner into the hole to ensure it fits snugly against the foundation, is level, and is properly aligned with the window. Adjust the surrounding soil or gravel as needed for a tight fit.
In areas like Maryland, professionals often recommend galvanized steel liners with a powder coating, as they are more durable and resistant to corrosion compared to plastic options.
Secure the liner to your foundation following the manufacturer’s instructions. Use a polyurethane-based sealant at connection points to help it withstand freeze–thaw cycles.
Step 5: Complete Installation and Test
Backfill the hole with the excavated soil, stopping 8–12 inches below the window sill. Be sure to slope the ground away from the foundation to direct surface water away from your home.
Add 8–12 inches of pea gravel at the bottom of the window well to encourage passive drainage. However, leave the drain cap exposed so it remains accessible for maintenance.
Run water from a garden hose into the window well to test the system. Make sure the water drains properly to the designated discharge point.
"The most common cause for a window well that is full of water, is a well that has debris and yard waste accumulated in the bottom of the well." – Window Well Experts [1]
Regular upkeep is essential. After heavy rains, check for debris in the drain area and clear it to keep the system functioning smoothly.
sbb-itb-843f8be
Maintenance and Troubleshooting
Keeping your window well drain in good shape is key to ensuring it works properly over time. Even the best installation can fail without consistent maintenance, so staying on top of upkeep is essential.
Regular Inspections
Plan to check your window well drains every few months, particularly in the fall and spring. Maryland’s heavy spring rains and autumn leaf fall can create prime conditions for drainage problems.
During inspections, clear out any debris, and take a close look at the gravel layer at the bottom of the well. If the gravel looks compacted or filled with sediment, replace it with clean pea gravel. Stick to the recommended depth of 8–12 inches, ensuring it stays loose and free of fine particles. Use the original installation guidelines as a reference for filter fabric and gravel layer specifications.
Don’t forget to inspect the window well liner. Look for cracks, holes, or rust (if you have a metal liner). Even minor damage can let water seep behind the liner and potentially reach your foundation. Also, check for standing water after it rains. If water lingers for more than a few hours, your drainage system may need immediate attention.
Common Problems and Fixes
One of the most common issues is clogged drain pipes. If water backs up even after cleaning the well, try flushing the pipe with a garden hose. For tougher clogs, a plumber’s snake can often do the trick.
Sediment buildup in the gravel is another frequent problem. If this happens, rake through the gravel to loosen it and clear any blocked weep holes. When the gravel becomes too contaminated with soil or debris, replace it with fresh, washed gravel. Be careful not to cover the drain cap with gravel, as this can hinder drainage.
Damage to the well liner should be fixed quickly to avoid foundation problems. Small cracks can usually be sealed with waterproof caulk that matches your liner material. For larger cracks or rusted sections, replacement may be necessary. These types of issues often stem from errors during the original installation, highlighting the importance of getting it right the first time.
Maryland’s heavy clay soils can also complicate drainage. For example, a homeowner in Howard County dealt with repeated flooding because compacted clay slowed water absorption. By replacing old gravel with clean, washed stone and connecting the drain pipe directly to the foundation drainage system, the issue was resolved.
Shifting or settling gravel can create low spots where water pools. Adding more gravel to even out the surface can help maintain consistent drainage.
During the freeze-thaw cycles common in Maryland winters, ice can temporarily block drainage pipes. While this usually resolves as temperatures warm up, persistent ice blockages may require professional help to prevent damage to the system.
If you’ve done all the regular maintenance and still notice water leaking into your basement or persistent drainage problems, it’s time to call in the experts. Complex issues often need specialized tools and knowledge to fix properly. By staying proactive with inspections and repairs, you can keep your drainage system running smoothly year-round.
Professional Installation Services
While basic installations might work for some, tackling complex soil conditions, building codes, or basement drainage on your own can quickly turn into a costly headache. That’s why professional drainage contractors are invaluable – they bring specialized tools and local expertise to get the job done right. This is where Pro Landscapes MD steps in, offering advanced drainage solutions tailored to your needs.
Pro Landscapes MD Drainage Services

Pro Landscapes MD provides a wide range of drainage solutions for central Maryland and nearby communities. Their expertise extends far beyond simple window well installations. They handle everything from drainage system installations and drain pipe placement to French drains, dry riverbeds, stormwater management, grading, yard leveling, and yard repair.
What sets Pro Landscapes MD apart is their deep understanding of the unique challenges in the region. They take a comprehensive approach, carefully evaluating how window well drainage interacts with your foundation, yard grading, and overall water flow. This attention to detail helps prevent issues like basement flooding, keeping your property safe and dry.
Additionally, they manage the entire process – from obtaining permits to scheduling inspections – making the installation process smooth and hassle-free. These expert services provide homeowners with peace of mind and long-term protection.
Professional Installation Benefits
Opting for professional installation pays off in several ways. Skilled contractors ensure that the system complies with local codes, optimizes water flow, and integrates seamlessly with your existing setup. They also use durable materials backed by warranties, giving you confidence in the quality of both the materials and the workmanship. Plus, professional crews work efficiently, completing projects faster than most DIY attempts and minimizing disruption to your property.
Another advantage is the attention to site restoration. Professionals take care to restore your landscape, leaving it in excellent condition once the work is done. They also have the expertise to spot and address hidden issues, such as the need for foundation waterproofing or adjustments to yard grading, before they escalate into larger problems.
If you’re dealing with persistent drainage challenges or if heavy rains reveal flaws in an older system, a professional evaluation is crucial. Complex problems often require advanced diagnostic tools and repair techniques – well beyond the reach of most homeowners. By turning to experts, you ensure the job is done safely, efficiently, and effectively.
Conclusion
Installing window well drains correctly is key to preventing basement flooding. This requires using reliable materials, proven techniques, and ensuring the system connects seamlessly to your foundation’s drainage network. Following these steps ensures your drainage system performs as intended[3][4].
Routine maintenance is just as important. Regularly clearing debris and checking gravel levels can help avoid blockages and prevent damage. Many drainage issues arise from neglect, as accumulated leaves and debris can lead to rust or wood rot around the window[3].
For a more dependable solution, professional installation is worth considering. Experts like Pro Landscapes MD are equipped to handle the challenges posed by central Maryland’s specific soil and climate conditions. They bring knowledge of local building codes and ensure proper integration with existing systems.
FAQs
Why are galvanized steel liners better than plastic for window well drains in Maryland?
Galvanized steel liners stand out for their strength, long lifespan, and ability to resist rust and corrosion – perfect for Maryland’s unpredictable weather. Unlike plastic options, these liners can withstand heavy impacts and wear, offering dependable protection for your basement. Opting for galvanized steel not only shields your home effectively but also cuts down on the hassle and cost of frequent replacements.
How do I keep my window well drains working properly during Maryland’s freeze-thaw cycles?
To keep your window well drainage system working smoothly through Maryland’s freeze-thaw cycles, it’s important to use materials that can withstand freezing temperatures and ensure the system is properly waterproofed to handle shifting soil. Regular maintenance, like clearing debris from the drains, is key to avoiding clogs and preventing ice from forming.
Another critical step is grading the soil around the window well so water naturally flows away from your home’s foundation. This simple measure can significantly reduce the chances of water seeping into your basement. For added peace of mind, you might also want to install check valves to prevent water from backing up during periods of thawing. These precautions can go a long way in protecting your basement from seasonal water issues.
How do I fix a clogged or malfunctioning window well drain?
If your window well drain isn’t functioning as it should, the first step is to clear away any obvious debris like leaves, dirt, or twigs that might be blocking the drain. After that, try flushing the drain with a garden hose to tackle smaller clogs. For tougher blockages, a plumbing snake can be a helpful tool.
To avoid future problems, make regular upkeep a priority. This includes keeping the area free of debris and ensuring the ground around the window well is sloped correctly to direct water away.
If these efforts don’t solve the issue, it’s a good idea to bring in a professional to assess and fix the drainage system. Proper drainage is crucial to prevent water buildup and the risk of basement flooding.
Chat with Us