


- bhavya gada
- No Comments
Cracks in skating rink floors are more than just cosmetic issues – they’re safety hazards that can lead to injuries, disrupt skating performance, and cause costly repairs if ignored. Addressing these cracks promptly helps maintain a smooth surface, ensures safety, and extends the life of the rink.
Key Takeaways:
- Why Cracks Happen: Temperature changes, heavy equipment, and poor water management are common causes.
- Inspection Tips: Use tools like a flashlight, measuring tape, and crack gauge to assess the size and depth of cracks.
- Repair Steps: Clean thoroughly, sand for adhesion, and apply the right material (e.g., epoxy for concrete, wood filler for hardwood).
- Prevention: Regular inspections, proper drainage, and maintaining stable temperature and humidity levels reduce future damage.
A well-maintained floor ensures a safer and better skating experience while minimizing long-term repair costs.
Fixing the Rink Floor at the Fountain Valley Skating Center!!!

Finding and Evaluating Floor Damage
Inspecting the rink thoroughly is key to identifying cracks and preventing expensive repairs. To start, walk the entire floor when it’s empty and well-lit, ensuring you cover every square foot. Focus on high-traffic zones, such as entrances and exits, as well as areas frequently exposed to heavy maintenance equipment. This systematic evaluation helps you pinpoint problem areas and plan for effective repairs and ongoing maintenance. Once you’ve mapped out the damage, identify the types of cracks and use the right tools to assess their severity.
Common Crack Types in Different Floor Materials
Different flooring materials develop distinct crack patterns, and understanding these differences is essential for choosing the right repair strategy.
- Synthetic Acrylic Floors: Hairline cracks often appear as thin, spiderweb-like lines, typically caused by temperature changes or natural settling. Deeper stress fractures, which usually follow straight lines, are often due to heavy equipment or structural shifts beneath the floor.
- Concrete Surfaces: Settlement cracks form when the subgrade shifts unevenly, creating irregular, widening cracks. Thermal cracks, on the other hand, result from repeated expansion and contraction during temperature changes.
- Hardwood Floors: These surfaces show issues like board separation, where planks pull apart at their joints, and split boards, which crack along the grain. Both problems are often linked to moisture changes or impact damage.
Weather extremes significantly contribute to crack formation across all materials. Frequent freezing and thawing cycles, combined with heavy use from skaters, equipment, and maintenance vehicles, place enormous stress on skating surfaces. Poor installation or low-quality materials can make floors even more vulnerable to cracking. Additionally, seismic activity or unstable soil can lead to structural pressure that manifests as surface damage.
Tools and Methods for Damage Assessment
Recognizing crack patterns is just the first step. Accurate measurement and documentation are equally important. Here’s what you’ll need: a 25-foot measuring tape, an LED flashlight, a digital camera, a crack gauge or ruler, and chalk or marking tape.
- Measuring Cracks: Start by measuring the length, width, and depth of each crack. Use the flashlight to illuminate cracks from different angles and take both close-up and wide-angle photos to capture their location on the floor.
- Hairline cracks (less than 1/8 inch wide) are usually surface-level.
- Cracks between 1/8 and 1/4 inch indicate moderate stress.
- Cracks wider than 1/4 inch often require professional assessment.
- Depth Assessment: Use a metal ruler or crack gauge to probe how deep the damage goes. Surface cracks typically affect only the top layer, while through-cracks penetrate the entire thickness of the floor.
- Subfloor Stability: Walk near cracks and watch for movement, bounce, or hollow sounds. These signs often point to structural problems.
- Moisture Issues: Look for water stains, discoloration, or dampness around cracks. These could indicate a compromised moisture barrier, a critical concern in ice rinks where freeze-thaw cycles can exacerbate damage.
- Crack Patterns: Pay attention to how cracks are distributed. Multiple parallel cracks might signal structural settling, while random, web-like patterns often suggest thermal stress. Cracks following straight lines may trace underlying joints or weak points in the subfloor.
Documenting environmental factors, such as temperature and humidity, is also important. Small flaws can worsen over time, so establishing baseline conditions now allows you to track changes later.
Finally, examine the edges of the cracks. Clean, sharp edges typically indicate recent damage, while rounded, worn edges suggest long-term wear from traffic or cleaning. This detail helps prioritize repairs, distinguishing between cracks that need immediate attention and those that can be monitored over time.
Getting the Floor Ready for Repair
The success of your skating rink floor repair heavily depends on how well you prepare the surface. A thorough and thoughtful approach can mean the difference between a repair that lasts for years and one that fails prematurely.
Cleaning and Debris Removal
Start by removing debris from cracks and surrounding areas. Use a shop vacuum equipped with a crevice tool to extract any particles lodged in the cracks. After vacuuming, follow cleaning methods tailored to your floor’s material.
- Synthetic acrylic floors: Avoid water-based cleaners as they can leave residue or cause swelling.
- Concrete surfaces: Scrub away oil stains, old sealers, and embedded dirt using a wire brush or putty knife. Blow out any remaining dust with compressed air.
- Hardwood floors: Vacuum thoroughly between the boards to clear out wood splinters or loose fragments. Wipe the area with a barely damp cloth to pick up fine sawdust, but don’t soak the wood – excess moisture can cause swelling and further damage.
Degreasing is another critical step, especially in areas exposed to maintenance equipment. Use a commercial degreaser formulated for your floor type, following the manufacturer’s instructions for dilution. Rinse the surface completely and allow it to dry thoroughly before moving on to the next step. Once the area is clean and dry, you’re ready to sand the surface for better adhesion.
Sanding and Edge Smoothing
Sanding is essential for creating a surface that repair materials can bond to effectively. Begin with 120-grit sandpaper to roughen the area, then switch to 220-grit for a smoother finish. Focus on a 2-inch border around each crack to ensure a gradual transition zone.
For delicate edges, hand sanding offers better control than power tools. Use circular motions rather than straight strokes to avoid noticeable scratches that might show through the repair.
If you’re working with concrete, use a diamond grinding disc on an angle grinder to create a V-shaped groove along the crack. This process, often called "routing", removes weak edges and increases the bonding surface area. Aim for a groove roughly twice as wide as the crack and about 1/4 inch deep.
To blend the repaired area seamlessly with the rest of the floor, taper the edges by reducing sanding pressure as you move outward from the crack. Vacuum between sanding steps to remove coarse particles, and finish with a tack cloth to eliminate any lingering dust.
Best Conditions for Floor Repairs
Creating the right environment is just as important as preparing the surface. Epoxy, a common repair material, performs best in temperatures between 68°F and 77°F (20–25°C), though it can still work within a range of 50°F to 86°F (10–30°C). Cold temperatures can make epoxy thicker and harder to work with, while high humidity can cause condensation, leading to surface defects like reduced gloss or blushing.
To avoid these issues, preheat the repair area with electric heaters (steer clear of propane heaters to prevent discoloration) and store epoxy at room temperature. Allow the epoxy to acclimate to the workspace for at least two hours before use. In less-than-ideal conditions, you might consider adding accelerators or solvents to improve epoxy flow, but keep in mind this could extend curing times[2].
Timing your repairs carefully can also make a big difference. Plan to work during off-seasons or extended maintenance windows when you can better control temperature and humidity. Once the environment is ready, you can move on to choosing and applying the appropriate repair materials.
sbb-itb-843f8be
Choosing and Using Repair Materials
Getting the right repair material is a key step in restoring a skating rink floor. Once the surface is prepped and cleaned, the next challenge is selecting a material that matches the floor’s composition and usage needs. Proper application techniques are equally important to ensure a smooth, durable repair.
Picking the Right Repair Products
Different floors call for different repair materials. Here’s a breakdown of what works best:
- Flexible polyurethane sealants are ideal for synthetic acrylic floors, especially in areas with temperature fluctuations. Their elasticity prevents cracking, which is especially useful for addressing small hairline cracks in colder climates.
- Two-part epoxy systems are the go-to for concrete skating rink floors. These create a strong chemical bond that can handle heavy traffic, making them a long-lasting option for high-use areas.
- Wood fillers are designed for hardwood floors and should be chosen based on the wood type. For example, solvent-based fillers work well with maple, helping to avoid issues like discoloration or raised grain.
- Acrylic-based compounds are a versatile choice for mixed-material floors or situations where flexibility is more important than maximum strength. They also cure faster than epoxy, which can be a big advantage when minimizing downtime.
Here’s a quick comparison of these materials:
| Material Type | Best For | Key Advantages |
|---|---|---|
| Polyurethane Sealant | Synthetic acrylic floors | Flexible and handles temperature changes well |
| Two-part Epoxy | Concrete floors | Strong, durable, and chemically bonded |
| Wood Filler | Hardwood floors | Tailored for wood finishing needs |
| Acrylic Compound | Mixed-material floors | Fast curing and flexible |
How to Apply Repair Materials
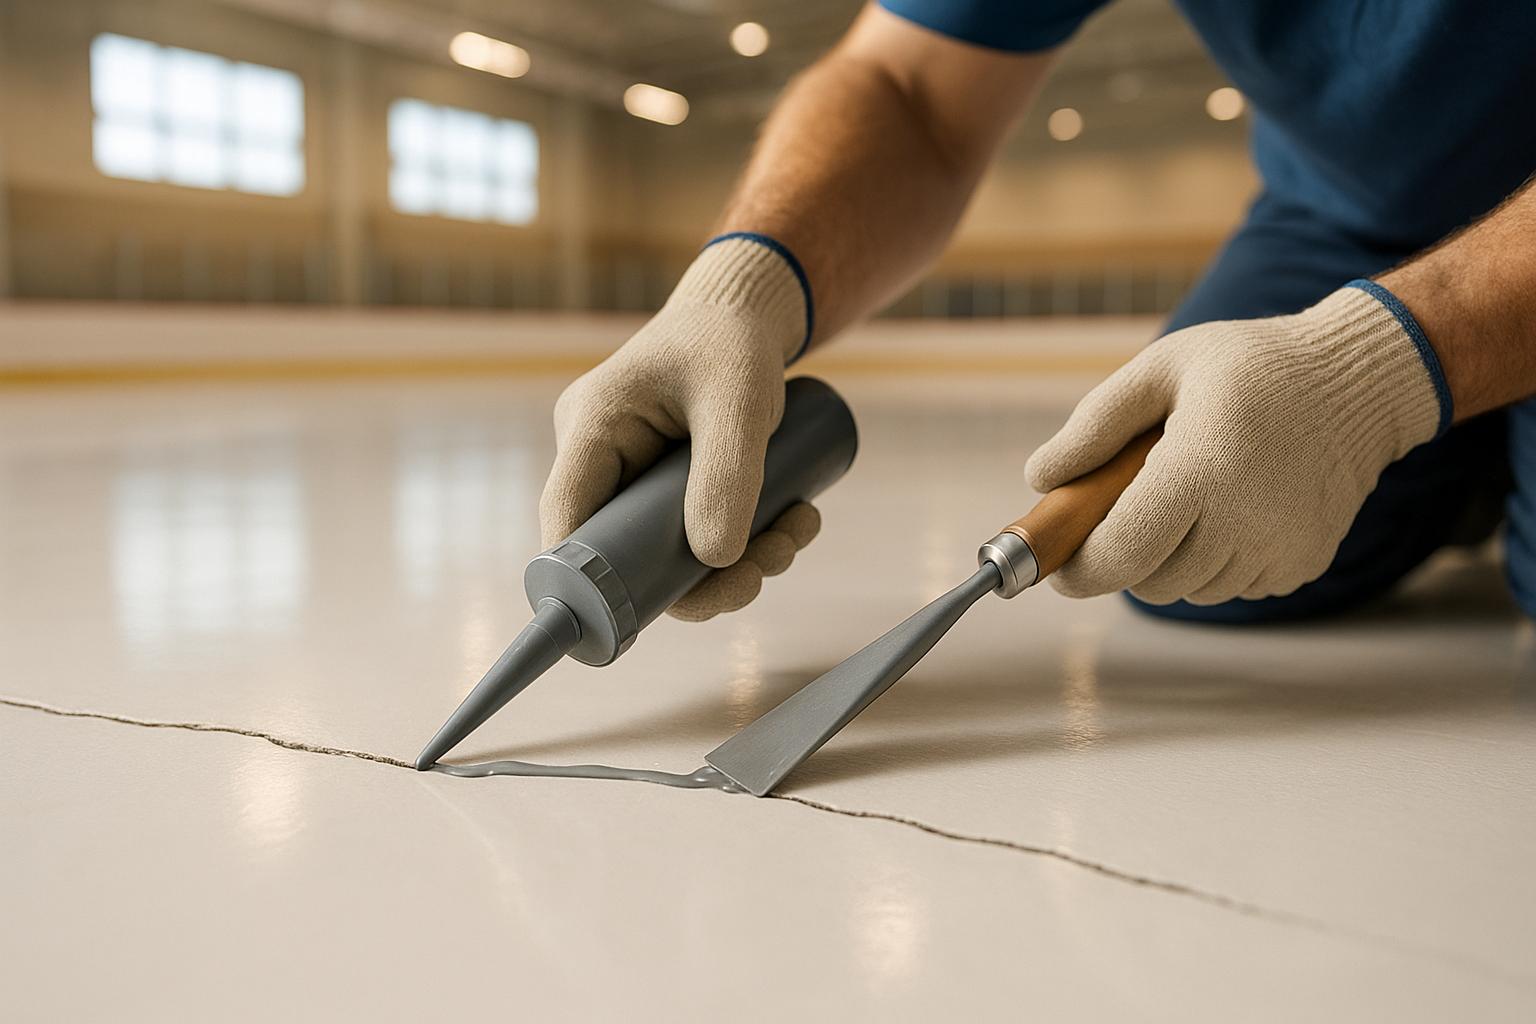
Applying repair materials correctly is just as important as picking the right one. For epoxy, use a putty knife to press the material into cracks, working in small sections for better control. Always slightly overfill cracks to account for shrinkage during curing. For deeper damage, apply the material in layers, letting each one cure before adding the next.
The tools you use also matter. Flexible sealants are best applied with a caulk gun, while epoxy works well with a stainless steel putty knife. Keep a solvent like acetone or the cleaner recommended by the manufacturer on hand for easy cleanup of tools and any accidental spills.
If you’re working with fast-curing materials, preparation is key. Have all your tools ready and mix only what you can use quickly. For larger repairs, slower-curing materials might be a better choice, giving you more time to work.
Making Repairs Match the Original Floor
Blending the repair with the existing floor is crucial for a seamless look. Use a straight-edge tool to scrape off excess material and level the surface. For smooth concrete, sanding the repaired area can help it blend in. Textured surfaces might require techniques like stippling while the material is still workable to mimic the original pattern. On hardwood floors, aligning the repair with the natural grain using a fine-bristled brush can make a big difference.
For color matching, tinting pastes can help epoxy repairs blend with the original floor. Start with a slightly lighter shade, as many materials darken as they cure.
Once the repair is cured, prepare the area for protective coatings. Sand the surface with fine-grit sandpaper to ensure uniformity and clean off any dust before applying a topcoat. For high-traffic areas that need to be back in use quickly, consider fast-curing epoxy formulations, even if they’re more expensive. This way, you can restore functionality while keeping downtime to a minimum. After blending textures and colors, move on to the curing and finishing process in the next steps.
Curing, Finishing, and Future Maintenance
The longevity of your repair depends heavily on proper curing and ongoing care. This final step ensures your efforts hold up over time.
Proper Curing Methods
Creating the right environment during curing is critical. Most repair materials perform best in dry, moderate conditions, so controlling the environment is key.
Because curing requirements vary by material, always follow the manufacturer’s instructions for timing and conditions. In enclosed spaces, good ventilation helps by reducing moisture and contaminants. Be sure to keep foot traffic off the repaired area until it has fully set – walking on it too soon can compromise the repair’s strength.
After curing is complete, the next step is to finish the surface with a protective coating.
Adding Protective Coatings
A protective coating does more than improve the look of the floor – it also shields it from wear and tear. Acrylic coatings, for instance, can enhance durability, while UV-resistant coatings are ideal for outdoor rinks, protecting against sunlight damage.
Before applying any coating, clean the repaired area thoroughly to remove any dust or residue leftover from the curing process. Apply the coating in thin, even layers, following the product’s instructions, and allow enough drying time between coats for proper adhesion and a smooth finish.
Stopping Future Cracks
To make your repair last, establish a regular maintenance routine. Frequent inspections can catch small problems before they grow into larger issues. Pay special attention to joints between materials and high-traffic areas, and always inspect the floor after extreme weather events that could cause stress.
Keeping the floor clean is another simple but effective way to extend its life. Quickly remove debris, leaves, and standing water to prevent moisture buildup, which can weaken the surface or reduce traction. Use cleaning products that are safe for your floor type – harsh chemicals can damage protective coatings.
"Routine cleaning, seasonal maintenance checks, timely crack repairs, and recoating (every few years) are necessary to ensure the safety, aesthetics, and playability of outdoor skating rinks." – Pacecourt [1]
Environmental controls also play a role in preventing future damage. For indoor rinks, maintaining steady temperature and humidity levels is important. Outdoor rinks, on the other hand, benefit from effective drainage systems that direct water away from the surface.
Finally, plan to recoat synthetic surfaces periodically based on the manufacturer’s guidelines. Factors like usage intensity and exposure to the elements will influence how often recoating is needed. Keeping detailed records of repairs, coatings, and inspections will help you stay on top of maintenance and know when additional work is necessary.
Key Points for Effective Floor Repairs
When tackling floor repairs, there are a few critical steps to ensure the results stand the test of time. Start with a detailed assessment of the damage. This means identifying what caused the problem in the first place – whether it’s structural weaknesses, heavy foot or vehicle traffic, moisture problems, settling, poor compaction, exposure to chemicals, temperature changes, or even subpar initial installation. If these underlying issues aren’t addressed, there’s a good chance the cracks or other damage will return[3][4][5][6].
Another essential step is thoroughly cleaning the area. Removing contaminants like dirt, grease, or debris is crucial for the repair materials to properly adhere to the surface. Skipping this step can compromise the repair’s effectiveness and longevity.
FAQs
What are the warning signs that a skating rink floor crack needs professional repair?
Cracks in skating rink floors that are large, deep, or spreading need immediate attention from professionals. These issues can compromise the surface, making it unsafe and unstable for skaters. If water starts seeping into these cracks – especially during freeze-thaw cycles – it can escalate the damage, potentially leading to expensive repairs down the line.
Cracks that result in bumps or uneven surfaces are another red flag. These imperfections increase the risk of skaters losing balance or control, which means they should be fixed right away to maintain safety and prevent the floor from deteriorating further.
How can I control temperature and humidity to prevent cracks in an indoor skating rink?
Maintaining a stable environment is key to preventing cracks in an indoor skating rink. Start with the ice surface temperature – it should stay between 17°F and 29°F. Meanwhile, the air temperature around the rink should be kept at a comfortable 55°F to 65°F. Humidity is another critical factor; aim for levels between 40% and 55% to avoid excess moisture, which can compromise the ice’s strength and lead to cracks.
Using proper dehumidification systems and temperature controls can help create a stable environment. This not only reduces frost buildup but also keeps the ice smooth and durable. Regularly monitoring these conditions ensures your rink stays in top shape for skaters.
How can I make floor repairs blend seamlessly with the rest of the skating rink surface?
To repair a skating rink floor effectively, begin by selecting a patching material that matches the color, texture, and finish of the current surface as closely as possible. Apply the material in thin, even layers, making sure to blend the edges seamlessly into the surrounding area to minimize visible seams. After the material has set, sand or texture the repaired section so it matches the original surface. Following these steps ensures the repair looks smooth and professional.
Chat with Us