


- bhavya gada
- No Comments
Rain gardens are a smart way to manage stormwater, reduce runoff, and improve your yard’s functionality. They capture rainwater from roofs and driveways, allowing it to soak into the ground instead of overwhelming storm drains. Plus, they help filter pollutants before water reaches streams or rivers.
Here’s a quick breakdown of the 5 steps to install a rain garden:
- Choose the Location & Test Soil
- Find where water naturally collects on your property.
- Perform a percolation test to ensure the soil drains within 24–48 hours.
- Call 811 to mark underground utilities before digging.
- Plan the Size & Layout
- Measure the hard surfaces (e.g., roof, driveway) contributing runoff.
- Design the garden to handle 10–20% of the drainage area.
- Use stakes or strings to outline the garden and ensure proper slope.
- Excavate & Prepare Soil
- Dig 6–8 inches deep and create sloped sides.
- Improve soil by mixing sand and compost for better drainage and plant growth.
- Level the garden bed for even water distribution.
- Plant & Mulch
- Use native plants suited for wet, moderate, and dry zones.
- Space plants properly and apply 2–3 inches of mulch to retain moisture and prevent erosion.
- Add Overflow Routes & Maintain
- Build berms and spillways to handle excess water during heavy rains.
- Regularly check for weeds, debris, and drainage issues. Refresh mulch annually.
Quick Tip: A rain garden can absorb 30% more water than a typical lawn and supports pollinators like bees and butterflies.
Follow these steps for a functional and visually appealing rain garden that manages stormwater effectively.
How To Create a Rain Garden | Ask This Old House

Step 1: Choose Your Location and Test the Site
Where you decide to place your rain garden can make or break its effectiveness. A good location not only ensures proper water management but also helps prevent issues like erosion or foundation damage. Taking the time to assess your property will save you from headaches down the road.
Find Natural Water Collection Areas
Start by watching how water behaves on your property during rainfall. Look for spots where runoff naturally gathers – these could include areas near downspouts, the base of gentle slopes, or the edges of paved surfaces. A heavy rainstorm is the perfect opportunity to observe these flow patterns. You might notice water streaming off your roof, pooling near driveways or patios, or carving small channels as it moves downhill. These observations will help you identify the best spot for your rain garden to catch and manage runoff.
Choose a location that gets steady water flow but doesn’t stay waterlogged for long periods. Persistent pooling usually signals poor drainage, which isn’t ideal. Additionally, keep your rain garden at least 10 feet away from your home’s foundation to avoid water seeping into basements or crawl spaces. Avoid areas with septic fields or large tree roots, as these can interfere with digging and compete with your garden for water and nutrients [4][5].
Test Your Soil Drainage Rate
Once you’ve found a potential site, it’s time to test the soil’s drainage capacity. This step, called a percolation test, ensures the ground can handle the water your rain garden will collect. Dig a hole about 6 to 12 inches deep – matching the depth of your planned rain garden – and fill it with water. Then, time how long it takes for the water to drain. To get accurate results, repeat this process three times, using the third test after the soil is fully saturated.
For rain gardens, the goal is soil that drains within 24 hours, though up to 48 hours is acceptable [3][4]. If drainage takes longer than 48 hours, you’ll need to amend the soil significantly. On the other hand, if the water drains too quickly (in under 4 hours), consider adding organic matter to slow it down. Ideally, your soil should have an infiltration rate of at least 0.5 inches per hour [3][4].
Mark Underground Utilities
Before you dig, make sure you know what’s beneath the surface. In the U.S., you can call 811 at least 48 to 72 hours before digging to have utility lines marked on your property [4][6]. This free service sends professionals to mark the locations of gas lines, water pipes, electrical cables, and communication lines, helping you avoid dangerous and costly mistakes.
Utility lines are typically marked with color-coded spray paint or small flags – red for electricity, yellow for gas, blue for water, and orange for communication lines. Keep these markers visible throughout your project and dig carefully by hand if you’re working near marked areas.
If you’re feeling overwhelmed, companies like Pro Landscapes MD can handle the entire process for you. From assessing the site to coordinating with utility services, their team ensures your rain garden is installed safely and in compliance with local regulations.
Once you’ve confirmed your site’s drainage and located any underground utilities, you’re ready to plan your rain garden layout.
Step 2: Plan Your Garden Size and Layout
Getting the size and layout right plays a big role in how well your rain garden works. A properly sized garden will manage runoff without spilling over, and a smart layout ensures water flows smoothly into the garden for better absorption.
Using the site and drainage tests you completed in Step 1, you can now figure out the best size and shape for your rain garden.
Measure Your Roof and Paved Areas
Start by figuring out how much water your rain garden will need to handle. Measure the length and width of every hard surface that will drain into it – this includes your roof, driveway, patio, walkways, and any other paved areas. Use these measurements to calculate the area of each surface, then add them together to find the total drainage area [10][11].
For irregularly shaped surfaces, break them down into simpler geometric shapes to make calculations easier. Don’t forget to include less obvious contributors, like shed roofs or decks, which might also add runoff.
Once you know the total drainage area, multiply it by 10–20% to estimate your rain garden’s size. For example, if your roof and driveway cover 1,000 square feet in total, your rain garden should be between 100 and 200 square feet [7][11]. A typical suburban home with a 1,200-square-foot roof and a 400-square-foot driveway (1,600 square feet combined) would need a garden of about 160–320 square feet. Keep in mind that local factors, like heavy clay soils or frequent downpours, might require a larger garden, while sandy soils that drain quickly might allow for a smaller one. When in doubt, it’s better to go slightly bigger than risk overflow during storms.
Map Water Flow Paths
Watch how water moves across your property during rainfall to see where it naturally flows. Use stakes or string to mark these drainage paths, which will help guide your garden’s layout [1][3][9]. Pay special attention to downspouts, as they usually carry the most runoff from your roof. You can direct water into your garden using options like underground pipes, splash blocks, or shallow swales (gentle surface channels). Keep the slope gentle to move water effectively without causing erosion.
Before settling on a final layout, use measuring tape, stakes, and string to outline the garden’s perimeter. This step helps you visualize the size and shape while ensuring it’s in the right spot. A carpenter’s level can confirm that the garden bed will be level after digging, which is key for proper water absorption. Also, position the garden at least 10 feet away from your home’s foundation and steer clear of areas with underground utilities.
Work with Sloped Ground
If your property is sloped, you’ll need to take extra steps to slow down water so it doesn’t rush through the garden too quickly. One effective method is building berms – raised soil barriers placed on the downhill side of the garden. These berms hold water in place long enough for it to soak into the soil [1]. A good berm should be at least 2 feet wide at the base and 1 foot wide at the top, with its peak about 6 inches above the expected water level. Compact the soil as you go to prevent settling or gaps that could let water escape.
For steeper slopes or larger gardens, small retaining walls can provide additional support. Pro Landscapes MD, for instance, offers expertise in designing and installing drainage solutions for tricky sloped sites.
Place your rain garden at natural low points where water already tends to collect, using the contours of your property to guide runoff from higher areas. To handle overflow, plan for a spillway or a rock-lined channel that sits just below the berm [1][3].
Step 3: Dig and Prepare the Soil
Getting the soil ready is a critical step in setting up a rain garden. By focusing on proper digging and improving the soil, you’ll create the ideal conditions for water absorption and plant growth. With your garden’s outline from Step 2 in place, it’s time to dig in – literally. This stage requires attention to depth, soil condition, and leveling to ensure water flows and drains as it should.
Dig to the Right Depth
Start by clearing the marked area of grass and other vegetation. For larger spaces, a sod cutter can make the job easier, while smaller areas can be tackled with basic hand tools.
Aim for a depth of 6 to 8 inches for your garden bed. This range is perfect for holding runoff water temporarily while allowing it to soak into the ground effectively [1]. For most residential gardens, a depth of around 7 inches strikes the perfect balance between water collection and manageable digging.
Gather your tools: a shovel, stakes, string, level, measuring tape, and a wheelbarrow. If you’re working on a large garden, renting equipment like a rototiller or small backhoe can save time. Keep a tarp handy to collect the soil you dig up – it’ll be useful for building a berm later.
As you dig, shape the sides of the garden with a gentle slope instead of steep walls. This helps prevent the soil from collapsing and encourages water to flow naturally into the garden. Be mindful not to compact the soil at the bottom by stepping on it, as compacted soil can hinder water absorption.
Don’t toss the soil you remove! Use it to construct a berm on the downhill side of the garden, following the dimensions you established earlier. Compact the berm as you build it to reduce the chances of settling or gaps.
Mix in Soil Amendments
Once the digging is done, it’s time to evaluate your soil. Not all native soils are ideal for rain gardens, so you may need to improve the texture and drainage. The goal is to strike a balance: soil that drains well but still holds enough moisture for your plants.
If your soil is heavy with clay and drains poorly, mix in 60% screened sand and 40% compost. For sandy or loamy soils, a blend of 65% native soil and 35% compost usually works best, as it enhances moisture retention and boosts nutrients. Compost is especially valuable – it improves drainage while feeding your plants.
Spread the amendments evenly across the dug-out area. Use a shovel or rototiller to mix them thoroughly with the native soil. It’s best to do this right after digging to prevent compaction and to ensure everything blends well. Work with slightly moist soil and avoid walking on the area to maintain its structure. Properly mixed soil should allow water to infiltrate at a rate of 1–2 inches per hour [3].
With the soil improved, you’re ready to move on to leveling the garden bed.
Level the Garden Bed
Leveling the garden bed is essential for even water distribution. A flat surface ensures water spreads uniformly across the garden, reducing pooling and preventing certain areas from drying out too quickly. To check for evenness, stretch a string between stakes and use a level to confirm the string is horizontal. Test multiple areas and adjust the soil as needed to create a smooth, even surface.
Pay special attention to low spots that could collect too much water and high spots that might dry out quickly. If your garden is on a slope, dig so the uphill side is shallower and the downhill side is deeper. This technique creates a flat bottom, even on uneven ground, and helps manage water flow while reducing erosion [1].
Once the bed looks level, test it by pouring water over the surface to see if it spreads evenly without pooling. Finally, check the soil’s infiltration rate by digging a small hole, filling it with water, and observing how quickly it drains. If the drainage rate is slower than 1–2 inches per hour, you may need to add more sand. On the flip side, if water drains too fast, mixing in additional compost can help retain moisture.
With a leveled and prepared garden bed, you’re ready to move on to the next step!
sbb-itb-843f8be
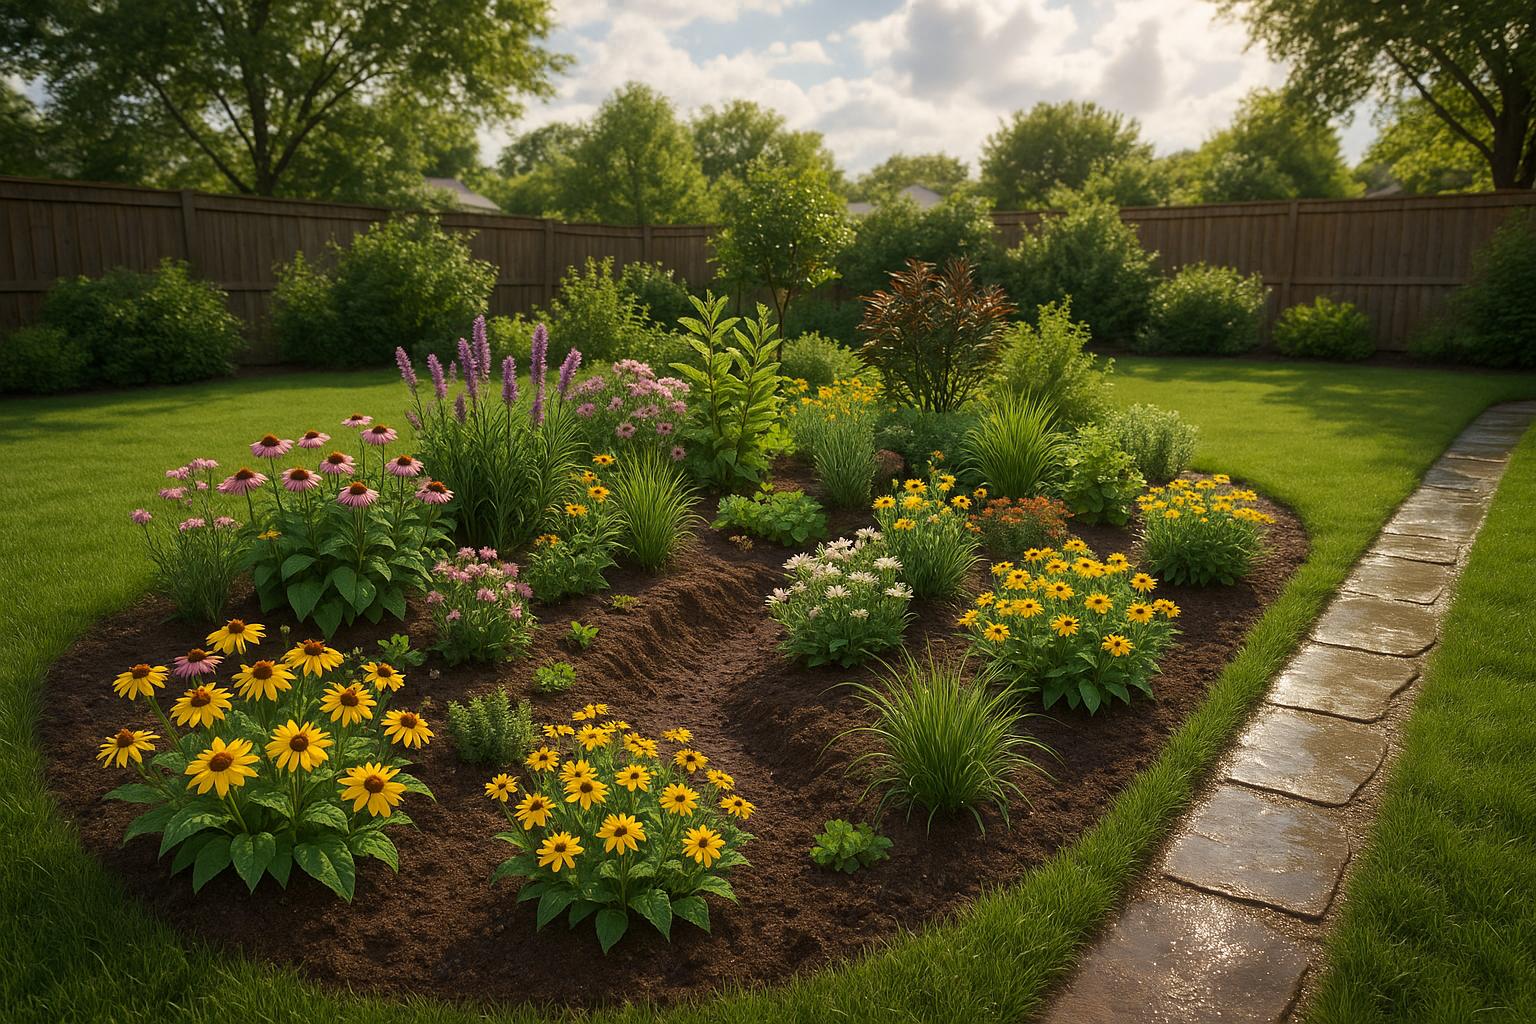
Step 4: Plant and Add Mulch
With your garden bed prepped and leveled, it’s time to bring your rain garden to life by planting native species and applying mulch. These steps not only protect your effort but also make future upkeep easier.
Pick Plants for Wet and Dry Zones
The key to a thriving rain garden is choosing plants that match the moisture levels in different areas. Divide your garden into wet, moderate, and dry zones.
For the wettest center area, go for plants that can handle standing water. Native options like Blue Flag Iris (Iris versicolor) offer vibrant purple blooms in late spring, Swamp Milkweed (Asclepias incarnata) attracts monarch butterflies, and Cardinal Flower (Lobelia cardinalis) brings bold red blooms that hummingbirds love.
In the middle zone, you can mix it up with plants that tolerate both wet and moderately dry soil.
The outer edges, which tend to stay drier, are perfect for drought-tolerant natives. Black-eyed Susan (Rudbeckia fulgida) is a low-maintenance choice with cheerful yellow flowers from summer to fall. Purple Coneflower (Echinacea purpurea) adds eye-catching purple blooms that attract pollinators, while Little Bluestem (Schizachyrium scoparium) provides texture with its fine grass blades that turn bronze in autumn.
This zoning mimics nature’s wetland gradients, giving each plant the conditions it needs to thrive. Plus, native plants support pollinators and other wildlife, boosting the ecological benefits of your rain garden.
Space and Plant Correctly
Spacing plants properly helps them grow strong roots, absorb water efficiently, and prevent overcrowding. For perennials, leave 12–24 inches between plants; for shrubs, space them 3–5 feet apart.
Before planting, arrange the containers in the garden to visualize the layout. A typical 100-square-foot rain garden might hold 30 to 40 plants, depending on their mature size and spacing needs.
When it’s time to plant, dig holes twice as wide as the root ball but no deeper than its height, so the top stays level with the soil. Planting too deep can lead to water pooling around the stem, which may cause rot.
Check for root-bound plants before placing them in the ground. If roots are circling inside the container, gently loosen or cut them to encourage outward growth. This step helps plants establish themselves more effectively.
After planting, water each one thoroughly to remove air pockets and ensure good soil-to-root contact. Then, apply mulch to protect roots and retain soil moisture.
Spread Mulch Around Plants
Mulch is essential, especially during the first year, as plants develop their root systems. Spread 2 to 3 inches of hardwood mulch around each plant, keeping it a few inches away from the stems to prevent rot.
Opt for natural, undyed hardwood mulch or double-shredded bark. These materials resist washing away during heavy rains better than lighter options like pine bark. Avoid dyed or cypress mulch, as they can introduce chemicals or harm natural resources.
Mulch provides several benefits: it conserves moisture during hot weather, reduces weeds, stabilizes soil temperatures, and minimizes erosion during storms – all while your plants grow stronger roots.
| Mulch Type | Pros | Cons |
|---|---|---|
| Shredded hardwood | Stays in place; ideal for rain gardens | May need yearly replenishment |
| Pine bark | Easy to find; visually appealing | Can wash away in heavy rain |
| Stone/gravel | Long-lasting; doesn’t decompose | Doesn’t improve soil; can retain heat |
Always mulch after planting to avoid burying young stems. During the first growing season, water your plants regularly during dry spells. Once they’re established – typically after one to two growing seasons – most native plants will need little to no extra watering.
For expert guidance on choosing and installing plants, check out Pro Landscapes MD. Their knowledge of local conditions and sustainable landscaping practices can help ensure your rain garden flourishes for years to come.
Step 5: Add Finishing Touches and Set Up Care Routine
With the groundwork and planting completed, it’s time to focus on the final details – setting up overflow routes and establishing a care routine to keep your rain garden thriving.
Create Overflow Routes
Even the most carefully designed rain gardens can struggle during heavy storms. That’s why overflow routes are essential to safely redirect excess water and prevent flooding.
Start by building berms on the downhill side using the soil you excavated earlier. These should be at least 6 inches higher than the ponding area, with the top 3–6 inches extending above the expected water level. Make sure to compact the soil firmly to avoid settling over time.
At the lowest point of the berm, install spillways lined with rocks or stones to prevent erosion. Spillways should be at least 1 foot wide and direct water to a safe area, like a lawn or an existing drainage system – never toward your home’s foundation or a neighbor’s property.
For more complicated drainage needs, you might want to consider stone-lined swales or French drains. These systems are especially useful for sloped properties where water needs to be carried farther away. Another option is a dry riverbed, which combines function and beauty. These channels, made of decorative stones, guide stormwater during heavy rains and serve as an eye-catching landscape feature during dry periods.
The EPA highlights that rain gardens with well-planned overflow systems can reduce local flooding and filter up to 30% more runoff compared to those without proper drainage measures[2].
Once your overflow routes are in place, shift your attention to regular maintenance to keep everything running smoothly.
Schedule Regular Care Tasks
A consistent care routine is key to ensuring your rain garden performs well year-round. During the first year, when plants are still establishing their roots, inspect your garden monthly and after heavy rains.
- Monthly tasks: Look for signs of plant stress, remove weeds, and clear debris from inlets and spillways. Pay attention to areas where water lingers for more than 24–48 hours, as this could signal drainage issues that need fixing.
- Annual tasks: Refresh mulch to maintain a 2–3 inch depth around plants. Mulch not only suppresses weeds but also helps retain moisture. As it decomposes, replace it and consider adding compost or soil amendments if your plants show signs of nutrient deficiency.
- Seasonal inspections: Especially before and after storm seasons, check your berms and spillways. Clear away leaves and debris, and repair any erosion or settling that could compromise your overflow system.
Rain gardens with regular maintenance experience 50% less plant loss and 40% less sediment buildup compared to those with inconsistent care[8].
Fix Common Problems
Addressing issues early can save you from bigger headaches later. For instance, if water remains stagnant for over 48 hours, mix sand or compost into the soil to improve drainage. In more severe cases, you might need to dig up and amend sections of the garden, which is easiest to do in fall or early spring when plants are dormant.
If plants are wilting, yellowing, or dying, they may not be suited to the moisture levels in their current spot. Swap struggling plants with species better suited to the conditions. You might also relocate moisture-loving plants closer to the wetter center of the garden and move drought-tolerant ones to the drier edges.
Blocked overflow routes often become apparent during storms when water spills over unintended areas. Regularly clear leaves, sticks, and other debris from spillways. If erosion has damaged your overflow paths, rebuild them with additional stones or consider widening them to handle larger water volumes.
Properly maintained rain gardens can remove up to 90% of nutrients and chemicals and up to 80% of sediments from stormwater runoff[2]. These benefits make the effort well worth it.
For those in Maryland and Washington, DC, Pro Landscapes MD offers professional rain garden installation and maintenance services. Their expertise in local soil conditions, climate, and stormwater management can help ensure your rain garden stays effective through every season.
Pro Landscapes MD: Professional Rain Garden Installation

Getting a rain garden professionally installed ensures it works as it should from the very beginning. Pro Landscapes MD specializes in stormwater management and drainage solutions, serving central Maryland communities, including Howard, Montgomery, Carroll, Frederick, Prince George’s, and Baltimore counties.
Their installation process combines proven techniques with a deep understanding of local conditions. The team starts by identifying natural water collection areas, performing soil percolation tests, and mapping water flow across your property. This ensures the rain garden captures the most runoff possible while avoiding drainage problems. They also locate underground utilities before digging to prevent costly errors. This thorough preparation aligns perfectly with the methods discussed earlier.
During the excavation phase, Pro Landscapes MD focuses on precision. They remove existing turf, dig to the correct depth (usually 6–12 inches), and shape the basin with sloping sides to optimize water absorption. On the downhill side, they build berms from compacted soil, often reinforcing them with gravel or plants for durability.
Next, they create the ideal soil mix – a blend that drains quickly while nourishing plants. This ensures water infiltrates efficiently and supports healthy growth.
Plant selection is another area where Pro Landscapes MD excels. Their horticulturists divide the rain garden into zones based on moisture levels: wet, intermediate, and dry. Native Maryland plants are chosen for each zone, with sedges and rushes thriving in the wetter center and drought-resistant perennials planted along the edges. Plants are spaced properly and installed at the right depth to promote long-term success.
For instance, in Ellicott City, Pro Landscapes MD tackled frequent yard flooding by improving clay-heavy soil and planting native grasses and perennials. They added a stone-lined overflow channel and a sturdy berm, which significantly reduced runoff and flooding.
Beyond grading and planting, they also focus on drainage solutions to handle excess water. Features like drainage pipes, French drains, and overflow routes direct water safely away from structures. Stone-lined spillways or swales are added to manage heavy rains, preventing standing water and erosion while keeping the garden effective during storms.
By addressing site-specific challenges like poor soil drainage or complex water flow patterns, Pro Landscapes MD ensures your rain garden is built to last. Their expertise minimizes risks, reduces the likelihood of future repairs, and complements the maintenance practices discussed earlier for long-term performance.
To keep your rain garden thriving, Pro Landscapes MD offers seasonal maintenance tips and services. Their designs prioritize native, low-maintenance plants and durable drainage systems, reducing upkeep while maximizing efficiency. This approach helps rain gardens remove up to 90% of nutrients and chemicals and up to 80% of sediments from stormwater runoff [2].
For Maryland and Washington, DC homeowners looking to manage stormwater effectively, Pro Landscapes MD delivers the skill and experience needed to create a rain garden that’s both functional and visually appealing, all while protecting your property from water damage.
Conclusion
Building a successful rain garden boils down to five essential steps: choosing the right site and testing the soil, determining the proper size and layout, carefully preparing the soil and excavating, selecting the right plants and mulch, and committing to regular upkeep.
By following these steps, you not only ensure the garden works as intended but also reap a range of benefits. Rain gardens can filter out up to 90% of nutrients and chemicals while absorbing 30% more water than a standard lawn [2]. On top of that, they boost property value and create a haven for pollinators and birds.
However, there are some common missteps to watch out for – like placing the garden too close to your home’s foundation, underestimating the size needed, or skipping soil testing. To avoid problems, make sure the garden drains within 24 hours and adjust the soil if necessary [2].
If you’re aiming for a flawless result, hiring a seasoned contractor can be a smart move. Their expertise in grading, soil amendments, and selecting native plants can make all the difference, especially for larger projects or tricky drainage issues.
Whether you tackle the project yourself or bring in professionals, a well-thought-out rain garden doesn’t just manage runoff – it becomes a beautiful, low-maintenance addition to your landscape. The time you spend planning and installing it upfront will reward you with better drainage, less upkeep, and enhanced curb appeal for years to come.
FAQs
How can I figure out the right size for a rain garden based on my property’s water runoff?
To figure out the right size for your rain garden, start by looking at the area of your roof, driveway, or any other surfaces that produce runoff. You’ll also need to take into account the type of soil on your property. As a rule of thumb, a rain garden should cover about 10-20% of the total runoff area. For instance, if your roof and driveway add up to 1,000 square feet, your rain garden should ideally be between 100 and 200 square feet.
If doing the math feels overwhelming or you’d prefer professional guidance, Pro Landscapes MD is a great resource. They specialize in creating and installing rain gardens, combining effective stormwater management with a visually appealing landscape design.
What types of plants work best in the different areas of a rain garden?
To help your rain garden flourish, it’s crucial to select plants that match the conditions of each zone. In the lowest and wettest area, go for water-loving plants such as sedges, irises, or swamp milkweed. For the middle zone, which alternates between wet and dry conditions, plants like black-eyed Susans or bee balm are great choices. In the upper, drier zone, drought-tolerant options like coneflowers or ornamental grasses thrive.
Need guidance on what works best for your location? Pro Landscapes MD offers expert advice and professional rain garden installation services designed specifically for your landscape.
What can I do if my rain garden isn’t draining properly and water is pooling for too long?
If your rain garden is taking an unusually long time to drain, it might be a sign of poor soil drainage, compacted ground, or a design flaw. To fix this, you may need to improve the soil’s ability to absorb water, tweak the garden’s slope, or add extra drainage features.
Pro Landscapes MD offers expert drainage solutions like French drains, berms, swales, and box-and-pipe systems. Their services are designed to handle excess water effectively, ensuring your rain garden works as it should while also improving the overall look and health of your outdoor space.
Chat with Us