


- bhavya gada
- No Comments
Rainwater harvesting lets you collect rainwater from your roof for outdoor uses like watering plants or washing your car. It’s a practical way to save water and reduce runoff, especially in Maryland, where it aligns with local stormwater management efforts. Here’s a quick breakdown of what you need to know:
- Benefits: Saves water, lowers bills, reduces runoff, and improves plant health.
- Materials: Includes gutters, filters, storage tanks (like barrels or cisterns), and optional pumps for water pressure.
- Installation Steps: Assess your site, prepare the area, install the tank, connect the system, and set up filters and overflow pipes.
- Maintenance: Regularly clean gutters, inspect tanks, and use mosquito control to keep the system running smoothly.
While you can install a system yourself, professional help ensures compliance with local rules and optimal performance. Rainwater harvesting is a smart way to manage water efficiently and support a cleaner environment.
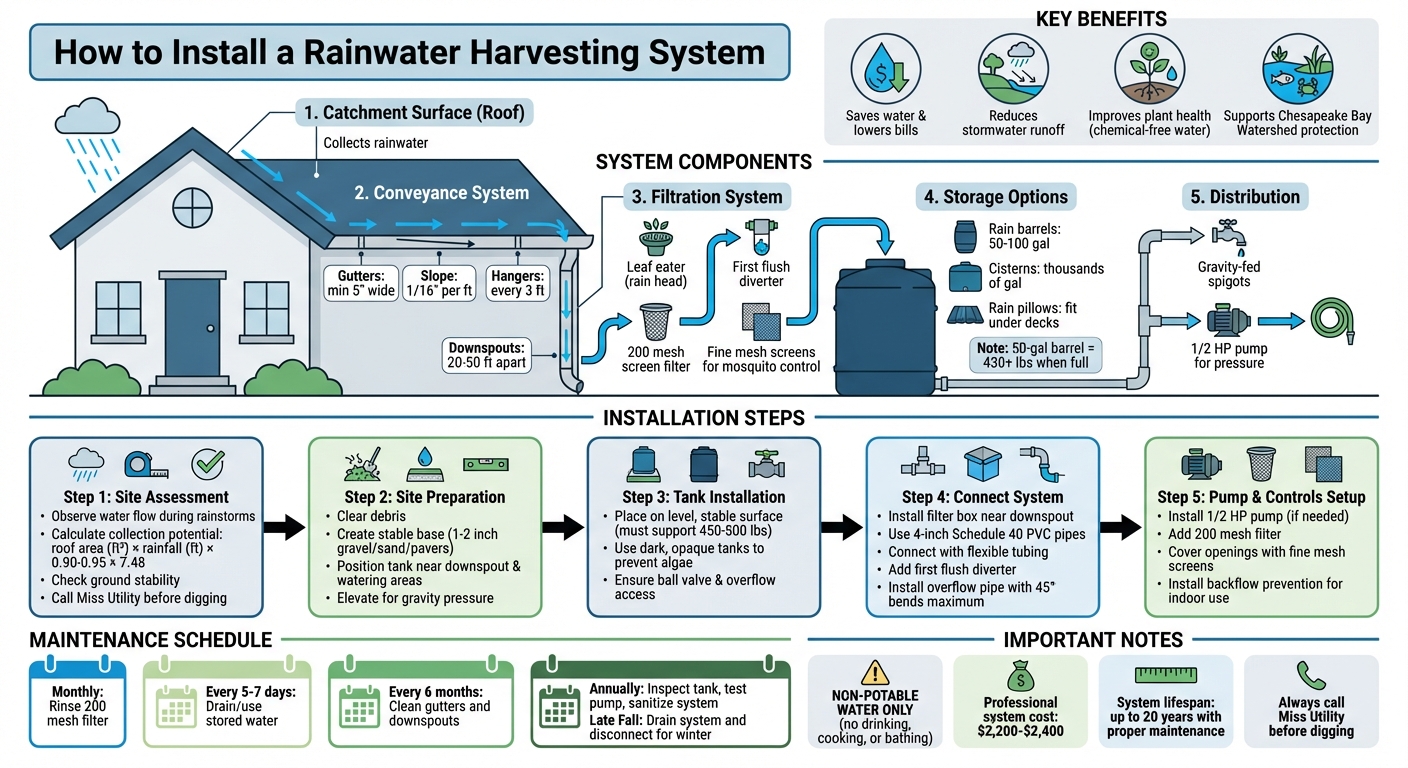
Rainwater Harvesting System Installation Steps and Components Guide
How to Install a Rainwater Harvesting System – DIY
sbb-itb-843f8be
Materials and Tools Needed
Before starting your rainwater harvesting system installation, make sure you have all the necessary components and tools on hand. A well-functioning system relies on several interconnected parts to capture, filter, store, and distribute water efficiently.
System Components
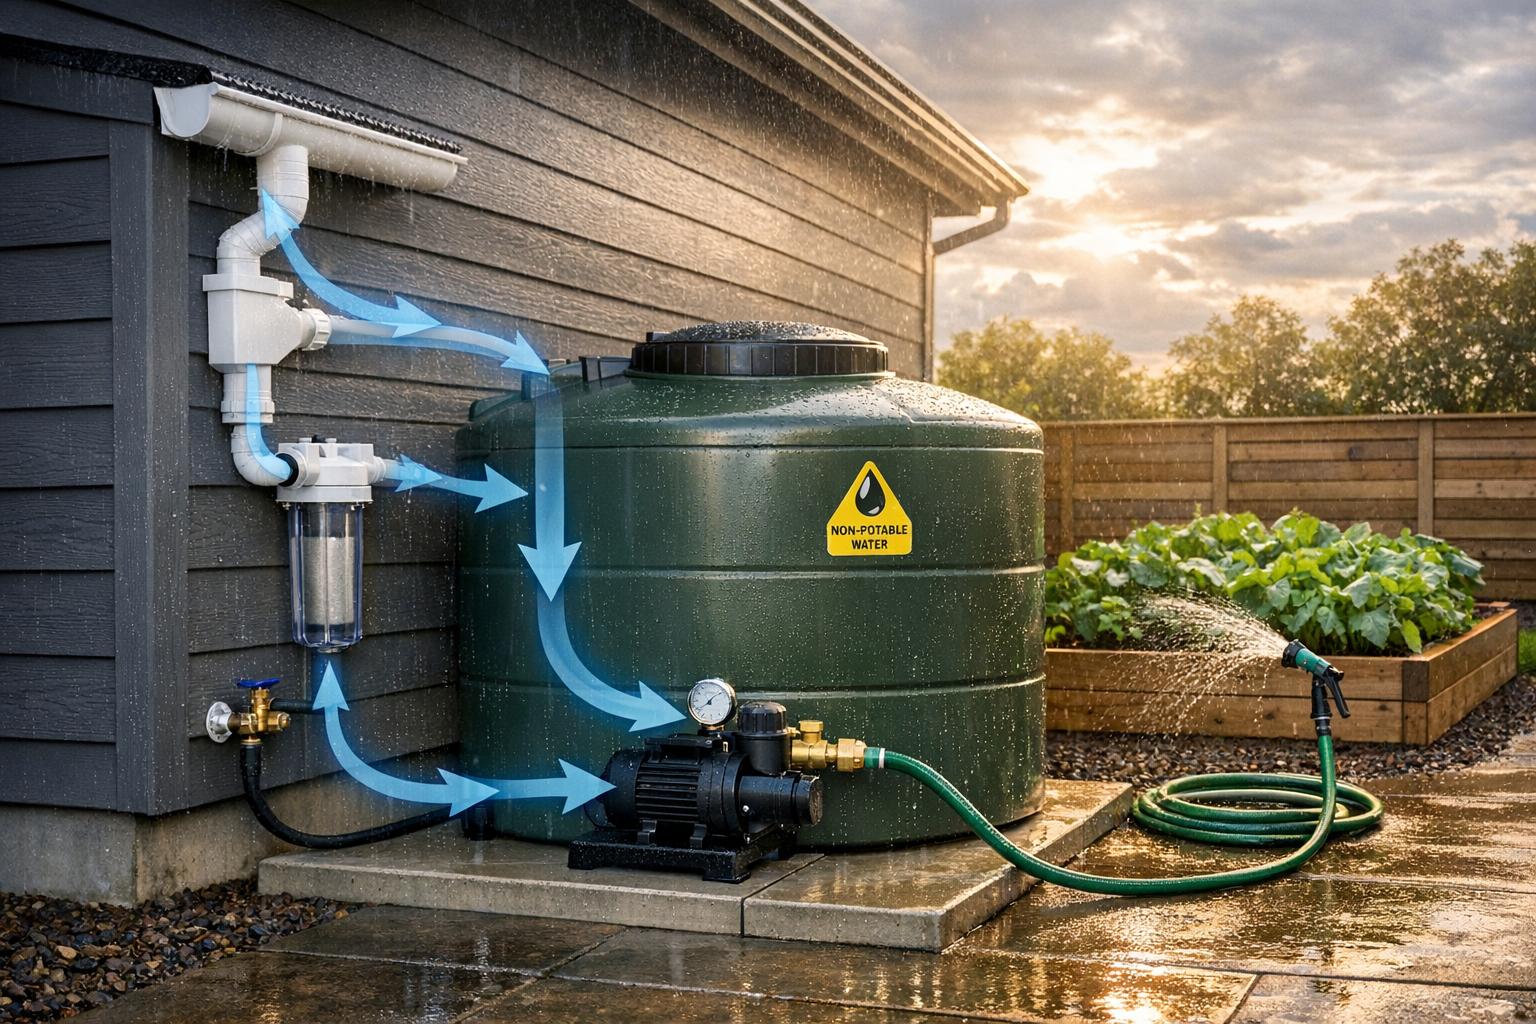
The catchment surface – often your roof – collects rainwater and directs it through a conveyance system made up of gutters and downspouts. For optimal performance, gutters should be at least 5 inches wide and constructed from 26-gauge galvanized steel or 0.025-inch aluminum[4]. To ensure proper drainage, slope the gutters at 1/16 inch per foot and secure them with hangers every 3 feet to handle heavy rainfall[4].
A filtration system is essential for keeping debris out of your stored water. Install a leaf eater (rain head) and a first flush diverter near the downspouts to capture leaves and remove the initial runoff, which may contain contaminants[6]. Use 4-inch diameter Schedule 40 PVC pipes for conveyance lines, and if you’re connecting the system to drip irrigation, add a 200 mesh screen filter[4]. To combat mosquito breeding during Maryland’s humid summers, include fine mesh screens and anti-larval mosquito control tablets with Bacillus thuringiensis[5].
Storage options vary widely, from basic 50–100 gallon rain barrels to large cisterns capable of holding thousands of gallons, or even flexible rain pillows designed to fit under decks[3]. Opt for dark, opaque tanks to block sunlight and reduce algae growth[2]. Keep in mind that a full 50-gallon barrel weighs over 430 pounds, so if you’re elevating it for better water pressure, the platform should support at least 450–500 pounds[5]. Professional-grade rain pillow systems typically cost between $2,200 and $2,400[3].
It’s also important to include an overflow pipe to safely divert excess water[3]. Use a splash block or hose to direct overflow away from your home’s foundation to prevent flooding and erosion[5]. For distribution, simpler setups can rely on gravity-fed spigots, while more advanced systems may require a 1/2 HP pump for higher water pressure[4].
Now that you’ve identified the system components, gather the tools needed for installation.
Installation Tools
For a smooth installation process, have the following tools ready:
- Shovel
- Drill/driver
- PVC pipe saw
- Level
- Pipe sealant
- Hammer and cold chisel
- Push broom
- Hole saw attachment
If you’re working with Maryland’s sandy or erosion-prone soils, create a stable foundation by laying a 1–2 inch base of gravel, sand, or patio pavers to support your tank[5][6]. For flexible storage solutions like rain pillows, place a thick plastic tarp beneath them to prevent wear from contact with concrete or rough surfaces[3]. Additionally, use sweeping 90-degree angles in your piping instead of sharp elbows to ensure smooth water flow[6].
For more complex installations, such as those involving existing drainage systems or custom grading, consider reaching out to Pro Landscapes MD. Their expertise in stormwater management and drainage solutions can help you design a system tailored to your property’s specific needs.
With all materials and tools prepared, you’re ready to move on to site preparation and planning.
Site Preparation and Planning
Getting your site ready is a crucial step to ensure your rainwater harvesting system works efficiently over time. Before you start digging or setting up equipment, take the time to study your property and make sure you meet Maryland’s specific rules and guidelines.
Site Assessment
Begin by observing your property during a rainstorm. Watch how water flows, where it pools, and note high and low areas around your home. Understanding these patterns will help you design a system that works with your landscape.
To calculate how much water you can collect, use this formula: roof area (ft²) × annual rainfall (ft) × runoff coefficient (0.90–0.95 for most roofs) × 7.48. This gives you the potential water volume in gallons. Compare this number with your landscape’s water needs. For instance, if you’re watering a vegetable garden or flower beds, grouping plants with similar water requirements can stretch your resources further.
Ground stability is another important factor. A full 55-gallon rain barrel weighs over 400 pounds[1], so the surface beneath it needs to be strong and level. Clear away debris, and if necessary, create a stable base using pavers, stone blocks, or pressure-treated wood. For rainwater pillow systems that fit under decks, lay down a thick plastic tarp to prevent wear on rough surfaces.
Position your tank close to a downspout and near watering areas to reduce the amount of piping needed. Elevating the tank – either on higher ground or on blocks – can create gravity-fed water pressure, making it easier to use. Make sure there’s enough space below the spigot for a bucket or watering can. Plan for overflow by directing excess water back to natural drainage paths or away from your foundation to avoid flooding or erosion.
"Always call Miss Utility before any digging or construction of any kind." – Ashley Bodkins, Senior Agent Associate and Master Gardener Coordinator, Garrett County, Maryland[1]
Keep your system away from septic tanks, potable water wells, or natural springs to prevent contamination. Before starting any digging, contact Miss Utility to locate and mark underground utilities like electric, gas, sewer, and internet lines.
Once you’ve mapped out your site and chosen a tank location, double-check local permits and regulations to ensure compliance.
Permits and Regulations
After assessing your site, the next step is to confirm that your system meets Maryland’s requirements. The Maryland Department of the Environment promotes Environmental Site Design (ESD) practices to help homeowners manage stormwater runoff on their properties instead of relying entirely on municipal systems.
In Maryland, harvested rainwater is considered non-potable, meaning it can’t legally be used for drinking, bathing, or cooking. It’s perfect for tasks like watering plants, washing vehicles, or other outdoor uses – just make sure it stays separate from your home’s potable water supply.
Check with your city or county planning office to see if you need a building permit. Small rain barrels usually don’t require permits, but larger cisterns or modifications to your drainage system might. Each county in Maryland has its own rules, so find out what applies in your area.
If your property has tricky drainage issues or uneven grading, Pro Landscapes MD can help. They specialize in stormwater management, grading, and land leveling throughout central Maryland. Their team can design a system that works with your landscape while meeting local codes.
Once your site is assessed and permits are squared away, you’re ready to move on to the installation phase.
Step-by-Step Installation Guide
With your site prepared and permits in hand, it’s time to set up your rainwater harvesting system. This process includes placing your storage tank, connecting components, and ensuring everything is secure. Follow these steps to ensure your system works efficiently for years to come.
Tank Placement and Excavation
Start by clearing away any debris from the installation site. If you’re working on a concrete surface, use a cold chisel to remove sharp edges that could damage the tank. For flexible "pillow" tanks, lay down a thick plastic tarp to protect the base. When positioning the tank, make sure the ball valve and overflow pipe are easy to access for maintenance.
Place the tank at a higher elevation than the area where the water will be used, like a garden or landscaped section. This setup allows gravity to move the water, reducing or even eliminating the need for a pump. Also, double-check that all inlet and outlet fittings are accessible for future maintenance.
Once the tank is properly positioned, you can move on to installing the filter and connecting the system.
Filter and Connection Installation
Install the filter box close to the downspout to catch water directly from the roof. Inside the box, place a filter pad or screen to trap leaves and debris before the water enters the tank. Use 4-inch Schedule 40 PVC pipes for water conveyance; this size handles heavy rainfall effectively without causing backups.
To ensure stability during downpours, install gutter hangers every 3 feet. Slope the gutters at a rate of 1/16 inch per foot, with the front edge of each gutter sitting 1/2 inch lower than the back. Space downspouts 20 to 50 feet apart to handle water collection efficiently.
"A proper filtration system is crucial to keep debris out of your stored water." – This Old House
Connect the filter box to the tank with flexible tubing. This type of tubing accommodates slight movements and simplifies the positioning process. Add a first flush diverter (or "roofwasher") to redirect the initial runoff – often contaminated with dust, bird droppings, and other pollutants – away from the tank. Install an overflow pipe at the top of the tank to channel excess water safely, and limit horizontal pipe bends to 45° to reduce the risk of clogs.
Backfilling and Finishing
For above-ground systems, ensure all connections are secure and the tank is level. If the surrounding area has bare dirt, grade the surface to direct runoff toward the collection system. Choose a dark, opaque tank to block sunlight and minimize algae growth.
Install a ball valve on the tank’s side to control water flow to your distribution system or pump. If you’re connecting a pump, use flexible piping to link the ball valve to a high-pressure electric pump, then attach a standard garden hose for water distribution. For drip irrigation systems, include filters with 200 mesh screens to prevent clogging of the emitters.
For gutter runs longer than 40 feet, add an expansion joint at the connection point to accommodate movement caused by temperature changes.
If your property requires advanced drainage solutions or a large-scale system, Pro Landscapes MD can help. They specialize in stormwater management and drainage installations across central Maryland, ensuring your rainwater harvesting system integrates smoothly with your landscape.
Next, move on to setting up the pump and controls for efficient water distribution.
Pump, Filtration, and Control Setup
Once your tank is securely placed and connected, it’s time to set up the pump and controls to turn your collection system into an efficient water distribution network.
Pump and Filter Installation
If gravity alone doesn’t provide enough water pressure, a 1/2 HP pump is a solid choice. Use flexible piping to connect the ball valve to a high-pressure electric pump, which will deliver the pressure needed for irrigation tasks.
To keep the system running smoothly, install a 200 mesh filter between the tank and the pump. This filter is especially important for drip irrigation systems, as it prevents small particles from clogging the emitters. Additionally, cover all openings with fine mesh screens to keep mosquitoes out. A complete system, including a pump and filtration setup, typically costs between $2,200 and $2,400.
Once the pump and filtration are in place, you can move on to configuring indoor systems for controlled water distribution.
Indoor System Connections
For indoor use, you’ll need backflow prevention devices to meet Maryland regulations. These devices are essential to keep your potable water supply safe from contamination. Since Maryland classifies rainwater as non-potable, it cannot be used for drinking, cooking, or bathing.
Connect the pump outlet to an indoor control panel that manages water distribution to fixtures. Be sure to avoid any cross-connections with the potable water system. Before starting any underground work, contact Miss Utility in Maryland to ensure safety and compliance.
To maintain the system’s durability, seasonal upkeep is key. For example, draining the pump in late fall will help protect it from damage during colder months.
Maintenance and Safety Tips
Keeping your irrigation system in top shape requires regular care. After installation, ongoing maintenance is key to ensuring your system runs smoothly and efficiently over time.
Routine Maintenance Checklist
To keep your system functioning at its best, follow these routine tasks:
- Gutters and Downspouts: Clean them every six months and inspect visually after storms to remove debris.
- Filters: Rinse your 200 mesh filter monthly or when you notice reduced water flow. For basket filters, clear debris into a compost bin every two months. Stainless steel self-cleaning filters should be checked every six months – hold the mesh up to a light to ensure it’s clear.
- Storage Tank: Inspect annually for leaks, cracks, or algae growth. Check for debris and seal any entry points for insects.
- Pump System: Test annually to confirm proper pressure and check for leaks.
- Stored Water: Drain and use stored water every 5–7 days to keep it fresh. Sanitize the tank once a year using a mild bleach solution.
Here’s a quick reference table to help you stay on track:
| Component | Maintenance Task | Frequency |
|---|---|---|
| Gutters/Downspouts | Clear debris | Every 6 months/After storms |
| Filters/Screens | Rinse or replace filter elements | Monthly or as needed |
| Storage Tank | Check for leaks, algae, and sanitize | Annually |
| Pump System | Inspect connections and test run | Annually |
| Water Supply | Drain or use stored water | Every 5–7 days |
These simple steps can extend the life of your system and ensure it’s ready for seasonal changes.
Seasonal Considerations
If you live in areas like Maryland, where winters bring freezing temperatures, your system needs extra care. Before winter sets in, drain all water from the system and disconnect downspouts, reconnecting them to their original drainage pathways. Rain barrels should be stored in a garage or flipped upside down to prevent freezing and damage.
Ashley Bodkins, Senior Agent Associate and Master Gardener Coordinator at the University of Maryland Extension, advises:
"In climates where snow and freezing temperatures occur, rain barrels will have to be drained, and downspouts reconnected to original drainage pathways in late fall." [1]
During warmer months, cover all openings with fine mesh screens to block mosquitoes. To reduce algae growth, use dark-colored, opaque tanks that limit sunlight exposure. If empty barrels are at risk of tipping in high winds, weigh them down with a brick until they fill with water.
Professional Support
For more advanced maintenance or system upgrades, consider reaching out to Pro Landscapes MD. Their team offers expertise in tasks like underground pipe inspections, pump replacements, and integrating new features with existing systems through their Premium Hardscaping and Drainage Solutions plans.
Before starting any digging or major upgrades, always contact Miss Utility to locate underground utilities. For professional assistance, Pro Landscapes MD can handle the heavy lifting, ensuring your system is both efficient and reliable.
Conclusion
Installing a rainwater harvesting system is a smart way to conserve water and manage stormwater runoff on your property. By following this guide, you can set up a dependable non-potable water source for tasks like irrigation and outdoor cleaning. The Maryland Department of the Environment encourages homeowners to take responsibility for stormwater management, and a well-maintained rainwater system aligns with these efforts [1].
The advantages go beyond just saving water. Rainwater is naturally soft and free of chemicals like chlorine and fluoride, making it perfect for healthy plant growth [2]. Capturing runoff also helps prevent stream bank erosion and reduces pollution in the Chesapeake Bay Watershed [1]. However, these benefits depend on proper maintenance. Regularly cleaning filters, inspecting tanks annually, and rotating stored water every 5–7 days can keep your system running efficiently for up to 20 years [7].
It’s important to note that harvested rainwater is non-potable. It should never be used for drinking, cooking, or bathing. Clearly labeling storage containers can help prevent accidental misuse [1].
For more complex setups – such as underground cisterns, indoor plumbing integration, or advanced filtration systems – professional help is highly recommended. Experts can ensure your system complies with local building codes and operates as intended. Pro Landscapes MD provides specialized services in central Maryland, offering site assessments, technical installations, and ongoing maintenance for rainwater systems.
Whether you choose to install the system yourself or hire professionals, a rainwater harvesting system is a worthwhile investment. It not only lowers water bills but also supports a healthier environment and enhances your outdoor spaces.
FAQs
What size tank should I choose for my roof and yard?
The size of the tank you need hinges on factors like how much rainwater your roof can collect, the size of your yard, and your water usage. For instance, if your roof can gather 600 gallons per inch of rainfall and your area receives 40 inches of rain annually, you have the potential to collect up to 24,000 gallons in a year. Smaller tanks, ranging from 50 to 100 gallons, are ideal for light watering tasks, while larger tanks – holding several hundred gallons – are better suited for more demanding irrigation needs.
How do I keep a rainwater system from breeding mosquitoes or growing algae?
To keep mosquitoes at bay, use fine mesh screens to cover all system openings and make it a habit to eliminate standing water every week. For algae control, ensure the system stays clean, free of debris, and covered to minimize sunlight exposure. Routine upkeep – like cleaning screens and checking for stagnant water – goes a long way in preserving water quality and stopping both mosquito breeding and algae growth.
When do I need a permit in Maryland for a rainwater system?
In Maryland, permits are generally required for rainwater harvesting systems used in stormwater management or those with large storage capacities that could impact runoff. Regulations emphasize that the collected rainwater should be utilized before the next storm to prevent overflow issues. Always review local guidelines to make sure your system meets all requirements.
Chat with Us