


- bhavya gada
- No Comments
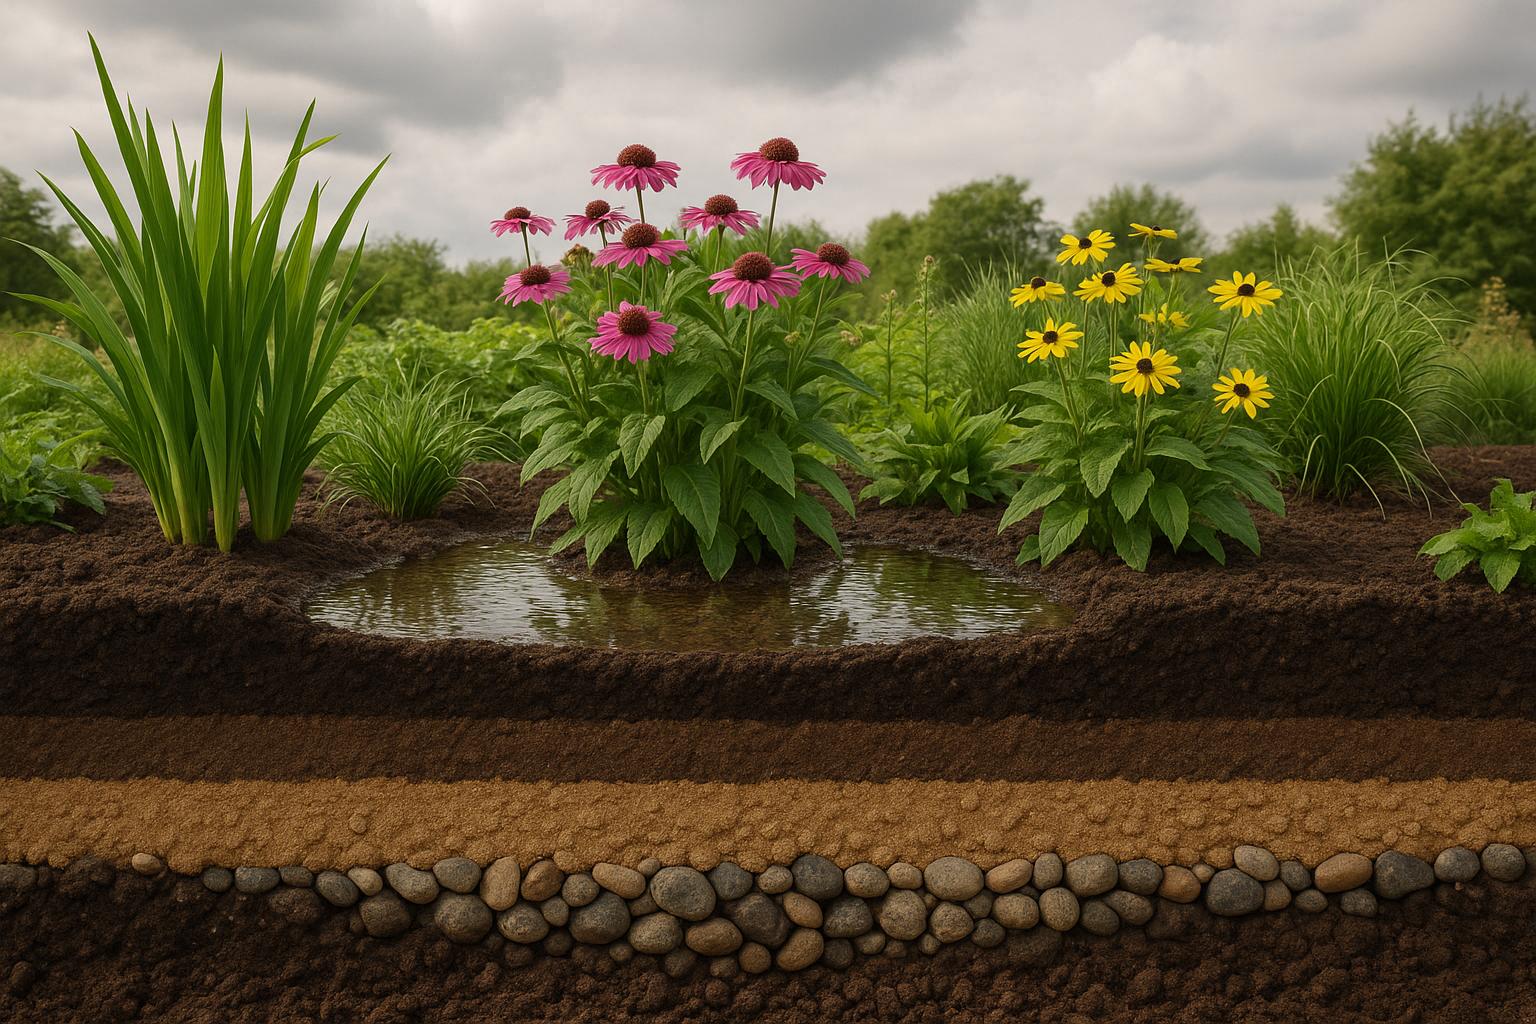
When designing a rain garden, the way you layer soil is the key to managing stormwater effectively. Rain gardens are shallow depressions filled with plants, mulch, and soil layers that slow down water runoff, filter pollutants, and reduce erosion. Here’s how to get it right:
- Why It Works: Layered soil acts like a natural filter, improving drainage and preventing soil compaction while supporting plant growth.
- Maryland Challenges: Clay-heavy soils and unpredictable weather require a custom soil mix and, sometimes, an underdrain to handle water flow.
- Soil Mix Recipe: Use 50–60% sand, 20–30% topsoil, and 20–30% compost. Keep clay content under 10% to avoid drainage issues.
- Mulch Tips: Opt for double-shredded hardwood mulch, applied 2–3 inches deep, to prevent erosion and retain moisture.
- Stone Placement: Use river rocks or cobblestones at water entry points to slow down water and prevent washouts.
- Maintenance: Regularly inspect for water pooling, weed growth, or clogged drainage, and refresh mulch yearly.
Proper preparation, regular care, and choosing the right materials ensure your rain garden handles runoff efficiently while staying healthy year-round.
Build a Rain Garden ☔️🌊❄️ Step by Step Instructions that Makes it Easy
Site Assessment and Preparation
Before diving into building your rain garden, take a close look at your site’s drainage. A thorough assessment sets the stage for effective soil layering and ensures your rain garden functions as it should.
Testing Site Conditions
Good drainage is key to a successful rain garden. Start by observing how your site behaves after heavy rainfall. Look for areas where water tends to pool or where the ground feels consistently damp. If puddles linger, it’s a sign that the drainage needs improvement [1].
To get a clearer picture of your soil’s drainage ability, try a percolation test. Here’s how: dig a hole about one foot deep, fill it with water, and see how long it takes for the water to drain. Ideally, it should empty in 30–40 minutes. If it takes longer, you might need to enhance the soil with amendments [1].
Proper drainage is crucial because plant roots need oxygen to thrive. Stagnant water can suffocate roots, leading to poor plant health [1]. For example, clay-heavy soils tend to hold onto moisture, which can be helpful during dry spells but problematic during heavy rains [1].
These observations will help you determine how to prepare your site and adjust the soil layers for optimal performance.
Choosing and Preparing Soil Layers
A rain garden’s success hinges on having the right soil mix – one that drains efficiently while holding onto the moisture and nutrients plants need to thrive.
Ideal Soil Mix Composition
The go-to recipe for rain garden soil includes 50–60% sand, 20–30% topsoil, and 20–30% compost[2][3]. This mix strikes a balance between drainage and nourishment:
- Sand ensures water flows through quickly, preventing pooling.
- Topsoil provides structure and helps retain just enough water.
- Compost boosts the soil with organic nutrients, giving plant roots what they need to grow strong.
One key tip: keep clay content below 10% of the mix[2][3]. Too much clay can lead to compaction and poor drainage. The soil should feel loose and crumble easily in your hand – this texture is ideal for supporting healthy plant growth and managing water effectively.
Improving Native Soil
If your soil tests show it’s heavy on clay, don’t worry. Simply remove the excess clay and replace it with the recommended mix. This adjustment ensures better drainage and creates a more hospitable environment for plant roots.
Adding Mulch and Surface Materials
After setting up your soil layers, choosing the right surface materials is essential to slow water infiltration and ensure your rain garden works as intended.
Selecting Mulch Types
For rain gardens, double-shredded hardwood mulch is the top choice. Its smaller, uniform pieces interlock, creating a stable surface that stays in place during Maryland’s heavy spring storms and summer downpours. This mulch also decomposes slowly, lasting 18–24 months, compared to lighter options like pine bark, which only last 8–12 months. The longer lifespan means less upkeep and better erosion control.
It’s best to avoid large wood chips (over 2 inches) or fresh bark mulch, as these materials can float away in heavy rain. Cedar mulch, though visually appealing, decomposes too quickly in Maryland’s humid climate and often needs replacing twice a year.
Applying and Caring for Mulch
Spread mulch evenly across the rain garden to a depth of 2 to 3 inches, but keep it at least 3 inches away from plant stems to prevent rot and pests. This depth strikes a balance – providing erosion protection while still allowing water to seep into the soil.
The best time to apply mulch is when the soil is slightly moist but not soggy. Wait 24 to 48 hours after a rainstorm to avoid compacting the soil underfoot during installation.
Each spring – typically in April or early May in Maryland – refresh your mulch layer. There’s no need to remove the old mulch entirely. Instead, lightly rake it to loosen matted sections, then add 1 to 2 inches of fresh mulch on top. The decomposing mulch underneath will continue to enrich the soil over time.
To further protect against erosion, consider adding stones in key areas.
Using Stone at Water Entry Points
In areas where water flows into the rain garden, river rock or cobblestones (3 to 6 inches in diameter) work well to handle the high water velocity. These stones prevent erosion and help slow down fast-moving water.
Create a 2- to 3-foot stone apron at the water entry point. This setup helps disperse the water flow evenly before it reaches the mulched areas. For downspout connections, a natural stone splash block is a great alternative to concrete. It blends seamlessly with the garden’s look while offering the same level of protection. Make sure the water flows onto the stone apron instead of directly onto the soil or mulch.
Skip small gravel or pea stone in high-flow areas, as anything smaller than 2 inches can be swept away during heavy storms. These smaller pieces can clog drainage systems downstream, causing more issues than they solve.
sbb-itb-843f8be
Maintenance and Monitoring
Keeping your rain garden in good shape requires regular care. This ensures it functions properly and avoids problems that could reduce its performance.
Regular Check-ups
Plan to inspect your rain garden in April, late October, and after heavy storms. During each visit, check the health of your plants.
If water remains in the garden for more than 24–48 hours, remove the excess. Make sure water entry points are clear of debris and that the mulch layer is about 3 inches deep [8, 9]. Standing water could mean the soil is compacted or there’s a drainage issue. If you notice any problems during these inspections, address them right away using the tips below.
Fixing Common Problems
When water doesn’t drain within 24–48 hours, aerate the soil to improve its ability to absorb water. Redistribute mulch to cover any exposed areas – this helps prevent soil compaction and keeps weeds at bay.
Weed control is another key task. Pull weeds by hand when the soil is moist to ensure you remove the roots completely [10, 12]. Pay special attention to young tree saplings and aggressive perennials. Removing them early stops them from developing deep roots that could interfere with the garden’s soil structure.
Clogged inlets and outlets can disrupt water flow. Clear out debris like leaves, dirt, or sand from pipes and drainage channels [5]. If your garden connects to a downspout, check that gutters are directing water properly so the garden can do its job.
Seasonal Care Tasks
In addition to routine inspections, seasonal tasks are vital for keeping your rain garden in top condition.
Spring: Clear out dead plant material from the previous season to warm the soil and give new plants space to grow [10, 11, 12]. This is also the perfect time to refresh the mulch layer, replant bare spots, and divide established perennials to strengthen their root systems. Don’t forget to clear any winter debris from inlets and drainage pipes to ensure water flows smoothly [5].
Summer: Every two weeks, take a walk through your garden to check on plant health and handle any small issues as they come up [4]. Remove weeds – especially tree saplings – by hand before they take root [10, 12].
Fall: Instead of cutting back all plant material, leave native stems and seed heads. These provide winter shelter for birds and insects. Focus on removing diseased plants and do a final round of weeding before the plants go dormant.
Throughout the year, water your rain garden during its first two growing seasons. This encourages deep root growth, which improves soil stability and helps water soak in more effectively.
Professional Installation Services
Professional installation can take your rain garden to the next level, ensuring it performs efficiently and fits seamlessly into your outdoor space.
Pro Landscapes MD offers specialized rain garden design and installation services throughout central Maryland [6]. Their team carefully evaluates your property to create a rain garden that not only manages stormwater but also enhances the beauty of your landscape.
Why Choose Professional Installation?
Hiring professionals guarantees that your rain garden is built with the right techniques and materials. From proper soil layering to addressing specific drainage issues, experts ensure long-term performance. They also have a deep understanding of Maryland’s unique soil and weather conditions, allowing them to select the best materials for the job.
What Pro Landscapes MD Offers

Pro Landscapes MD takes a customized approach to designing rain gardens. Their process focuses on stormwater control while promoting eco-friendly landscaping. With their expertise, your rain garden will be built to handle Maryland’s climate and function effectively all year.
Ready to Begin?
Getting started is simple. Schedule a consultation with Pro Landscapes MD, and their team will analyze your soil, drainage, and overall landscape. From there, they’ll deliver a custom solution designed to last.
Conclusion
Getting the soil right is the secret to turning your rain garden into an effective stormwater management tool. By layering drainage materials, adding nutrient-rich soil, and finishing with proper surface treatments, your rain garden can handle runoff while keeping plants healthy year-round.
Key Points to Remember
The foundation matters most. A well-prepared soil mix ensures water seeps through effectively and provides the nutrients plants need to thrive.
Prepare the site carefully. Proper excavation, grading, and shaping (like building berms) help channel runoff into your rain garden. Adding a drainage layer beneath the soil mix boosts overall functionality.
Maintenance keeps it working. Regular upkeep prevents problems like soil compaction or blocked drainage, ensuring your rain garden performs well through Maryland’s changing seasons.
Next Steps for Your Project
Now that you’re familiar with the basics, it’s time to plan your next move. Here’s how to keep your project on track:
- Start with a site evaluation and soil percolation test to understand the drainage and slope conditions.
- Think about professional help for complex setups. While DIY can save money, hiring experts ensures long-term performance.
- Pro Landscapes MD offers end-to-end stormwater management services in central Maryland. From evaluating your soil to choosing the right plants, they’ll make sure your rain garden blends perfectly with your landscape.
Reach out to Pro Landscapes MD for a consultation and take the first step toward managing stormwater effectively while supporting Maryland’s environment.
FAQs
How can I check if my yard is suitable for a rain garden?
To figure out if your yard is a good spot for a rain garden, start by testing how fast the soil drains. The ideal drainage rate is 0.5 to 2 inches per hour. Here’s a quick way to check: dig a small hole, fill it with water, and time how long it takes to soak in. Areas that are flat or have a gentle slope and well-drained soil are the best candidates. If your soil doesn’t drain well, you can improve it with amendments to boost infiltration. Good drainage is essential for a rain garden to handle stormwater effectively.
What challenges do clay-heavy soils create for rain gardens, and how can they be fixed?
Clay-heavy soils can pose a challenge for rain gardens because they drain poorly and tend to compact, which can lead to water pooling and damage plant roots. To tackle this, try adding organic matter like compost. It helps loosen the soil, improves its structure, and makes it more permeable. Another useful trick is mixing in gravel or sand to boost drainage.
If the clay is especially dense, you might want to consider creating raised beds. These elevate plant roots above the tough clay layer, giving them a better chance to thrive. With these tweaks, your rain garden can handle clay-rich soil while still absorbing water effectively.
Why should you refresh the mulch in your rain garden regularly, and how does it help with stormwater management?
Keeping the mulch in your rain garden fresh is essential for ensuring it works as it should. New mulch plays a big role in keeping weeds at bay, holding onto soil moisture, and regulating temperature – factors that all contribute to healthier plants and improved stormwater absorption.
Swapping out old mulch also helps prevent it from becoming compacted, which can block water from soaking into the soil. By refreshing the mulch, you enhance the garden’s ability to filter runoff, minimize soil erosion, and handle stormwater more effectively. It’s a simple but crucial step to keep your rain garden thriving and doing its job.
Chat with Us