


- bhavya gada
- No Comments
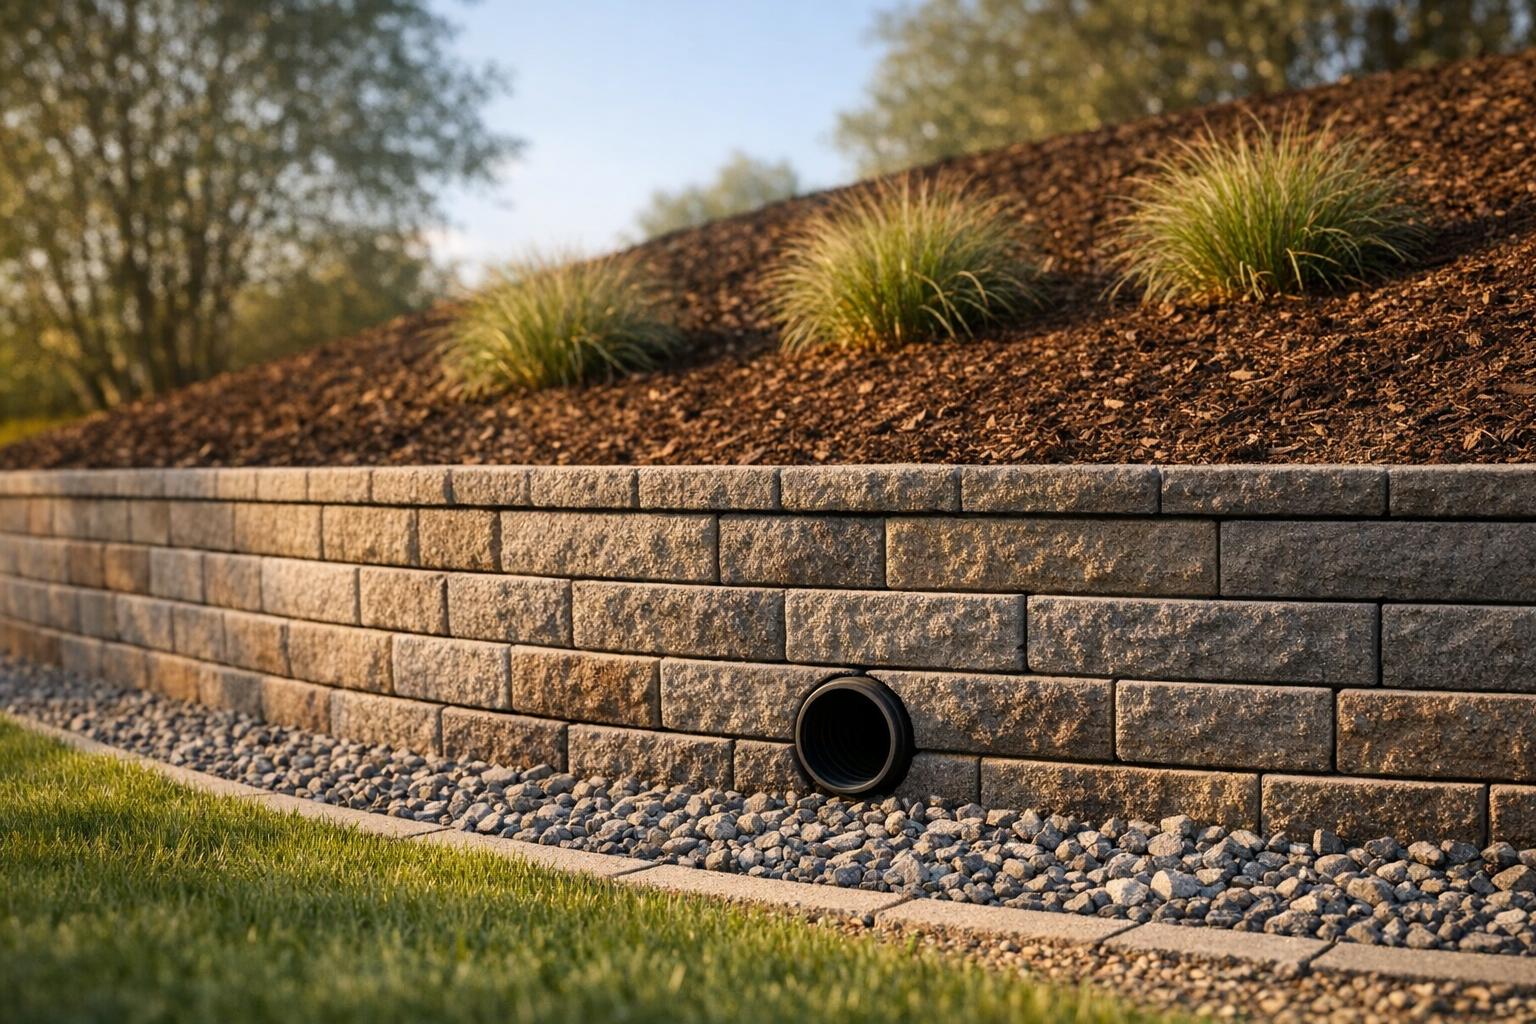
Modular block retaining walls are a durable way to combat erosion on sloped properties. They stabilize soil, manage water runoff, and prevent damage caused by heavy rain or shifting terrain. These walls use interlocking concrete blocks that are easy to install, long-lasting, and can reduce soil erosion by up to 80% when paired with proper drainage systems.
Key benefits include:
- Soil stabilization: Heavy blocks create a gravity-based barrier to hold soil in place.
- Water management: Built-in drainage reduces pressure and prevents washouts.
- Durability: Designed to withstand freeze-thaw cycles and heavy rainfall.
- Cost-effectiveness: Installation costs range from $2,500 to $7,500 for a 50-foot wall, with potential property value increases of 10–15%.
For Maryland homeowners, these walls not only protect against erosion but also make steep land usable for outdoor spaces. Proper construction and maintenance are essential for long-term performance.
We Built a Block Retaining Wall (How to do it right!)
sbb-itb-843f8be
What Are Modular Block Retaining Walls?
Modular block retaining walls are made up of interlocking concrete units that stack together without the need for mortar. Unlike traditional stone walls, which require skilled masonry and mortar application, these blocks are designed with built-in alignment features, making installation faster and more consistent. They are specifically engineered to stabilize slopes and manage drainage effectively.
The blocks themselves are manufactured from concrete and are often textured to resemble natural stone. Whether the finish looks tumbled, chiseled, or quarried, the result mimics the appearance of limestone or granite – minus the higher labor costs. Their uniform size ensures predictable performance across the entire structure.
What makes these systems stand out is their ability to integrate with reinforcement. For taller walls or steeper slopes, modular blocks can be combined with systems like geogrids or "Positive Connection" anchors. These reinforcements dig deep into the hillside, creating a gravity wall capable of withstanding greater soil pressure. Additionally, these blocks allow for creative designs, including curves, corners, terraces, and even raised patios, offering flexibility that poured concrete simply can’t match.
Key Features of Modular Block Walls
Each modular block includes a rear-lip locator that hooks onto the block below, ensuring proper alignment and stability. As Belgard notes:
Diamond Pro blocks allow for easy installation with a rear-lip locator that minimizes error and maximizes strength [4].
This interlocking feature helps prevent shifting and ensures consistent setback angles throughout the wall. It’s especially useful in tight spaces, such as narrow side yards or sloped residential backyards, where heavy equipment access might be limited.
These systems are built to endure harsh weather conditions, including freeze-thaw cycles and heavy rainfall, which are common in places like Maryland. The concrete is designed to resist cracking caused by ice expansion, while the open joints between blocks allow for slight movement without compromising the structure. This reduces maintenance needs over time. Together, these features make modular block walls highly durable against natural forces like erosion.
Materials Used in Modular Blocks
Most modular blocks are made from precast concrete and come in two main types: wet cast and dry cast. Wet cast blocks have more detailed textures, making them ideal for premium applications, while dry cast blocks are the standard choice for segmental retaining walls. Material costs for these blocks typically range from $15 to $30 per square foot [1].
For those seeking a more natural look, options like limestone, granite, and fieldstone are available. These materials provide a classic aesthetic but often require more precise installation techniques. Alternatively, manufactured stone veneers offer a practical middle ground, combining the visual appeal of natural stone with the reliability of concrete-based units.
The concrete used in modular blocks is designed for high compressive strength, allowing the blocks to handle significant loads without failing. This strength not only helps prevent soil erosion but also makes it possible to address challenging landscape conditions with confidence.
How Modular Block Retaining Walls Prevent Erosion
Modular block retaining walls are a practical way to combat erosion by leveraging gravity, managing water runoff, and reinforcing slopes. These methods form the backbone of their effectiveness, setting the stage for the installation steps discussed later.
Gravity Retention and Soil Stabilization
The weight of interlocked modular blocks creates a gravity-based barrier that stabilizes soil and slows water runoff. These blocks are often designed with a lip-and-notch interlocking system, ensuring each layer is securely tied to the one below it. This seamless connection forms a sturdy structure that can withstand soil pressure without shifting [6]. With the ability to stabilize slopes ranging from 10° to 45°, modular walls are versatile enough for both residential yards and commercial spaces [5].
Water Runoff Management
In addition to stabilizing soil, these walls are designed to manage water effectively. Open joints in the block system allow water to pass through, reducing hydrostatic pressure and preventing washouts. This feature is especially useful during heavy rains, as it helps prevent mudslides that could erode topsoil [5]. When paired with drainage enhancements like gravel backfill or perforated drain pipes, modular walls guide water away from erosion-prone areas, allowing it to gradually absorb into the ground instead of pooling or rushing downhill.
Slope Reinforcement
Modular blocks also reinforce slopes by combining secure footings and optional geogrid reinforcement. Their flexible design allows them to contour to slopes, curves, and grade changes without compromising strength [3]. This adaptability makes them ideal for areas most vulnerable to erosion, such as along drainage paths, at the base of hills, or around delicate landscaping. By creating a durable barrier, these walls minimize silt displacement and handle high water flow without losing integrity, offering a reliable solution for erosion-prone environments [7].
Benefits of Modular Block Systems for Erosion Control
Modular block systems not only offer structural strength but also bring a range of advantages that improve functionality and visual appeal. These systems are known for their durability, straightforward installation, and ability to integrate seamlessly into different landscape designs.
Ease of Installation
The interlocking design of modular blocks makes them easy to install without the need for mortar or advanced masonry skills. Blocks are stacked securely without adhesives, simplifying assembly for experienced installers. A solid base of compacted crushed stone – approximately one-third the height of the wall – provides the necessary stability and drainage. This simple setup allows for creative designs while maintaining structural integrity.
Design Flexibility and Appearance
After installation, modular block systems open up numerous design possibilities. They come in a variety of finishes to match either modern or rustic aesthetics, and their ability to contour to curves and handle grade changes makes them perfect for challenging landscapes. Whether you’re creating terraced gardens on steep slopes or defining areas like seating spaces or flower beds, these systems turn previously unusable slopes into functional and attractive outdoor areas. This versatility not only enhances the usability of your property but also boosts its visual charm.
Cost-Effectiveness and Longevity
Unlike erosion control blankets, which typically last just 90–120 days, modular block walls are built to last for decades. Professionally installed walls can even increase property values by 10–15% and speed up sales by as much as 20% [2][8]. The long-term durability and value offered by modular concrete blocks far surpass temporary solutions, making them a wise investment for erosion control and property enhancement.
Steps for Installing Modular Block Retaining Walls
How to Install a Modular Block Retaining Wall in 3 Steps
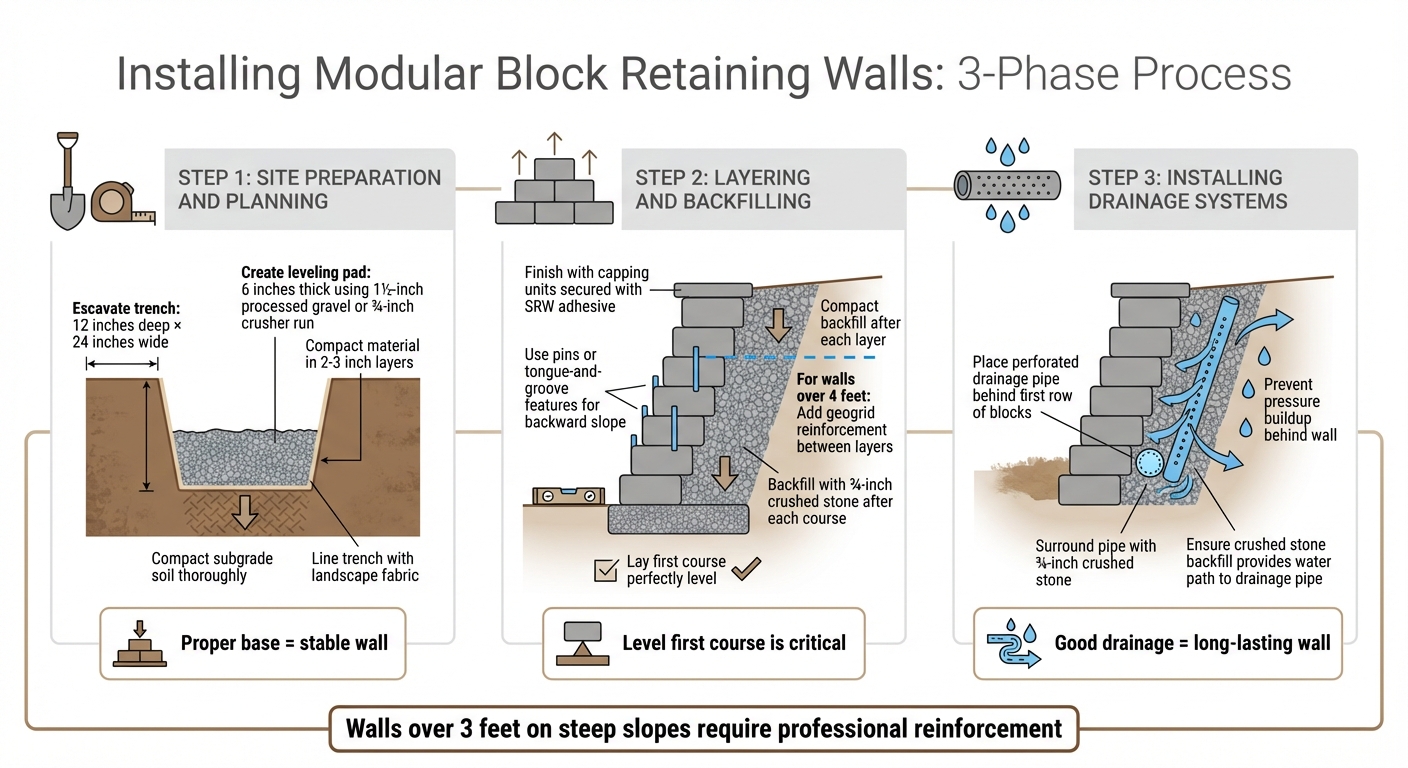
Installing a modular block retaining wall requires thoughtful preparation to effectively manage erosion. This process unfolds in three key phases: preparing the site, building the wall layer by layer, and setting up a drainage system.
Site Preparation and Planning
First, determine whether your project needs a freestanding wall for flat terrain or a retaining wall for sloped areas. As Belgard explains:
Retaining walls are required for slopes and structural support purposes, as they use footings to hold a wall in place and better retain soil [3].
Begin by excavating a trench that’s about 12 inches deep and 24 inches wide [9]. Compact the subgrade soil thoroughly, then line the trench with landscape fabric to prevent soil from mixing with the drainage materials. Next, create a 6-inch thick leveling pad using 1 1/2-inch processed gravel or 3/4-inch crusher run. Compact the material in 2- to 3-inch layers until the pad is complete [9]. This sturdy base ensures the wall remains stable over time. Once the foundation is ready, you can start stacking the blocks.
Layering and Backfilling
With the base in place, begin building the wall one course at a time. Lay the first course of blocks carefully and ensure they are perfectly level – any unevenness at this stage will only worsen as the wall gets taller. Stack each subsequent course with staggered joints to improve strength [9]. Most modular systems include features like pins or tongue-and-groove designs, which naturally create a slight backward slope (known as a "batter" or "setback") to help the wall withstand soil pressure.
After laying each course, backfill the area behind the wall with 3/4-inch crushed stone [9]. Compact the backfill after each layer to avoid future settling. For walls taller than 4 feet, add geogrid reinforcement between layers. These geogrid strips extend into the soil behind the wall, increasing its stability [9]. To finish, use capping units secured with SRW (Segmental Retaining Wall) adhesive, giving the wall a clean appearance and extra durability.
Installing Drainage Systems
Good drainage is critical for a retaining wall’s longevity. Start by placing a perforated drainage pipe behind the first row of blocks to channel water away from the wall [9]. Surround the pipe with 3/4-inch crushed stone, which allows water to flow freely while keeping soil out of the system. The crushed stone backfill behind each layer not only stabilizes the wall but also provides a path for water to reach the drainage pipe, preventing pressure buildup behind the wall. Proper drainage ensures the wall remains effective at controlling erosion for years to come.
Maintenance for Long-Term Erosion Control
Once your modular block retaining wall is installed, keeping up with regular maintenance is key to ensuring it continues to protect your property from erosion. Routine checks and upkeep can stop small issues from turning into costly repairs.
Inspecting for Settling and Cracks
After major weather events, take time to inspect your wall for any signs of settling or cracking. Pay special attention to the mortarless joints where the blocks lock together using their lip-and-notch design. Shifts in alignment can signal settling or pressure issues [6]. Walk along the base to confirm that the footings are still buried and stable. Belgard explains:
Retaining walls are required for slopes and structural support purposes, as they use footings to hold a wall in place and better retain soil [3].
If footings become exposed, it could mean the wall is leaning or losing its structural strength. Additionally, check the soil behind the wall – any noticeable displacement might indicate a problem with the drainage system. After your inspection, make sure all drainage components are clear and functioning to keep the wall stable.
Clearing Drainage Paths
A well-maintained drainage system is crucial for keeping water away from the wall. After heavy rains, look for signs of washouts or displaced soil behind the wall. Make sure the perforated pipe and crushed stone backfill are free from blockages [5]. Clear out any leaves, dirt, or debris from drainage outlets. If you spot standing water or soggy soil near the wall, it may be time to address potential drainage issues.
Repairing Erosion at the Base
If you notice erosion at the base of the wall, act quickly. Even small voids can weaken the wall’s support. Fill eroded areas with compacted gravel to restore stability under the blocks. However, if you see significant settling or multiple blocks shifting out of place, the problem might require more than basic maintenance. In such cases, it’s wise to contact a professional to evaluate whether repairs or reinforcements are necessary.
Conclusion
Modular block retaining walls are an effective way to manage erosion on sloped properties. Acting as barriers against gravity and water flow, these walls help reduce soil erosion by intercepting heavy rainfall, redirecting runoff away from foundations, and easing hydrostatic pressure with built-in drainage systems. At the same time, they create tiered outdoor spaces that enhance the usability of sloped areas.
However, their effectiveness hinges on proper construction and regular maintenance. For walls over 3 feet tall on steep slopes, professional reinforcement and precise drainage systems are critical. Techniques like geogrid reinforcement can improve lateral soil resistance by up to 30% [2], while well-graded drainage channels ensure water is directed away from vulnerable areas efficiently.
In addition to controlling erosion, these walls offer financial benefits. Professionally built retaining walls can boost property values and even help homes sell faster [2]. This makes modular block systems a practical investment for homeowners looking to protect their property while enhancing its appeal.
For Maryland homeowners dealing with erosion challenges or aiming to optimize their outdoor space, Pro Landscapes MD specializes in designing and installing retaining walls. Serving central Maryland – including Howard County, Montgomery County, Carroll County, Frederick County, Prince George’s County, and Baltimore County – their team provides comprehensive services, from site assessments and drainage planning to construction and ongoing maintenance.
FAQs
Do I need a permit for a retaining wall in Maryland?
In Maryland, you’ll need a permit to build a retaining wall if its height exceeds 3 feet (36 inches) for residential projects or 30 inches for commercial ones. Additionally, permits are required if the wall:
- Supports surcharge loads
- Crosses property lines
- Falls within a county right of way
How do I know if my wall needs geogrid reinforcement?
If your retaining wall is tall, built on a slope, or under significant soil pressure, you might need geogrid reinforcement. This material enhances stability, making it particularly useful for taller or more complex walls in tough conditions.
It’s a good idea to consult a professional landscaper to assess critical factors like the wall’s height, the type of soil, and the slope of the land. Proper reinforcement can make a big difference in ensuring long-term stability and protecting against erosion or structural issues.
What drainage setup works best behind a block retaining wall?
The best drainage system for a block retaining wall combines perforated pipes, weep holes, and gravel backfill. These components manage water flow effectively, reducing hydrostatic pressure. This helps keep the wall stable and minimizes the risk of damage over time.
Chat with Us