


- bhavya gada
- No Comments
Mulching your garden beds for winter protects plants from harsh cold, keeps soil temperatures stable, and prevents frost heaving. The goal isn’t to keep plants warm but to maintain dormancy. Here’s what you need to know:
- Timing: Apply mulch after the first hard freeze to avoid trapping heat.
- Preparation: Clear weeds, debris, and diseased plants from beds. Deep-water plants during dry spells before the ground freezes.
- Mulch Types: Organic options like shredded leaves, pine needles, and straw insulate soil and improve its quality over time. Avoid inorganic mulches for winter as they don’t regulate soil temperature effectively.
- Application: Spread mulch 2–4 inches deep, keeping it away from plant stems to prevent rot.
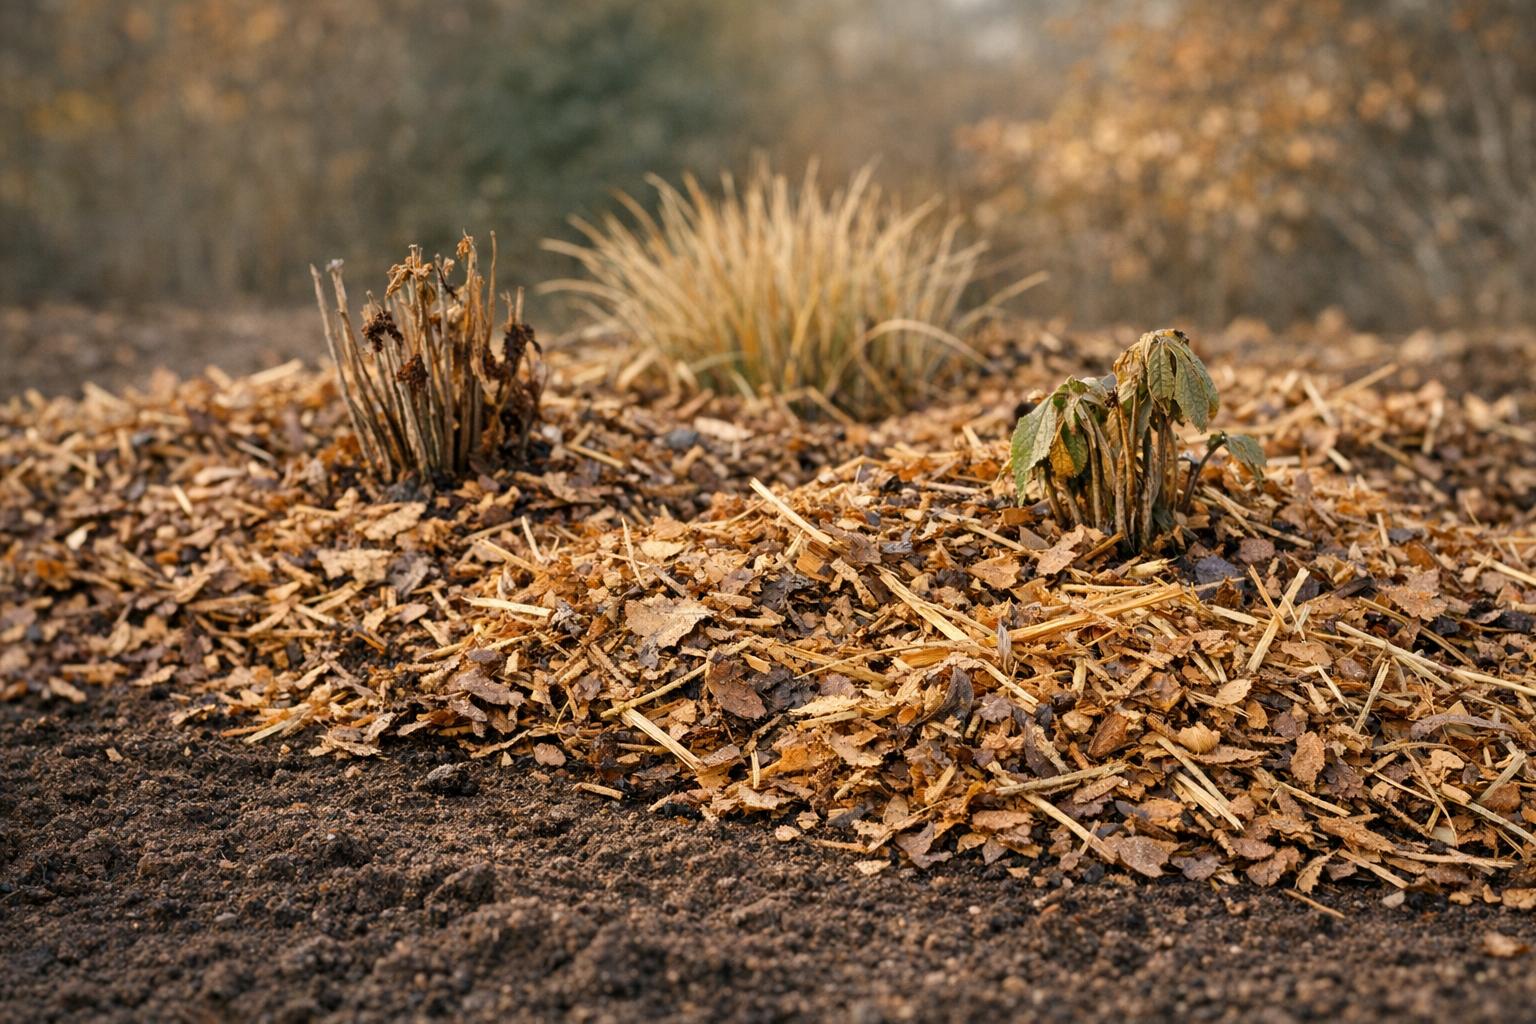
How to prepare flower beds for winter, keep moisture in and weeds out using mulch.
Preparing Garden Beds for Mulching
Hold off on mulching your perennial beds until after the first hard freeze. In central Maryland, this typically occurs in late November or early December. Applying mulch too early can trap heat in the soil, leading to freeze-thaw cycles that damage plants or even cause them to break dormancy too soon. Once temperatures consistently stay below freezing and your plants have fully entered dormancy, it’s time to get started. The first step? Give your beds a thorough cleanup.
Cleaning and Weeding
Before laying down mulch, take the time to clear out weeds, dead plants, and debris from your garden beds. This step is crucial because leftover plant matter can provide winter hiding spots for pests like bean beetles and lanternflies. Rotting vegetables and diseased plants can also harbor harmful bacteria and fungal spores that may infect your garden when spring arrives. Annette Cormany, Principal Agent Associate and Master Gardener Coordinator at the University of Maryland Extension, emphasizes the importance of this prep work:
"A little time spent now routing out weeds pays you back tenfold. Some weeds overwinter and set seed in the spring, multiplying rapidly." [7]
For crops like asparagus, cut the foliage down to 2-inch stubs after the first frost before applying mulch [3]. If any of your plants suffered from severe disease or pest issues during the growing season, be sure to remove them entirely and dispose of them in the trash – don’t compost them.
Soil Preparation
Once your beds are cleared, it’s time to focus on the soil. During dry spells, deep-water your plants every 7–10 days to help their roots absorb moisture before the ground freezes. This is especially important for newly planted shrubs, trees, and broadleaf evergreens like hollies and rhododendrons [5]. If you haven’t already, test your soil’s pH and nutrient levels before the ground becomes too hard to work [3]. For beds that dealt with pest problems during the growing season, lightly till the soil to disrupt soil-dwelling insects like cucumber beetles [3]. After addressing soil moisture and structure, move on to defining your garden bed boundaries.
Creating Edges for Mulch Containment
Establish clear edges for your garden beds to keep mulch in place and prevent it from spilling into your lawn. Whether you opt for a shallow trench or install edging material, this step is especially important for sloped areas where water runoff could carry mulch downhill. A well-defined edge not only keeps your mulch in check but also gives your garden a polished look and simplifies spring maintenance. Use a flat spade to cut a clean, 2–3 inch deep line around your beds [4].
Selecting the Right Mulch for Your Garden
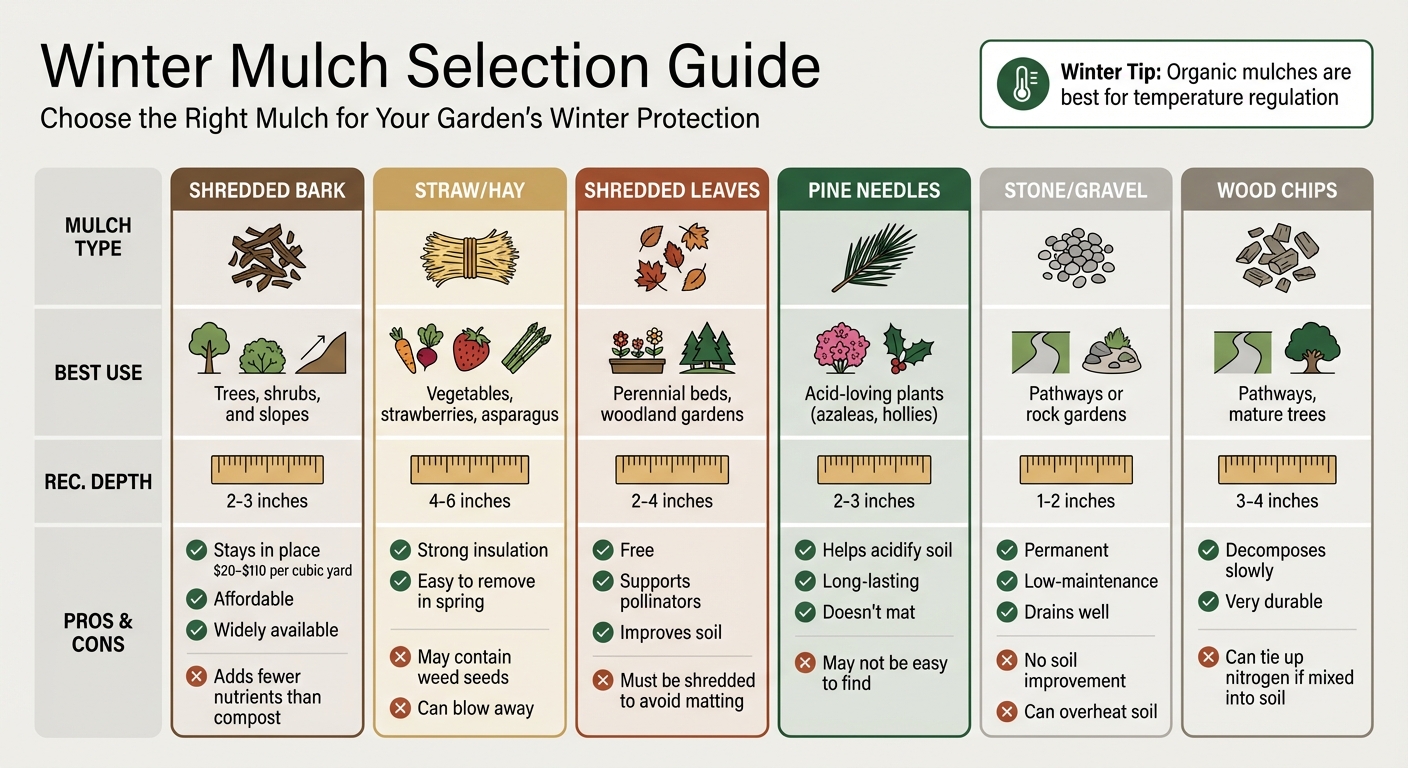
Winter Garden Mulch Types Comparison Guide
Picking the right mulch is key to keeping your soil in good shape year-round. While summer mulching focuses on keeping the soil cool and retaining moisture, winter mulching has a different job – keeping the ground frozen to help plants stay dormant. B. Rosie Lerner, an Extension Consumer Horticulture Specialist at Purdue University, explains it well:
"Winter mulch isn’t necessary for all garden plants, but it can mean survival for some less hardy ones. The main benefits of winter cover are to protect against wide temperature fluctuations in the soil and to prevent extreme cold temperatures from harming plants." [2]
Let’s break down the options for organic and inorganic mulches to help you make the best choice for winter protection.
Organic Mulch Options
Organic mulches are a great way to protect your garden during the colder months, especially in areas like central Maryland. Shredded bark is a solid option for sloped areas because its fine texture keeps it in place. It’s also relatively affordable, costing between $20 and $110 per cubic yard [6][9]. Spread it 2 to 3 inches deep around trees and shrubs for the best results. For vegetable gardens or crops like strawberries and asparagus, straw is an excellent insulator. Apply it 4 to 6 inches deep, but keep in mind it may contain weed seeds [2][3].
If you want a free option, shredded leaves are a fantastic choice. They not only provide insulation but also support pollinators that overwinter in the leaf litter [3][1]. To prepare, run your mower over fallen leaves to shred them, then spread a 2- to 4-inch layer across your perennial beds. Avoid using whole leaves, as they can mat down and block water from reaching the soil [8][6]. For acid-loving plants like azaleas or hollies, pine needles work wonderfully. Spread them 2 to 3 inches deep – they help maintain soil acidity and won’t mat down [6].
Inorganic Mulch Considerations
Inorganic mulches, such as stone, gravel, and rubber, are durable but less effective at insulating soil during winter. These materials tend to absorb sunlight, causing the soil to warm during the day and freeze at night, leading to rapid freeze-thaw cycles [9][10]. Additionally, they don’t break down to provide nutrients, and some – like plastic sheeting – can block water and air from reaching plant roots [9][11]. That said, inorganic mulches can be useful in specific settings, like rock gardens or around home foundations, where gravel may help deter termites [10]. However, for winter garden protection, organic mulches are generally the better choice.
Mulch Type Comparison Table
Here’s a quick overview of different mulch types and their best uses:
| Mulch Type | Best Use | Recommended Depth | Advantages | Disadvantages |
|---|---|---|---|---|
| Shredded Bark | Trees, shrubs, and slopes | 2–3 inches | Stays in place; affordable; widely available [8][6] | Adds fewer nutrients than compost [6] |
| Straw/Hay | Vegetables, strawberries, asparagus | 4–6 inches | Strong insulation; easy to remove in spring [2][3] | May contain weed seeds; can blow away [6] |
| Shredded Leaves | Perennial beds, woodland gardens | 2–4 inches | Free; supports pollinators; improves soil [3][1] | Must be shredded to avoid matting [8][6] |
| Pine Needles | Acid-loving plants (e.g., azaleas) | 2–3 inches | Helps acidify soil; long-lasting; doesn’t mat [6] | May not be easy to find [8] |
| Stone/Gravel | Pathways or rock gardens | 1–2 inches | Permanent, low-maintenance; drains well [8][6] | No soil improvement; can overheat soil [8][6] |
| Wood Chips | Pathways, mature trees | 3–4 inches | Decomposes slowly; very durable [8] | Can tie up nitrogen if mixed into soil [6] |
sbb-itb-843f8be
How to Apply Mulch for Winter Protection
Mulching for winter protection is all about timing and technique. Wait until after the first hard frost or when plants are fully dormant before applying mulch. This ensures the soil is properly insulated without trapping unnecessary heat. As Jeff Gillman, Director of the University of North Carolina Charlotte Botanical Gardens, explains:
"Applying winter mulch right after the first hard frost of the season. If you mulch too early, heat can get trapped in the soil, worsening the freeze-thaw damage as air temperatures drop." [4]
Once your garden bed is cleaned and the soil is prepped, follow these steps to shield your plants from winter’s chill.
Checking Existing Mulch and Soil Conditions
Start by inspecting your garden beds. If there’s old mulch, rake and fluff it to improve airflow and water absorption. Matted or moldy mulch can block these essential processes, so addressing it is critical [8]. If pests or diseases are present, remove the old mulch completely. Otherwise, you can mix it into the soil to recycle its nutrients. Also, check the soil’s moisture levels – ensuring it’s adequately hydrated before the ground freezes is key for plant health.
Proper Mulch Application Techniques
Spread fresh mulch evenly to a depth of 2 to 4 inches, depending on the type of material you’re using [2] [8]. Be careful to keep the mulch several inches away from plant stems, tree trunks, and crowns. This prevents issues like rot and pest infestations [8] [4]. Avoid piling mulch directly against trunks or stems – commonly referred to as the "volcano" method – as it can cause long-term damage. For perennials, leave a 1- to 2-inch gap around the stems to reduce the risk of crown rot.
Watering After Mulching
Once your mulch is in place, give it a light watering. This helps it settle into position and reduces the chance of wind blowing away lighter materials like straw or shredded leaves. A gentle soak is all you need to secure the mulch and ensure it provides effective protection throughout the winter.
Common Mulching Mistakes to Avoid
When it comes to protecting your garden during winter, mulching can be a game-changer – but only if done correctly. Missteps in mulching can undo all your hard work, so it’s crucial to understand what to avoid.
Over-Mulching and Root Suffocation
Piling on too much mulch might seem like a good idea, but it can actually do more harm than good. Excessive mulch blocks oxygen from reaching plant roots, which can stress or even kill your plants. The Brooklyn Botanic Garden Staff highlights this risk:
"The goal of winter mulch is to keep plants dormant, not warm. If they are kept too warm, they may break bud, and the tender growth will be killed by winter conditions." [12]
To avoid this, keep mulch at least 6 inches away from tree trunks and limit the depth to 2–3 inches. Timing your application is just as important to avoid other potential problems.
Timing and Pest Risks
Applying mulch too early can cause plants to delay dormancy, increasing the risk of premature bud break. It can also attract pests looking for shelter. B. Rosie Lerner, an Extension Consumer Horticulture Specialist at Purdue University, stresses this point:
"Timing is critical when applying winter mulch. Applying it too early can smother the plant and encourage disease development." [2]
Waiting until plants are fully dormant ensures they’re better prepared for winter conditions.
Mulching on Slopes
Gardens on slopes present their own set of challenges. Lightweight mulch materials like straw or loose bark can easily get washed away by winter rains or melting snow, especially on slopes steeper than 2:1 [13][14]. A better option for these areas is pine needles, as their interlocking structure helps them stay in place [6][4]. For even steeper slopes, shredded bark works well to anchor the mulch. You can also secure it with netting or apply a slightly thicker layer of 3–4 inches for added stability.
Understanding these common mistakes will help you make the most of your mulching efforts and keep your winter garden protected.
Conclusion
Winter mulching is a reliable way to shield your garden from Maryland’s unpredictable cold snaps. By prepping your garden, choosing the right type of mulch, and applying it properly, you set the stage for a thriving spring.
The goal isn’t to keep plants warm but to maintain steady soil temperatures, ensuring plants stay dormant. This consistency helps prevent the freeze-thaw cycles that can dislodge roots and damage delicate growth. Beyond temperature control, this method also supports the other advantages discussed earlier.
Clearing out debris and weeds before mulching is key to stopping pests and diseases from settling in for the winter. Using organic materials like shredded leaves, pine needles, or straw not only insulates the soil but also breaks down over time, enriching it naturally. Winter mulching does more than protect plants – it conserves soil moisture, minimizes erosion from winter rains or snow, suppresses weeds, and even supports local ecosystems by offering shelter to beneficial insects.
If you need professional help with your winter garden care, local experts are available. Pro Landscapes MD offers landscaping services throughout central Maryland, covering areas like Howard County, Montgomery County, Carroll County, Frederick County, Prince George’s County, and Baltimore County. Their team’s horticultural knowledge ensures your garden gets the seasonal care it needs.
FAQs
What are the best organic mulches to protect garden beds in winter?
The most effective organic mulches for winter protection are those that insulate plants, retain moisture, and decompose slowly over time. Popular choices include straw, pine needles, shredded hardwood bark, and pine bark chips. When applied in a 2–4 inch layer, these materials help shield plant roots from the harsh freeze-thaw cycles of winter while also minimizing soil movement. In the Mid-Atlantic region, shredded hardwood and pine bark are particularly popular due to their durability, natural look, and ability to enrich the soil as they break down.
To apply mulch properly, spread it evenly to a depth of 2–4 inches, but leave a small gap around tree trunks or shrub stems to avoid rot. For those who prefer a finer texture, leaf mulch can be a good option – just be sure to loosen it to prevent compaction. For larger garden beds, a mix of pine needles and bark chips provides excellent insulation, long-lasting coverage, and gradual nutrient release.
If you’re not sure which mulch will work best for your garden, Pro Landscapes MD can guide you in selecting and applying the right option to protect your plants and maintain healthy soil all winter long.
How can I stop mulch from blowing away on windy days?
To keep your mulch from blowing away on windy days, consider these practical tips:
- Opt for heavier mulch types like shredded bark, hardwood, or gravel. These materials are naturally more resistant to being carried off by the wind.
- Apply mulch evenly and thickly, aiming for a depth of 2–4 inches. This added weight helps keep it firmly in place.
- Add barriers or edging such as stones, plastic, or metal borders. Alternatively, plant shrubs to act as a natural windbreak around your garden beds.
- Anchor the mulch using breathable landscape fabric underneath or mulch netting over the top. Both options allow air and water to pass through while keeping the mulch secure.
By using sturdy materials, applying the right amount, and adding protective barriers, you can keep your garden looking tidy and your mulch exactly where it belongs, even through blustery weather.
Why should I mulch my garden beds after the first hard freeze?
After the first hard freeze, mulching becomes an important step to shield your plants through the winter. A layer of mulch acts like a blanket, insulating the soil to protect roots from harsh cold and sudden temperature swings that could lead to root damage or even soil heaving.
Timing matters, though. Waiting until plants are fully dormant – after that first hard freeze – prevents issues like smothering or encouraging diseases. Beyond winter protection, mulching also helps the soil retain moisture and sets the stage for healthier growth when spring rolls around.
Chat with Us