


- bhavya gada
- No Comments
Maintaining your paver patio is simpler than you think and can save you money in the long run. Here’s what you need to know:
- Clean Regularly: Sweep weekly to remove dirt and debris. Wash monthly with mild detergents while avoiding harsh chemicals and high-pressure washers.
- Prevent Weeds and Moss: Remove weeds manually, use vinegar solutions for moss, and fill gaps with polymeric sand to keep growth at bay.
- Seal Every 3–5 Years: Sealing protects against stains, UV damage, and weather. Ensure pavers are dry before applying any sealant.
- Repair Damage Quickly: Fix cracks, chips, and loose pavers early to prevent larger structural problems. Address drainage and base issues as needed.
- Seasonal Adjustments: Protect against Maryland’s freeze-thaw cycles in winter and inspect drainage in spring to avoid water damage.
How to Clean & Seal Pavers | Restore Old Patio, Walkway & Driveway Pavers Step-by-Step
sbb-itb-843f8be
Regular Cleaning for Paver Patios
Keeping your paver patio clean isn’t just about appearances – it’s about protecting it from dirt buildup, stains, and wear that can shorten its lifespan. Regular cleaning lays the groundwork for effective sealing and timely repairs. Before diving into any cleaning routine, make sure to clear away furniture, planters, and other items to access every corner and remove hidden debris.
Weekly Sweeping and Debris Removal
A weekly sweep goes a long way in preventing dirt from embedding into the paver surface, making future cleaning much easier. Use a broom or a stiff-bristled brush for this task, but avoid wire or steel brushes, as they can scratch and weaken the pavers. As Belgard warns, "Using wire or steel brushes isn’t recommended, as these could damage the pavers cosmetically and structurally" [1]. While sweeping, take the time to pull out any weeds to stop their roots from spreading and disrupting the structure of your patio. After sweeping, rinse the area with a garden hose to wash away fine dust and leftover debris. This simple routine keeps buildup in check and makes monthly cleaning more effective.
Monthly Washing with Mild Detergents
While weekly sweeping tackles loose dirt, a monthly wash ensures your patio gets a deeper clean. Start by wetting the entire surface with a garden hose – this step prevents cleaning solutions from soaking into dry pavers and causing damage. Mix a solution of warm water with a mild soap, like dishwashing or hand soap. Caroline Fallon from Nicolock suggests, "A solution of regular dishwashing soap or hand soap is simple to create, and it will remove mild to moderate dirt, stains, and grease" [2]. For an eco-friendly option, consider using a chemical-free cleaner like Simple Green, which is safe for outdoor use and family-friendly. Always test your cleaning solution on a hidden area first to check for discoloration. Scrub the surface with a stiff-bristle brush or push broom, and rinse thoroughly to remove all soap residue.
Avoiding Harsh Chemicals and High-Pressure Washers
Though high-pressure washers might seem like a quick fix, they can actually harm your pavers. Excessive pressure can erode the surface and wash away the joint sand that stabilizes the pavers. If you must use one, stick to the lowest pressure setting and use a round brush attachment. Belgard recommends relying on a stiff brush and manual scrubbing over pressure washing [1]. Avoid scouring pads entirely, as they can scratch the surface and strip away sealant. For tough organic stains, like those from leaf rot or tobacco, a diluted bleach solution (10 parts water to 1 part bleach) may help, but always test it on a small area first. And don’t forget safety – wear non-slip shoes to avoid accidents while working on wet surfaces. Once the cleaning is done, you’ll be ready to tackle any organic growth that could compromise your patio’s structure.
Preventing Weed and Moss Growth
Once you’ve cleaned your patio, keeping weeds and moss at bay is key to maintaining a smooth, safe surface. These nuisances can mess up the paver joints and lead to uneven areas over time.
Manual Removal and Vinegar Solutions
Pulling weeds by hand works best right after it rains since the damp soil makes it easier to remove the roots completely. For moss, use a brush or scraper to lift it out, especially when it has shallow roots. Regular sweeping also helps by disturbing weed seeds before they take hold.
For tougher growth, try a 1:1 vinegar-water spray or a baking soda solution. Spray the affected spots, let it sit for 15–20 minutes, and then scrub with a soft brush. Chris Rusch, an OSU Master Gardener Volunteer, advises, "Leave it for 15–20 minutes, and repeat the process for a week. Wash your driveway afterward to remove the excess vinegar" [4]. Always test any solution on a small, hidden area first to ensure it doesn’t harm your paving materials. Another tip? Trim nearby trees and shrubs to increase sunlight exposure, as moss thrives in shady, damp spots. Combined with regular cleaning, these steps will help keep your patio looking great and structurally sound.
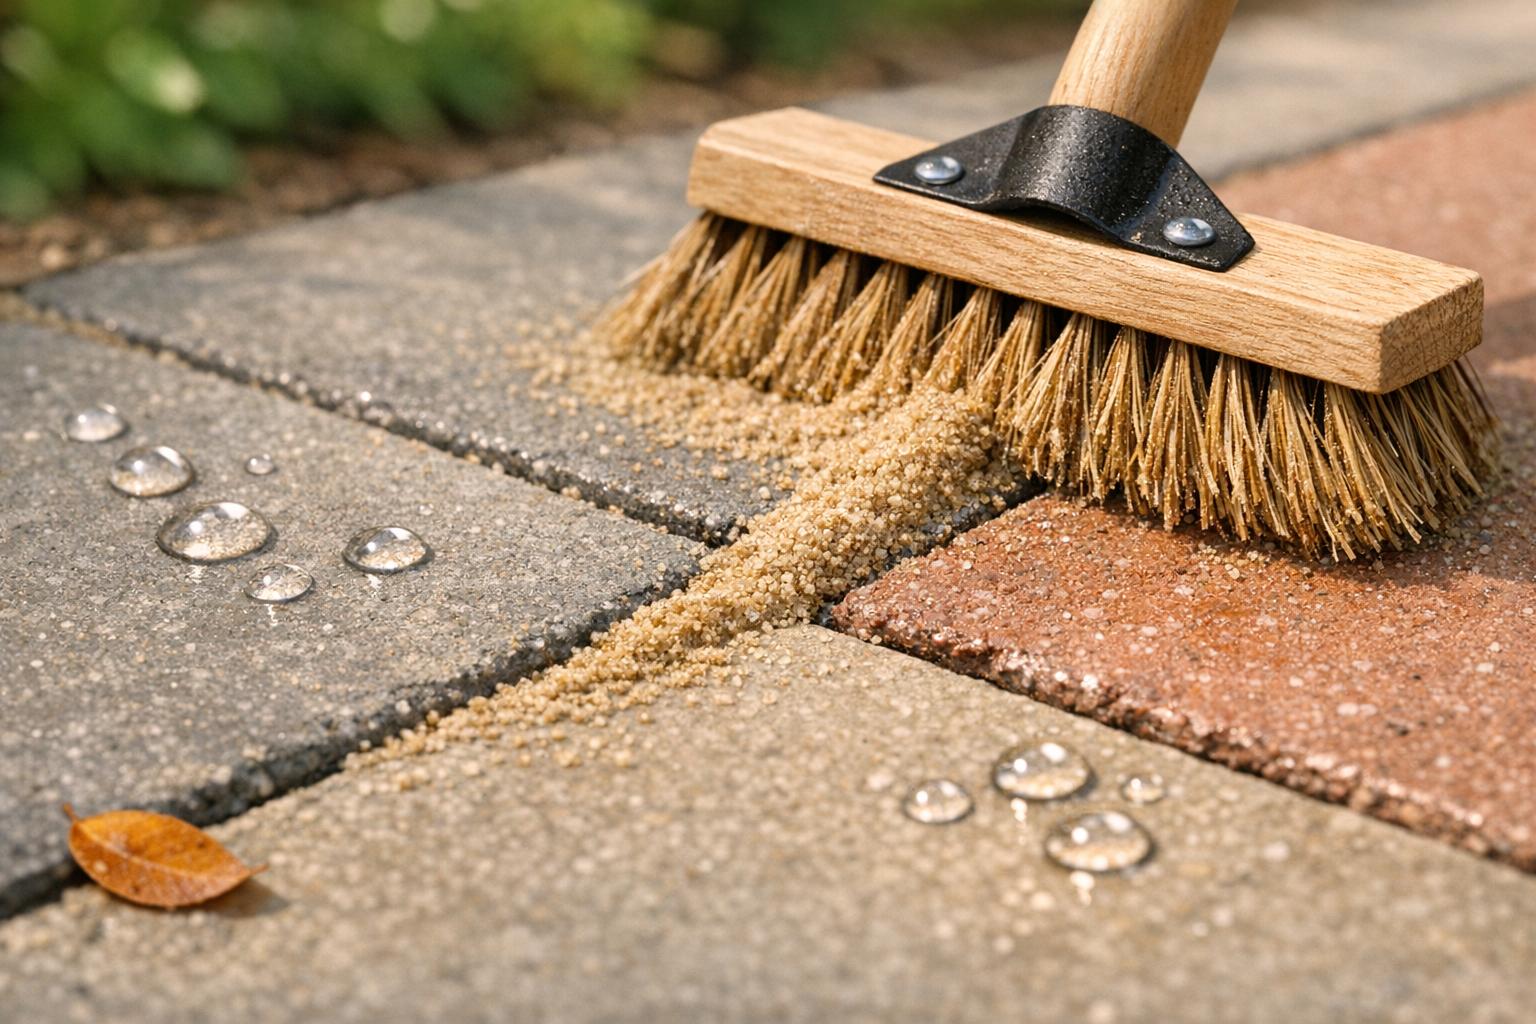
Using Polymeric Sand to Fill Gaps
While manual methods control surface growth, polymeric sand is excellent for sealing joints and stopping weeds from pushing through. This sand hardens when dry and stays in place even when wet. According to Techniseal, "Polymeric sand prevents weed growth in paver joints almost completely" [3].
Before applying polymeric sand, make sure the joints are at least 1/8 inch wide and 1.5 inches deep. Use a power washer to clear out old sand or debris, then sweep the new sand evenly into the joints with a street broom. Secure it with a rubber mallet or plate vibrator, and blow away any excess with a leaf blower to avoid staining. Once the joints are filled, lightly spray with water and allow 30 days for the sand to cure. Keep in mind, though, that while polymeric sand prevents weeds from growing between the pavers, moss and algae can still form on the surface in damp, shady areas. Annual cleanings and applying a protector can help keep your patio in top shape for the long haul.
Sealing Paver Patios for Protection
Sealing your paver patio is a smart way to shield it from stains, weather damage, and fading. A sealant creates a protective layer over porous materials like concrete or stone, stopping oil, grease, dirt, and spills from seeping in – making cleanup much easier. Plus, sealants act as a defense against moisture, rain, and freeze-thaw cycles (especially important in Maryland’s climate), helping to prevent surface erosion and structural wear over time.
Sealants also block harmful UV rays that can cause pavers to lose their color. Depending on your preference, you can choose a glossy finish for a polished look or a natural matte finish to highlight the texture and tone of your pavers. Another benefit? Sealing helps keep polymeric sand in place, which reduces weed growth and cuts down on debris buildup that can lead to mold or moss. By protecting against moisture-related issues, sealants can significantly extend the life of your patio.
When and How Often to Seal Pavers
Most paver patios should be resealed every 3–5 years, depending on factors like sunlight exposure, foot traffic, and weather conditions [5]. You’ll know it’s time to reseal when water stops beading on the surface, colors start fading, or stains from spills become more noticeable. Increased weed growth between joints or a dull appearance despite regular cleaning are also signs it’s time to reapply the sealant.
For new pavers, allow them to cure for 30–90 days before sealing. Sealing too soon can trap moisture, leading to efflorescence – a white, chalky residue on the surface. Make sure the patio is completely dry and clear of debris before applying the sealant, and always test the product on a small, hidden area first to check how it affects the color and finish.
Step-by-Step Guide to Sealing Pavers
- Clean the Surface: Start by thoroughly cleaning the patio using a mild detergent and a soft brush or low-pressure washer. Remove all dirt, stains, and organic growth. Let the surface dry completely for 24–48 hours – trapped moisture under the sealant can cause clouding or efflorescence.
- Choose the Right Sealer: Once the patio is dry, pick a sealer that fits your needs. Solvent-based sealers penetrate deeply and resist oil and UV rays, making them ideal for high-traffic areas, though they have a strong odor [5]. Water-based sealers are eco-friendly, easier to clean up, and better suited for residential patios, though they may not last as long. Penetrating sealers maintain a natural look, while acrylic and polyurethane options offer varying levels of gloss and durability.
- Apply the Sealer: Use a roller or sprayer to apply the sealer evenly in small sections, avoiding lap marks. For pool decks or walkways, choose a slip-resistant product, as some high-gloss sealers can become slippery when wet.
- Allow for Curing: Let the first coat dry for 4–6 hours before applying a second coat. Avoid walking on the patio for at least 24 hours, and keep vehicles off for 48–72 hours to ensure the sealant cures properly.
- Maintain the Sealed Surface: Once sealed, maintenance becomes easier. Regular sweeping and gentle washing will keep your patio looking great, as the sealant prevents contaminants from penetrating the pavers.
For expert advice on sealing and maintaining your paver patio, consider consulting with Pro Landscapes MD. Next up, learn how to handle cracks, chips, and loose pavers to keep your patio in top shape.
Repairing Cracks, Chips, and Loose Pavers
Fixing minor issues promptly helps keep your patio in good shape and ensures cleaning and sealing efforts remain effective. Even with regular maintenance, problems like uneven surfaces can arise due to poor compaction, water intrusion, or too much bedding sand. If you notice shifting pavers or widening gaps, it could mean the edge restraints are loose or failing. Missing joint sand, especially in areas exposed to heavy use, can weaken the patio’s structure. A white, chalky residue (known as efflorescence) might appear on the surface – this is a harmless chemical reaction that only affects the look of your patio, not its strength. However, oil stains that seep deeply into the pavers and resist cleaning with detergent and hot water may require replacing the stained pieces. High-quality interlocking concrete pavers are designed to handle a minimum compressive strength of 8,000 psi and have water absorption rates under 5% [6].
Replacing Damaged or Loose Pavers
One of the great things about paver patios is how easy they are to repair. Interlocking pavers can be removed and reinstalled without much hassle. If you spot an issue, remove about 18 inches (0.5 m) of pavers around the damaged area to give yourself enough space to level the bedding sand properly. Make sure the bedding sand remains under 1.5 inches (40 mm) thick – adding extra sand to fix base issues is not a good idea. Check the edge restraints; if the pavers are shifting outward, tighten or replace them as needed. If leveling and realignment don’t solve the problem, it’s likely time to address the base itself.
Fixing Base Issues and Preventing Water Damage
Repairing the base is crucial for maintaining your patio’s stability over time. For areas where the ground has settled, remove the pavers and bedding sand. Then, add and compact new base material to create a solid foundation. Skipping this step or doing it improperly can lead to water pooling and further erosion issues. If you notice oil leaks, clean them immediately with liquid detergent and hot water to stop the oil from soaking in too deeply, which could force you to replace the pavers. For more challenging repairs, like significant settling or drainage problems, it’s often best to call in professionals. Companies like Pro Landscapes MD in central Maryland specialize in restoring bases and reinstalling pavers correctly, ensuring a long-lasting fix [6].
Seasonal Maintenance for Maryland Climates
Taking care of your patio isn’t just about cleaning and sealing – it’s also about adjusting your routine to match Maryland’s changing seasons. With winters that freeze and summers that bring heavy humidity, your paver patio faces unique challenges that require extra attention.
Winter Protection from Freeze-Thaw Cycles
Winter can be especially tough on patios. The freeze-thaw cycles in Maryland’s colder months can wreak havoc if your pavers aren’t properly sealed. As Hardscape Restoration points out:
If your pavers are not properly sealed, snow can get in between them and cause a shift in the formation [7].
To minimize damage, seal your patio before the first snowfall to prevent moisture from seeping between the pavers. When snow piles up, clear it promptly to reduce pressure on the surface. After a heavy snow melts, take a close look at your patio. If you notice pavers shifting, it could mean the sealant or joint sand has failed. Addressing these issues in early spring makes repairs far simpler.
Drainage and Edge Restraint Inspections
Spring and summer bring Maryland’s frequent rainstorms, which can lead to water pooling on your patio if drainage isn’t adequate. Check that water flows away from the surface rather than collecting in low spots. Standing water after a storm might mean you need to adjust the grading or add drainage solutions.
Edge restraints are another critical component of patio stability. These can loosen over time, especially after winter’s freeze-thaw cycles. Inspect the edges of your patio every spring and fall. If pavers near the edges start to shift or gaps appear, it’s time to tighten or replace the restraints. In the fall, make sure to sweep away leaves regularly. Wet leaves left on the patio – or trapped under a fresh layer of sealant – can leave behind stains that are tough to remove.
Common Maintenance Mistakes to Avoid
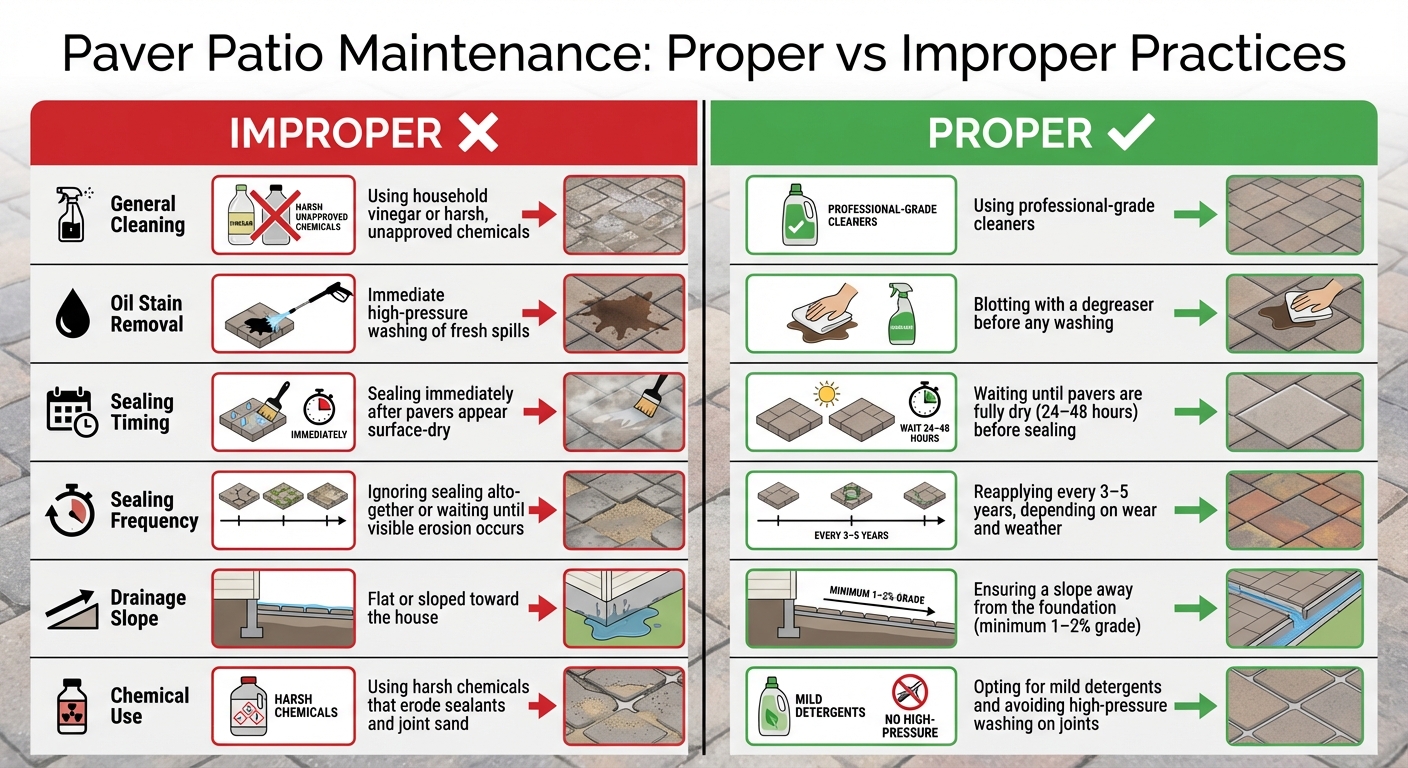
Paver Patio Maintenance: Proper vs Improper Practices Guide
When maintaining your pavers, it’s just as important to know what not to do as it is to follow proper care routines. Here are some common mistakes to steer clear of:
One frequent error is cleaning with household vinegar. While it might seem like a natural and eco-friendly choice, vinegar’s acidity can harm the surface of your pavers, potentially causing discoloration or damage. Instead, stick to professional-grade cleaners designed specifically for pavers [8].
Another misstep is sealing pavers before they are fully dry. Even if the surface appears dry, sealing too soon can trap moisture, leading to white, chalky efflorescence or even sealant failure. Always check that the pavers are completely dry – this usually takes 24 to 48 hours – and keep an eye on the weather forecast to avoid sealing during rainy conditions.
Improper oil stain removal is another common issue. Avoid blasting fresh oil spills with high-pressure water, as this can spread the stain further. Instead, blot the area with a degreaser before gently cleaning. Also, never apply acidic cleaners to dry pavers; always pre-wet the surface to prevent damage.
To help you avoid these pitfalls, here’s a handy comparison table outlining proper versus improper practices:
Comparison Table: Proper vs. Improper Practices
| Practice | Improper | Proper |
|---|---|---|
| General Cleaning | Using household vinegar or harsh, unapproved chemicals. | Using professional-grade cleaners. |
| Oil Stain Removal | Immediate high-pressure washing of fresh spills. | Blotting with a degreaser before any washing. |
| Sealing Timing | Sealing immediately after the pavers appear surface-dry. | Waiting until pavers are fully dry (24–48 hours) before sealing. |
| Sealing Frequency | Ignoring sealing altogether or waiting until visible erosion occurs. | Reapplying every 3–5 years, depending on wear and weather [5]. |
| Drainage Slope | Flat or sloped toward the house. | Ensuring a slope away from the foundation (minimum 1–2% grade). |
| Chemical Use | Using harsh chemicals that erode sealants and joint sand. | Opting for mild detergents and avoiding high-pressure washing on joints. |
One of the biggest mistakes is neglecting to seal your pavers entirely. Unsealed pavers are highly porous, which means they soak up moisture, oil, grease, and dirt, making stains nearly impossible to remove. Over time, exposure to UV rays, freeze-thaw cycles, and erosion of joint sand can weaken the structure, destabilize your patio, and encourage weed growth. To keep your pavers protected, plan to reseal every 3–5 years, depending on weather and foot traffic [5].
Conclusion
Keeping your paver patio in great shape is simpler than you might think. Stick to a regular routine – sweeping, washing, seasonal deep cleaning, and resealing every 3 to 5 years – and you’ll protect your patio from Maryland’s unpredictable weather [18, 19].
One area that needs extra attention is the paver joints. As Belgard explains:
The joints between paving stones are the most vulnerable areas of any installation.
Filling these joints with polymeric sand and fixing any gaps quickly can save you from expensive structural problems down the line [9].
While many maintenance tasks are perfect for DIY enthusiasts, some situations call for professional help. Issues like base erosion, choosing the right sealer for your pavers, or fixing drainage problems often require specialized tools and expertise. Pro Landscapes MD provides expert services, including inspections, sealing, and repairs, throughout central Maryland. They serve areas like Howard County, Montgomery County, Carroll County, Frederick County, Prince George’s County, and Baltimore County. Their annual inspections can catch early warning signs such as fading, water absorption, or shifting pavers [18, 19].
Professional sealing is another step where expertise makes a difference. Knowing whether to use a penetrating or topical sealer – and applying it correctly – helps prevent surface issues like filming or discoloration. Professionals can also tackle hidden structural problems that might lead to shifting pavers if ignored [18, 19].
Whether you prefer to handle the routine upkeep yourself or enlist professional help, the key is consistency. A well-maintained paver patio not only boosts your home’s curb appeal but also provides a safe, inviting outdoor space for your family to enjoy for years to come. Proactive care ensures your patio remains a lasting and beautiful part of your home.
FAQs
How do I know my pavers need sealing?
If your pavers start looking dull, hazy, or worn, it’s a clear sign they need resealing. This usually happens every 3–5 years. Because concrete pavers are porous, they can easily absorb stains and lose their color. Sealing them helps protect against discoloration and fading. To keep your pavers looking their best and well-protected, make sure to reapply the sealant as needed.
What’s the safest way to clean pavers without damage?
To clean pavers without causing damage, start by sweeping away dirt and debris using a broom or a stiff brush. Avoid wire or steel brushes, as they can scratch the surface. If you’re using a pressure washer, choose a low to medium pressure setting to keep the pavers intact. For stubborn stains, consider natural solutions like vinegar or opt for cleaners specifically designed for pavers. After cleaning, be sure to rinse everything thoroughly with a garden hose or a pressure washer set to a safe level.
When should I call a pro for shifting or sinking pavers?
You should reach out to a professional if your pavers become uneven or sink. These issues can lead to trip hazards, drainage problems, and even long-term damage if left unaddressed. The best time for repairs is during dry, mild weather, like in spring or early fall. Taking care of noticeable shifting or sinking right away helps ensure safety and stops further harm to your patio.
Chat with Us