


- bhavya gada
- No Comments
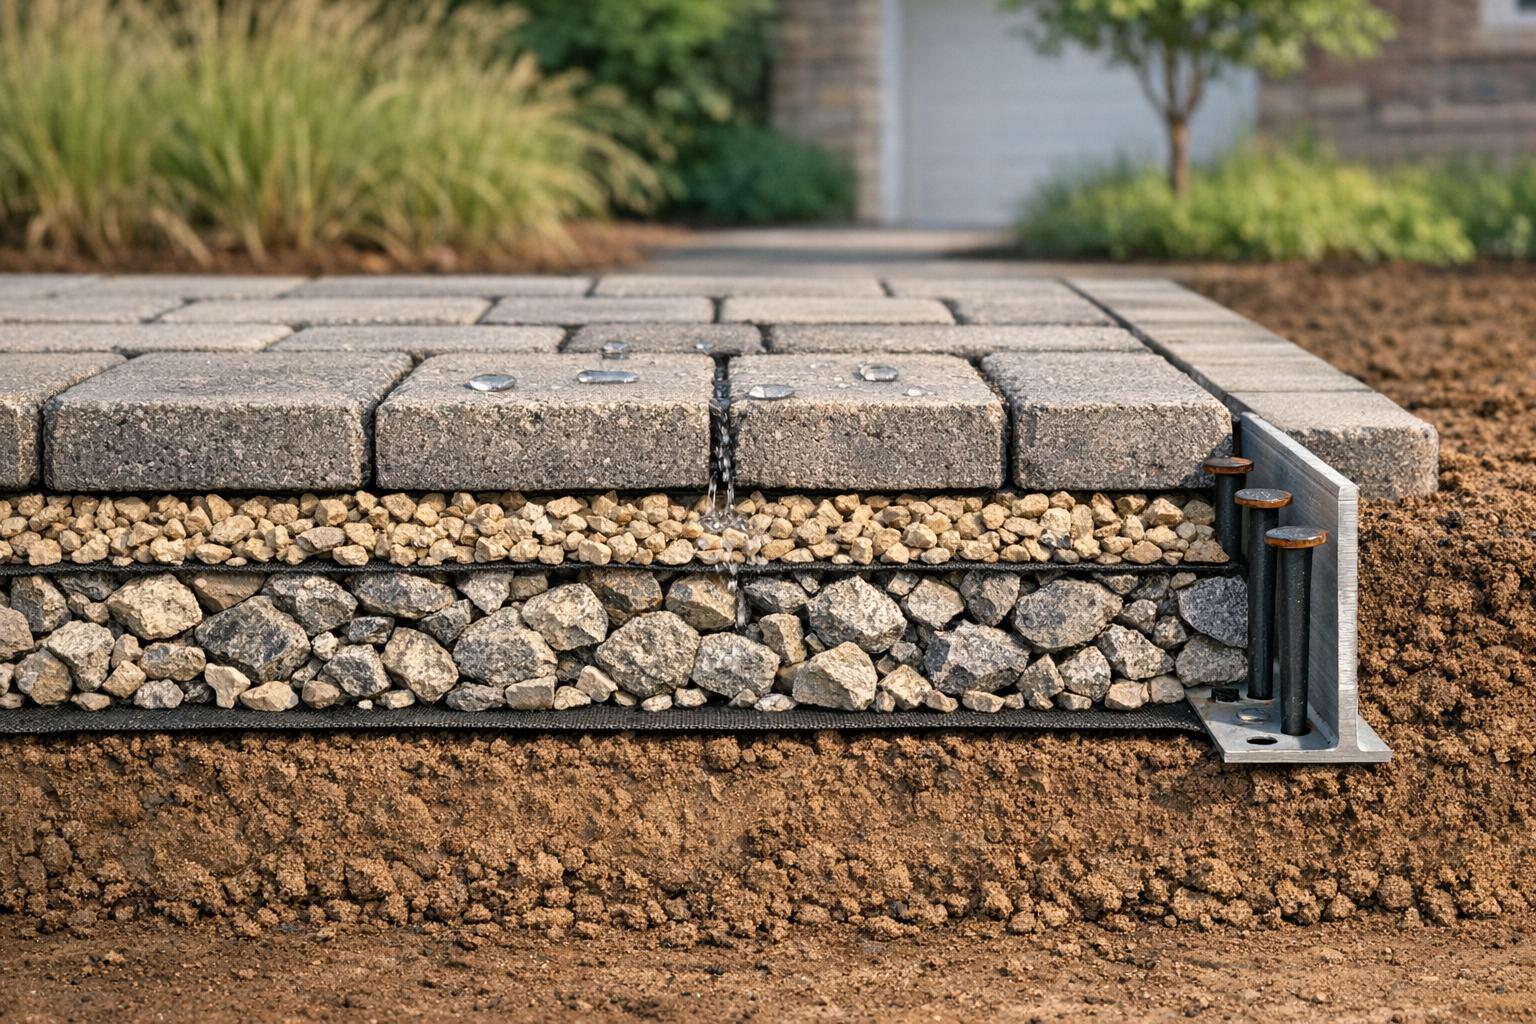
Permeable surfaces are a smart solution for managing stormwater while reducing runoff and pollutants. These systems allow water to seep through specially designed pavers into an underground aggregate base, filtering contaminants and supporting water absorption. Proper installation is critical for long-term performance and durability.
Here are the key steps to ensure success:
- Site Preparation: Assess soil infiltration rates, locate utilities, and plan drainage. Avoid compacting subgrade soil in infiltration designs.
- Material Selection: Use open-graded aggregates (ASTM No. 2, 57, 8) for base layers and high-strength concrete pavers for the surface.
- Installation: Excavate carefully, layer aggregates with proper compaction, and secure edges to prevent shifting.
- Maintenance: Regular vacuum sweeping prevents sediment buildup, ensuring the system remains functional for decades.
These surfaces not only improve water management but also support tree health, reduce flooding risks, and simplify winter maintenance. With a design life of up to 50 years, they’re a durable investment for both residential and commercial properties.
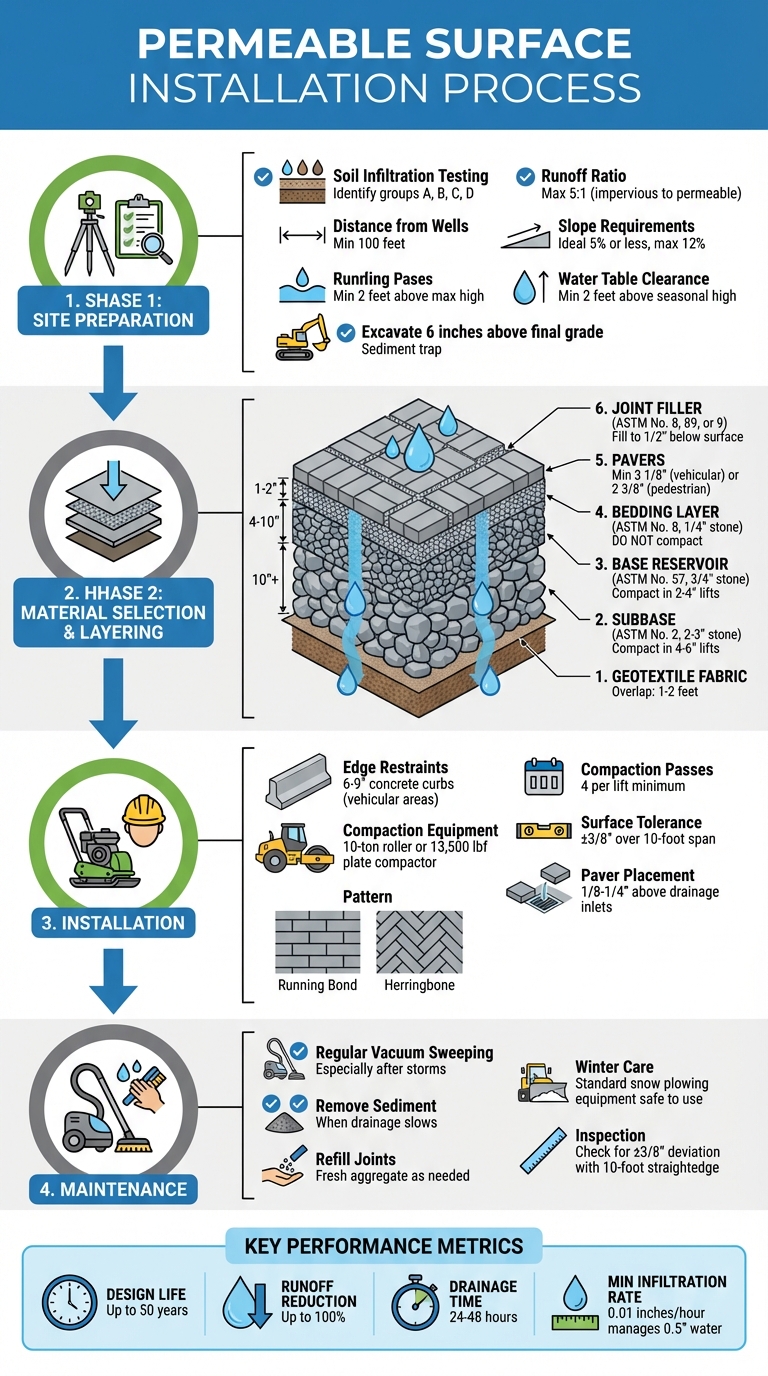
Permeable Surface Installation Process: 4-Step Guide with Material Specifications
Paver Installation Guide: Permeable
sbb-itb-843f8be
Site Preparation and Assessment
Before starting any project, it’s crucial to evaluate the site’s soil, utilities, and grading. This step helps identify potential drainage issues and avoids costly mistakes later on. The assessment checks soil conditions, locates underground utilities, and ensures the grading supports proper water flow.
Soil Infiltration Testing
Testing how well the soil absorbs water is a key step for successful permeable pavement installations. The soil’s infiltration rate determines the type of system your site can handle:
- Full infiltration: For sandy or gravelly soils with high permeability.
- Partial infiltration: For silty or clay soils with lower permeability, requiring underdrains.
- No infiltration: For areas with very low permeability.
"The infiltration rate of the saturated subgrade determines how much water can drain from the aggregate into the underlying soils." – Concrete Masonry and Hardscapes Association (CMHA) [2]
Even soils with low rates – like 0.01 inches per hour – can manage about 0.5 inches of water over 48 hours [2]. This data helps engineers calculate the necessary thickness for aggregate base layers and ensures the pavement base is at least 2 feet above the seasonal high water table to filter pollutants effectively [2].
Start by identifying your soil type using NRCS hydrologic soil groups (A, B, C, D). Also, check the site’s fill history and compaction levels, as these influence natural infiltration [2]. If your design relies on infiltration, avoid compacting the subgrade soil during excavation – compaction drastically reduces water absorption [2]. Additionally, steer clear of "stormwater hotspots" like vehicle salvage yards or fueling stations, where contamination risks are high [2].
Drainage and Utility Line Considerations
Good drainage planning is essential to protect both the permeable surface and nearby structures. The runoff ratio from impervious areas to the permeable surface shouldn’t exceed 5:1 [2]. For example, a 400-square-foot permeable patio should not handle runoff from more than 2,000 square feet of impervious surfaces like roofs or driveways.
Place permeable surfaces downslope from building foundations to avoid water intrusion. If proximity to basements is unavoidable, install piped drainage and impermeable liners [2]. Keep at least 100 feet of distance from water supply wells to prevent contamination [2]. Ideally, the surface slope should be 5% or less, with a maximum of 12% [2].
During site surveys, document all public and private utilities, noting their type, diameter, material, and any bends [3]. For vehicular applications, consider adding a vertical perforated pipe (4 to 6 inches in diameter) at the lowest point to monitor water levels within the aggregate base [2]. Avoid areas where runoff carries soil, mulch, or other debris, as these materials can clog the system [2].
Once drainage strategies are in place, the next step is precise grading and clearing to maintain the project’s integrity.
Site Grading and Clearing
During construction, it’s important to prevent sediment from contaminating the aggregate layers. Start by excavating 6 inches above the final bottom elevation and using this space as a temporary sediment trap. Grade the site just before installing the aggregate [2]. Use tools like silt fences, temporary drainage swales, and tire-washing stations for trucks to keep the site clean during this phase [2].
Ensure the soil subgrade slopes away from adjacent impervious pavement to protect traditional pavement bases from water damage [2]. For the compacted aggregate subbase, maintain a surface tolerance of +/- 2.5 inches over a 10-foot straightedge [2]. Final surface elevations should be 1/8 to 1/4 inch higher than nearby drainage inlets or channels to prevent ponding and ensure smooth overflow transitions [1].
Proper site preparation is the foundation for a durable and efficient installation. A clean, well-graded site ensures the materials perform as intended for years to come.
Choosing Materials for Permeable Surfaces
Selecting the right materials is crucial for ensuring both effective drainage and the long-term durability of permeable surfaces. These systems rely on open-graded aggregates without fines to maximize water storage and infiltration.
Building a successful permeable system involves three main components: the aggregate layers for structural support, geotextiles and underdrains to manage water flow, and surface materials that handle traffic while allowing water to pass through. Each part must work together to create a surface that supports weight while maintaining efficient drainage. Let’s break down each component and its installation process.
Aggregates and Base Layers
Permeable surfaces use a layered design with specific aggregates assigned to each layer. These layers work together to provide structure, drainage, and a stable surface for pavers.
- Subbase: Large, angular stones (ASTM No. 2, 3 to 2 inches) form the foundation, offering both structural support and water storage [2].
- Base Reservoir: Mid-sized stones (ASTM No. 57, 1 inch to 1/2 inch) create a "choking layer" that prevents smaller particles from migrating downward [2].
- Bedding Layer: Small angular stones (ASTM No. 8, 1/4 inch) provide a level surface for pavers to rest on [2].
All aggregates should be crushed and angular for stability. Pedestrian areas require a minimum 6-inch base, while vehicular areas need thicker layers depending on soil conditions and expected loads [2].
The bedding layer is installed at a 2-inch thickness and should not be compacted before laying pavers. Instead, it is screeded flat, allowing the pavers to settle during the final compaction. For areas with heavy loads or unstable soils, adding bi-axial or tri-axial geogrid to the base layers can improve strength and stability [1].
| Layer | Material (ASTM) | Typical Thickness | Function |
|---|---|---|---|
| Joint Filler | No. 8, 89, or 9 | Full joint depth | Allows water entry from the surface |
| Bedding Course | No. 8 (1/4") | 1.5 to 2 inches | Provides a level setting bed for pavers |
| Base Reservoir | No. 57 (1" to 1/2") | 4 to 6 inches | Acts as a choking layer and stores water |
| Subbase Reservoir | No. 2, 3, or 4 (3" to 2") | Varies by load | Provides structural support and storage |
Geotextiles and Underdrains
Geotextile fabric plays a dual role as a separator and filtration layer between the soil subgrade and the aggregate base [2]. It prevents soil from mixing with the aggregates, preserving the system’s drainage capabilities. Install the geotextile along the bottom and sides of the excavation, overlapping by at least 1 foot for stable soils or 2 feet for weaker soils with a California Bearing Ratio (CBR) below 5% [2].
In areas with poor infiltration, such as clay or silt soils, underdrains are essential. Perforated PVC or double-wall HDPE pipes remove excess water, connecting the permeable base to stormwater systems or underground storage. These pipes ensure the system doesn’t remain waterlogged, allowing water to drain within 24 to 48 hours. Even soil with a slow infiltration rate of 0.01 inches per hour can handle up to 0.5 inches of water during this time [2].
To protect drainpipes during compaction, make sure they are covered with at least 12 inches of aggregate [2]. For monitoring, include a vertical perforated pipe (4 to 6 inches in diameter) at the system’s lowest point. This observation well helps track water levels and overall drainage performance [2].
Surface Material Options
Permeable Interlocking Concrete Pavers (PICP) are the most common choice for permeable surfaces. These pavers have molded joints or openings that allow water to pass through while maintaining a stable surface. For vehicular areas, pavers should be at least 3 1/8 inches (80 mm) thick, while pedestrian areas can use thinner units at 2 3/8 inches (60 mm) [2]. Depending on the system design, these pavers can eliminate surface runoff entirely [2].
Small angular stones (ASTM No. 8, 89, or 9) are swept into the joints between pavers, enabling water infiltration and locking the pavers in place. Edge restraints – such as 6-inch poured concrete curbs or specialized plastic restraints – are critical to keep the pavers and base materials from shifting over time [2].
While alternatives like porous concrete and permeable gravel exist, pavers offer better stability and aesthetics for high-traffic areas. By carefully selecting materials and following proper installation methods, you can ensure the system performs effectively for years to come.
Installation Process Step by Step
A well-executed installation process builds on solid site preparation and careful material selection. Each phase is crucial, with attention to excavation depth, compaction, and leveling ensuring proper drainage and long-lasting performance.
Excavation and Base Preparation
Start by excavating to the required depth, adding an extra 6 inches above the final grade to act as a sediment trap. Protect the soil’s ability to absorb water during this step [2]. For pedestrian areas, a 6-inch aggregate base is generally sufficient, while vehicular installations may need 10 inches or more, depending on the soil and expected loads.
Use tracked equipment to avoid compacting the subgrade soil [2]. After excavation, line the bottom and sides with non-woven geotextile fabric, overlapping joints by at least 24 inches. Begin at the top of any drainage slope to prevent soil migration [1][4].
Next, install the sub-base layer using large stones (ASTM No. 2, 3, or 4). Place the material in 4- to 6-inch lifts, compacting thoroughly with light misting to aid the process [1][2]. Add a base reservoir layer of 3/4-inch open-graded aggregate (ASTM No. 57) in 2- to 4-inch lifts. Finally, screed a 1- to 2-inch bedding layer of small angular stone (ASTM No. 8). Keep this layer loose – do not compact it before laying pavers. Check that the compacted base is within ±½ inch over a 10-foot straightedge. Replace any contaminated aggregate with clean stone [1][4].
| Layer Type | Typical Material | Thickness | Compaction Rule |
|---|---|---|---|
| Subgrade | Native Soil | N/A | Do not compact |
| Sub-Base | 2"–3" Stone (ASTM No. 2) | 10"+ (as needed) | 4–6" lifts; 4 passes min. |
| Base | 3/4" Stone (ASTM No. 57) | 4"–10" | 2–4" lifts; 4 passes min. |
| Bedding | 1/4" Stone (ASTM No. 8) | 1"–2" | Do not compact |
Once the base is stable, secure the structure with strong edge restraints to maintain its shape and function.
Edge Restraints and Surface Placement
Edge restraints are essential for keeping the permeable surface stable under stress. For vehicular areas, use poured-in-place concrete curbs measuring 6 to 9 inches in height, installed directly on the compacted sub-base [2][4]. In residential or pedestrian settings, plastic or aluminum restraints can work, but these should include a bi-axial or tri-axial geogrid to create a mechanical lock [1][4].
When the permeable surface meets non-permeable materials like asphalt or concrete, extend the curb to the full depth of the base and add an impermeable liner to manage water flow. Precast concrete or stone curbs may need a concrete haunch for added stability [2].
After the edge restraints have set, start laying pavers from one corner, moving outward in a running bond or herringbone pattern. Position the pavers 1/8 to 1/4 inch above drainage inlets to account for minor settling [4]. Use a masonry saw to cut edge pavers in a designated area away from the installation site to avoid clogging the voids with dust [3].
With the edges secured and pavers in place, the next step is compaction and leveling.
Compaction and Leveling Techniques
Proper compaction locks the layers together and ensures the pavers are seated securely. For the sub-base and base layers, use a 10-ton static roller or a reversible plate compactor with at least 13,500 lbf of force. Make four passes per lift until the aggregate no longer moves [1][2][4]. If using a vibratory roller, do two passes in vibratory mode, followed by two in static mode.
Once the pavers are laid, sweep small angular stones into the joints and compact the surface with a 75–90 Hz plate compactor for 2–3 passes [1]. This step pushes the joint material into the gaps until it sits about ½ inch below the paver surface. At the end of each workday, ensure all pavers within 3 feet of the laying face are fully compacted and seated. Avoid compacting within 3 feet of unrestrained edges to prevent shifting. Use a straightedge to confirm the surface is within ±3/8 inch over a 10-foot span, ensuring effective drainage and durability [1].
Maintenance for Long-Term Performance
Maintaining your permeable surfaces after installation is key to keeping them in top shape over time. With regular upkeep, you can ensure optimal performance and avoid costly repairs. Most maintenance tasks are simple, focusing on clearing sediment and keeping joints free for proper water drainage.
Regular Cleaning and Sediment Removal
Vacuum sweeping is your best friend when it comes to preventing sediment from settling deep into the joints [2]. Make it a habit to vacuum the surface regularly, especially after heavy storms, to stop sediment from building up. If you notice water draining slower or sediment piling up, vacuum out about 1 inch of the joint material. Once the joints are clear, refill them with fresh angular stone – like ASTM No. 8, 89, or 9 – ensuring it sits about ½ inch below the paver surface.
To minimize sediment buildup, avoid directing runoff from areas with exposed soil, mulch, or erosion onto the surface. Routine cleaning like this not only keeps your system working efficiently but also reduces the need for bigger fixes down the line.
Handling Repairs and Surface Settling
To spot surface settling, use a 10‑foot straightedge. If the surface deviates by more than ⅜ inch, it’s time for repairs [1]. Start by removing the affected pavers, then add and compact base aggregate before reinstalling the original units. This process is also handy for utility work, allowing you to fix the pavement without compromising the drainage system.
If joint material is lost during cleaning or due to settling, simply sweep new aggregate into the joints and compact it. As the Concrete Masonry and Hardscapes Association points out:
utility cuts into the pavement do not cause damage to the surface that can in turn decrease pavement life [2].
Seasonal Care and Deicing
Seasonal maintenance is just as important for keeping your permeable surfaces functional all year. These surfaces handle winter weather well and can be plowed with standard snow removal equipment. Plus, water drainage through the joints speeds up ice melt, reducing the need for deicing chemicals and lowering the risk of slips. If sediment or debris from storms clogs the surface, a quick vacuuming session will restore proper drainage.
Thanks to their high-strength concrete, these units resist freeze-thaw cycles and aren’t damaged by deicing materials, making them reliable even in harsh winters [2].
For more advice or professional help with maintaining your permeable surfaces, reach out to Pro Landscapes MD. They can guide you in keeping your surfaces in excellent condition year-round.
Conclusion
The success of a permeable installation hinges on three key factors: careful site preparation, quality materials, and ongoing maintenance. One crucial step is soil infiltration testing, which determines whether the site supports full infiltration or requires underdrains. Additionally, proper grading ensures the surface is positioned downslope from building foundations, safeguarding long-term structural integrity. As highlighted by the Concrete Masonry and Hardscapes Association:
The infiltration rate of the saturated subgrade determines how much water can drain from the aggregate into the underlying soils [2].
Once the site is assessed, selecting the right materials becomes essential for durability. Opting for ASTM C936 concrete pavers paired with open-graded aggregates (ASTM No. 2, 57, and 8) creates a system that can last up to 50 years. This combination not only eliminates total suspended solids in stormwater but can also reduce surface runoff by as much as 100% [2]. However, protecting these materials from sediment contamination is critical – sediment infiltration can permanently compromise permeability.
Consistent maintenance is equally important. Regular vacuum sweeping helps remove joint sediment, maintaining high infiltration rates and preventing expensive repairs. These surfaces are also engineered to handle freeze–thaw cycles and harsh winter conditions, minimizing slip hazards and reducing the reliance on deicing chemicals.
FAQs
Do I need an underdrain for my soil?
When deciding if an underdrain is necessary, the key factor is your soil’s infiltration rate and the specifics of your project design. If the soil in your area has a high infiltration rate, water can naturally seep into the ground, making an underdrain unnecessary. On the other hand, low-infiltration soils or locations prone to water pooling often benefit from an underdrain to manage excess water and reduce runoff. Carefully evaluating the site conditions will help you determine whether an underdrain is a critical component for your permeable surface installation.
How thick should the base be for my driveway or patio?
For driveways, the base usually needs to be 6 to 10 inches thick to handle the weight of vehicles. In contrast, pedestrian areas like patios typically require a base thickness of 4 to 6 inches, depending on how much foot traffic they’ll endure. Getting the base thickness right is key to ensuring the surface remains durable and performs well over time.
How often should permeable pavers be vacuum swept?
Permeable pavers need regular vacuum sweeping to keep them from clogging and to maintain their ability to absorb water. For general upkeep, you can sweep the surface or use a leaf blower. However, for larger areas, vacuum sweeping is often necessary to ensure the pavers remain clean and effective.
Chat with Us