


- bhavya gada
- No Comments
Rain gardens are an effective way to manage stormwater runoff, improve water quality, and enhance your landscape’s appearance. Preparing the site correctly is key to their success. Here’s a quick summary of the steps involved:
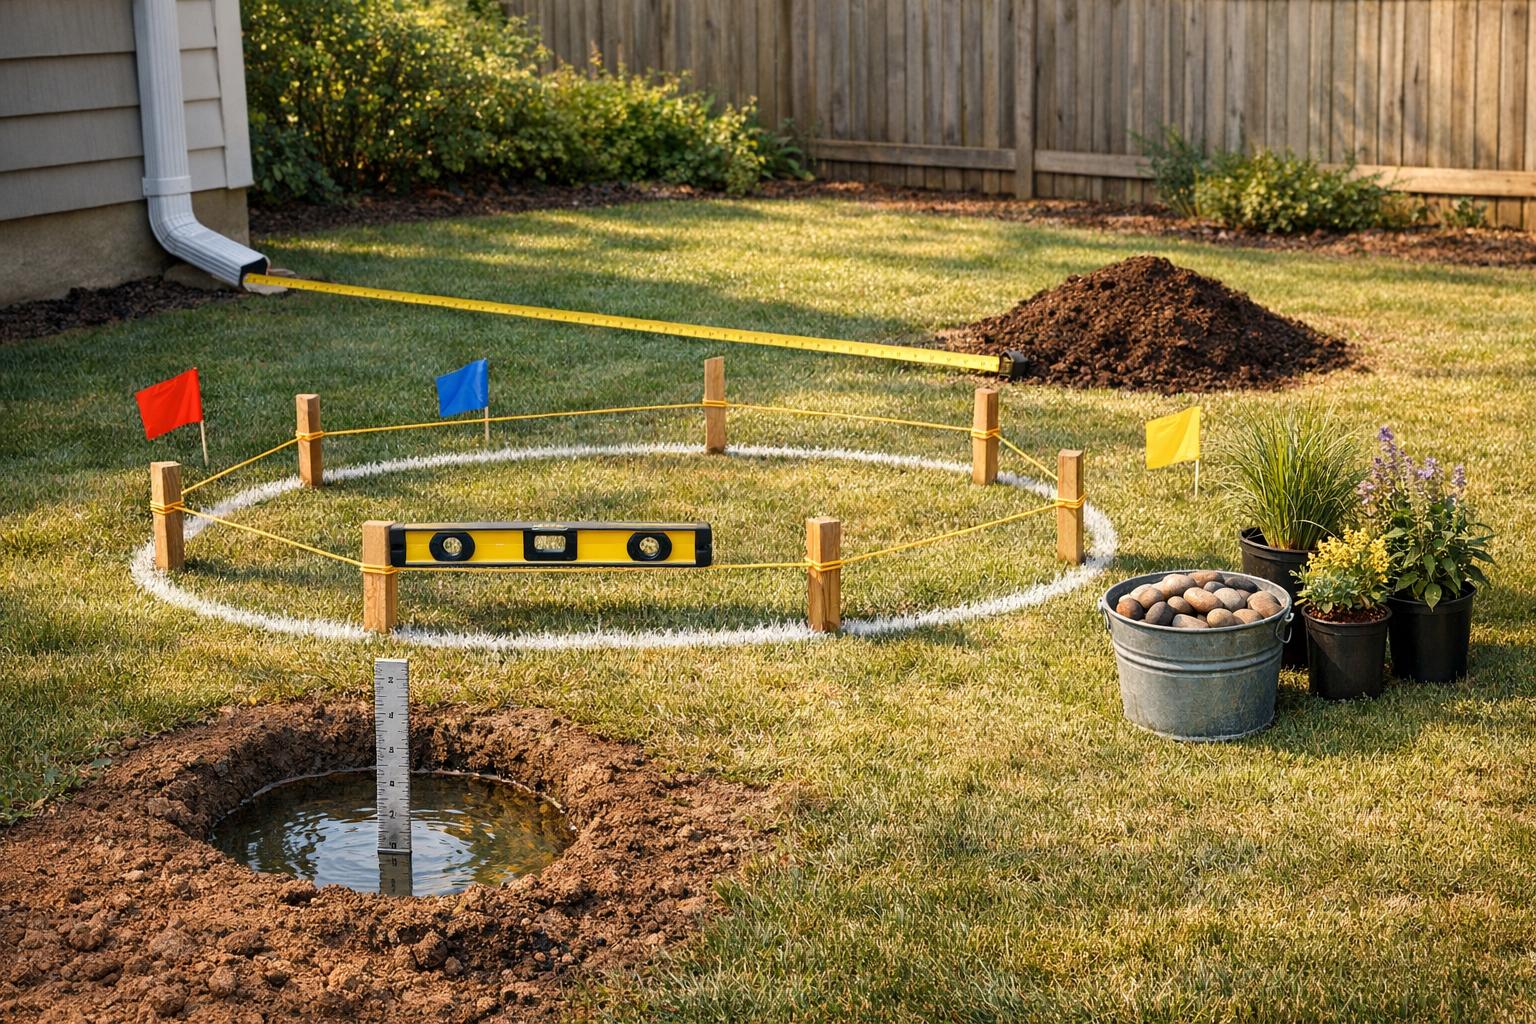
- Site Assessment: Observe water flow during rain, identify low, flat areas, and avoid spots with poor drainage or steep slopes (>10%). Keep at least 10 feet away from building foundations.
- Soil Testing: Conduct a percolation test to check infiltration rates. Ideal drainage is 1 inch per hour. Amend soil with sand and compost if needed.
- Utility Check: Call 811 to mark underground utilities before digging.
- Location Criteria: Avoid septic systems, wells, and large tree roots. Position the garden to collect runoff from impervious surfaces like roofs and driveways.
- Sizing and Grading: Size the garden to be 10%-20% of the runoff area. Ensure the slope is gentle for proper water flow.
- Materials and Tools: Use a soil mix of sand, topsoil, and compost. Native plants with deep roots are best for water absorption.
Proper preparation ensures your rain garden will drain efficiently, protect nearby structures, and support healthy plant growth. Follow these steps to create a functional and visually appealing rain garden.
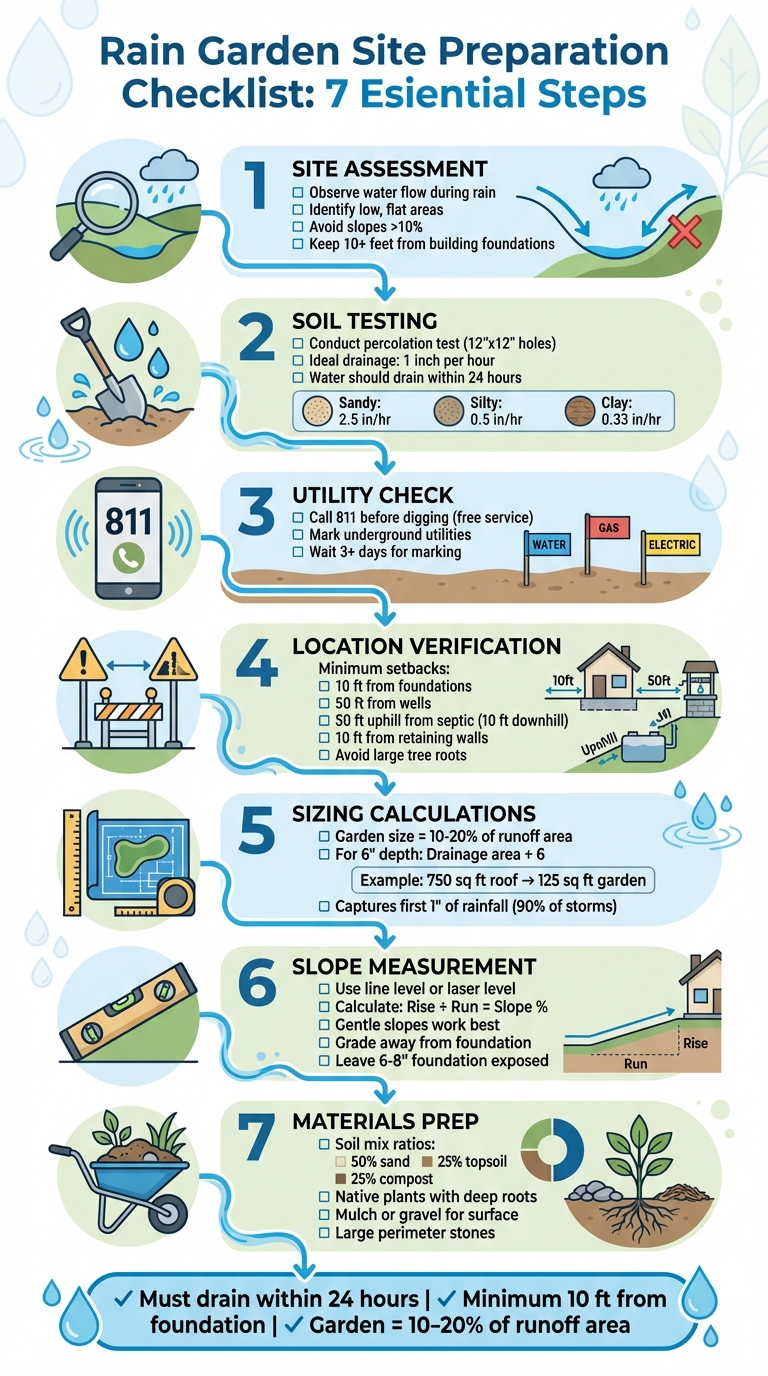
Rain Garden Site Preparation Checklist: 7-Step Process
How To Create a Rain Garden | Ask This Old House

sbb-itb-843f8be
Pre-Site Assessment Tasks
Before diving into any digging, it’s crucial to evaluate your property to pinpoint the best location for your rain garden. One of the simplest yet most effective ways to do this is by observing your property during a rainstorm. As Jodi Sulpizio, a Natural Resources Educator at Penn State Extension, advises:
To determine possible rain garden locations, walk the property in the rain to observe storm water flow [1].
This hands-on approach helps you see where water naturally collects and the paths it takes – details that aren’t obvious when the ground is dry.
Understanding Rainwater Flow and Runoff Patterns
Hard surfaces like roofs, driveways, and sidewalks are the primary sources of runoff. Watch how water flows from downspouts, crosses pavement, and moves through your yard. Look for low, flat areas where water tends to pool naturally, but steer clear of spots that remain waterlogged for long periods – these won’t drain effectively [1].
Pay close attention to the slope of potential sites. If the slope is greater than 10%, it’s unsuitable for a rain garden since water will flow too quickly to soak into the ground [1]. Additionally, keep a safe 10-foot distance from building foundations to avoid basement flooding and structural issues [1]. Documenting these observations will help guide the final design of your rain garden.
Identifying Potential Obstacles
Once you’ve mapped out water flow patterns, the next step is to identify anything that could interfere with proper drainage. One of the most critical concerns is underground utilities. Hitting a gas line, water pipe, or electrical cable during excavation can lead to hazardous and costly problems. Always call 811 before digging to have utilities marked at no charge. As Sulpizio explains:
The service sends someone out to mark all underground utilities, preventing costly and potentially fatal accidents [1].
Trees also require careful consideration. Building too close to their roots can harm both the tree and your rain garden’s effectiveness. Other areas to avoid include foundation walls, septic systems, leach fields, drinking water wells, and underground infrastructure. If you notice stressed or dying plants in a specific area, it could indicate extreme wetness, dryness, or even toxic runoff, which might mean soil replacement is necessary [2]. A sulphur smell is another red flag – it signals anaerobic conditions caused by rotting organic material, pointing to poor drainage [2].
Site Selection Criteria
Once you’ve mapped runoff patterns and identified obstacles, the next step is selecting the best spot for your rain garden. The right location balances proximity to water sources with the site’s environmental characteristics.
Proximity to Water Sources
Position your rain garden close enough to collect runoff from impervious surfaces – like roofs, driveways, sidewalks, or parking lots – but far enough from your home to avoid structural damage. As Jodi Sulpizio from Penn State Extension advises:
Rain gardens should be at least 10 feet from a building’s foundation to avoid creating basement water issues [1].
To ensure efficiency, place the garden at least 10 feet away from building foundations and in a location where it can catch runoff from downspouts or paved areas. The garden’s size should typically be 10% to 20% of the impervious surface area that drains into it [1]. Avoid placing it near septic systems, leach fields, drinking water wells, or large tree roots to prevent potential conflicts with existing infrastructure.
Once you’ve determined the general location, don’t forget to assess sunlight and soil drainage to ensure the site is suitable.
Sunlight and Drainage Conditions
Understanding how much sunlight your site receives is essential for choosing the right plants. Sites can range from full sun (6+ hours of sunlight), partial sun (3–6 hours), to shade (less than 3 hours). Selecting native plants that thrive in the specific light conditions of your site will help them grow strong and benefit local wildlife.
Drainage is another key factor. Your rain garden should absorb and filter water within 24 hours [1]. Soil type plays a big role in this process: sandy soil drains at about 2.5 inches per hour, silty soil at 0.5 inches per hour, and clay soil at just 0.33 inches per hour [1]. To test your soil, dig a 1-foot by 1-foot hole, fill it with water, and time how long it takes to drain. If water remains after 24 hours, you’ll need to amend the soil or consider a different location. Avoid areas that are permanently waterlogged or have slopes steeper than 10%, as these conditions can hinder proper water infiltration [1].
Soil Testing Procedures
Checking your soil’s drainage is a crucial first step to ensure water can infiltrate effectively before starting your project.
Conducting a Percolation Test
A percolation test, or "perc test", measures how quickly water moves through the soil. To perform this test, dig several holes (12 inches wide by 12 inches deep) in different spots within the planned rain garden area. This ensures you account for any variations in soil composition, which can differ even across small spaces.
Fill each hole with water and time how long it takes to drain completely. According to Jodi Sulpizio from Penn State Extension:
If it takes more than 24 hours for the water to drain, you should consider another site [1].
For accuracy, always conduct the test in the exact location where the rain garden will be installed. If you’re dealing with clay-heavy soil, use a garden fork to roughen the sides of the hole. This prevents smearing, which can seal the soil and give inaccurate results. Avoid testing during very rainy periods, as digging in overly wet soil can compact it, potentially affecting drainage.
Once you’ve recorded the drainage times, you can move on to analyzing your soil type and making any necessary amendments.
Analyzing Soil Type and Quality
After measuring the drainage rate, the next step is to examine your soil’s composition. Typical drainage rates vary by soil type: sandy soils drain at about 2.5 inches per hour, silty soils at 0.5 inches per hour, and clay soils at around 0.33 inches per hour [1]. For a rain garden, the ideal infiltration rate is one inch per hour, meaning a test hole should empty within roughly 8 hours [4].
If your soil drains too slowly, don’t worry – there are ways to improve it. For silty soils, mix in compost at a rate of about 4 pounds per square foot [4]. If the site has heavy clay, you might need to dig deeper to reach better-draining layers. Once there, backfill with a mix of sand and leaf compost. As Princeton Hydro points out:
With compost added and blended in, a siltier type of soil can be improved too. However, clay soils are not conducive to a rain garden [4].
To incorporate amendments, till them into the soil to a depth of about 12 inches. However, if drainage still takes longer than 24 hours after these efforts, it’s best to find a different location for your rain garden.
Utility and Location Verification
Once you’ve confirmed that the soil is suitable, the next step is to ensure your site complies with all utility and local regulatory requirements. This step is crucial to guarantee safety and adherence to local codes before you start digging.
Locating Underground Utilities
Before digging, call 811 at least three days in advance. This free nationwide service will send professionals to mark underground utility lines, such as gas, water, and power lines. These markings help you avoid accidents and costly damage.
After the utility lines are marked, make sure your rain garden is not placed directly over or too close to them. With the markings in place, you can safely outline your garden’s shape using tools like a rope, garden hose, or spray paint, ensuring you steer clear of any buried lines.
Reviewing Local Codes and Permits
With utility lines identified, the next step is to check that your project adheres to local setback and permit requirements. For example, maintain a minimum 10-foot setback from home foundations and ensure the garden is at least 50 feet away from drinking water wells. If you’re near a septic system, follow these guidelines: 50 feet uphill and 10 feet downhill. Similarly, keep a 10-foot buffer from retaining walls, as required by local codes [3].
Reach out to your local cooperative extension office to confirm regional standards for soil amendments and determine the correct sizing factor percentage (usually between 10% and 20%) for your area. Additionally, verify that the groundwater level is at least 2 feet below the soil surface, and avoid steep slopes or bluffs when choosing your location [3].
Finally, contact your municipality to check for any stormwater regulations, zoning restrictions, or plant height ordinances that could affect your project [1]. Taking these steps ensures your rain garden will be safe, functional, and compliant with all local rules.
Sizing and Slope Measurements
Once you’ve assessed the site and tested the soil, the next step is getting the sizing and slope right for your rain garden. These two factors are critical for ensuring the garden handles water runoff effectively and directs it properly, avoiding issues like erosion or pooling. With utilities marked and permits in hand, it’s time to determine the garden’s dimensions and grade.
Calculating Water Runoff Volume
Rain gardens are designed to capture the first inch of runoff, which accounts for about 90% of storm events [5]. The "watershed" that contributes to this runoff includes any surface that doesn’t allow water to soak into the ground – like roofs, driveways, and patios [6].
To begin, measure the drainage area. For example, calculate the footprint of your house by multiplying its length by its width. If only half of the roof’s water flows into the garden via gutters, divide that total by two [5].
For a rain garden with a depth of 6 inches, divide the contributing area by 6 to figure out the garden’s surface area [5][6]. So, if the roof’s drainage area is 750 square feet, the garden would need to be about 125 square feet (750 ÷ 6 = 125).
Soil type plays a big role as well. To manage 90% of runoff with an infiltration rate of 0.4 inches per hour, the garden should be about 20% of the contributing roof area [6]. Clay soils, which drain more slowly, require larger gardens, while sandy soils may need smaller ones since they absorb water faster. If your percolation test shows water takes over 24 hours to drain, you may need to amend the soil with compost and sand or pick a better location [5].
Once you’ve nailed down the right garden size, the next step is to set up the slope for proper water flow.
Measuring and Adjusting the Slope
To ensure water flows correctly, you’ll need to measure and potentially adjust the slope of your site. Start by determining the "Rise" (vertical distance) and "Run" (horizontal distance) of the land. Instead of eyeballing it, use tools like a line level or laser level for accuracy.
Mark the highest and lowest points of your garden area, then connect them with a taut string. Use the line level to make sure the string is perfectly horizontal. Measure the "Rise" by noting the distance from the string to the ground at the lowest point. Divide the rise by the run to calculate the slope. For example, a 1-foot rise over a 5-foot run equals a 20% slope.
Rain gardens work best on flat or gently sloping areas. Steeper slopes may require retaining walls [5]. If the slope directs water toward your house, you’ll need to adjust it. Add topsoil to low areas and redistribute it to create a gentle slope. As garden designer Amy Fedele explains:
Using the back of a hard rake, carefully and slowly pull the dirt from your new high point… to your new low point… The goal here is to change the angle of the slope [7].
When grading near your home, leave at least 6 to 8 inches of the foundation exposed above the soil to prevent water damage or seepage behind siding. As you add soil, compact it – whether by stomping, using a tamper, or jumping on a plywood sheet placed over the area. This helps minimize settling after heavy rain and ensures water flows away from your house, protecting the foundation [7].
Materials and Tools Inventory
Before diving into construction, make sure you’ve gathered all the necessary materials. DIY installation costs can top $500, so it’s smart to plan your purchases ahead of time[8]. Here’s a breakdown of what you’ll need to ensure the soil and planting setup works efficiently.
Materials for Soil Amendments and Planting
Getting the soil mix right is key to proper drainage. A good starting point is a blend of about 50% sand, 25% topsoil, and 25% compost. Alternatively, you can go with a mix of 50%–60% sand, 20%–30% topsoil (low in clay), and 20%–30% compost[8]. Whichever ratio you choose, keeping clay content low is crucial for better water infiltration.
For plants, go with native species that have deep root systems – they’re excellent for boosting water absorption[8]. To protect the surface, add a layer of mulch or gravel, which helps control erosion, retains moisture, and keeps the soil temperature stable[8]. Use large perimeter stones to handle heavy water flow, and make sure to amend the excavated topsoil for the garden bed. You can also use the subsoil to build a berm on the downhill side[8].
Initial Site Clearing Steps
Once you’ve gathered your materials and tools, it’s time to prepare the site. This step ensures nothing interferes with water infiltration or competes with the native plants you plan to introduce, building on the site conditions you’ve already tested.
Removing Grass and Vegetation
Start by clearing all vegetation to expose bare soil. For smaller areas, use a sharp spade or shovel – cut the sod into sections you can handle, then lift and roll them up for removal. If you’re working on a larger area, renting a sod cutter might be a better option. This tool strips grass in even layers, saving you time and effort.
For stubborn vegetation, an organic vinegar-based herbicide can help. Apply it and wait 7–14 days to ensure the plants are completely dead before digging. Avoid chemical herbicides, as they can contaminate the soil and harm water quality.
While clearing, remove roots, rocks, and debris that might block water infiltration. Dispose of the sod and vegetation through a local yard waste program, or compost it off-site if no herbicides were used. Keep your topsoil separate from subsoil for use later during planting.
Once the vegetation is cleared, you can move on to shaping the ground to maximize water capture.
Leveling and Grading the Area
With the site cleared, the next step is to create a gently sloping basin for water infiltration. Use a transit level or laser level to ensure the bottom is relatively flat, allowing water to pool temporarily. The sides should slope gently (2–5%) toward the center to guide runoff into the basin.
Excavate to a depth of 4–8 inches, following the results of your percolation test. Use a 10-foot board and level to check the grade, making adjustments by adding or removing soil in thin layers. Rake the surface smooth, then lightly water it to help the soil settle. This will also reveal any low spots that need further correction. The area should feel firm underfoot, and all utility markings should remain visible throughout the process.
For those in central Maryland, Pro Landscapes MD offers professional site clearing and grading services as part of their drainage solutions, ensuring your rain garden starts with a properly prepared foundation.
Final Checklist and Next Steps
Take a walk around your site to confirm your rain garden is ready for installation. Double-check that the area aligns with your design plans. The basin should be free of debris, the soil should feel firm underfoot, and any low spots need to be addressed. If you conducted a percolation test, compare your results with typical infiltration rates. For instance, sandy soil usually drains at about 2.5 inches per hour, while clay soil handles water much slower, around 0.33 inches per hour [1].
Review of Preparation Steps
Before moving forward, make sure you’ve followed these key preparation steps:
- The rain garden should be at least 10 feet away from building foundations and far from septic tanks, leach fields, drinking water wells, or large tree roots.
- Verify that the site slope is no more than 10%.
- Ensure the garden’s size is about 10% to 20% of the impervious surface area it will collect water from, such as rooftops or driveways [1].
"A successful rain garden installation starts with a good plan. Careful site selection, design, and installation are needed to create an attractive garden that blends with the existing landscape and avoids creating new problems." – Jodi Sulpizio, Natural Resources Educator, Penn State Extension [1]
Once everything checks out, you’re ready to move on to shaping water flow and adding the garden’s essential features.
Next Steps for Rain Garden Installation
With the groundwork done, it’s time to install your rain garden. Observe how water flows during the next rainfall. Use this to pinpoint areas that stay wet the longest – perfect for moisture-loving plants – and drier spots that will suit sun-tolerant species. Include an inlet lined with rocks to slow down incoming water, build a low berm to form the basin, and create an outlet to handle overflow without causing erosion. Make sure the garden is designed to drain fully within 24 hours [1].
If you’re in central Maryland, Pro Landscapes MD can take the stress out of the process. They provide full-service rain garden design and installation as part of their drainage solutions, handling everything from site assessment to final planting. Visit their website at https://prolandscapesmd.com to explore how they can help bring your project to life.
FAQs
How do I choose the best spot for a rain garden?
To find the best location for a rain garden, look for a spot at least 10–15 feet away from your home’s foundation. Ideally, choose a low-lying area that naturally collects water after it rains. The site should get full or partial sunlight and be free of large tree roots. Make sure the soil in the area drains well, and position the garden downhill from buildings and close to runoff sources like roofs or driveways.
What if my soil drains too slowly?
If your soil struggles to drain, you can fix it by mixing in compost or sand and digging deeply – about a foot – to break up compacted areas. For soils with a lot of clay, you might need to add specific amendments or even install an underdrain system. The goal is to make sure water drains within 24 to 36 hours, preventing pooling and helping your rain garden manage stormwater efficiently.
Do I need a permit to build a rain garden?
In general, you don’t need a permit to build a rain garden. That said, local rules and specific site conditions can differ, so it’s a good idea to check with your local authorities to make sure you’re following any relevant regulations.
Chat with Us