


- bhavya gada
- No Comments
Retaining wall drainage issues are a leading cause of wall failures, often resulting in costly repairs. Water buildup behind the wall creates hydrostatic pressure, which can lead to cracking, leaning, or collapse. Proper drainage is essential to prevent these problems and protect your investment. Here’s what you need to know:
- Common Issues: Water buildup, missing components (like perforated pipes or weep holes), poor grading, and erosion.
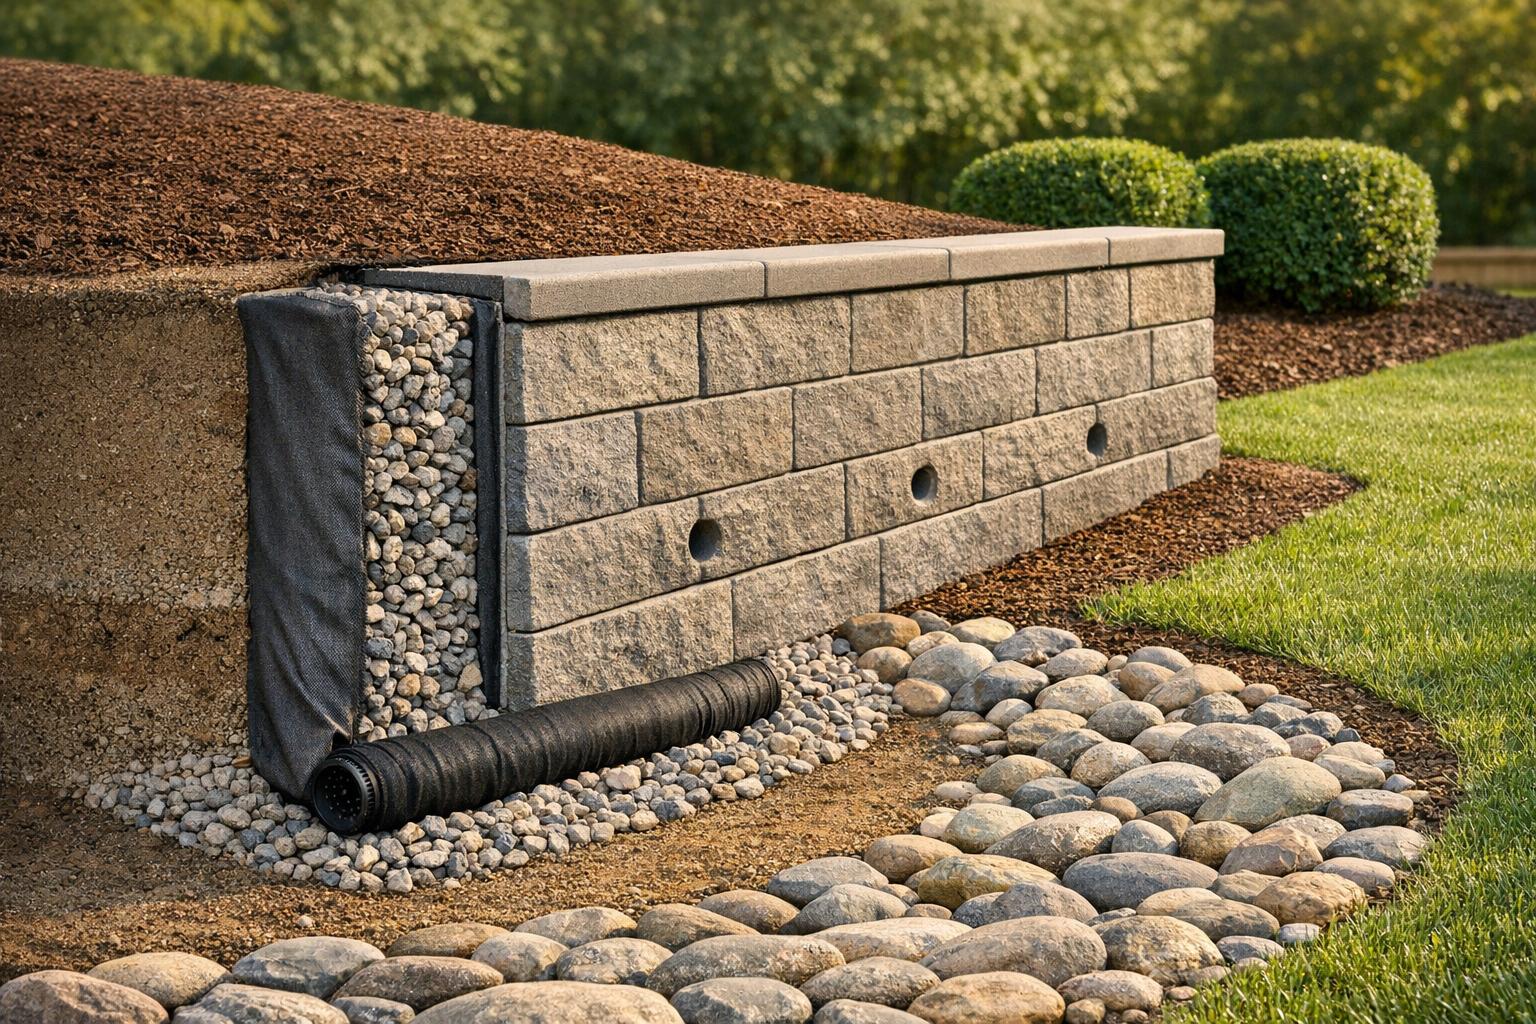
- Key Solutions: Install a 3-part drainage system (drain pipe, gravel backfill, weep holes), fix grading to direct water away, and use features like dry creek beds for runoff.
- Costs: Installing drainage during construction costs $2,000–$5,000, while repairs for a failed wall can reach $10,000–$20,000.
- When to Call a Pro: If your wall shows signs of leaning, bulging, or cracking, or if it’s over 4 feet tall, professional inspection and repairs are crucial.
Addressing drainage issues early saves money and extends the life of your retaining wall.
Essential Drainage Methods to Prevent Retaining Wall Failure
sbb-itb-843f8be
Common Drainage Problems in Retaining Walls
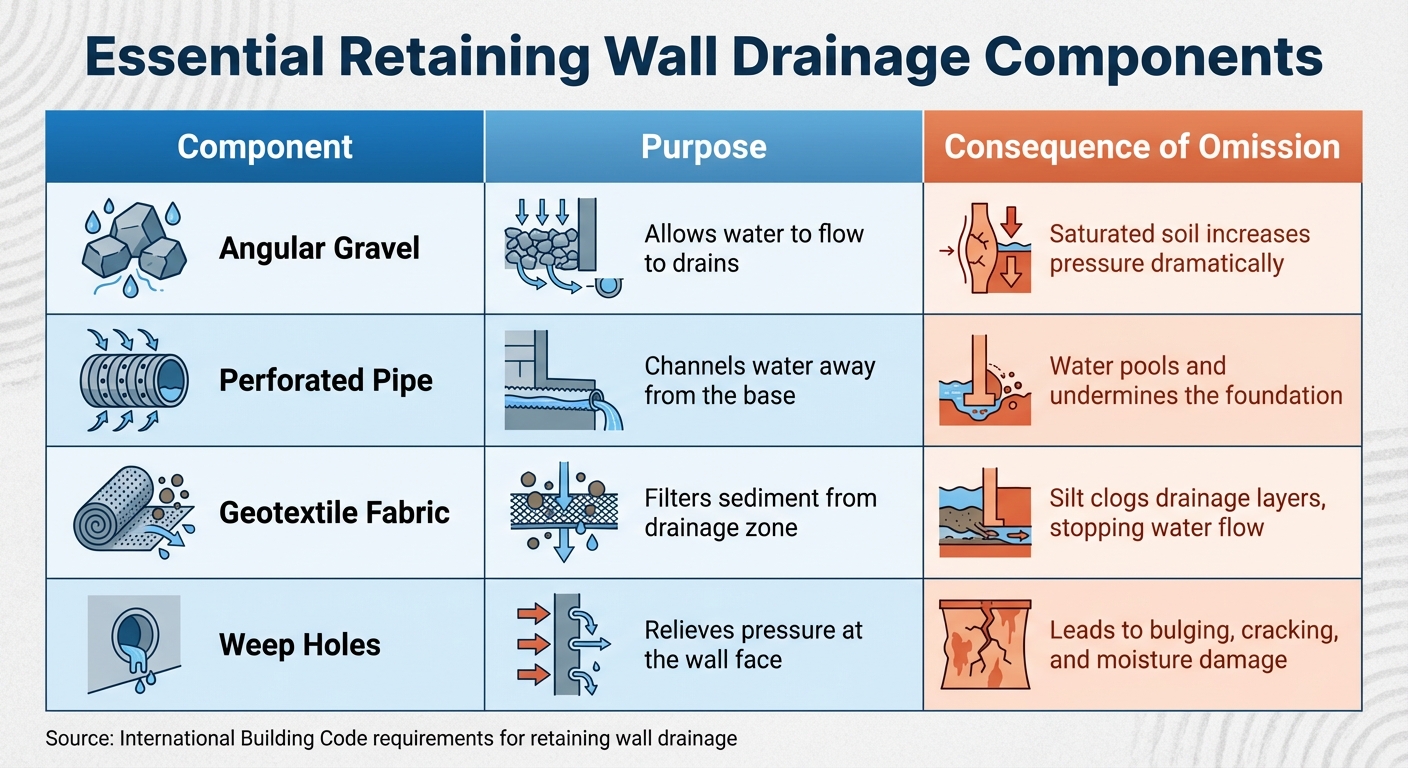
Retaining Wall Drainage Components: Purpose and Consequences of Omission
Understanding the typical drainage challenges in retaining walls can save you from costly repairs down the road. Most problems arise when water collects where it shouldn’t, undermining the wall’s stability and requiring immediate attention.
Water Buildup and Hydrostatic Pressure
When water gets trapped behind a retaining wall, it adds weight to the soil and creates hydrostatic pressure, which can reach thousands of pounds [3]. This pressure often shows up as bulging in the wall’s lower sections, horizontal cracks in mortar joints, or even the wall leaning outward. Clay soils make the problem worse because they hold onto water longer and expand significantly when wet [1]. Mismanaged downspouts can also dump excess water behind the wall, overwhelming its drainage systems. In colder climates like Maryland, water trapped behind the wall freezes and expands, causing frost heave that misaligns the wall and enlarges existing cracks [1].
"Hydrostatic pressure is the silent killer of retaining walls." – Varello Landscaping [5]
Missing or Insufficient Drainage Components
Issues often arise when retaining walls lack essential drainage elements or when these components are improperly installed. For example, using native clay or standard soil as backfill instead of clean, angular gravel traps moisture behind the wall [5]. Without perforated pipes, water collects near the foundation, weakening its support [5]. In solid masonry walls, the absence of weep holes prevents water from escaping, forcing it through the wall and causing efflorescence – a white, powdery residue [3]. Additionally, without geotextile filter fabric, fine soil particles can clog the drainage stone, rendering the system ineffective. These issues are so critical that the International Building Code requires proper drainage measures for most retaining wall designs [3].
| Component | Purpose | Consequence of Omission |
|---|---|---|
| Angular Gravel | Allows water to flow to drains | Saturated soil increases pressure dramatically |
| Perforated Pipe | Channels water away from the base | Water pools and undermines the foundation |
| Geotextile Fabric | Filters sediment from drainage zone | Silt clogs drainage layers, stopping water flow |
| Weep Holes | Relieves pressure at the wall face | Leads to bulging, cracking, and moisture damage |
Neglecting these components not only reduces the system’s efficiency but also intensifies the risks associated with water buildup.
Poor Grading and Erosion
Proper grading is crucial for directing water away from the wall. The ground should slope at least 2% away from the structure (roughly 1/4 inch per foot) to ensure surface water flows elsewhere [5]. If the slope directs water toward the wall, even a well-constructed drainage system can become overwhelmed. Erosion at the wall’s base is another concern – it can wash away the supporting soil, creating voids that lead to sudden shifts or even collapse. Warning signs include exposed roots, washed-out mulch, dips in the ground, or muddy water flowing from the wall’s base during heavy rain. When soil becomes waterlogged, it loses its ability to support weight, which can cause the wall to tilt or move. Tackling these issues early on can save you from expensive repairs and extend the wall’s lifespan.
"The slope of the ground above the retaining wall should direct water away from the structure – not toward it. If nearby areas funnel rainwater toward the wall, drainage components can quickly become overwhelmed." – Perfection Outdoor Solutions [6]
Drainage Solutions for Retaining Walls
After spotting drainage problems, the next step is finding solutions that shield your retaining wall from water damage. A well-thought-out drainage system not only prevents expensive repairs down the line but also helps your wall last longer.
Installing a 3-Part Drainage System
Dealing with water buildup requires a system with multiple components working together. A reliable drainage setup for retaining walls typically includes three key parts:
- Drain Pipe: Start with a perforated 4-inch PVC or flexible drain pipe at the base of the wall. Position the holes facing downward and maintain a slope of at least 1/4 inch per linear foot (or 1 inch every 8 feet) to ensure smooth water flow [1][5].
- Backfill with Gravel: Use clean, angular crushed stone (3/4 to 1 inch) to backfill behind the wall. For shorter walls, aim for at least 12 inches of gravel, but for walls taller than 4 feet, increase this to 18 inches or more [1]. To keep fine soil out while maintaining water flow, line the gravel with non-woven geotextile fabric [5].
- Weep Holes: For masonry or concrete walls, install weep holes every 4 to 6 feet along the base. These act as pressure relief outlets to prevent water buildup [1][9].
Professional installation of such a system can range from $2,000 to $5,000. However, if you’re tackling a small garden wall yourself, DIY materials typically cost between $200 and $500 – much cheaper than the $10,000 to $20,000 price tag for major repairs [7]. This setup is both cost-effective and practical, offering long-term protection for your wall.
Fixing Landscape Grading and Water Runoff
Managing surface water is just as important as addressing subsurface drainage. Over time, soil may settle and reverse the slope, causing water to pool near the wall. Regular checks can help prevent this.
To keep water from saturating the wall’s base, extend downspouts well away from the backfill area [4][6]. In areas where grading alone isn’t enough, consider adding French drains or dry wells. These gravel-lined trenches safely capture and disperse excess runoff [8]. Shallow drainage swales built several feet behind the wall can also intercept surface water before it reaches the backfill zone [5].
If water from neighboring properties is an issue, an interceptor drain or swale along the property line can redirect it away from your retaining wall [2]. Additionally, compacting the soil above the gravel drainage zone can reduce water infiltration into the backfill [8]. Together, these surface water management strategies lessen the strain on your drainage system and help preserve your wall.
Adding Dry Creek Beds for Drainage and Appearance
For a functional yet visually appealing solution, a dry creek bed is worth considering. These rock-lined channels not only improve drainage but also add a decorative touch to your landscape. They slow down runoff, prevent erosion, and direct water away from areas prone to damage.
To create one, dig a trench 12 to 18 inches deep with a concave center. Line it with heavy-duty non-woven geotextile fabric, then place large boulders (10 inches or larger) along the edges to mimic natural riverbanks. Fill the trench with river rock or gravel (3/4 to 1.5 inches thick) to hide the fabric.
A typical dry creek bed is about 3 feet wide, with the depth roughly half its width [12][13]. Placing one directly under a gutter downspout can transform a muddy area into a functional drainage feature [10][14]. DIY costs are about $3 to $4 per square foot [12], and keeping it clear of leaves with a rake or leaf blower in the fall ensures it stays effective [11]. This solution not only safeguards your retaining wall but also enhances your yard’s overall look.
When to Get Professional Inspection and Repairs
DIY solutions might handle minor drainage issues, but some problems demand professional attention. Tackling these issues early can save you thousands of dollars and help prevent serious structural failures, like a complete wall collapse.
Getting a Complete Retaining Wall Assessment
Professionals have the tools and expertise to spot problems that homeowners might overlook. For instance, a 4° forward lean in a 6-year-old wall can indicate severe water pressure problems [5]. Experts often use specialized methods, like dye tests, to trace water flow through the wall system with precision [5]. They also identify hidden construction flaws. A common issue is the "bathtub effect", where drainage stone only partially fills the wall, leaving the upper soil soaked while the lower section drains properly [5]. Heavy clay soils pose another challenge, as they expand when wet, leading to significant pressure spikes [1][5]. Additionally, professionals can check if the wrong type of landscape fabric – woven instead of non-woven – was installed, which could block drainage [5].
Scheduling a professional inspection at least once a year and after major storms is a smart move. These evaluations can catch early signs of cracking or soil movement [6][3]. Walls over 4 feet tall often require professional engineering to meet International Building Code standards and to safely handle soil and water loads [1][5][3]. Warning signs like horizontal cracks, stair-step patterns, bulging, or white chalky deposits (efflorescence) suggest water is moving through the wall material instead of the drainage system [15][6].
Creating Custom Repair and Maintenance Plans
Once an assessment is complete, experts craft tailored repair and maintenance plans to address specific issues. Because every property is different, one-size-fits-all solutions rarely work for drainage problems. Professionals calculate hydrostatic and earth pressure loads, which can double when soil becomes saturated [15][7]. In regions with freeze-thaw cycles, water-soaked soil can expand by around 9%, exerting immense pressure that can crack or shift the wall [15].
Custom plans consider local soil conditions. For example, areas with heavy clay may need wider drainage zones – up to 36 inches of gravel rather than the standard 12 to 18 inches – to ensure effective water management [15][5]. Experts might also design surface water management systems, like swales or water bars above the wall, to redirect runoff before it reaches the backfill [5][9]. In some cases, hydro-jetting may be used to clear silt and root blockages from drainage pipes [5].
"A properly drained retaining wall typically lasts 2-3 times longer than one without good drainage. That’s the difference between replacing your wall in 10 years versus enjoying it for 30 years or more." – Kyle Nix, Owner, Nix Landscaping [15]
While professional installation costs range from $2,000 to $5,000, it’s a worthwhile investment compared to the $10,000 to $20,000 price tag of replacing a collapsed wall [7]. Pro Landscapes MD offers full retaining wall and drainage services throughout central Maryland, including Howard County, Montgomery County, Carroll County, and nearby areas. Their team handles everything from initial evaluations to crafting custom repair plans, ensuring your wall meets local building codes and effectively manages drainage challenges.
Conclusion
Taking care of drainage issues in your retaining wall is crucial for protecting your investment. Did you know that nearly 50% of retaining wall failures are caused by drainage and water problems? [16] This kind of pressure doesn’t just threaten the wall – it can also damage nearby patios, driveways, or even your home’s foundation.
Catching problems early can save you a lot of money. Spotting minor issues like efflorescence or small cracks during regular inspections can help you avoid a complete wall replacement, which is far more expensive. As Simmons Landscape & Irrigation points out, "It’s far more affordable to install proper drainage during initial retaining wall design instead of paying for the hidden cost of poor drainage later" [1].
"A well-drained retaining wall is a safe, stable, and long-lasting one." – Green Bay Landscaping [3]
Preventative measures go a long way in avoiding water damage and expensive repairs. Simple steps, like clearing debris from weep holes, ensuring gutters direct water away from the wall, and watching for signs like bowing, wet cracks, or pooling water, can keep your wall in good shape. Routine annual inspections are your best defense against major issues. And if your wall is over 4 feet tall or shows signs of structural stress, calling in a professional is essential – not just for safety but also to meet building codes.
FAQs
How can I tell if my retaining wall has a drainage issue?
Look for warning signs such as cracks, bulging, leaning, or water seeping behind the wall. If you notice water pooling at the base of the wall or visible pressure causing bulges or leaning, it’s a clear indication of poor drainage. Tackling these problems early can help avoid serious structural damage and water-related issues down the line.
Can I add drainage to an existing retaining wall without rebuilding it?
Yes, it’s possible to add drainage to an existing retaining wall without tearing it down. Some effective options include installing perforated drainage pipes, adding weep holes, or using gravel backfill. These methods help manage water buildup, reducing the risk of structural damage and ensuring the wall remains stable over time.
What’s the best drainage option for clay soil behind a retaining wall?
When dealing with clay soil behind a retaining wall, the most effective drainage system combines gravel backfill, perforated drain pipes, and possibly a gravel- or rock-filled French drain. These components work together to channel water away, reducing hydrostatic pressure. This helps maintain the wall’s strength and prevents potential damage over time.
Chat with Us