


- bhavya gada
- No Comments
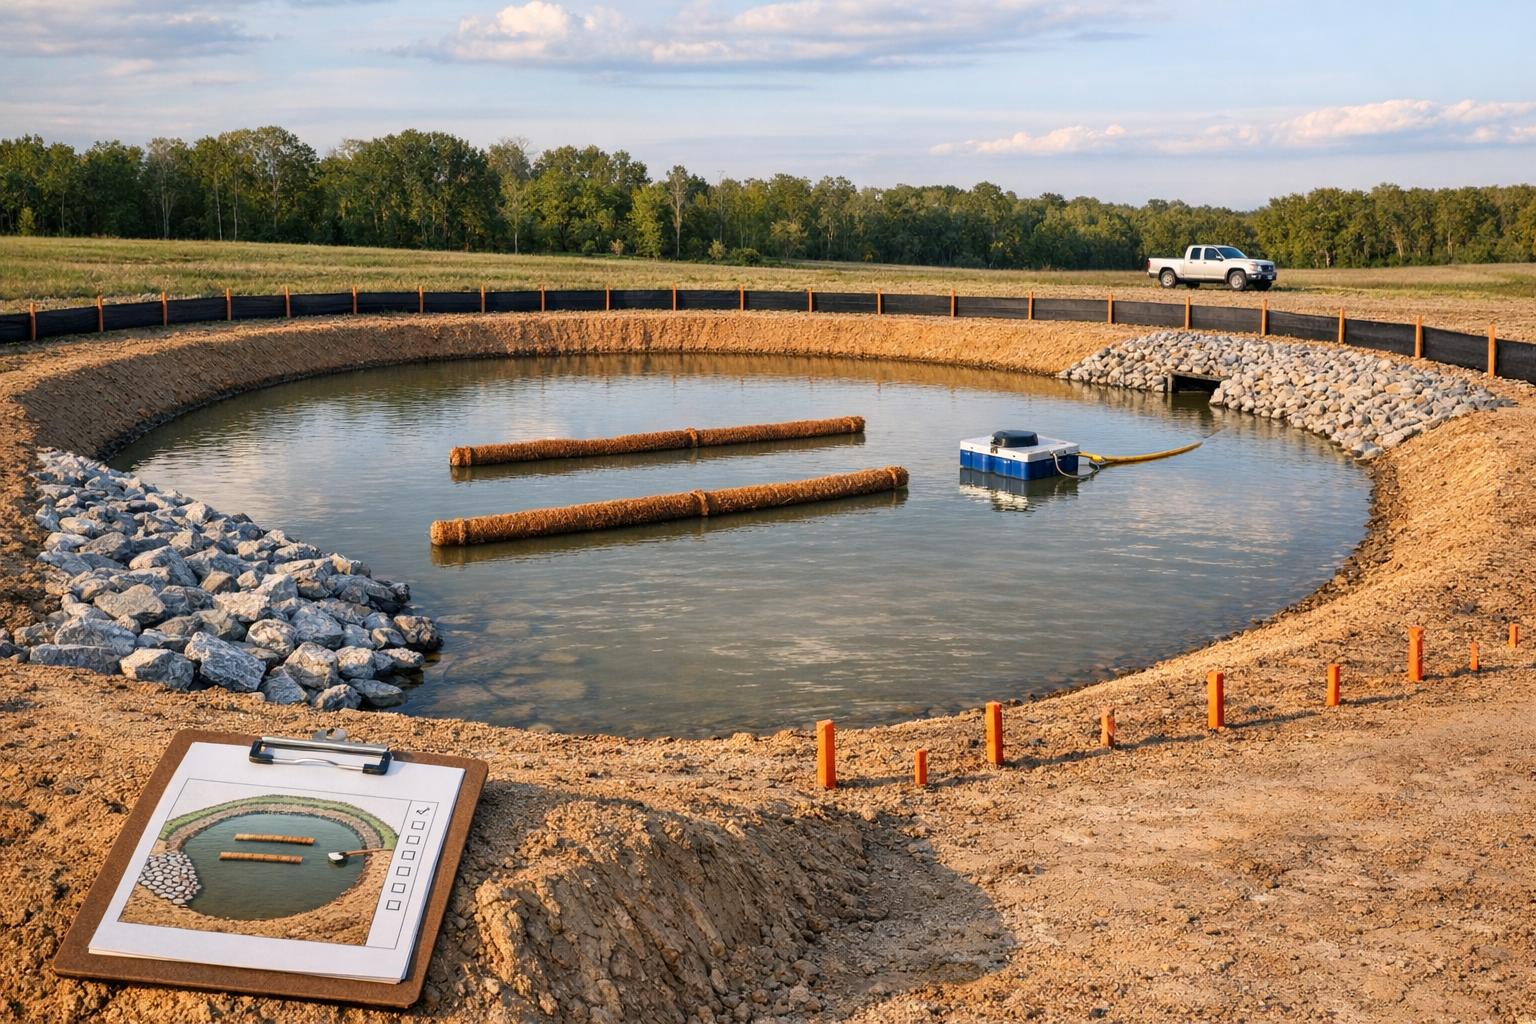
Sediment basins are temporary structures that prevent sediment-filled stormwater runoff from construction sites from polluting nearby water bodies. They are required by federal and state laws, such as the Clean Water Act and NPDES permits. Proper planning, design, construction, and maintenance are essential to ensure compliance and functionality. Here’s a quick overview of key steps:
- Pre-Construction: Assess site conditions, test soil, and develop an Erosion and Sediment Control (ESC) plan. Locate basins in low areas, design for proper drainage, and sequence construction to reduce sediment dispersal.
- Design: Prioritize surface area over depth, include forebays for coarse sediment, and design stable embankments with anti-seep collars and emergency spillways.
- Construction: Build basins before major earthwork, stabilize foundations, compact embankments, and install diversion controls to manage runoff.
- Maintenance: Inspect monthly and after storms, remove sediment when forebays reach 50% capacity, and repair embankments or outlets as needed.
- Removal/Transition: Stabilize surrounding areas before decommissioning or converting basins into permanent stormwater systems.
Proper sediment basin management minimizes erosion, protects water quality, and avoids costly penalties.
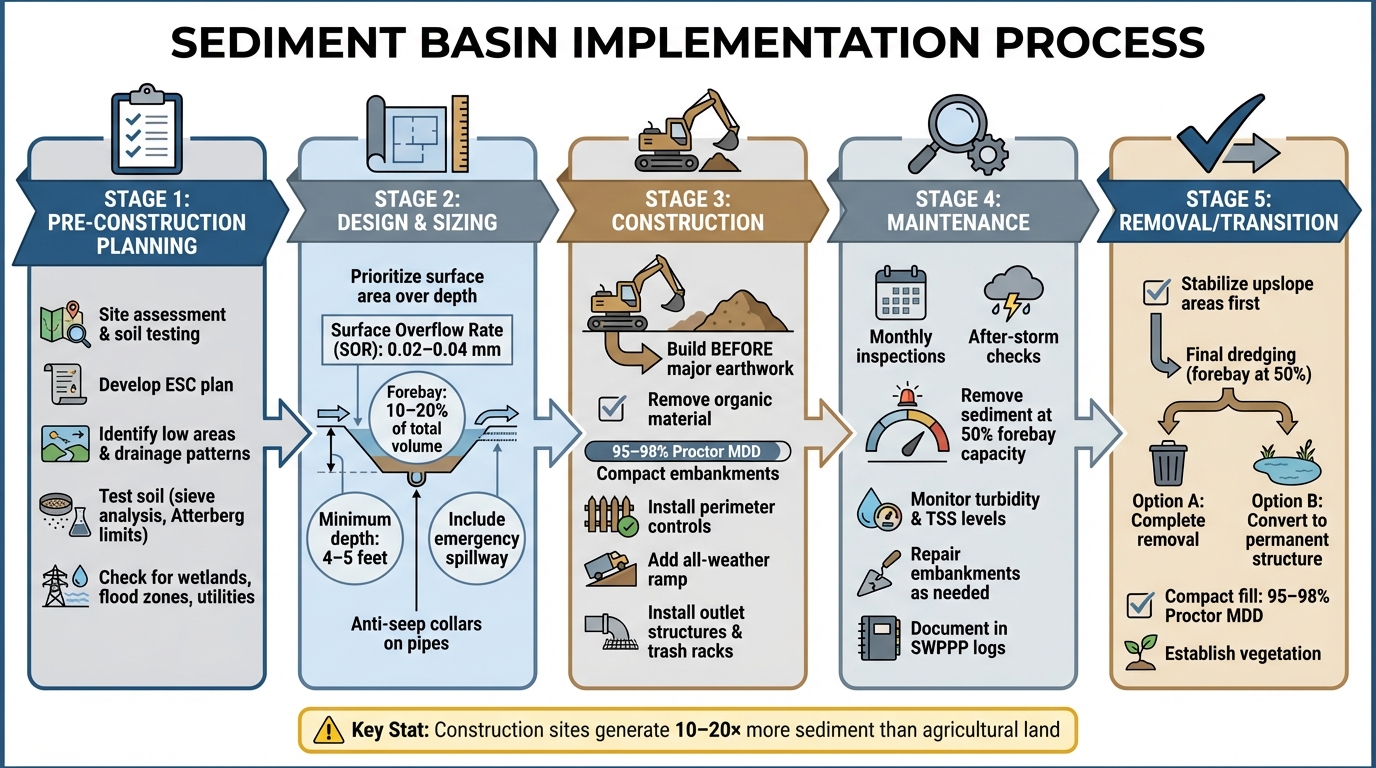
5-Stage Sediment Basin Implementation Process: From Planning to Removal
Pre-Construction Planning
Site Assessment and Permits
Before breaking ground, it’s crucial to evaluate the site’s natural features. Look at the topography and drainage patterns to pinpoint low areas that require minimal earthmoving. Identify steep slopes, map stormwater flow, and measure any disturbed drainage zones.
Soil testing is a must. Tests like sieve analysis and Atterberg limits can reveal how silts and clays will behave. For instance, high-plasticity silts and clays settle slowly, which might mean you’ll need longer detention times. Also, check the soil’s bearing capacity and settlement potential to ensure the embankment remains stable. If the foundation is too permeable, plan for measures like clay cores, cutoff trenches, or geomembrane liners to control seepage and prevent piping.
Don’t forget to assess potential obstacles like wetlands, flood zones, or karst formations. Also, check for existing utilities to ensure heavy equipment can access the site in all weather conditions.
Development of an ESC Plan
Using the findings from your site assessment, create a detailed Erosion and Sediment Control (ESC) plan. This plan should clearly outline the locations of sediment basins, perimeter controls, and temporary drainage features. Include drawings that mark inlet and outlet structures, emergency spillways, and the dimensions of forebays.
For embankments, aim for compaction levels between 95–98% of the Proctor Maximum Dry Density. Anti-seep collars should be added to pipe penetrations to prevent leakage. Design the basin to handle particles between 0.02 mm and 0.04 mm in diameter, maintain a minimum water depth of 4–5 feet to limit sediment resuspension, and dedicate 10–20% of the basin’s total volume as a forebay for trapping coarse sediment [1].
Staging and Sequencing
Once the site has been assessed and the ESC plan is in place, carefully sequence construction tasks to minimize sediment dispersal. Start by installing perimeter controls before any clearing or grubbing begins. This helps prevent sediment from escaping during the initial disturbance. Prepare the basin subgrade by removing organic material, addressing soft spots, and proof-rolling to confirm the soil’s bearing capacity. Once the ground is stable, place embankment fill in thin layers, ensuring proper moisture control and density testing.
"A well-sited, well-drained basin with a robust embankment and maintainable outlet will outperform an oversized basin built on weak ground." – Turn2Engineering [1]
Coordinate basin construction with the placement of utilities and roads. Set up an all-weather ramp for maintenance, especially when the forebay reaches 50% capacity [1]. Before allowing the basin to collect runoff, double-check all orifice dimensions, skimmer elevations, and that the emergency spillway is properly armored.
sbb-itb-843f8be
What Are The Key Considerations In Designing A Sediment Basin? – Earth Science Answers
Design and Sizing Requirements
When moving from pre-construction planning to sediment basin design, these guidelines help fine-tune performance to meet regulatory standards.
Sizing for Storage Volume
The surface overflow rate (SOR) is key to determining if your basin will effectively trap sediment. To calculate this, divide the design inflow by the basin’s surface area. The SOR should stay below the settling velocity (0.02–0.04 mm) to maximize sediment capture efficiency [1]. Focus on surface area rather than depth when sizing your basin. A wider and shallower design often works better than a narrow, deep one because sediment settling relies more on surface area than volume.
To estimate storage volume, multiply the target detention time by the storm inflow. Maintain a minimum water depth to avoid sediment resuspension. Include a forebay that accounts for 10–20% of the total volume [1]. This separate section at the inlet traps coarse sediment, making maintenance easier and protecting the main basin.
Once storage is optimized, the next priority is ensuring outlet safety and effective flow control.
Outlet Structures and Safety Features
Outlets should include a perforated riser, trash rack, and skimmer to handle floatable debris. Add anti-seep collars along the outlet barrel and anti-vortex devices to prevent piping and vibration issues [1]. Anti-seep collars are particularly important, as piping failures are a leading cause of embankment collapses.
An emergency spillway should be designed as a broad-crested weir, positioned above the normal pool elevation with enough freeboard and protected by riprap [1]. Before the basin starts operating, double-check all orifice dimensions, skimmer placements, and spillway armoring to ensure functionality.
Redundant and Supplemental Controls
Supplementary controls can further boost basin performance. Use fixed or floating baffles to extend the flow path and prevent short-circuiting [1]. At the inlet, install a riprap apron or stilling basin to dissipate high-energy inflows and reduce the risk of resuspension [1]. For soils with high plasticity, apply approved flocculants to speed up sediment settling [1]. Additionally, upstream erosion controls – like mulch, erosion control blankets, and check dams – help reduce the sediment load entering the basin, minimizing the frequency of cleanouts [1].
Construction and Installation
Once the design parameters are set, proper installation becomes critical to safeguard the site and ensure compliance with regulations. Sediment basins should be built before significant earthmoving begins. This ensures the site is protected as soon as grading activities start.
Perimeter and Diversion Controls
Before excavation begins, install earth dikes or swales along the basin’s perimeter. Pair these with upstream erosion controls – such as mulch, erosion-control blankets, or check dams – to manage runoff and reduce the sediment load entering the basin. This proactive approach also helps cut down on how often forebay dredging is needed.
Once diversion controls are in place, the next step is preparing and stabilizing the basin’s foundation.
Basin Construction Standards
Creating a stable foundation is key to building a reliable embankment. Start by removing any organic material or soft spots. Use proof rolling to identify areas of instability, and rebuild weak sections to ensure they can handle the required loads. Once the subgrade is stable, scarify and compact it to the specified density before adding embankment fill. The fill should be applied in thin layers and compacted to 95–98% of the Proctor Maximum Dry Density (MDD), with moisture levels kept close to the Optimum Moisture Content (OMC) [1].
After the embankment is constructed, stabilize all slopes and basin perimeters within three days to prevent internal erosion. Add anti-seep collars along the outlet barrel to prevent piping issues, and construct an all-weather ramp leading to the forebay for easy maintenance access.
Temporary Stormwater Diversion
Once the basin is built, implement temporary stormwater diversion systems. Redirect existing or newly installed storm drains to the basin outfalls to handle runoff until permanent stabilization measures are in place. This ensures sediment-laden water is treated through the basin rather than bypassing it.
Additionally, include an emergency spillway – typically a stabilized broad-crested weir positioned above the normal pool level. This feature safely manages flows that exceed the basin’s capacity. Before filling the basin, double-check all orifice dimensions, skimmer elevations, and spillway armoring to confirm everything is set up correctly.
Maintenance and Inspection Guidelines
Regular inspections are essential to ensure compliance and maintain performance. Check the basin after every major storm and conduct monthly inspections during active earthwork periods to catch potential problems early. During inspections, confirm that outlets are clear, baffles are intact, and freeboard levels are consistent. Look for signs of erosion, animal burrows, or piping on embankments, as these could signal structural issues. Additionally, make sure the emergency spillway’s armoring is stable and free of obstructions. Keep detailed records of each inspection in the SWPPP logs [1].
Inspection Frequency and Checklist
A structured inspection routine helps maintain the basin’s effectiveness. Use field testing kits to measure turbidity and Total Suspended Solids (TSS), comparing water quality upstream and downstream. This data will indicate whether the basin is performing as designed. Also, verify that the orifice and weir dimensions match design specifications and confirm that skimmer elevations are correct before the basin fills [1].
Sediment Removal and Disposal
Remove sediment from the forebay once it reaches 50% capacity to preserve its efficiency [1]. For the main basin cell, dredge whenever you notice a considerable reduction in storage capacity or surface area. After dredging, move the sediment to a controlled stockpile for dewatering before either disposal or reuse. Make sure an all-weather ramp is available for vacuum units or excavators, ensuring accessibility under any site conditions [1]. Once sediment removal is complete, repair and stabilize any damaged areas to keep the basin functioning effectively over time.
Repair and Stabilization
To reinforce embankments, establish turf, mow it regularly, and remove woody vegetation to prevent seepage paths [1]. During winter, adjust weirs and skimmers to maintain freeboard and clear debris from outlets. Address any damage to outlet protection, riprap, or embankments as soon as possible to ensure the basin continues to operate as intended.
Removal and Final Stabilization
Once construction is complete and the site is stabilized, it’s crucial to properly decommission the temporary sediment basin. This step helps prevent erosion and ensures the site remains stable over the long term. The process includes protecting upslope areas, carefully removing basin infrastructure, and, if needed, transforming the temporary basin into a permanent stormwater management system.
Permanent Stabilization Measures
Before dismantling any part of the basin, focus on stabilizing the surrounding areas. Use dense turf or approved vegetation to cover disturbed upslope regions. Embankments should have thick, established vegetation, and any woody growth must be cleared to avoid seepage risks. Outfalls and spillways should be reinforced with riprap and filter layers to handle water flow effectively. Keep upstream controls in place until the entire drainage area is fully stabilized.
Basin Removal Process
Once permanent stabilization is achieved, the basin can be removed. Start with a final dredging of the forebay (at 50% capacity) and the main cell to meet the original design requirements [1]. After removal, ensure all disturbed areas are stabilized, and maintain vegetation through regular mowing to promote growth and prevent erosion.
Conversion to Permanent Structures
If the sediment basin will be repurposed as a permanent stormwater feature, treat it like a small dam embankment. Compact the fill to 95–98% of Proctor Maximum Dry Density [1]. For permeable sites, add seepage controls like clay cores, cutoff trenches, or geomembrane liners to prevent water flow through unintended pathways. Temporary outlets should be replaced with permanent, armored spillways or weirs, and an all-weather access ramp should be installed for future maintenance needs. Inspect all pipe penetrations, anti-seep collars, and filter envelopes thoroughly to confirm they are leak-free before completing the conversion.
For expert guidance on sediment basin removal, final stabilization, or converting temporary basins into permanent stormwater features, Pro Landscapes MD offers specialized services. Their experience in drainage and stormwater management can help ensure your site remains stable and functional for years to come.
These steps lay the groundwork for the final inspection and long-term stability, which will be addressed in the concluding section.
Conclusion
Managing sediment basins requires careful attention at every stage of their lifecycle. Achieving success depends on proper hydraulic design, understanding the ground conditions, ensuring embankment stability, and controlling seepage. A well-placed and well-maintained basin with a solid embankment and functional outlet system will always perform better than an oversized basin built on unstable ground.
It’s essential to construct sediment basins before major earthworks begin. This proactive approach helps protect the site from excessive erosion. Construction sites can generate 10 to 20 times more sediment than agricultural land, making early preventative measures crucial [2].
In addition to following design and maintenance guidelines, regular upkeep is a legal obligation under the Clean Water Act. Monthly inspections, as well as checks after significant storms, are necessary. Maintenance tasks, such as dredging, should be initiated when the forebay reaches 50% of its capacity [1]. Ignoring these responsibilities can lead to costly stop-work orders and penalties, which can run into tens of thousands of dollars per violation per day [2].
As the project nears completion, decommissioning the basin requires the same level of diligence as its installation. Ensure all upslope stabilization measures are fully in place, compact embankment fill to 95–98% of the Proctor Maximum Dry Density [1], and complete any necessary conversions to permanent stormwater structures [3][4]. This thorough approach helps maintain compliance and protects downstream water quality at every stage.
If you need expert guidance for sediment basin planning, construction, or transitioning to permanent stormwater systems, Pro Landscapes MD offers specialized services in drainage and stormwater management across central Maryland. Their knowledge of regulatory standards and site stabilization ensures your project remains efficient and compliant over the long haul.
FAQs
When is a sediment basin required on a job site?
A sediment basin is commonly required on large construction sites – typically those over 2 acres – where managing runoff is critical to prevent sediment from polluting nearby water sources. This is particularly important when other sediment control methods aren’t feasible or when the site plans include a permanent stormwater basin for post-construction use.
How do I determine the size of a sediment basin?
The size of a sediment basin hinges on several factors, including the drainage area, sediment load, and specific conditions of the site. These basins are generally designed to manage areas ranging from 5 to 100 acres, ensuring they can effectively detain runoff. Important considerations include the volume of stormwater, the topography of the land, and the space available for construction. It’s crucial to review local regulations and thoroughly assess your site to determine the right basin size for efficient performance.
What are the most common sediment basin failure points?
The main reasons sediment basins fail often boil down to three key issues: improper installation, poor maintenance, and straying from approved plans. These problems can severely limit the basin’s ability to remove sediment effectively and might even lead to compliance violations.
Chat with Us