


- bhavya gada
- No Comments
Soil testing is a must in Maryland if you’re applying phosphorus-based fertilizers due to state regulations aimed at protecting the Chesapeake Bay. Testing helps you understand your soil’s pH, nutrient levels, and organic matter, ensuring healthier plants and preventing wasteful fertilizer use. Here’s what you need to know:
- Why Test? Maryland law requires soil testing every three years before using phosphorus fertilizers. It also helps diagnose soil issues like acidity or nutrient deficiencies, common in Maryland soils.
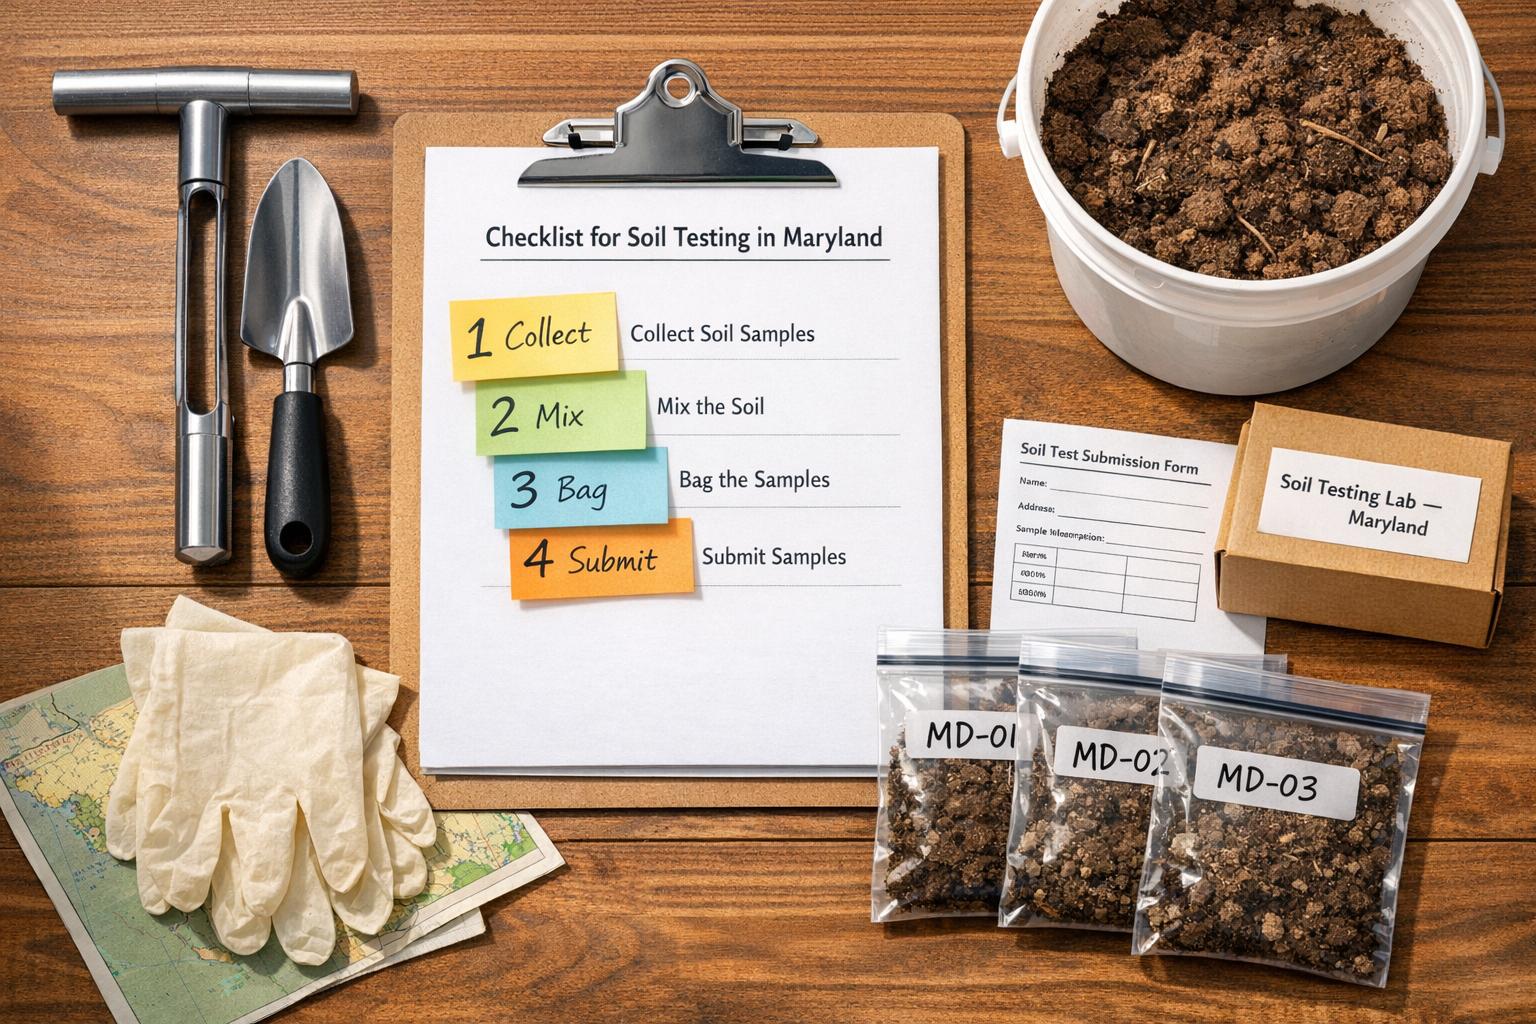
- Tools Needed: A clean trowel, stainless steel soil probe, plastic bucket, and labeled plastic bags for samples.
- Cost: Professional tests cost $11–$30, plus about $10 for shipping. DIY kits are cheaper but less accurate.
- When to Test: Fall is ideal for testing, allowing time for adjustments before spring planting.
- Steps: Collect 10–12 sub-samples per area, mix them, label clearly, and send to a recommended lab.
Testing ensures your lawn or garden thrives while staying compliant with Maryland’s fertilizer laws. For detailed results and tailored care, consider professional services like Pro Landscapes MD.
Tools and Materials Needed for Soil Testing
Basic Tools for Soil Testing
Getting started with soil testing doesn’t require anything fancy – just a few clean, basic tools. A trowel or spade works well for digging and collecting soil samples, but make sure it’s rust-free since rust could interfere with the chemical analysis. If you’re aiming for precise, uniform samples, a stainless steel soil probe is an excellent choice. These probes help you collect consistent cores from the top 4 to 8 inches of soil, where most of the organic matter and microbial activity are concentrated.
You’ll also need a clean plastic bucket to mix sub-samples from the same area into one representative sample. Steer clear of brass or galvanized containers, as these can contaminate your results. Once you’ve mixed the sub-samples, transfer about one pint (or 1 pound) of soil into clean plastic bags. Label each bag immediately with a permanent marker (e.g., “Front Lawn,” “Backyard Garden”) to ensure it matches the lab’s submission form.
Before sealing the bags, remove any organic debris like leaves or roots, as well as rocks. If you’re testing multiple areas, clean your tools thoroughly between zones to avoid cross-contamination.
With the tools sorted, it’s time to think about the costs involved in professional soil testing.
Cost Considerations
Understanding the costs upfront can help you plan better. Basic lab tests typically range from $11 to $30, with shipping costs adding about $10, bringing the total to $21 to $40 [1][2][6]. As noted by Montgomery County Government:
Soil tests for lawns are inexpensive, and most cost less than $15 [2].
While DIY soil testers are available for $10 to $20, they don’t offer the same level of detail as professional lab tests [5]. Brett McCurdy, Owner of BAM’s Landscaping, explains:
While DIY soil testers are easy to use, they do not give very accurate results. They also don’t give you any details about what minerals are high or low in your soil [5].
For a slightly higher cost, professional lab tests provide much more detailed and reliable data, making them a worthwhile investment, especially for homeowners in Maryland.
sbb-itb-843f8be
Preparing to Collect Soil Samples
Identify Key Testing Areas
Before diving into soil sampling, it’s crucial to pinpoint the areas you want to test. Walk around your property and identify distinct zones, or "management units", that you care for differently. For instance, your front lawn, backyard, and vegetable garden might all have unique needs. Since each area may require different fertilizers or soil treatments, it’s best to test them separately [4].
Pay close attention to spots where plants or grass aren’t doing well. Yellowing grass, mossy patches, persistent weeds, or bare spots often indicate nutrient deficiencies or pH imbalances that soil testing can reveal. If you’ve applied fertilizers, lime, or manure to some areas but not others, treat those zones as separate units because their soil composition will likely differ [4].
To ensure accurate results, avoid sampling areas that might throw off the data. Skip wet spots, areas frequented by pets, old fence lines, spots under downspouts, or recently amended areas. These locations may not reflect the overall condition of your soil and could distort your results [4].
Once you’ve mapped out your testing zones, it’s time to prepare them for sampling.
Clear the Testing Area
After identifying the areas to test, clear away grass clippings, leaves, mulch, and other debris to expose the undisturbed soil beneath [4]. Avoid including plant material or roots in your sample, as they can interfere with the accuracy of the test [1].
Clearing the area can also reveal hidden problems, like leftover construction debris – plywood, rocks, or other materials buried during home construction – that no amount of fertilizer will fix [3]. Removing this debris ensures you’re testing the soil itself, not external factors that could skew your results.
Soil Testing with Wayne of MRW Lawns
Step-by-Step Soil Testing Checklist
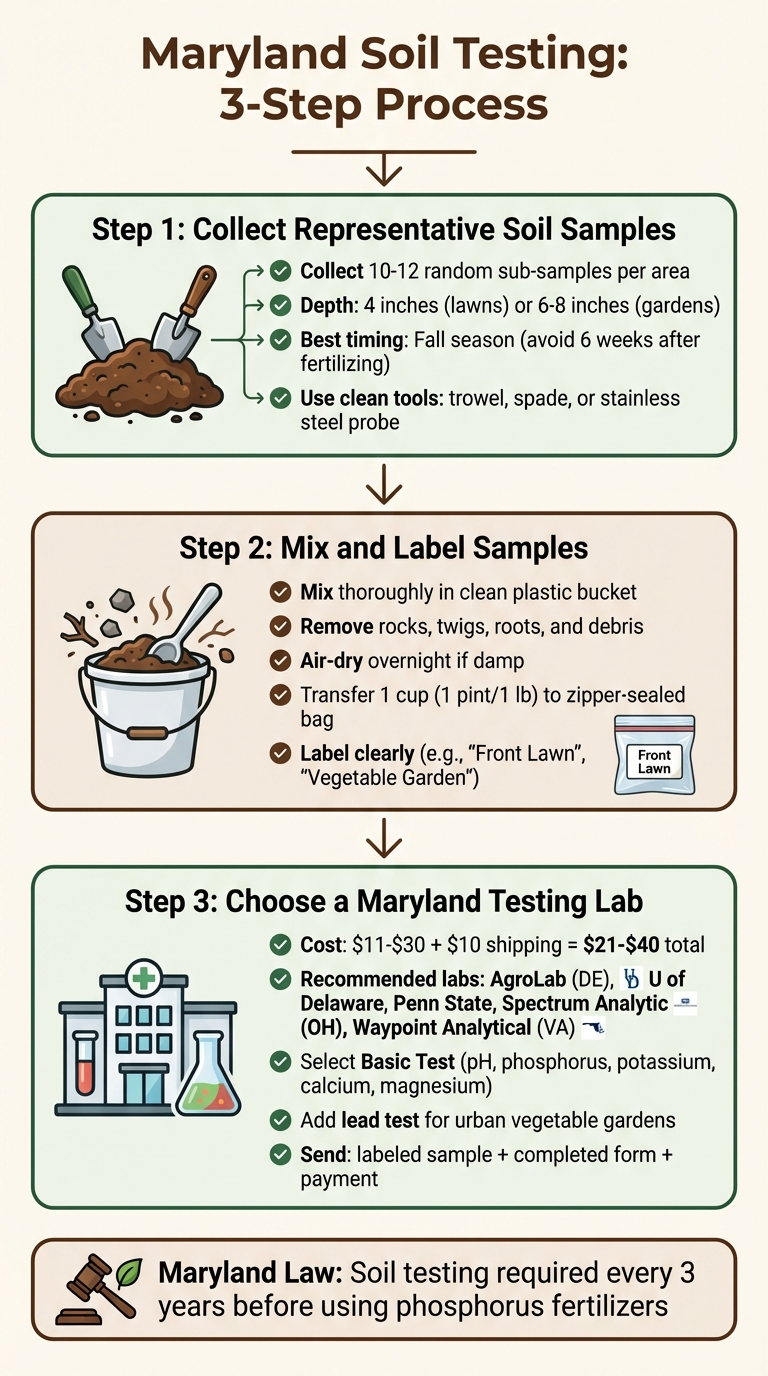
Maryland Soil Testing Process: 3-Step Checklist for Homeowners
Step 1: Collect Representative Soil Samples
Start by gathering soil samples from each area you want to test. For accurate results, collect 10–12 random sub-samples from each distinct area, such as the front lawn, backyard, or vegetable garden. These sub-samples will be combined into one composite sample to represent the entire zone [1].
When collecting, dig to a depth of 4 inches for lawns and 6–8 inches for garden beds. Use clean tools like a trowel, spade, or stainless steel probe to take thin cores of soil from random spots across the area.
While you can collect samples at any time, fall is an ideal season. This timing allows amendments like lime to adjust your soil before spring planting. However, avoid sampling within six weeks of applying fertilizer or manure, as these can distort nutrient readings [1][4].
Once collected, combine the sub-samples in a clean bucket for the next steps.
Step 2: Mix and Label Samples
With your sub-samples in hand, mix them thoroughly in a clean plastic bucket. Break up any clumps and remove rocks, twigs, roots, or other debris [1][4].
If the soil is damp, let it air-dry overnight on clean paper [4][1]. Most labs require about 1 cup (roughly 1 pint or 1 pound) of soil for testing [4][1].
Transfer the dried, mixed soil into a sturdy, zipper-sealed plastic bag, and label it clearly with a unique identifier, such as "Front Lawn" or "Vegetable Garden." Ensure this label matches what you’ll write on the lab’s submission form [1][6].
Now, it’s time to select a testing lab or consult with professional landscaping services for expert assistance.
Step 3: Choose a Maryland Testing Lab
Although the University of Maryland no longer operates its own soil testing lab, they recommend several regional facilities that adhere to Maryland’s nutrient management guidelines [1]. Options include AgroLab in Harrington, Delaware; University of Delaware in Newark; Penn State in University Park, Pennsylvania; Spectrum Analytic in Washington Court House, Ohio; and Waypoint Analytical in Richmond, Virginia [1].
Basic tests range from $11–$30, plus shipping [1]. Opt for the Basic Test, which measures pH, phosphorus, potassium, calcium, and magnesium. If you’re testing soil for a vegetable garden, it’s a good idea to add a lead test, especially for urban gardens [1].
Download the lab’s submission form and fill it out completely, including details like the crop type (e.g., lawn, ornamentals, or vegetables). Send the form, your labeled soil sample, and payment in a sturdy box or padded envelope [1][6]. For consistent results, stick with the same lab for future tests, as different labs use varying methods and measurement units [1].
Careful collection, thorough mixing, and timely submission are key to getting accurate soil test results.
Understanding Soil Test Results
Common Soil Parameters and Their Ideal Ranges
Soil test reports provide valuable insights into your soil’s nutrient levels and chemical properties. One key measurement is soil pH, which gauges acidity or alkalinity on a scale of 0 to 14, with 7.0 being neutral. Jon Traunfeld, Director of the University of Maryland Extension‘s Home and Garden Information Center, explains:
Soil pH is a measure of how acidic (sour) or basic (sweet) your soil is. Soil pH directly affects nutrient availability [7].
For most Maryland lawns, the ideal pH range is between 5.5 and 7.0 [7]. When pH falls outside this range, plants may struggle to absorb nutrients effectively. For example, phosphorus becomes less available when pH drops below 6.0 or rises above 7.3 [7].
Your report will also highlight levels of phosphorus (P) and potassium (K), two essential nutrients. Nitrogen is usually excluded from basic soil tests because it fluctuates rapidly due to environmental factors [7]. Nutrient levels are categorized as "Low", "Medium", "Optimum", or "Excessive." If a nutrient is rated as "Optimum" or higher, adding more won’t typically enhance plant growth [7].
Another critical factor is organic matter (OM), expressed as a percentage by weight. Healthy soils in Maryland generally contain at least 2% OM, which helps improve structure and nutrient retention [7]. Additionally, the Cation Exchange Capacity (CEC) measures the soil’s ability to store and release nutrients. A CEC below 10 suggests that adding organic matter could be beneficial [7].
Understanding these ranges enables you to interpret your soil test results and take specific actions to address deficiencies.
| Parameter | Ideal Range for Maryland Lawns | Notes |
|---|---|---|
| Soil pH | 5.5–7.0 | Outside this range, nutrient issues may arise [7] |
| Organic Matter | 2% or greater | Enhances soil structure and nutrient storage [7] |
| Phosphorus (P) | Low (only if adding) | Avoid adding if Medium to Excessive to protect water quality [7] |
| CEC | >10 | Add organic matter if below 10 [7] |
These benchmarks provide a foundation for the corrective steps outlined below.
Recommendations for Soil Improvement
Your soil test results can guide specific amendments to improve soil health. If the pH is too low, apply calcitic lime – no more than 50 lbs. per 1,000 sq. ft. at a time. For example, if 85 lbs. is recommended, spread 50 lbs. initially and apply the remaining 35 lbs. six months later [7]. Use dolomitic lime if both calcium and magnesium levels are low [7].
To lower pH, incorporate elemental sulfur or iron sulfate into the soil. Avoid aluminum sulfate, as it can cause toxicity in acidic soils [7].
For soils with low organic matter, add 2–4 inches of compost to the topsoil annually for several years. Once your garden is established, maintaining it with a yearly 1-inch compost layer will gradually enhance soil structure and nutrient retention [7].
Phosphorus management is particularly important. The University of Maryland Extension advises against adding phosphorus if soil test results indicate medium to high levels, as excess phosphorus can harm local waterways like the Chesapeake Bay [7]. Phosphate fertilizers should only be used when phosphorus levels are low.
Nitrogen application is regulated by Maryland law, which limits single applications to 0.9 lbs. per 1,000 sq. ft. and annual totals to 2.7 lbs. per 1,000 sq. ft. [6]. These limits must be followed, even if your soil test suggests otherwise.
Next Steps: Improving Lawn Health with Pro Landscapes MD

Professional Lawn Care Services
Pro Landscapes MD takes the guesswork out of lawn care by using your soil test results as the starting point for customized solutions. Soil testing can feel overwhelming, with its myriad choices, steps, and the math involved in calculating fertilizer needs. Dan Adler from the University of Maryland Extension highlights these challenges, which can discourage homeowners from tackling the process themselves [6].
To simplify things, Pro Landscapes MD handles everything – from coordinating lab testing to creating tailored lawn care plans. Their team translates lab results into precise application rates for your yard, ensuring accuracy. This not only prevents issues like lawn burn from over-fertilizing but also keeps you compliant with Maryland’s strict fertilizer regulations [6].
Their services go beyond just balancing nutrients. For soils with a cation exchange capacity (CEC) below 10, they incorporate organic matter to enhance soil structure and nutrient retention [7]. By addressing deficiencies and improving nutrient balance, they help your lawn thrive.
But nutrient management is just part of the equation. Physical soil conditions also play a key role in achieving a healthy lawn.
Custom Landscaping Solutions
Healthy soil isn’t just about nutrients – it’s also about structure and drainage. Pro Landscapes MD offers landscaping services that tackle these physical challenges, ensuring your lawn reaches its full potential. For example, compacted soil can limit root growth, while poor drainage may lead to standing water. Their experts provide solutions such as aeration to loosen heavy clay soils and drainage installations like French drains or regrading to improve water flow [3].
Serving homeowners across Howard, Montgomery, Carroll, Frederick, Prince George’s, and Baltimore Counties, Pro Landscapes MD crafts soil health programs that align with Maryland turfgrass’s ideal pH range of 6.0 to 7.5. Their landscape design and planting services are tailored to your yard’s specific conditions, avoiding generic approaches. This personalized care transforms struggling lawns into lush, vibrant spaces while also supporting Chesapeake Bay conservation through responsible nutrient practices.
Conclusion
Healthy soil is the backbone of a thriving lawn in Maryland. By testing for pH, nutrients, and organic matter, you can make smarter decisions that save money, protect the environment, and provide the best care for your lawn. Regular soil testing – at least every three years – also helps you stay compliant with Maryland’s Fertilizer Law [2] and prevents issues like nutrient lockout, which happens when soil pH drifts outside the ideal range [5].
The advantages of soil testing go far beyond your yard. Proper testing minimizes over-fertilization, which keeps excess nitrogen and phosphorus from polluting the Chesapeake Bay and fueling harmful algae blooms [2]. Considering that basic lab tests cost just $11 to $30, it’s a small price to pay for healthier soil and a cleaner environment [1].
Still, interpreting those test results or determining fertilizer rates can feel overwhelming. As Dan Adler from the University of Maryland Extension puts it:
The subject [of soil testing] is intimidating [6].
That’s where Pro Landscapes MD steps in. They take care of everything – from coordinating lab tests to crafting lawn care strategies tailored to your soil’s specific needs. Serving homeowners in Howard, Montgomery, Carroll, Frederick, Prince George’s, and Baltimore Counties, their team handles the technical work so you can enjoy a lush, green lawn. Whether your soil needs pH adjustments, better drainage, or more organic matter, their services tackle both nutrient and structural challenges.
With Pro Landscapes MD, you get a complete solution for your lawn’s health. Start with a soil test this fall, and let them transform your results into a vibrant, sustainable outdoor space that aligns with Maryland’s environmental goals.
FAQs
Do I need to soil test before using phosphorus fertilizer in Maryland?
Soil testing might not be mandatory before applying phosphorus fertilizer in Maryland, but it’s a smart step to take. It helps gauge nutrient levels and avoid overusing fertilizers. That said, Maryland law does require soil testing every three years if you’re applying phosphorus. This not only keeps you compliant with regulations but also promotes better soil health and management practices.
How many soil samples do I need for each part of my yard?
To get accurate soil testing results, it’s generally advised to gather 10 to 15 soil samples from each section of your yard. Combine these samples to create a single, representative mixture for testing. This approach helps ensure the results reflect the overall condition of that specific area.
Which soil test should I order for a lawn vs. a vegetable garden?
For lawns, get a basic soil test to check levels of pH, calcium, phosphate, potassium, and magnesium. For vegetable gardens, order the same test and consider adding lead testing if there’s any concern about contamination. These tests are essential for maintaining healthy soil and ensuring it’s safe for your intended use.
Chat with Us