


- bhavya gada
- No Comments
Stone veneer installation costs for vertical surfaces range from $11 to $33 per square foot, depending on material type, project size, and complexity. Here’s a quick breakdown of what affects the price:
- Material: Natural stone veneer is the most expensive ($15–$30/sq ft), while manufactured veneer is more affordable ($10–$24/sq ft). Mortarless systems cost the least ($1.50–$3.50/sq ft).
- Labor: Skilled masons charge $5–$30 per square foot, influenced by design complexity and stone type.
- Preparation: Costs $2–$5/sq ft for surface cleaning, moisture barriers, and permits.
- Finishing: Adds $1–$3/sq ft for grouting, sealing, and cleanup.
Larger projects may reduce per-square-foot costs, but intricate designs or challenging conditions can increase labor expenses by 30–100%. Proper site preparation and professional installation are crucial to avoid long-term issues like moisture damage. For Maryland homeowners, local factors like freeze-thaw cycles and permit requirements also play a role in pricing. Hiring experienced contractors ensures a durable and visually appealing result.
Real Stone Veneer Cost: Everything You Need to Know
Preparation Costs for Vertical Stone Veneer
Before installing stone veneer, your vertical surfaces need to be properly prepped. This preparation phase generally costs $2 to $5 per square foot, ensuring the installation is durable and visually consistent.
Site Evaluation and Permits
A professional contractor will start with a detailed site evaluation to check the wall structure, moisture levels, and any underlying issues that could interfere with installation.
In Maryland, most stone veneer projects require building permits, especially for exterior work. Permit fees vary depending on the county or municipality, typically ranging from $50 to $300. Local building codes might also specify certain materials or installation techniques, which can affect both the preparation process and overall costs[1].
Surface Preparation
The condition of your walls plays a big role in determining preparation costs. If your walls have significant damage, moisture issues, or old finishes, you may need additional repairs, which can increase labor and material expenses. For instance, painted brick often requires extra lath or cement board, while damaged sections may need to be removed entirely.
Cleaning and repairing surfaces costs $1 to $2 per square foot. This includes removing loose paint, filling cracks, and addressing structural issues. If walls are in particularly poor condition, additional work like replacing damaged areas or treating moisture problems may be required.
Adding a moisture barrier and metal lath costs $0.50 to $2 per square foot. The moisture barrier prevents water from seeping behind the veneer, while the lath provides a suitable surface for the stone to adhere to. Both steps are essential for ensuring the installation lasts on vertical surfaces.
Challenges such as hidden moisture damage, unstable walls, or outdated materials can add to both time and costs. These issues often require specialized repairs or additional barriers to ensure the project meets safety and durability standards[1].
Preparation Cost Estimates
For a standard 215-square-foot project, preparation costs (including materials) range from $1,490.77 to $2,086.04, with labor adding an additional $271.59 to $537.23[3]. These costs can scale depending on the size and complexity of the project.
| Preparation Step | Typical Cost per Sq Ft | Notes |
|---|---|---|
| Site evaluation/permits | $0.50–$1.00 | Varies by jurisdiction and project size |
| Surface cleaning/repair | $1.00–$2.00 | Depends on wall condition |
| Moisture barrier/lath | $0.50–$2.00 | Required for most vertical applications |
| Total preparation | $2.00–$5.00 | Combined estimate for all prep steps |
Pro Landscapes MD ensures thorough assessments, adherence to local codes, and the use of high-quality materials for moisture barriers and lath installation. Their expertise minimizes risks like moisture damage or detachment, helping your stone veneer installation stand the test of time.
Cutting corners during preparation can lead to costly repairs later. Proper prep work is essential to prevent issues like moisture infiltration or premature failure, which can result in expensive fixes down the line.
Labor Costs for Installation
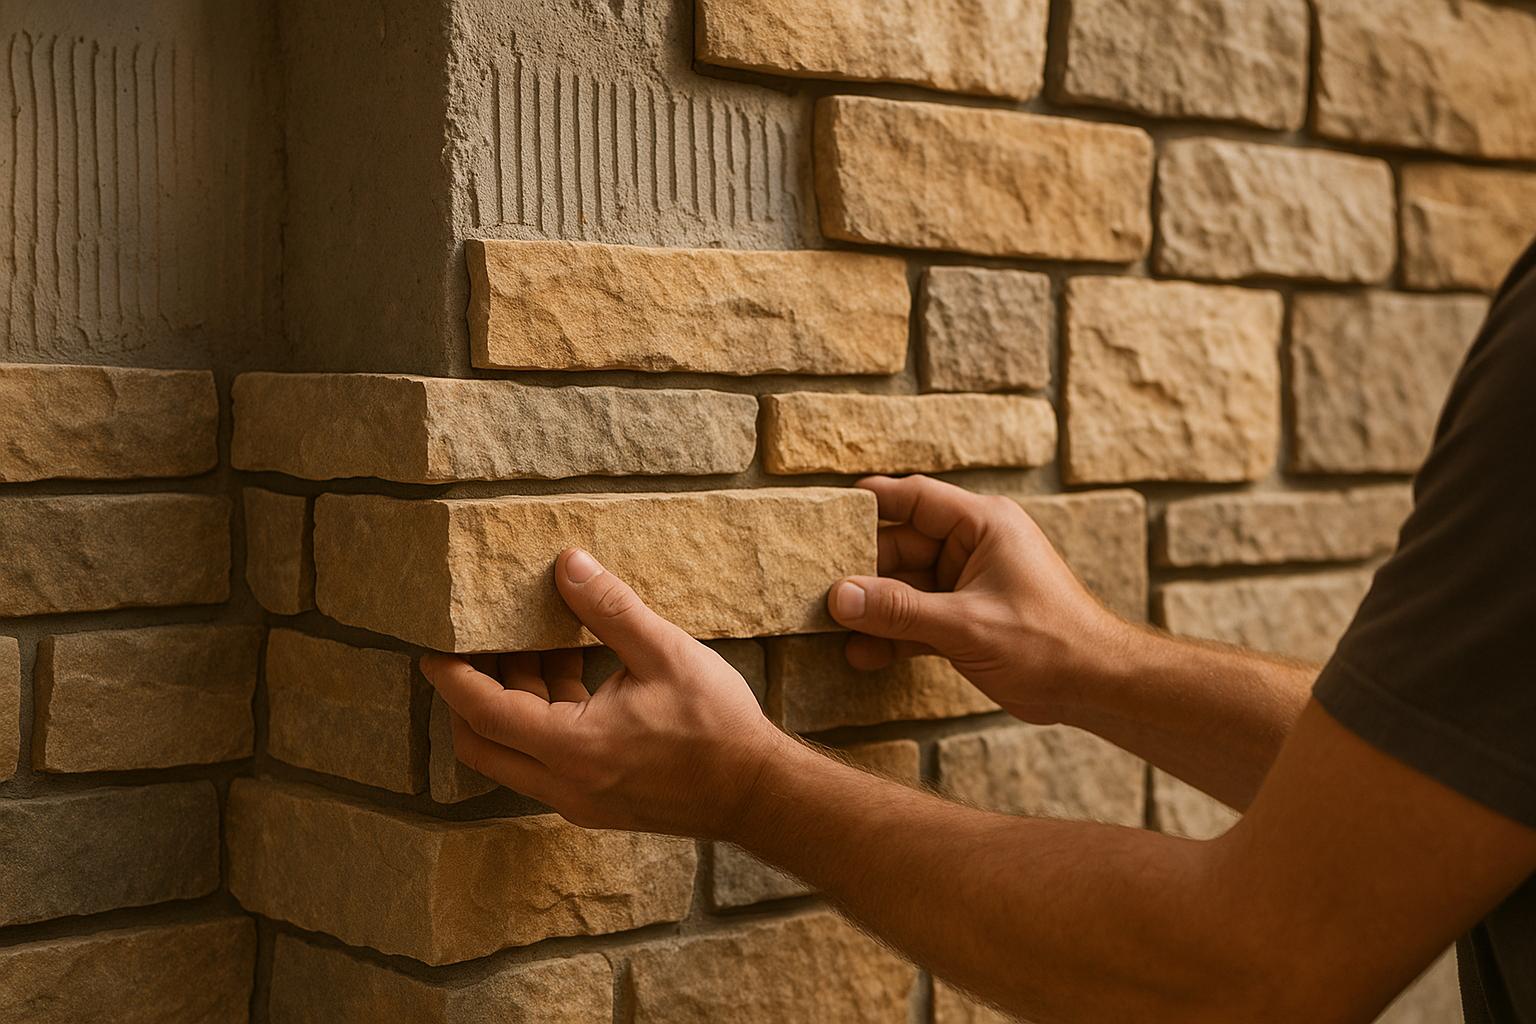
After careful preparation, the installation phase becomes the most labor-intensive and expensive part of the project. Skilled masons take the lead here, ensuring the stonework is both durable and visually appealing.
Installation Process Steps
The installation process begins with layout planning, where the stone pattern is mapped out. Next comes mortar mixing, done in small batches to maintain the right consistency. From there, each stone is carefully placed to ensure proper spacing and alignment.
Placing individual stones is a meticulous task. Each piece must be aligned with precision, and masons often need to make custom cuts to fit stones around corners, windows, or other architectural details. The type of stone used plays a big role in how long this step takes – some stones are easier to cut and fit, while others require specialized tools and techniques[6].
Maintaining alignment and spacing is essential for a professional finish. Installers use tools like spacers, levels, and string lines to keep everything straight and consistent.
These detailed steps highlight how the complexity of the project directly affects labor costs.
Time and Complexity Factors
The complexity of the installation process significantly impacts both the timeline and the overall expense. Projects involving multi-story structures, intricate designs, or interior work often require additional safety measures, specialized tools, and more time. These factors can increase labor costs by 30–100% compared to simpler exterior installations[5][6].
Patterns and surfaces also play a role. For example, a straightforward running bond pattern is quicker to install than more intricate designs like herringbone or random ashlar layouts. Curved surfaces and intricate patterns demand greater precision and skill, which increases hourly labor rates and extends the project timeline[5].
Hard-to-reach areas, such as around windows, doors, or in tight spaces, require more detailed work and slower installation speeds. Additionally, the condition of the existing structure and the architectural complexity of the building can influence labor costs as well[5].
Installation Labor Cost Ranges
Labor costs vary widely depending on the type of stone and the complexity of the installation:
- Manufactured stone veneer is the most popular option, with labor costs ranging from $5 to $12 per square foot[6]. These stones are designed for easier installation, thanks to their uniform sizes and lighter weights, which speed up the process.
- Mortarless stone veneer systems offer the lowest labor costs, typically between $1.50 and $3.50 per square foot[6]. These systems use mechanical fasteners, eliminating the need for mortar mixing and curing, making them faster to install.
- Natural stone installations are the most labor-intensive, with rates between $20 and $30 per square foot[2]. Natural stone requires custom fitting and experienced masons who can handle irregular shapes and varying thicknesses.
- Complex installations, including intricate patterns, multi-story projects, or challenging site conditions, can cost $15 to $25 per square foot[2]. These projects often require specialized equipment and highly skilled craftsmen.
| Stone Type | Labor Cost per Sq Ft | Installation Complexity |
|---|---|---|
| Mortarless Veneer | $1.50–$3.50 | Low – mechanical fastening |
| Manufactured Veneer | $5.00–$12.00 | Moderate – standard mortar use |
| Natural Stone | $20.00–$30.00 | High – custom fitting required |
| Complex Designs | $15.00–$25.00 | Very High – specialized skills |
Beyond these rates, there are additional labor-related costs to consider. For instance, equipment allowances for specialty tools, such as diamond masonry saws, can range from $32.74 to $50.93 for a 215-square-foot project[3][4]. Job supplies, including fasteners, adhesives, and sealants, add another $67.40 to $72.98 for the same project size[3][4].
Labor setup and mobilization time are also standard for smaller stone veneer jobs[4]. Costs for site preparation and protecting existing structures typically add $100 to $150 for smaller projects but can represent a larger portion of the budget for bigger installations.
Pro Landscapes MD brings years of expertise to the table, ensuring labor costs are transparent and efficient. Their skilled masons excel at working with high-quality materials like El Dorado Stone, delivering exceptional craftsmanship. By clearly defining the scope of work in your contract, you can avoid hidden fees and ensure upfront pricing for preparation, installation, and finishing work[4].
sbb-itb-843f8be
Finishing and Cleanup Costs
Once the stone veneer installation is complete, the final step is all about adding those perfect finishing touches and ensuring the site is thoroughly cleaned. These steps transform a construction site into a polished, long-lasting feature.
Detail and Finishing Work
The finishing phase includes several crucial tasks that not only enhance the appearance of your stone veneer but also ensure its durability over time. One of the first steps is joint grouting, where masons fill the gaps between stones with high-quality grout. This creates a smooth, seamless look and helps prevent water from seeping in, which could otherwise damage the structure beneath.
Next comes edge trimming, which involves creating clean, sharp lines around windows, doors, and corners. This attention to detail is what sets professional installations apart from amateur ones.
After the structural work, the focus shifts to surface cleaning. This step removes construction dust, mortar residue, and other debris from the stone surfaces. Depending on the situation, crews may use pressure washing or gentle scrubbing to bring out the natural beauty of the stone.
The final step in this phase is applying protective sealers. These sealers, available in water-based or solvent-based options, not only enhance the stone’s natural colors but also provide a barrier against moisture, stains, and weather-related damage. By sealing the stone, you significantly extend its lifespan, ensuring it remains a striking feature for years to come.
Site Cleanup and Debris Removal
Once the detailed finishing work is complete, contractors turn their attention to cleaning up the site. Excess materials are removed, and the area is restored to its original condition. Contractors follow local disposal regulations and often opt for eco-friendly practices, such as recycling stone waste and other construction materials whenever possible.
Beyond debris removal, all tools, equipment, and hazards are cleared from the site to ensure it’s safe for homeowners and their families.
Finishing Cost Estimates
After the finishing and cleanup work is done, the costs are tallied up. Typically, this phase adds $1 to $3 per square foot to your overall project cost, depending on the size and complexity of the job. For example, a standard 200-square-foot vertical stone veneer installation would incur an additional $200 to $400 for detailed finishing work, plus $100 to $200 for site cleanup and debris removal.
Several factors can influence these costs. Larger projects may benefit from cost efficiencies, while intricate designs or hard-to-reach areas can push costs higher due to the additional labor involved.
| Finishing Task | Cost Range | Project Impact |
|---|---|---|
| Joint grouting and trimming | $0.50–$1.50/sq ft | Ensures a polished, professional look |
| Surface cleaning and sealing | $0.50–$1.00/sq ft | Protects your investment over time |
| Site cleanup and debris removal | $0.50–$1.00/sq ft | Restores the site to its original state |
Hiring skilled professionals, such as the team at Pro Landscapes MD, ensures that every finishing detail is handled with precision. Their combined expertise in hardscaping and landscaping means the finishing work not only safeguards your investment but also enhances the overall beauty of your property.
This final phase is a testament to the dedication and quality craftsmanship that Pro Landscapes MD delivers, ensuring your stone veneer installation remains a standout feature for years to come.
Summary and Choosing Local Experts
Breaking down costs clearly is essential for making smart decisions about your stone veneer installation project. On average, total expenses fall between $11 and $33 per square foot, covering three distinct phases of the process.
Key Points About Stone Veneer Costs
Here’s a quick recap of the main cost components: the project is divided into preparation, installation, and finishing.
- Preparation includes tasks like site evaluation, obtaining permits, and getting the surface ready.
- Installation is where most of the budget goes, especially if you’re using natural stone, which requires skilled craftsmanship.
- Finishing involves grouting, sealing, and cleaning up after the work is done.
The type of veneer you choose and the complexity of the project play a big role in cost differences. Natural stone, for example, requires experienced masonry, while mortarless systems are more budget-friendly, with labor costs ranging from $1.50 to $3.50 per square foot. Interior installations tend to be pricier – sometimes 30% to 100% more than exterior projects – because of the added difficulty.
To budget effectively, measure the total square footage accurately and gather detailed, itemized quotes from several contractors. This helps you compare proposals and avoid surprises.
Why Choose Pro Landscapes MD?

When it comes to stone veneer projects, having local experts on your side can make all the difference. Pro Landscapes MD specializes in stone veneer installations throughout central Maryland, serving areas from Annapolis to Washington, DC. Their understanding of Maryland’s building codes, permit requirements, and climate considerations ensures every project meets local standards.
Their strong relationships with local suppliers often mean better material prices and faster delivery, reducing project timelines by up to 30%. With a proven track record and glowing customer reviews, Pro Landscapes MD stands out for their precision and reliability.
From design and preparation to installation and cleanup, Pro Landscapes MD handles every stage of the process. Their expertise prevents costly mistakes, ensures proper techniques, and provides ongoing support, giving you peace of mind and a high-quality result that lasts.
FAQs
What should I consider when deciding between natural stone veneer and manufactured stone veneer for my project?
When deciding between natural stone veneer and manufactured stone veneer, it’s essential to weigh factors like cost, appearance, durability, and installation needs. Natural stone veneer provides a classic, genuine look and long-lasting durability. However, it often comes with a higher price tag and added weight, which can make installation more labor-intensive and costly. On the flip side, manufactured stone veneer is generally more budget-friendly, lighter, and comes in a variety of styles. That said, it may not hold up as well over time compared to natural stone.
You’ll also want to consider the project’s location and your local climate. Natural stone typically resists weathering better, making it a solid choice for harsher conditions. In contrast, manufactured stone may fade or show signs of wear after prolonged exposure. Ultimately, your decision will depend on your budget, the look you’re going for, and how much maintenance you’re willing to commit to in the future.
How does Maryland’s climate, including freeze-thaw cycles, affect the installation and durability of stone veneer?
Maryland’s climate, with its frequent freeze-thaw cycles, poses challenges for the installation and durability of stone veneer. During the colder months, water can find its way into tiny cracks or gaps in the veneer. When temperatures dip below freezing, that trapped water turns to ice and expands, which can lead to cracks or even loosen the veneer over time.
To make sure stone veneer stands the test of time, proper preparation and installation are key. This means using top-notch materials, applying a reliable moisture barrier, and ensuring there’s adequate drainage to keep water from accumulating. Opting for professional installation can also go a long way in minimizing these risks and helping the veneer hold up, even in Maryland’s tough weather.
Why is proper site preparation essential for installing stone veneer, and what problems can arise from skipping this step?
Proper preparation is the backbone of a successful stone veneer installation. It ensures the surface is clean, level, and ready for the materials to bond securely. This process typically involves cleaning the wall thoroughly, applying a moisture barrier, and adding a metal lath or scratch coat, depending on the surface type. Skipping these steps or rushing through them can lead to serious problems like poor adhesion, uneven surfaces, or even long-term issues such as cracking and water damage.
Cutting corners here doesn’t just risk the quality of the installation – it can also lead to expensive repairs later. Taking the time (or hiring professionals) to prepare the site correctly ensures a smooth, durable finish and helps protect your investment in the stone veneer.
Chat with Us