


- bhavya gada
- No Comments
Want your media filter drain system to last and perform well? Regular maintenance is the key. Here’s what you need to know:
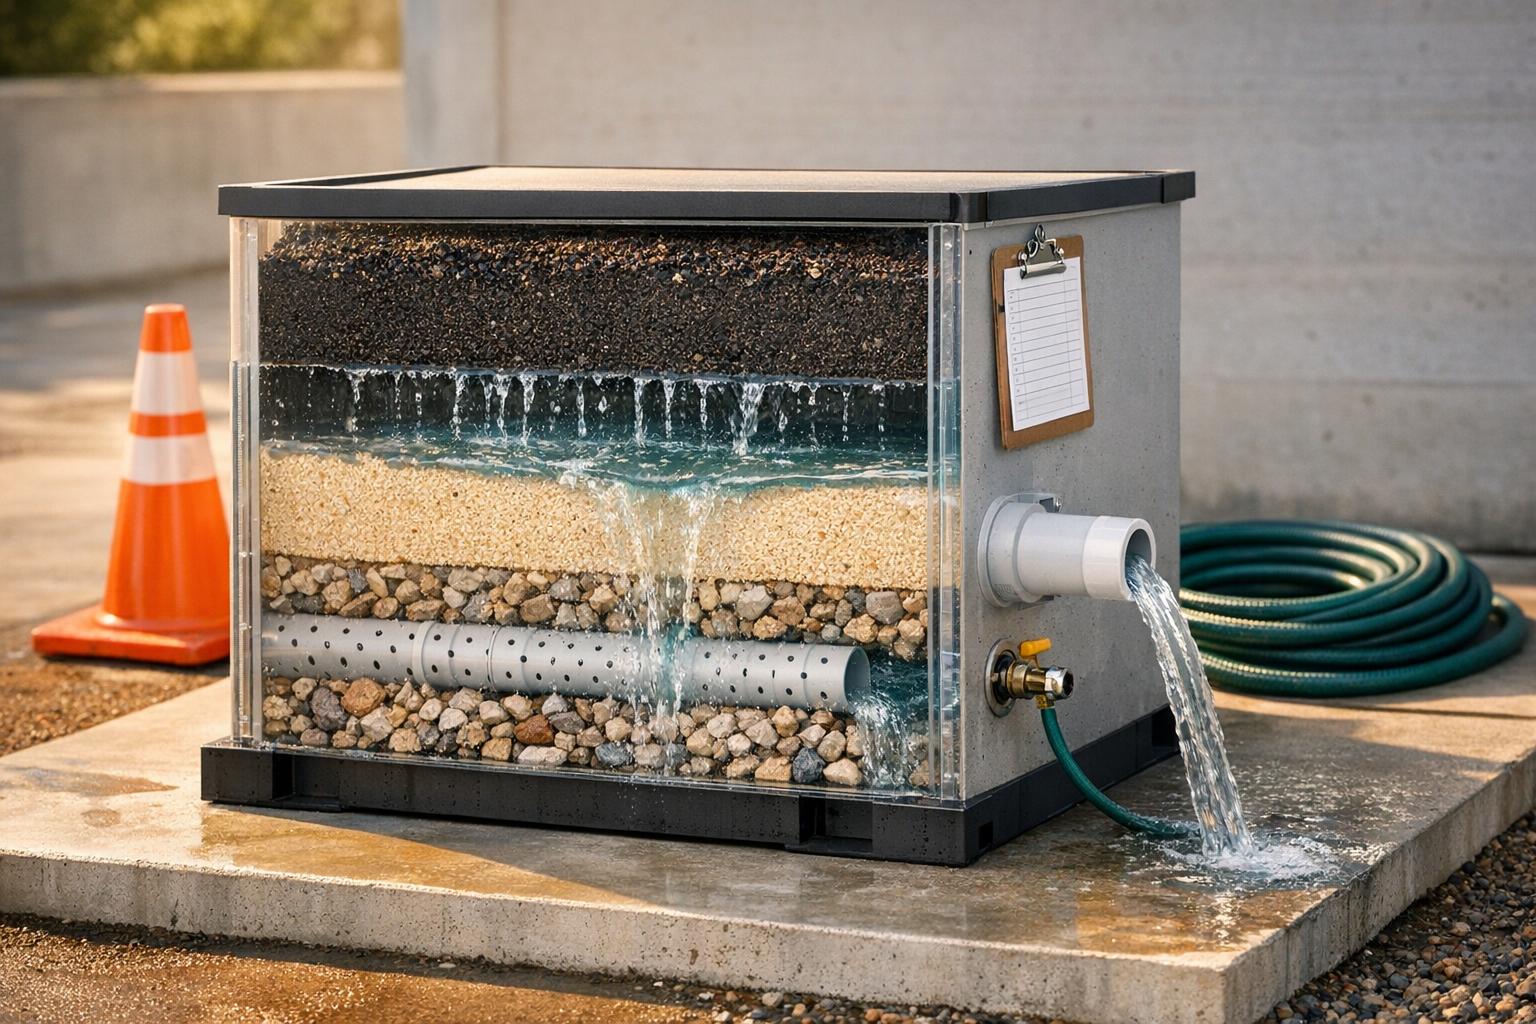
- What It Does: Media filter drains treat stormwater by filtering out debris, neutralizing harmful chemicals, and improving water clarity using layers of sand, gravel, and other materials.
- Why Maintenance Matters: Without regular care, media degrades, clogs form, and untreated water can harm local ecosystems. Neglect can lead to costly repairs or system failure during heavy storms.
- Key Maintenance Tasks: Check for sediment buildup, monitor flow rates, backwash when needed, and replace filter media every 10–20 years. Maryland property owners should also winterize systems to prevent freezing damage.
- Common Issues: Watch for standing water, uneven media surfaces, or media grains in finished water – these signal problems like clogs or underdrain damage.
Routine inspections, cleaning, and timely media replacement will keep your system running efficiently while protecting your property and nearby watersheds. For complex tasks, consult professionals experienced in Maryland’s unique drainage challenges.
Backwash of Granular Media Filter v2
sbb-itb-843f8be
Main Parts of Media Filter Drain Systems
To keep a media filter drain system running smoothly, it’s crucial to understand its main components. These systems rely on three key parts working together: the filtration media, the underdrain collection network, and the monitoring equipment that tracks how well everything functions.
Media Layers and What They Do
Media filter drains use multiple layers of materials, with each layer designed to handle a specific job. The first layer, known as the mechanical media, is made of coarse materials like sand, gravel, or foam. This layer traps larger debris such as leaves, sediment, and suspended solids, preventing them from clogging the deeper layers [3].
Next is the biological substrate, which often consists of porous ceramic rings or structured plastic (commonly called MBBR media). This layer provides a home for beneficial bacteria that break down harmful substances like ammonia and nitrites, converting them into less toxic nitrate [3].
Finally, the chemical media layer – using materials like activated carbon or ion-exchange resins – removes dissolved contaminants, tannins, and odors that the other layers can’t capture [3].
When replacing or adding media, always follow this sequence: start with the coarse mechanical media, place the biological substrate in the middle, and finish with the chemical media. This setup ensures that fine particles don’t reach the biological layer too early, allowing each stage to work efficiently. Keep in mind that media grains degrade over time, losing up to an inch annually due to wear and tear [2].
Next, let’s dive into how underdrains manage water collection and distribution.
Underdrains and Water Distribution
Underdrains form the foundation of the filter unit, performing two vital tasks: collecting the filtered water and supporting the media layers above. Common designs include PVC header-lateral systems and steel plate configurations, both of which are designed to keep media grains from escaping into the filtered water [2]. During backwashing, underdrains also distribute water evenly to dislodge trapped solids and avoid clumping [2].
T.J. Stroebl from Kurita America highlights a key indicator of underdrain failure:
"An uneven media surface immediately following backwash (visible craters or mounds) would indicate that the underdrain is compromised as would discovering media grains below the underdrain or in the finished water" [2].
If you notice uneven media surfaces after backwashing, inspect the underdrain. Many experts suggest replacing older steel plate systems with PVC header-laterals during media updates. While this upgrade adds to upfront costs, it saves you the hassle and expense of excavating the system later [2]. Additionally, support gravels beneath the filter improve underdrain efficiency by stabilizing the structure [2].
These components work hand-in-hand with monitoring equipment to ensure the system operates effectively.
Flow Control and Monitoring Equipment
Monitoring equipment like pressure gauges and flow meters plays a crucial role in tracking system performance. Pressure gauges can detect head loss, which signals that the media is clogged and may need backwashing or replacement [2]. Flow meters, on the other hand, confirm that water is circulating at the correct rate. For residential ponds, experts recommend turning over the entire water volume 1–2 times per hour to maintain oxygen levels for the beneficial bacteria [3].
Other tools, such as perforated manifolds, spray bars, and distribution plates, ensure water flows evenly across the filter. Uneven distribution can leave some parts of the filter underutilized while overloading others, which lowers the overall effectiveness of the system [3].
Regular Maintenance Tasks for Media Filter Drains
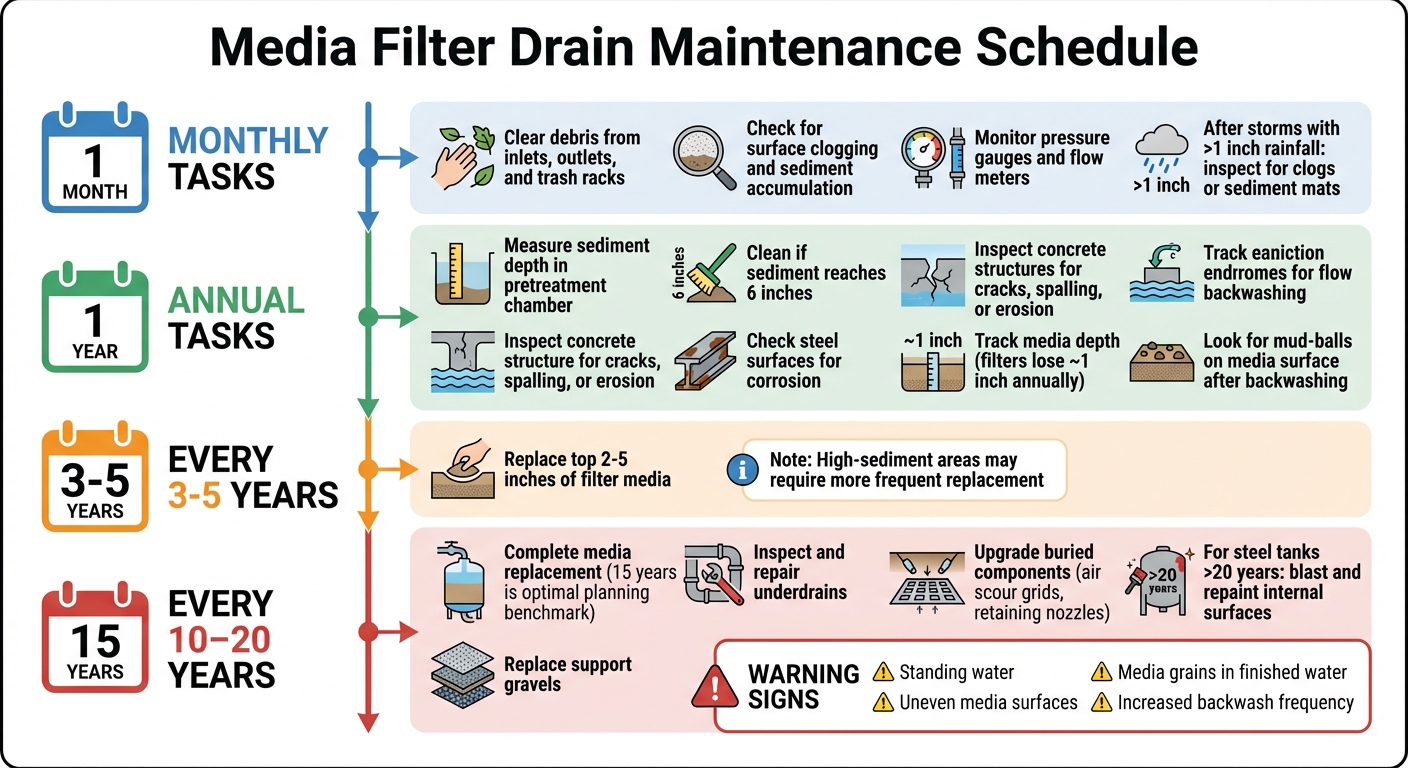
Media Filter Drain Maintenance Schedule and Tasks
Keeping up with regular maintenance is key to making sure your media filter drain works efficiently and lasts longer. A consistent schedule for inspections and cleanings helps you spot issues early and avoid expensive repairs.
Checking for Sediment and Physical Damage
Inspect inlets and outlets monthly for debris that might bypass the filter. After storms with more than 1 inch of rainfall, check the surface for clogs or sediment mats that could block drainage [1].
Once a year, measure the sediment depth in your pretreatment or sediment chamber. If it reaches 6 inches, it’s time to clean it out [1]. During this annual check, look for "mud-balls" on the media surface after backwashing – these clumps of media and solids indicate potential issues.
Also, inspect concrete structures for cracks or spalling and check steel surfaces for corrosion [1]. Track your media depth annually since filters typically lose about an inch of media each year due to grain breakdown from repeated use [2]. If you notice media grains in the finished water or below the underdrain, it could mean the internal retaining structures need repairs [2].
Monitoring flow and pressure is another crucial step in spotting early signs of clogging.
Tracking Flow Rates and Pressure
Use pressure gauges at the inlet and outlet to monitor the head loss across the media bed [5]. A rising pressure differential suggests the media is clogging and may need backwashing or replacement [2]. Flow meters can help confirm that your system maintains at least 80% of its original design flow [5].
Keep a detailed maintenance log that includes weather conditions, flow readings, pump run times, and starts during each visit. This helps identify trends before they turn into bigger problems [4]. For example, use a stopwatch to compare actual pump run times with your control panel settings – this can reveal if clogging is causing the system to run more frequently [4]. Check the "squirt height" from distribution laterals; uneven spray heights might indicate clogging [4]. Standing water for more than a few minutes is another sign of media fouling [4].
When these signs appear, it’s time to backwash and clean the system to restore its performance.
Cleaning and Backwashing the System
After monitoring flow and pressure, initiate cleaning when you notice reduced flow rates or increasing head loss. Start by hosing off mechanical components like brushes, screens, and coarse pads [3]. For biological substrates, gently rinse them in a bucket of system water to preserve the biofilm that helps break down contaminants [3].
If the filter bed is partially clogged, manually remove and replace the top 2–5 inches of media. In areas with low sediment, this may only be needed every 3 to 5 years, but high-sediment regions may require more frequent replacements [1]. For tougher clogs, agitate the top six inches of media to improve flow [1].
Keep an eye on how quickly head loss builds up between backwash cycles. If it increases faster than normal, you might need to backwash more often or replace the media [2]. Always ensure underdrains and outlet structures are clear to prevent standing water or bypassing [1]. In freezing climates, bypass waterfall runs and store delicate filter cartridges in a dry area to avoid ice damage [3].
Here’s a quick reference table for your maintenance schedule:
| Activity | Recommended Schedule |
|---|---|
| Clear debris from inlets, outlets, and trash racks | Monthly [1] |
| Check for surface clogging and sediment accumulation | Monthly [1] |
| Inspect for concrete cracks, spalling, or erosion | Annually [1] |
| Remove sediment from chamber (if > 6 inches) | Annually (or as needed) [1] |
| Replace top 2–5 inches of filter media | Every 3 to 5 years [1] |
Fixing Common Media Filter Drain Problems
Even with regular maintenance, occasional issues can crop up that demand specific solutions. Spotting these problems early and addressing them promptly can save you from expensive repairs and ensure your system keeps functioning properly.
Handling Media Saturation and Standing Water
If you notice water pooling on the filter surface during your inspections, it’s a sign the media may be overloaded with debris. When water remains stagnant for more than a few minutes, the top layer of media likely needs attention. To fix this, remove and refresh the top 2 to 5 inches of media. Break up any compacted areas by agitating the surface, then replace it with new material to restore proper flow [1]. In areas prone to heavy sediment, this process might need to be done more often than the standard 3- to 5-year schedule.
After backwashing, check for "mud-balling" – clumps of media and particles that stick together due to water chemistry issues. This can disrupt flow and allow water to bypass the filtration layer. If you see craters or mounds forming on the media surface right after backwashing, it could point to a problem with the underdrain system. In such cases, a professional inspection is recommended [2]. Additionally, if media grains appear in the finished water or below the underdrain, it’s a clear sign of structural damage that needs immediate repair [2].
Clearing Algae and Organic Debris
Green-tinted or tea-colored water, bad odors, and visible algae growth often indicate organic blockages. Tackling these issues alongside regular media cleaning and backwashing will help maintain filtration performance.
Start by rinsing foam pads and mechanical screens under running water, squeezing them repeatedly to remove trapped debris [6]. For biological media like bio-balls or ceramic rings, gently agitate them in system water – avoid using chlorinated tap water, as it can harm the beneficial bacteria that break down waste [6].
To maintain filtration capacity, clean the media in stages. For instance, rinse half of your biological media during one session and clean the other half a few weeks later [6]. After a major cleaning, add a double dose of beneficial bacteria to help the system recover faster [6]. Also, clean algae buildup from the filter housing walls and empty debris baskets two to three times a week during high-debris seasons like fall [6].
Once organic blockages are resolved, it’s important to prepare for seasonal challenges.
Protecting the System from Freezing
As winter approaches, take extra precautions to shield your system from freezing temperatures. For areas with cold winters, like Maryland, freezing conditions can damage media filter drains. Follow your winterization steps as outlined in backwash procedures. If ice begins to form around inlets or outlets, temporarily redirect flow until temperatures rise above 32°F. For systems that need to run year-round, insulate any exposed pipes and consider adding heating cables to vulnerable sections to maintain proper flow during cold spells [3].
Media Replacement and System Lifespan
Routine cleaning can help maintain short-term performance, but if you want your system to run efficiently over the years, replacing the filter media is key.
When to Replace Your Filter Media
Filter media doesn’t last forever. Most systems need a complete media replacement every 10 to 20 years, with 15 years being a solid planning benchmark [2]. As T.J. Stroebl, Technical Marketing Leader at Kurita America, puts it:
"For planning purposes, 15 years is a good rule of thumb to replace media. Though, the optimal time depends on many factors like operation frequency, backwash frequency, and backwashing methods." [2]
There are signs that your media may be nearing the end of its life. If your system requires backwashing more often, even though it’s still removing contaminants, it’s a strong indicator that the media has deteriorated. You might also notice physical changes in the media grains – either shrinking due to wear or increasing in size as a result of chemical buildup and fouling [2]. For systems in areas with heavy sediment loads, you may need to replace the top layer more frequently to maintain performance [1].
How to Replace Filter Media
When it’s time for a full replacement, start by shutting down the system and draining the filter chamber. The old media can be removed using a vacuum or by digging it out manually. This is also a great opportunity to inspect and, if necessary, replace buried components like underdrains, support gravels, and retaining nozzles. Since these materials are relatively inexpensive compared to the labor involved, it’s smart to address them during this process [2].
For steel tank systems that are over 20 years old, media replacement is also a chance to blast and repaint the internal surfaces. This helps prevent corrosion and ensures the tank remains structurally sound [2]. When adding new media, follow the proper loading sequence: begin with coarse mechanical media to capture large debris, layer in the biological substrates, and finish with the chemical polishing media [3]. Once installed, rinse the media thoroughly to remove any dust and run a few backwash cycles before resuming normal operations.
After replacing the media, it’s important to prepare your system for winter to protect your investment.
Preparing the System for Winter
Winterizing your system after a media replacement is crucial, especially in regions like Maryland, where temperatures often dip below freezing. Before the first hard freeze, drain any standing water from exposed components and store sensitive media in a dry, temperature-controlled area [3].
If your system needs to stay operational through the winter, take precautions to avoid damage. Insulate exposed pipes and install heating cables on vulnerable sections to prevent freezing. You’ll also want to bypass any waterfall features or surface flows that could over-cool the water and create ice dams [3]. To maintain oxygen levels in deeper zones, keep an aeration system running. This helps preserve beneficial bacteria colonies even when biological activity slows down in the cold [3].
Professional Drainage Services in Maryland
Drainage Solutions from Pro Landscapes MD

Pro Landscapes MD provides specialized drainage services across central Maryland, including Howard, Montgomery, Carroll, Frederick, Prince George’s, and Baltimore Counties. They tackle the area’s persistent drainage challenges caused by clay-heavy soil, which tends to drain slowly and retain water. Their solutions include French drains with perforated pipes and gravel to manage underground water, grading and regrading to redirect runoff away from structures, and installing surface water systems like catch basins, channel drains, and trench drains for patios and driveways. Additionally, they incorporate features like rain gardens, bioswales, and dry creek beds to control erosion while enhancing the property’s appearance [8]. These methods complement advanced media filter systems, offering a comprehensive approach to managing both soil and surface water issues.
When it comes to media filter drain systems, Pro Landscapes MD excels in maintenance and refurbishment. Every 15 years, they replace filter media, support gravels, and upgrade buried components such as air scour grids and retaining nozzles. They also inspect and repair underdrains, which may involve tasks like blasting and painting internal steel surfaces or retrofitting outdated steel plate underdrains with modern PVC header-lateral systems [2].
Why Work with Pro Landscapes MD for Drain Maintenance
Pro Landscapes MD’s expertise in media filter maintenance ensures systems remain efficient over time. Their proactive methods address common problems like media attrition – where filter media degrades and exits the system during backwash, potentially losing up to an inch of depth annually – and mud-balling, which causes clumping and uneven water flow [2]. Regular upkeep is crucial, as media properties evolve, impacting contaminant removal and increasing resistance to water flow [2].
Their process includes a 6-point evaluation to create tailored maintenance plans. This involves assessing the property after rainfall, testing soil type and drainage speed, and evaluating slopes and hardscape features. By following an "outlet-first" design philosophy – starting at the discharge point and working backward – they ensure systems like French drains and bioswales direct water to effective endpoints, such as pop-up emitters or dry wells. This approach prevents merely shifting water problems from one area to another, delivering long-term solutions [7].
Conclusion: Maintaining Your Media Filter Drain System
To keep your media filter drain system running smoothly, regular and timely maintenance is key. Perform inspections annually and after storms producing at least 1 inch of rain. These checks help catch sediment buildup, pressure fluctuations, or structural issues early on, before they escalate into bigger problems [1]. Monthly tasks like clearing debris and monitoring pressure can also prevent minor issues from turning into emergencies.
Staying ahead of maintenance can save you significant costs. For instance, planning to replace the media around the 15-year mark – rather than waiting for a complete system failure – can help you avoid expensive repairs and stay compliant with local stormwater regulations [2].
For more complex tasks, such as media replacement or underdrain inspections, it’s wise to consult professionals. In Maryland, where clay-heavy soil and freeze-thaw cycles are common, experts like Pro Landscapes MD bring valuable experience. They understand challenges like media attrition, which can reduce media depth by up to 1 inch annually, and mud-balling, which can compromise system performance and water quality [2].
Routine upkeep is essential for optimal performance. Keep an eye on pressure levels, perform backwashing as needed, and schedule professional inspections periodically. Whether you manage the maintenance yourself or work with specialists like Pro Landscapes MD, these steps will extend your system’s lifespan and protect your property investment for years to come [9].
FAQs
How can I tell if my media filter drain is clogging?
Here’s how you can tell if your media filter drain might be clogged:
- Continuous water drainage outside of normal backwash cycles could point to a blockage in the system.
- Changes in flow rate, whether it’s slower or unusually fast water movement, are another red flag.
- Standing water or discoloration on the filter might indicate debris or organic material buildup.
If you notice these signs, cleaning or replacing the filter media could help get things back on track.
What should I log during each maintenance visit?
During each media filter drain maintenance visit, make sure to document the following details:
- Check for ponding, sediment buildup, debris, or any damage, particularly after storms.
- Assess the filter media surface for trash accumulation, clogging, or signs of wear and tear.
- Identify any repairs required, such as fixing leaks or addressing structural problems.
- Look for standing water or discoloration, which could signal clogging issues.
- Measure sediment levels and determine if removal or cultivation is necessary.
- Keep thorough records of all inspections, maintenance actions, and repairs performed.
This routine helps maintain the system’s performance and keeps track of any recurring problems.
Can freezing damage a media filter drain system?
Freezing temperatures can indeed harm a media filter drain system. When water is left inside the system and freezes, it can expand, leading to structural damage or even a complete failure of the system. To avoid this, it’s crucial to drain the system thoroughly and perform necessary maintenance before temperatures drop below freezing.
Chat with Us