


- bhavya gada
- No Comments
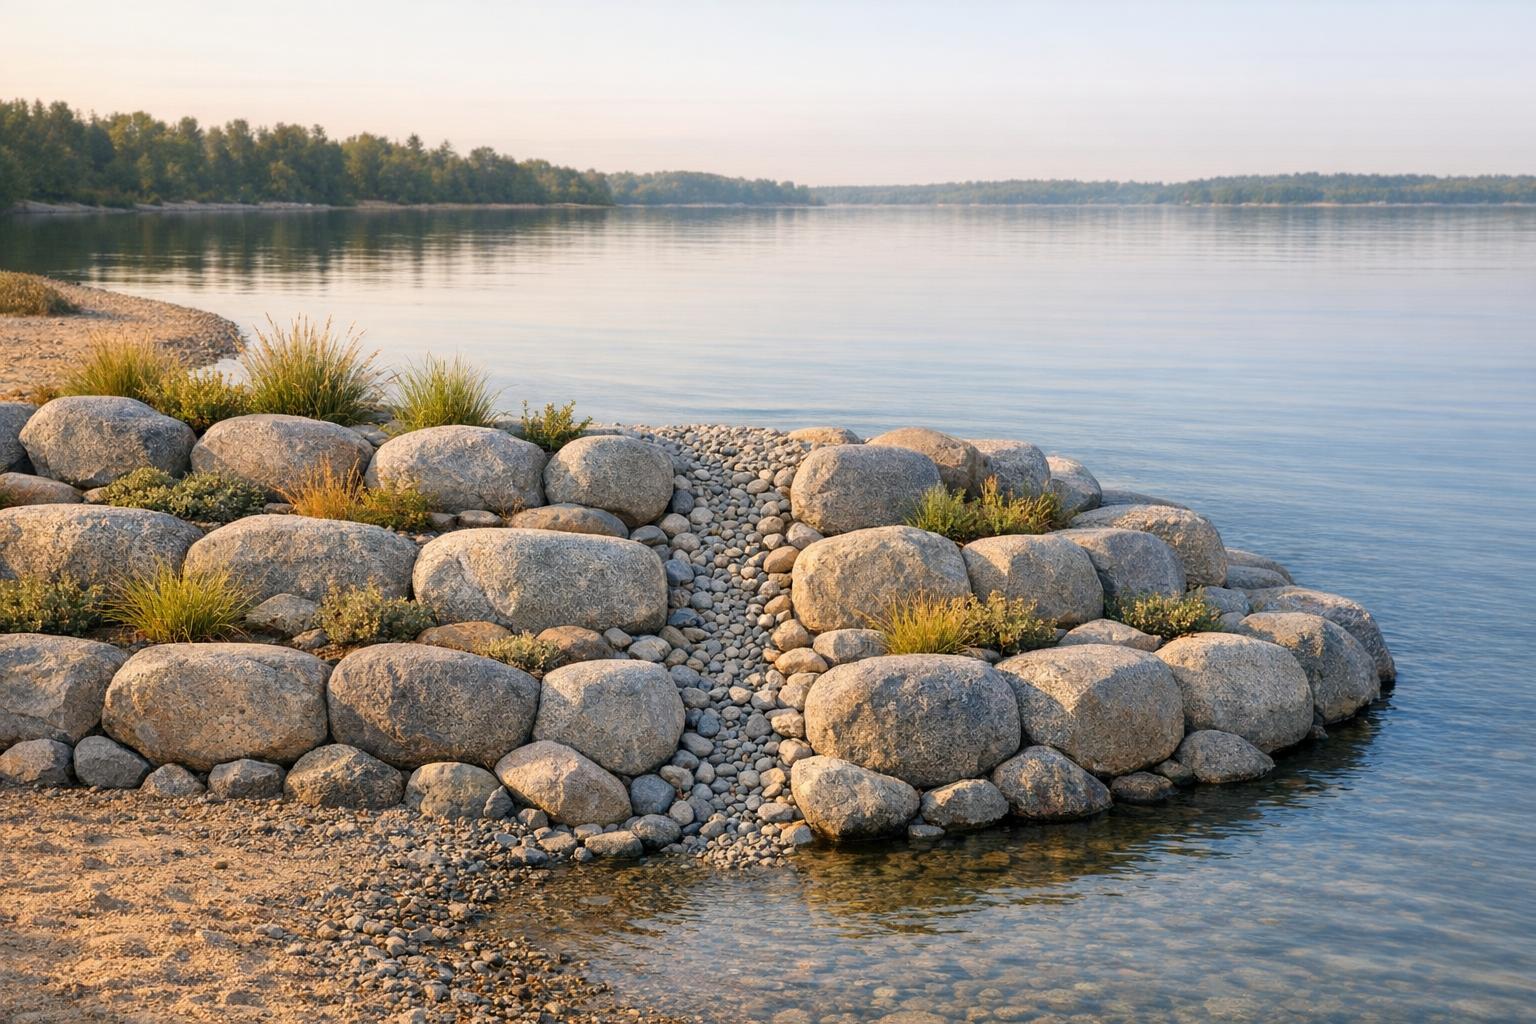
Erosion can damage your property by washing away topsoil, exposing roots, and creating unsightly gullies. Boulders offer a durable and effective way to manage water flow and stabilize soil. Here’s how you can use them:
- Choose the Right Material: Granite and limestone are durable and weather-resistant. Angular boulders interlock better than rounded ones for stability.
- Pick the Right Size: Larger boulders (12–36 inches) work best for heavy water flow, while smaller ones suit low-impact areas.
- Placement Matters: Bury one-third to one-half of each boulder to anchor it securely. Arrange them to deflect water, not block it.
- Combine Techniques: Use terraces, rock toes, and riprap to manage slopes and shorelines.
- Add Vegetation: Plants with deep roots, like native grasses or shrubs, help hold soil in place around boulders.
Regular maintenance, such as checking for shifting stones and clearing debris, ensures long-term effectiveness. By integrating boulders with proper drainage and vegetation, you can protect your property while improving its appearance.
Selecting the Right Boulders for Erosion Control
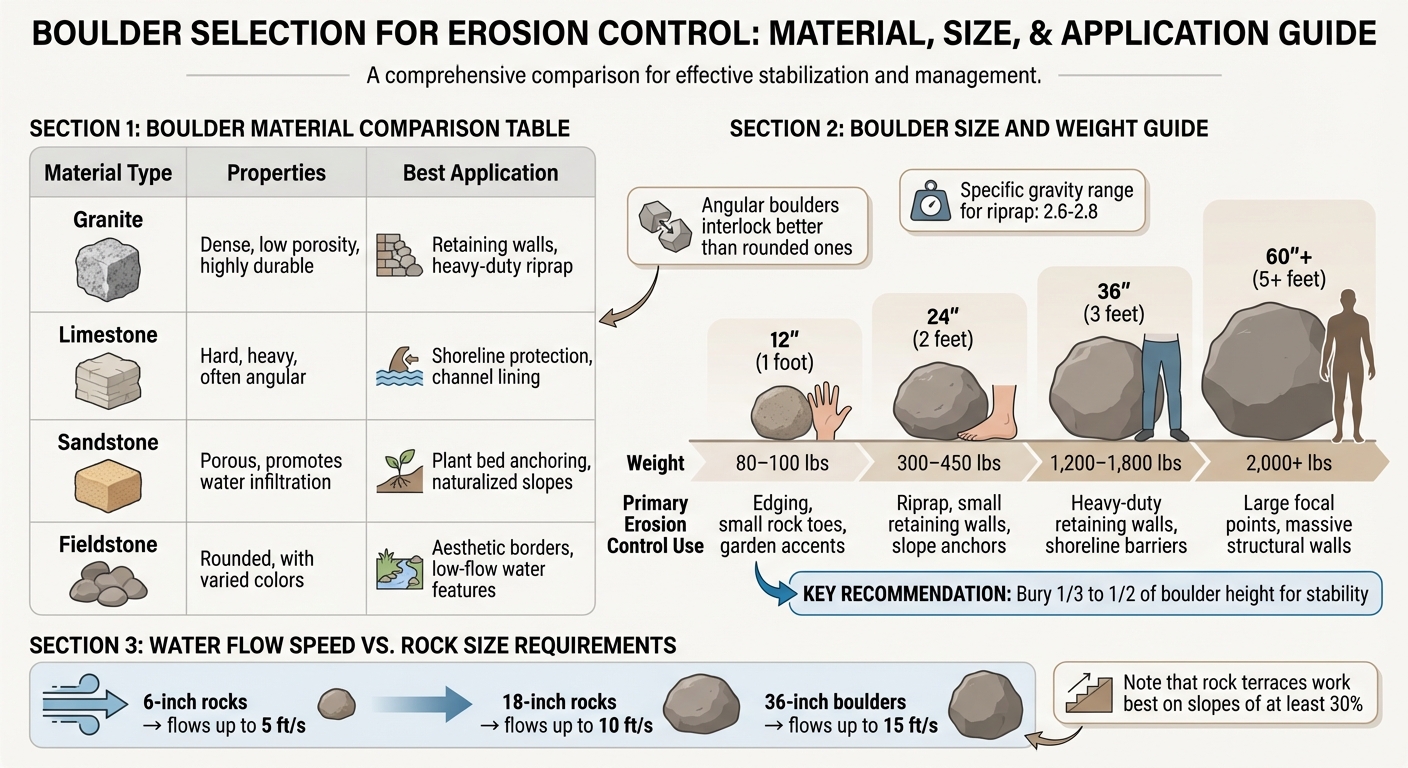
Boulder Selection Guide for Erosion Control: Material Types, Sizes, and Applications
Picking the right boulders for erosion control means finding a balance between durability, proper weight, and how well they fit with your Baltimore hardscaping and surroundings.
Evaluating Boulder Types
The type of material you choose plays a big role in how well your boulders can handle Maryland’s weather and water conditions. Granite and limestone are top choices for erosion control because they’re dense and hold up well against weathering [9]. These hard rocks resist damage from freeze-thaw cycles and constant exposure to water.
Angular boulders outperform rounded stones in erosion control. Their irregular edges naturally interlock, making them ideal for riprap installations and retaining walls [7][9]. Rounded fieldstones may look nice, but they lack the grip needed for high-stress applications. Randy Jurgensen, President of Wholesale Stone Solutions, emphasizes avoiding lightweight materials:
I guess if you had to ask me for the least effective stone to use, it would be volcanic lava stone type stone, which is really lightweight and can get moved around more easily [3].
Porosity is another key factor. Sandstone, being porous, allows water to pass through, which is helpful for maintaining soil moisture in planted areas [2]. On the other hand, non-absorbent stones like certain types of granite are better for retaining walls and terraces where strength is more important than water drainage [2]. Standard riprap boulders generally have a specific gravity between 2.6 and 2.8, which helps them stay in place during storms [9].
| Material Type | Properties | Best Application |
|---|---|---|
| Granite | Dense, low porosity, highly durable | Retaining walls, heavy-duty riprap |
| Limestone | Hard, heavy, often angular | Shoreline protection, channel lining |
| Sandstone | Porous, promotes water infiltration | Plant bed anchoring, naturalized slopes |
| Fieldstone | Rounded, with varied colors | Aesthetic borders, low-flow water features |
Once you’ve chosen the right material, the next step is determining the appropriate size for your specific erosion challenges.
Determining the Correct Size
The size of your boulders directly impacts how well they hold up during heavy rain or fast-moving water. A one-foot boulder typically weighs 80–100 pounds, while a three-foot boulder can weigh as much as 1,800 pounds [7]. Areas with high water velocity or flash flooding often require boulders weighing a ton or more to stay in place [6].
For shoreline "rock toes", stones between 10 and 16 inches are ideal – they grip the soil well without being too large [2]. Standard riprap for heavy-duty erosion control usually ranges from 12 to 24 inches in diameter, with individual stones weighing 150 to 800 pounds [9].
| Boulder Size | Weight Estimate | Primary Erosion Control Use |
|---|---|---|
| 12" (1 foot) | 80–100 lbs | Edging, small rock toes, garden accents |
| 24" (2 feet) | 300–450 lbs | Riprap, small retaining walls, slope anchors |
| 36" (3 feet) | 1,200–1,800 lbs | Heavy-duty retaining walls, shoreline barriers |
| 60"+ (5+ feet) | 2,000+ lbs | Large focal points, massive structural walls |
For sloped properties, rock terraces work best when the incline is at least 30%. To ensure stability, bury at least one-third of each boulder’s height into the ground [2][7][8].
Choosing Boulders That Match Your Landscape
After selecting the right material and size, the final step is ensuring the boulders complement your landscape. Color and texture should blend with the existing soil and hardscaping elements. For example, granite offers rugged shades of gray, pink, or black, while limestone provides softer cream to light gray tones that weather beautifully. Sandstone adds warm reds, oranges, and browns, making it a great choice for a more natural look [1].
Using a grouping strategy can enhance the overall appearance. Clusters of three, five, or seven boulders in varying sizes create a natural, non-uniform look [1]. Position the most visually appealing side of each boulder toward key viewpoints like patios, windows, or walkways [1].
Costs will depend on the type of stone and its availability. For properties in Maryland, locally sourced stones are often more affordable and better suited to the region’s geological conditions.
sbb-itb-843f8be
Preparing the Site and Planning Boulder Placement
Before placing boulders, take the time to study how water moves across your property and pinpoint areas prone to erosion. Proper preparation ensures that the boulders remain stable during storms and that your efforts effectively manage water flow.
Assessing Slope and Drainage
Start by identifying problem spots – like slopes, edges, low areas where water collects, or spots under downspouts. Watch how water behaves during rainfall to locate natural flow paths. These areas are ideal for installing features like dry creek beds or lining banks to guide water away.
Measure the slope of your property; rock terraces are most effective on inclines of at least 30% [2]. Also, evaluate how fast water moves through the area. Faster runoff requires heavier, angular stones that naturally interlock to resist being displaced [3]. Randy Jurgensen, President of Wholesale Stone Solutions, emphasizes:
Stone is the best used in areas that are either getting a lot of erosion to keep it from getting worse or areas that you think are going to be susceptible and still have good soil [3].
When arranging boulders, focus on deflecting water rather than blocking it. Blocking water can create pressure behind the stones, increasing the risk of structural failure [1]. For steep slopes, consider creating terraces or "shelves." These flat sections slow down water, reducing its speed and erosive power.
Once you’ve evaluated the slope and water flow, move on to marking and testing your boulder layout to ensure stability.
Marking and Testing the Layout
Use durable paint to mark where boulders and excavation areas will go. To ensure stability, bury a significant portion of each boulder below ground. Start marking from the bottom of the slope and work your way up to enhance overall support [6].
Before finalizing your layout, test its effectiveness. Use a garden hose to simulate water flow along the slope. This quick test helps you see if your setup redirects water properly or if adjustments are needed. For sloped areas, consider laying non-woven geosynthetic fabric beneath the boulders. This material helps prevent soil from shifting and resists lateral forces [3]. When stacking terraces, position them slightly perpendicular to the hillside. This arrangement allows water runoff to flow naturally without stripping the soil of nutrients [2].
Step-by-Step Guide to Boulder Placement
Once you’ve completed your site assessment and layout, here’s how to effectively install boulders. Start at the lowest point and work your way upward. This ensures that each level supports the one above it [11]. Before placing the boulders, lay down a filter material – either nonwoven geotextile fabric or a 6-inch layer of granular material. This step helps prevent soil from washing through the gaps between the stones [11]. If you need to overlap fabric sections, make sure they extend at least 1.5 feet downhill [11]. When placing boulders, avoid dropping them from more than 1 foot above the fabric unless you’ve added a 6-inch protective cushion [11].
Constructing Rock Toes and Berms
Using your marked layout as a guide, start by stabilizing the edges of the slope. Rock toes are particularly effective at the base of banks or shorelines, where they help anchor the slope. Choose rocks between 10 and 16 inches in size – smaller stones often grip the soil better than larger ones [2]. Ensure the boulders are buried deeply enough to hold them securely in place [10].
For berms, begin by creating a rounded soil mound with a gentle 5:1 slope ratio (5 feet of width for every 1 foot of height). This mimics the natural terrain [12]. Once the mound is shaped, add angular boulders, filling the gaps between larger stones with smaller, sharp-edged ones [11]. This interlocking approach ensures stability and allows water to flow around the structure rather than directly against it.
Building Boulder Terraces
To manage water flow on steep slopes, boulder retaining wall terraces are an effective solution. These staggered, flat shelves slow down water movement and reduce erosion. Start by cutting into the hillside to create a level base for each shelf. Place the largest, flattest boulders at the bottom, ensuring a stable foundation [2]. Stack the remaining boulders so they lean slightly back into the hillside. This positioning helps resist the pressure of the soil behind them [2]. To prevent soil migration while allowing water to drain, use non-woven geosynthetic fabric behind the boulders [3].
Randy Jurgensen, President of Wholesale Stone Solutions, emphasizes the importance of vegetation in these areas:
The more root systems you have in the soil, the more that soil is going to be able to stay in place during these water events [3].
Fill the spaces between the terrace levels with soil and plant vegetation to further enhance stability.
Installing Check Dams and Riprap
In areas where water flow is concentrated, check dams and riprap can help reduce velocity and protect your design. These structures are particularly effective in ditches and channels. Use angular stones with at least one fractured face, as they interlock better than rounded stones [11]. The size of the boulders should match the speed of the water. For example:
- 6-inch rocks for flows up to 5 ft/s
- 18-inch rocks for flows up to 10 ft/s
- 36-inch boulders for flows up to 15 ft/s [11]
Align the stones perpendicular to the slope, staggering the joints for added stability. Fill any narrow gaps with smaller "chinking" stones to secure the larger boulders [11]. When using check dams to protect culvert inlets, arrange the boulders to form retention berms. These berms help catch sediment and slow the water before it enters the drainage system [11].
Additional Erosion Control Techniques
Combining boulders with effective drainage solutions and strategic vegetation creates a powerful erosion control system. This approach not only stabilizes soil but also manages water flow efficiently.
Adding Drainage Solutions
Incorporating drainage systems alongside boulder structures is key to controlling water movement in erosion-prone areas. Options like French drains, dry creek beds, and gravel swales work well to redirect excess water and prevent it from destabilizing your erosion control setup [5][4].
For example, drainage swales should be 1 to 1.5 feet deep with side slopes of 2 to 3 feet. Fill these with porous gravel, preferably at least 2 inches in size, to allow water to infiltrate gradually rather than rushing off the surface [6]. Porous sandstone gravel is particularly effective for this purpose [2]. This combination of boulders for structural support and gravel for drainage creates a system that manages both soil stability and water runoff [5].
Randy Jurgensen, President of Wholesale Stone Solutions, underscores the importance of selecting the right materials:
Stone is the best used in areas that are either getting a lot of erosion to keep it from getting worse or areas that you think are going to be susceptible and still have good soil and some established vegetation [3].
When placing drainage materials behind boulder terraces or retaining walls, angular rocks are ideal. Their interlocking shapes hold firmly on slopes, especially when installed deeper than decorative stones to withstand heavy rain [3][6].
Pairing these drainage techniques with vegetation adds an extra layer of stability.
Using Vegetation for Stability
Vegetation plays a critical role in reinforcing erosion control systems. Plants with deep root systems, for instance, are excellent at stabilizing soil around boulders. Suckering shrubs like Virginia Sweetspire (Itea virginica), Aronia, and Diervilla spread through underground roots to create dense colonies that hold soil together effectively [13][15]. These shrubs thrive on slopes and in spaces between boulders, offering natural reinforcement.
For smaller gaps, mat-forming ground covers like Creeping Phlox and Sedums fill spaces between rocks beautifully [13][15]. Native grasses such as Switchgrass (Panicum virgatum) and Little Bluestem also provide excellent support. Their dense rhizomes are particularly useful behind boulder retaining walls or terraces [13][15].
Another method, live staking, involves planting cuttings of woody plants like Silky Dogwood or Black Willow directly into the soil between boulders or riprap. As these plants grow, their roots form a flexible matrix that strengthens the rock structure. This technique works especially well for stabilizing shorelines when combined with boulders ranging from 10 to 16 inches [2][14][15].
To ensure the success of new plants, water them consistently for two to three growing seasons to help roots establish deeply [16]. Using a variety of plant species rather than relying on just one type adds resilience to your system, protecting it from drought, disease, or pests [16]. Until plants are fully established, natural fiber blankets made from jute or coconut coir can hold soil in place around boulders [15][16].
Maintaining Boulder-Based Erosion Control Systems
Once your erosion control system is installed, ongoing care is essential to keep it functioning effectively. While boulders require minimal maintenance, regular inspections – especially after heavy rain or severe weather – are key to ensuring long-term stability [1].
Inspecting and Adjusting Boulder Placement
After major storms, take a close look at your boulders for any signs of movement, settling, or erosion. To maintain stability and a natural look, make sure that one-third to one-half of each boulder remains buried. As The Detail Guys recommend:
Inspect around bases periodically. Erosion or settling can expose more of the boulder over time. Add soil if needed to maintain the proper buried depth. [1]
If you notice exposed boulder bases or gaps forming, promptly add soil to restore the correct depth. Also, check that boulders are redirecting water flow rather than blocking it, as water buildup can create pressure, leading to shifting [1].
Cleaning and Replenishing Materials
Keep the spaces between boulders free of leaves, branches, and dirt. Trapped debris can hold moisture, potentially weakening the structure [18]. For limestone or sandstone boulders, use a mild acid solution to clean off mineral deposits caused by hard water [1]. Additionally, ensure that drainage features, such as weep holes and gravel backfill, remain clear. Dylan Smith from Utah Boulder Walls emphasizes:
Ensure that any drainage features, such as weep holes or gravel backfill, are clear and functioning as intended. Fix any clogs or blockages promptly. [18]
Pay attention to the soil and gravel behind boulder walls or terraces. If settling occurs, replenish the backfill material to maintain stability. When adding gravel, opt for porous natural stones like sandstone, which allow water to pass through while providing the necessary weight to hold the soil in place [2][18].
Maintaining Vegetation
Caring for surrounding vegetation is another vital part of maintaining your erosion control system. Plants integrated into the system need consistent attention until they are well-established. Water new plantings regularly and manage weeds to reduce competition for resources. If weeds begin to overtake grass seedlings, mow them to about 8 inches instead of pulling them out, which could disrupt the soil around the boulders. Avoid mowing too close to the ground, as native grasses may need up to two growing seasons to fully establish [17][19]. Additionally, periodically brush off organic matter from the boulders to preserve their texture [1].
Conclusion
Boulder-based erosion control involves three key steps: material selection, strategic placement, and ongoing maintenance. For high-pressure areas, materials like granite or basalt are ideal, while retaining walls benefit from foundation boulders measuring 36–48 inches. To ensure both stability and aesthetics, bury one-third to one-half of each boulder [10][20].
Placement techniques play a critical role in managing water flow. Methods such as rock toes for shorelines, terraces for slopes steeper than 30%, and check dams for runoff control help redirect water effectively rather than obstructing it. These designs help combat soil loss caused by erosion on a global scale [20][2].
Regular maintenance is essential. This includes checking for shifted boulders, clearing drainage paths, and supporting vegetation growth around the structures. Such efforts keep your erosion control system functioning effectively, a goal that local specialists can help you achieve.
For homeowners in Maryland, Pro Landscapes MD offers customized erosion control solutions throughout central Maryland. Their services include site evaluations, heavy equipment operation, and integrated drainage systems like French drains and dry riverbeds. With expertise in both hardscaping and landscaping, they design systems that combine durability with natural beauty in areas like Ellicott City, Columbia, Bethesda, Gaithersburg, and more.
FAQs
Do I need geotextile fabric under boulders?
Using geotextile fabric beneath boulders is a smart choice for controlling erosion. This fabric acts as a separation layer, helping to stabilize the soil, reduce washout, and improve drainage. Nonwoven geotextile fabrics are especially useful because they allow water to flow through while keeping soil securely in place. This setup is particularly effective on slopes or areas where soil movement is a concern, offering added stability and better erosion control.
How do I tell if water flow is too strong for my boulders?
When inspecting boulders for soil erosion control, ensure they remain firmly in place and are effectively doing their job. Each boulder should have at least three contact points to maintain stability. If you notice boulders shifting, moving, or water aggressively flowing around them, it’s a sign that the water’s force is too strong. In such cases, you might need to adjust your approach by using larger boulders, adding reinforcements, or incorporating features like riprap to handle the excessive water energy more effectively.
When should I hire Pro Landscapes MD for erosion control?
Hire Pro Landscapes MD for expert erosion control solutions, especially if your property has slopes, water runoff challenges, or you’re looking for a durable and visually pleasing option. They specialize in selecting, placing, and maintaining boulders to effectively prevent soil erosion. With their professional touch, you’ll get properly installed and maintained boulders designed to meet the unique needs of your landscape, ensuring long-term protection and functionality.
Chat with Us