


- bhavya gada
- No Comments
Organic waste like food scraps, leaves, and grass clippings is often discarded, but it can be a powerful tool for improving soil and creating healthier landscapes. By composting organic materials, you reduce landfill waste, lower methane emissions, and save money on fertilizers and soil amendments. Compost improves soil structure, retains moisture, and prevents erosion, making it ideal for Maryland’s sandy and clay soils.
Key Takeaways:
- Composting Benefits: Reduces trash, improves soil health, and cuts landscaping costs.
- Materials: Combine nitrogen-rich "greens" (e.g., food scraps) with carbon-rich "browns" (e.g., dry leaves) for effective composting.
- Methods: Options include basic compost piles, three-bin systems, and trench composting.
- Applications: Use compost to enrich soil, mulch trees, or improve water management in rain gardens.
Transform waste into a resource that supports your plants, saves money, and contributes to a cleaner environment. Whether you’re composting on your own or seeking help from professionals like Pro Landscapes MD, there’s a method to suit every yard and goal.
4 Easy Composting Methods to Transform Waste into Rich Mulch & Potting Mix | No Dig Gardening Tips
sbb-itb-843f8be
Choosing the Right Organic Waste Materials
Organic waste comes in many forms, but not all are equally suited for landscaping. The secret lies in understanding the balance between nitrogen, which fuels microbial activity, and carbon, which powers decomposition. Striking the right mix ensures your compost pile stays active and productive.
Nitrogen-rich "greens" include fruit and vegetable scraps, grass clippings, coffee grounds, and crushed eggshells. On the other hand, carbon-rich "browns" consist of dry leaves, twigs, shredded non-glossy paper, untreated wood chips, and cardboard. Browns also add structure to your pile, keeping it from becoming too wet or smelly. A good rule of thumb is to use two to three parts browns for every one part greens, measured by volume [2].
Different materials decompose at different rates. For example, food scraps have a carbon-to-nitrogen ratio of 15:1 to 25:1, while wood chips range from 200:1 to 700:1 [3]. Grass clippings may break down in weeks, but wood chips can take months – or even years. Choose materials that align with your timeline and landscaping needs.
Types of Organic Waste and Their Uses
Keeping the carbon-to-nitrogen ratio in mind, here’s how specific organic materials can enhance your landscape:
- Grass clippings: Provide a quick nitrogen boost, especially when mixed with shredded leaves.
- Coffee grounds: Improve soil structure by helping sandy soils retain moisture and enhancing drainage in clay soils [1].
- Dry, shredded leaves: Make excellent mulch for trees and shrubs. In the fall, till 3 to 4 inches of shredded, uncomposted leaves directly into garden beds to enrich the soil over winter [1].
- Kitchen scraps: Vegetable peels and fruit waste decompose quickly, adding valuable nutrients. Crushed eggshells are a great source of calcium.
- Cardboard and shredded paper: Offer a carbon source without the risk of introducing weed seeds.
A well-maintained compost pile can reach temperatures between 130°F and 160°F, which is hot enough to kill pathogens and weed seeds [2]. After curing, finished compost typically shrinks to about one-third of its original volume, making it a concentrated soil enhancer [2].
Keeping Contaminants Out of Your Organic Waste
To maintain a clean and effective compost pile, avoid adding certain materials. Meat, dairy, fats, and oils can attract pests and require the higher temperatures of commercial composting facilities to break down safely [2]. Pet waste introduces harmful pathogens, and treated or painted wood contains chemicals that can harm plants.
Be cautious with herbicide-treated grass clippings, as the chemicals can survive the composting process and damage sensitive plants [2]. Use a 1/4-inch hardware cloth to sift finished compost, removing items like twigs, fruit pits, or plastic stickers [2]. For container gardening, strain compost through a finer sieve to eliminate larger particles that could disrupt the potting mix [1].
Finally, keep invasive weeds and seed heads out of your compost. Backyard piles may not consistently reach the 130°F to 140°F needed to neutralize them [3].
With clean, well-chosen materials, you’re ready to explore composting techniques that will maximize your landscaping efforts.
Composting Methods for Your Landscape
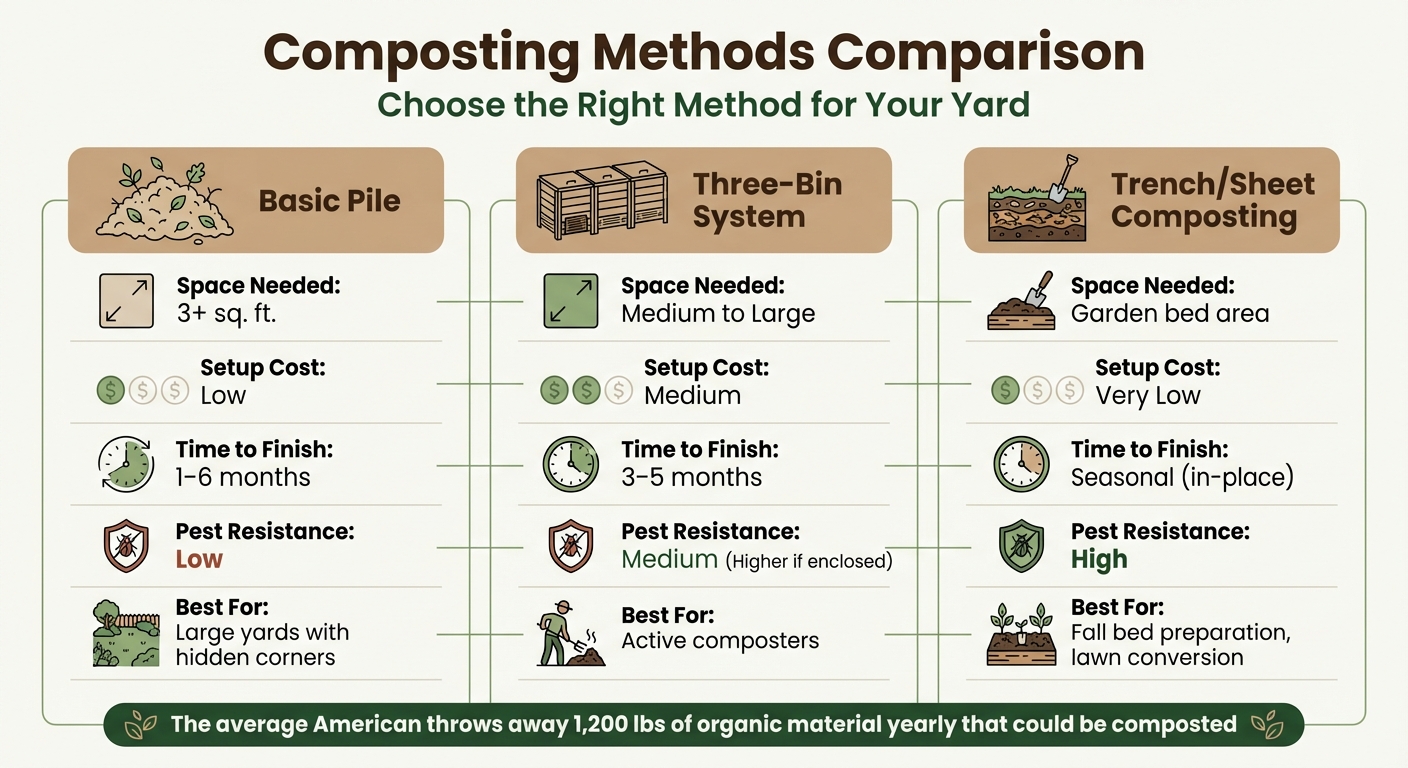
Composting Methods Comparison: Space, Cost, Time, and Best Uses
Once you’ve gathered quality organic materials, the next step is to pick a composting method that works for your space and goals. Each option helps turn organic waste into a resource that can improve your soil and support your plants.
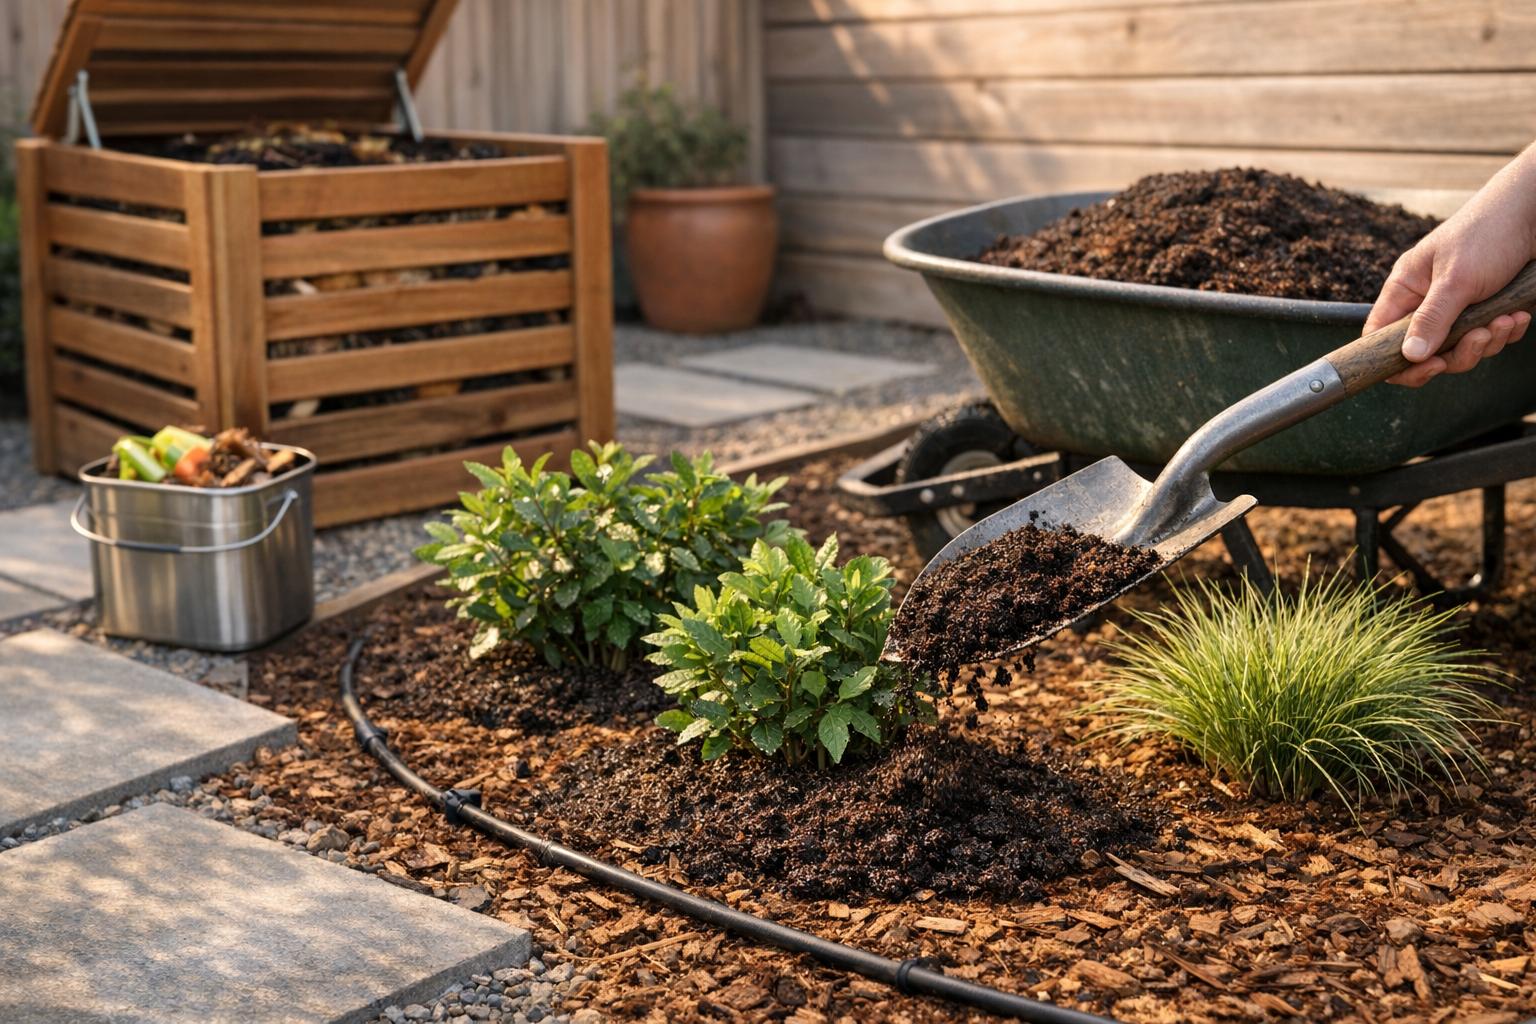
How to Build a Basic Compost Pile
The basic compost pile is a straightforward option, perfect for anyone with at least 3 square feet of bare soil in a dry, shady spot. Start by laying down twigs or straw to improve drainage and airflow at the base. Then, alternate layers of "browns" (like dried leaves) and "greens" (like vegetable scraps) until the pile is about 3 to 5 feet high. Sprinkle a thin layer of garden soil over each green layer to aid decomposition, and top it off with a brown layer to help control odors.
Keep the pile moist – aim for the feel of a wrung-out sponge – and turn it regularly. At first, turn it every few days, then shift to every 7 to 10 days. Use a shovel or garden fork to move the material from the center to the edges. For proper decomposition, the internal temperature should stay between 130°F and 150°F. Depending on the weather, the compost can take 1 to 2 months to break down in warm conditions or up to 6 months in colder climates [4].
Setting Up a Three-Bin Turning System
If you generate a lot of organic waste, a three-bin system might be a better fit. This setup keeps your compost organized and speeds up the process. The three bins serve different purposes: one for fresh materials, one for active decomposition, and one for finished compost. You can build the bins using materials like chicken wire or wooden pallets.
Open bins made from wire or wood allow for excellent airflow and make it easy to turn the compost. On the other hand, enclosed bins with lids are better at keeping pests out and controlling odors, which is especially useful in urban or suburban areas [4]. With this system, you can continuously add new materials to the first bin, manage decomposition in the second, and store ready-to-use compost in the third.
Trench Composting and Sheet Mulching
For those who prefer a low-maintenance approach, trench composting and sheet mulching let you compost directly in your garden beds. In the fall, mix 3 to 4 inches of shredded, uncomposted leaves into your flower or vegetable beds. Over the winter, these materials naturally break down, enriching the soil for spring planting.
Sheet mulching is an excellent method for converting a lawn into a planting bed [5]. Start by laying down a layer of cardboard or newspaper over the grass. Then, cover it with several inches of compost and organic mulch. This method not only suppresses grass but also builds nutrient-rich soil underneath.
Composting Methods Comparison
| Method | Space Needed | Setup Cost | Time to Finish | Pest Resistance | Best For |
|---|---|---|---|---|---|
| Basic Pile | 3+ sq. ft. | Low | 1–6 months | Low | Large yards with hidden corners |
| Three-Bin System | Medium to Large | Medium | 3–5 months | Medium (Higher if enclosed) | Active composters |
| Trench/Sheet Composting | Garden bed area | Very Low | Seasonal (in-place) | High | Fall bed preparation, lawn conversion |
The average American throws away around 1,200 pounds of organic material every year that could be composted [4]. By picking a method that matches your needs and staying consistent with upkeep, you can turn that waste into nutrient-rich compost that leads to healthier plants and soil.
Using Compost in Your Landscape Design
Now that your compost is ready, it’s time to make it work for your landscape. With the right techniques, compost can enhance various areas of your property while boosting soil health and plant growth.
Enriching Soil in Plant Beds and Gardens
Compost is a fantastic soil amendment that tackles the challenges of different soil types. For sandy soil, it helps retain moisture, while for clay soil, it improves drainage by forming larger pores [1]. This makes it a valuable addition no matter your soil conditions.
To get started, mix 2–4 inches of finished compost into the top 6–9 inches of soil [2]. This not only enriches the soil but also supports earthworms, insects, and beneficial microorganisms, which are essential for healthy soil [1]. For established gardens, repeat this process annually to maintain soil quality.
When transplanting, mix a small amount of compost into the backfill soil. This loosens the soil for young roots and provides essential nutrients exactly where they’re needed [1]. For container gardening, create a custom potting mix by combining two parts strained compost with one part garden loam and one part perlite or sand [1]. Be cautious not to apply more than 2 inches of compost, as it can attract grubs [1].
| Application Use Case | Recommended Amount | Integration Depth |
|---|---|---|
| General Soil Amendment | 2–4 inches | 6–9 inches |
| Annual Garden Top-dressing | 2 inches | 6–8 inches |
| Raised Bed Construction | 2 inches | 6–8 inches |
| Container Gardening Mix | 2 parts compost (to 1 part loam/1 part perlite) | Full depth of container |
Beyond improving soil, compost is also an excellent tool for mulching around trees, shrubs, and water features.
Using Compost as Mulch for Trees and Shrubs
Compost can take your mulching efforts to the next level. Use it as a nutrient-rich base layer under traditional mulch. Start by spreading a 1-inch layer of compost around trees and shrubs in late spring, then cover it with 2–3 inches of shredded bark, pine needles, or straw [1]. This two-layer system combines the benefits of compost’s nutrients and humic acid with the weed suppression and temperature control of the outer mulch layer.
Before applying, loosen the top 2–3 inches of soil to help the compost integrate better [2]. Avoid using compost alone as a surface mulch, as its nutrient-rich nature can encourage weed growth [1]. The top mulch layer solves this issue while still allowing compost to improve soil moisture and fertility over time [1]. This method not only supports plant health but also makes landscaping more efficient and cost-effective.
Adding Organic Waste to Rain Gardens and Bioswales
Compost isn’t just for plants – it’s a game-changer for water management systems like rain gardens and bioswales. Compost improves both water absorption and drainage, which is why the US EPA highlights its benefits:
Compost enables soil to better absorb and hold water, helping to reduce erosion and flooding in heavy rains and retain water during droughts [2].
For new rain gardens or bioswales, mix 2 to 4 inches of finished compost into the top 6–9 inches of soil [2]. This immediately enhances the soil’s structure and water absorption [2]. For erosion control in bioswales, apply a 3-inch compost layer as mulch, ensuring it’s a few inches away from plant stems [2]. Compost also acts as a natural filter, releasing nutrients gradually while preventing runoff into groundwater [2]. For existing features, top-dress with up to 1/4 inch of high-quality compost once or twice a year to steadily improve soil health [1]. These techniques turn organic waste into a versatile, eco-friendly resource for your landscape.
Step-by-Step Guide to Using Organic Waste in Your Landscape
Turn your organic waste into a powerful tool for improving your landscape with these simple steps.
Planning Your Design with Organic Materials
Start by evaluating your yard’s soil, drainage, and sunlight to determine where compost will make the biggest impact [7]. Gail Hansen from the University of Florida highlights the importance of preparation:
The most important step is to put a plan on paper. Developing a master plan will save you time and money and is more likely to result in a successful design [7].
Set up a service area for composting that’s easy to access year-round, ideally near a water source [2][7]. Choose a composting method that suits your needs: hot composting (fast but requires frequent turning), cold composting (slower and hands-off), or vermicomposting (perfect for small spaces) [8]. Place your compost bin in a dry, shady spot to maintain steady moisture levels. A good bin size to aim for is about a 3-foot cube, which helps generate heat while allowing airflow [8].
Next, organize your yard into "outdoor rooms" – vegetable gardens, flower beds, and lawn areas – where you’ll use the finished compost [7][1]. Plan application depths carefully: 2 inches for garden beds, 1 inch for trees and shrubs, and 1/4 inch for lawn topdressing [1]. Keep in mind that compost shrinks to about one-third of its original volume as it breaks down, so plan accordingly [2].
Once your plan is ready, you can move on to applying the compost effectively.
Applying Organic Waste to Your Landscape
Timing and technique are key when spreading compost. For vegetable and flower beds, apply 2 inches of compost annually and mix it into the top 6 to 8 inches of soil [1]. Be cautious not to exceed 2 inches at a time, as too much compost can attract pests like grubs [1]. If your compost supply is limited, prioritize transplants by adding a trowel of compost to each planting hole [1].
For trees and shrubs, apply 1 inch of compost and cover it with 2 to 3 inches of mulch like bark, straw, or pine needles [1]. For lawns, incorporate 2 inches of compost into the soil before planting new turf, or apply a 1/4-inch topdressing once or twice a year, ideally after core aeration [1]. Keep the soil consistently moist to activate beneficial microorganisms [2][8]. When building your compost pile, layer nitrogen-rich "greens" (like food scraps) with carbon-rich "browns" (like leaves and twigs) in a 1:2 or 1:3 ratio for the best results [2][6].
These steps not only enrich your soil but also contribute to eco-friendly landscaping.
Working with Professionals for Better Results
If you’re tackling a large project or need expert advice, consider hiring professionals like Pro Landscapes MD. They specialize in integrating compost into different soil types, whether it’s improving water retention in sandy soils or enhancing drainage in clay soils [1]. They also use high-quality compost processed at high temperatures to eliminate weed seeds and pathogens [1].
Experts can guide you on proper application techniques and help avoid common pitfalls. They can even combine compost topdressing with advanced methods like lawn coring to maximize results [1]. For large-scale projects, professionals ensure the right soil-to-compost ratios and application depths [1]. For additional guidance, reach out to your local Cooperative Extension office or Extension Master Gardeners [1].
Maintenance and Problem Solving
Once your compost system is up and running, regular upkeep is key to keeping it effective. Paying attention to a few essential factors can help you avoid common problems while ensuring your compost continues to enrich your soil.
Managing Aeration and Moisture
To maintain proper oxygen levels and moisture, turn your compost pile every week. Start with a 4–6 inch base of bulky materials like twigs or wood chips to promote airflow [5,9].
Keep the pile damp but not soaked – it should feel like a wrung-out sponge [5,13]. If it’s too dry, add water while turning it. On the other hand, if it’s too wet or has a sludge-like smell, mix in dry, carbon-rich materials like shredded paper or leaves [5,9]. A well-managed pile can heat up to 130°F–160°F, which speeds up decomposition and kills weed seeds [2]. Breaking down tough items like corn cobs or broccoli stalks into smaller pieces also prevents air pockets and helps the pile break down faster [2].
Once you’ve got aeration and moisture under control, focus on preventing pests and odors.
Controlling Pests and Odors
Foul smells often mean your pile is either too wet or lacking oxygen. Craig Coker, Principal at Coker Composting & Consulting, highlights the importance of managing odors:
"Odor control is critical to avoid regulatory issues and public complaints" [9].
To tackle odors and keep pests at bay, add dry browns like leaves or shredded paper and turn the pile regularly. Always bury food scraps under 4–8 inches of material [2]. Avoid adding meat, dairy, or oils to your compost, as these can attract rodents and create strong odors [2]. When applying compost to garden beds, stick to a maximum depth of 2 inches to prevent grubs from becoming a problem [1].
Here’s a quick guide to troubleshooting common compost issues:
| Problem | Likely Cause | Recommended Action |
|---|---|---|
| Bad Odor | Too wet or lack of oxygen | Add dry browns and turn the pile [2] |
| Pile Not Heating Up | Lack of nitrogen or moisture | Mix in "greens" (food scraps/grass) and turn [2] |
| Decomposition Stopped | Pile is too dry | Add water and turn the pile [2] |
| Pests/Rodents | Meat/dairy added or scraps exposed | Remove prohibited items and bury scraps [2] |
Addressing these problems as they arise ensures your compost remains effective year-round.
Adjusting Organic Waste Use by Season
Timing your compost use to match the seasons can make it even more beneficial. In the fall, till 3–4 inches of shredded, uncomposted leaves directly into your garden beds. These will break down over winter, enriching the soil for spring planting [1]. By late spring, apply a 1-inch layer of compost around trees and shrubs, then top it with 2–3 inches of bark chips or pine needles to help retain moisture during the hotter months [1]. For lawns, spread a 1/4-inch layer of compost once or twice a year – ideally after core aeration – to improve soil quality [1].
Jeff Wilson, Horticulture Specialist at Mississippi State University Extension Service, explains:
"By composting these organic waste materials, homeowners can produce beneficial material that can be used in the garden, lawn and landscape" [10].
It’s also a good idea to test your soil 2–3 months before planting so you can adjust your soil amendments accordingly [10]. During dry spells, compost can act as a natural moisture regulator, improving water retention in sandy soils and enhancing drainage in clay soils [2,16].
Conclusion
Using organic waste effectively can bring noticeable benefits to both the environment and your landscape. Turning yard and kitchen scraps into compost not only enhances your property but also helps cut down on landfill waste and methane emissions.
As noted by Virginia Cooperative Extension:
Compost also promotes a biologically healthy soil by providing food for earthworms, soil insects, and beneficial microorganisms [1].
Starting a composting project is simpler than you might think. By collecting organic waste and following the best practices shared in this guide – like proper application depths and timing – you can steadily improve soil quality while cutting back on chemical fertilizers.
If you’re tackling a larger project or need expert advice, Pro Landscapes MD offers eco-conscious landscape design and construction services across central Maryland. Their team of horticulture professionals can create custom organic waste strategies tailored to your property. They use high-temperature commercial composting methods to ensure weed seeds and pathogens are eliminated, delivering the best results for your landscape.
Whether you take the DIY route or seek the expertise of Pro Landscapes MD, using organic waste effectively can turn it into a powerful tool for creating healthier, more vibrant outdoor spaces.
FAQs
How do I know when compost is finished?
Finished compost looks like dark, crumbly soil and gives off a pleasant, earthy aroma. If you notice a sour or ammonia-like smell, slimy patches, or visible, undigested food scraps, it means the compost is still breaking down. When these signs disappear, your compost is ready to enrich your garden or landscaping projects.
What’s the easiest compost method for a small yard?
For a small yard, the easiest way to compost is by creating a simple compost pile using yard waste like leaves and grass clippings. Pick a dry, shady spot that’s roughly 3 feet wide, deep, and tall – this size helps maintain proper insulation. Start with just yard waste, and as you get the hang of it, you can slowly incorporate food scraps. This method is low-maintenance and doesn’t require any special tools, making it perfect for compact spaces.
Can compost help fix drainage or puddling problems?
Compost can play a big role in improving soil drainage. By adding compost, you introduce organic matter that helps create larger pores in the soil. These pores allow water to flow more easily, reducing the chances of puddling or waterlogging. It also enhances the soil’s structure, making it easier for excess water to drain away. If you’re dealing with drainage problems, incorporating compost into your soil is a simple and effective solution for healthier, well-draining soil.
Chat with Us