









- bhavya gada
- No Comments
If I were building a backyard court in Maryland, I’d focus on three things first: drainage, base prep, and local rules. That’s because clay-heavy soil, freeze-thaw winters, and frequent rain can lead to puddles, cracking, and frost heave if the site work is off.
Here’s the short version:
- Pick the right court size for the yard
- Pickleball play area: 20 ft x 44 ft
- Usable backyard pickleball footprint: about 30 ft x 60 ft
- More comfortable pickleball layout: about 34 ft x 64 ft
- Full tennis court footprint: about 60 ft x 120 ft
- Check the site before picking materials
- Measure the buildable area, not just the lot
- Review setbacks, easements, HOA rules, and impervious coverage
- Aim for north-south orientation when possible
- Watch for wet spots, slope, tree cover, and compacted soil
- Get the base and water flow right
- Court should sit about 4–6 inches above nearby grade
- Surface slope should be about 0.8% to 1%
- Use 4–6 inches of compacted crushed stone base
- Add drains or swales if runoff reaches the court from uphill areas
- Choose the surface based on weather and upkeep
- Concrete: longer life, higher upfront cost
- Asphalt: lower upfront cost, more crack repair over time
- Modular tiles: softer feel underfoot and strong drainage over a hard base
- Finish the area for daily use
- Add 4–6 ft access paths
- Keep loose gravel away from the court edge
- Use seating, planting, and grade work to keep dirt and runoff off the surface
- Plan fencing and lighting around how often you’ll play
A backyard court can work well in many Maryland yards. But I’d treat it as a site and drainage project first, and a sports surface project second. That one choice can save a lot of repair work later.
Below, I break down the main build points so you can size the court, plan the base, pick the surface, and tie it into the rest of the yard.
What You Need to Know to Build a Home Pickleball Court
sbb-itb-843f8be
Check Your Yard Size, Slope, and Court Layout
Before you pick a surface or hire a contractor, make sure your yard can fit the court you want. On paper, a lot can look big enough. In practice, setbacks, drainage, and existing hardscape often eat up more room than people expect.
Measure the Space You Actually Have
A regulation pickleball court is 20 ft x 44 ft, but that’s just the playing area. For a backyard court, you also need room to move and chase balls. A practical minimum is about 30 ft x 60 ft (~1,800 sq ft), which adds roughly 5 ft on each side and 7–8 ft behind the baselines.[9][5][4]
If you want a setup that feels less cramped, plan for something closer to 34 ft x 64 ft (~2,176 sq ft). That gives you about 10 ft of clearance on all sides.[9][3][8]
Things change fast if you’re thinking about a tennis-style surface. The USTA recommends a minimum pad of 60 ft x 120 ft (7,200 sq ft), including overruns.[12] That’s a big jump. If your lot is tight, a multi-use court at 30 ft x 60 ft is often the better fit for pickleball plus half-court basketball.[13]
To find the space you can build on, subtract setbacks, easements, and any structures already in the way. That number is your buildable envelope, and it’s usually smaller than the full lot size.
If the footprint works, the next issue is playability. A court that technically fits can still be a pain to use if the sun is in your face or water sits on the surface.
Set Court Orientation and Avoid Common Maryland Site Problems
A north–south orientation is the usual recommendation for outdoor courts. With that layout, the net line runs about east–west, so the sun moves across the sides of the court instead of shining straight into players’ eyes at the baselines.
East–west courts tend to create more glare at the baselines, especially on spring and fall evenings and summer mornings. That’s the kind of thing people don’t think about until the first game.
You should also watch for site problems that make construction harder or leave the court wet longer than it should be:
- Slopes
- Wet spots
- Compacted subsoil
- Dense tree cover
Each of those can make grading tougher and slow drying after rain.
Once the layout works for sun and drainage, check that it still fits local setback and lot coverage rules.
Check Zoning, Setbacks, and Impervious Coverage Rules Early
Treat the court as an accessory structure, then check setbacks and impervious coverage before you lock in the design. In Montgomery County, rear and side setbacks for accessory structures are often around 10–15 ft or more from lot lines, depending on the zoning classification, and larger courts can need more distance.[6][7][10]
Courts built with asphalt, concrete, or pavers count toward impervious coverage under Maryland stormwater rules and zoning ordinances.[4][11] In Baltimore City’s detached residential districts, maximum impervious surface limits often fall between 40% and 50% of total lot area, depending on the zone.[11]
That matters more than many homeowners expect. If you already have a driveway, patio, walkways, or other hardscape, you may be closer to the limit than you think. Measure total coverage before you decide on court size.
Build a Stable Base With Proper Grading and Drainage
Maryland’s clay soils, frequent rain, and freeze-thaw cycles make base prep and drainage a big deal. If the base isn’t firm and water can’t get out, you’ll end up with puddles, cracks, and frost heave. Once the layout is approved, the life of the court depends on what happens under the surface.
Set the Finish Height and Slope to Move Water Off the Court
The finished court should sit 4–6 inches above the surrounding grade. That extra height helps water move off the court pad instead of collecting at the edges or washing back onto the playing area. [18][19][2]
For slope, aim for 0.8%–1% – about 1/8 inch per foot – across the playing surface. That’s enough to move water without making the court feel tilted during play. On a standard 60-foot multi-sport court, a 1% slope creates a 7 1/4-inch elevation difference from the high side to the low side. [19][2]
The number matters, but the direction matters too. Watch your yard during a heavy rain, or right after one, and see where water already wants to go. Then line up the court with that drainage path. Set the high side so runoff moves away from the house.
Once the slope is established, the subgrade needs to be compacted well enough to hold it.
Prepare the Subgrade and Install the Base Correctly
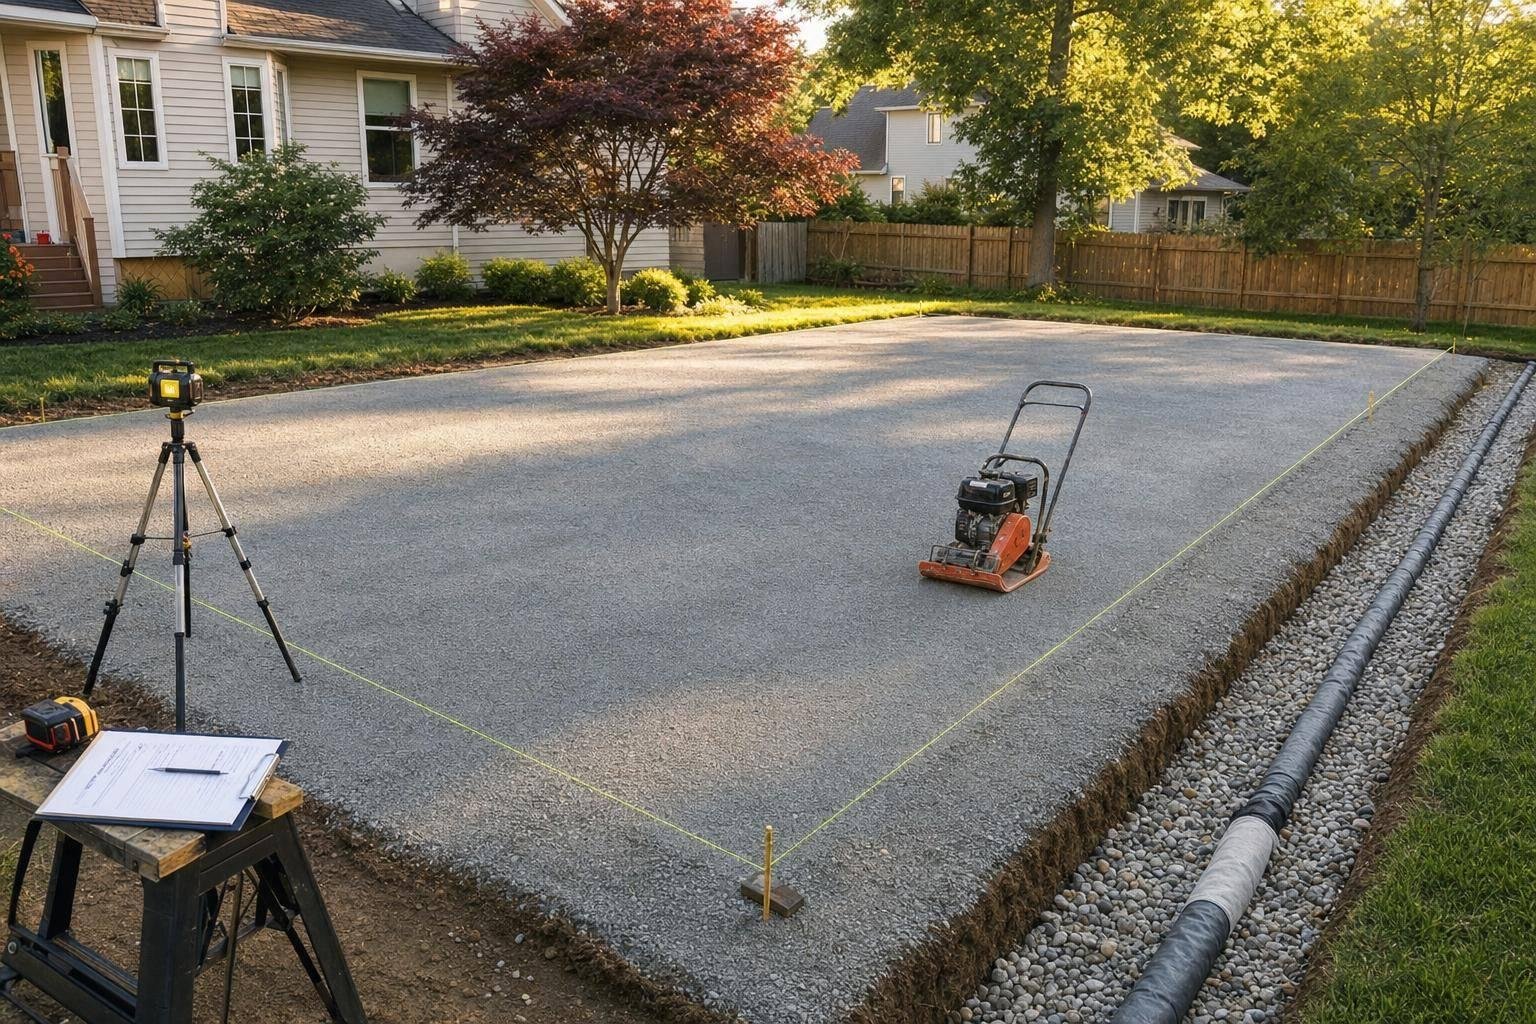
The order here is simple: strip, compact, base, then fine-grade. Miss a step – or rush compaction – and cracking or settlement can show up later, which is a common problem on Maryland courts. [15][16][17]
- Strip all sod and topsoil across the full court footprint, plus at least 12–18 inches beyond the court edge. If organic material stays in place, it can break down over time and leave soft spots under the surface.
- Shape and compact the native subgrade by cutting down high spots, filling low spots, and making multiple passes with a plate compactor or roller until the soil feels firm and doesn’t rut underfoot. Maryland clay shifts a lot when it isn’t compacted well.
- Install 4–6 inches of compacted crushed stone – such as crusher run or graded aggregate base – in two or more lifts. Spread each 2–3 inch lift, compact it well, and then add the next layer. If you dump the full depth all at once, loose material can get trapped in the middle.
- Fine-grade the top of the stone base with a laser or string line, and confirm the planned slope before the court surface or tile system goes down.
Here’s a simple field check: after compaction, walk the surface and look for footprints deeper than 1/4 inch. If you see more movement than that, those soft areas need more compaction before you go any farther. [19]
Plan Drainage Around the Court, Not Just Under It
The court slope and stone base deal with the rain that lands on the surface. But on a sloped Maryland lot, runoff coming from uphill can overload the court if you don’t intercept it first. A French drain along the low edge can catch that water and send it to a safe discharge point. [14][17]
In Maryland clay, French drains should be 18–24 inches deep and at least 12 inches wide, with 4-inch perforated pipe and 3/4-inch clean washed stone, plus a minimum 1% slope throughout. [14][17] If the drain is too shallow or too flat, it tends to stop working.
Swales and dry riverbeds also help. They can steer water around the court perimeter and help control erosion in spots where storm flow hits harder.
Once the base and drainage are in place, the next step is picking the surface system that fits the site and the amount of upkeep you’re willing to take on.
Choose the Surface, Lines, Fencing, and Ball Containment
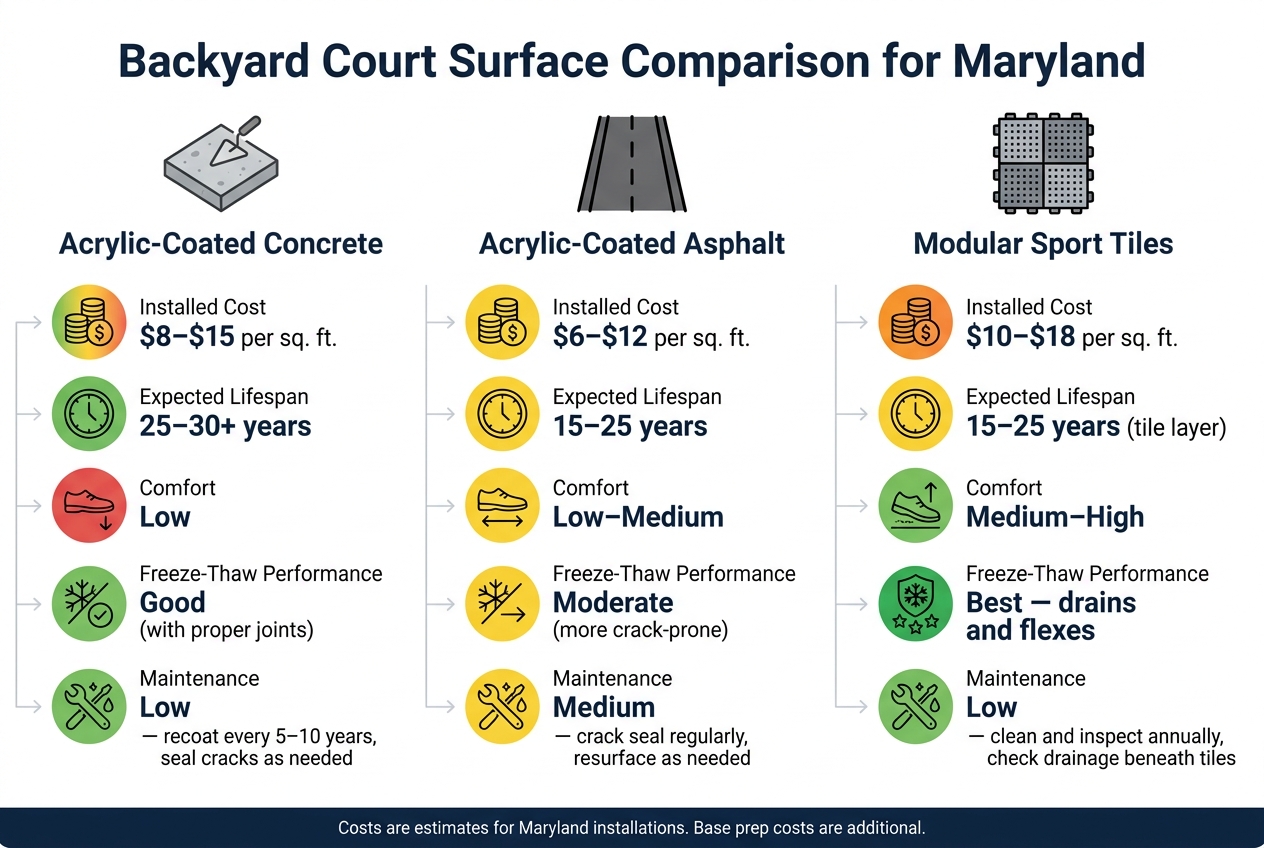
Backyard Court Surface Comparison: Concrete vs Asphalt vs Modular Tiles
Next, narrow the surface, line layout, fencing, and lighting based on how the court will be used.
Compare Court Surfaces for Maryland Weather and Upkeep
Most Maryland homeowners end up choosing from three main options: acrylic-coated concrete, acrylic-coated asphalt, or modular sport tiles installed over a hard base.
Concrete keeps its shape well and usually lasts the longest. But in Maryland, freeze-thaw cycles matter, so the slab needs control joints and an air-entrained mix to deal with movement. Asphalt usually costs a little less up front, but summer heat can make it soften, and it often needs crack sealing more often. Modular tiles go over a hard base, let water pass through open joints, and can be replaced one tile at a time if one gets damaged. That makes them a low-upkeep choice over the long run.
| Surface Type | Est. Installed Cost (per sq. ft.) | Expected Lifespan | Comfort | Freeze-Thaw Performance | Maintenance |
|---|---|---|---|---|---|
| Acrylic-Coated Concrete | $8–$15 | 25–30+ years | Low | Good with proper joints | Low; recoat every 5–10 years and seal cracks as needed |
| Acrylic-Coated Asphalt | $6–$12 | 15–25 years | Low–Medium | Moderate; more crack-prone | Medium; crack seal regularly and resurface as needed |
| Modular Sport Tiles | $10–$18 | 15–25 years (tile layer) | Medium–High | Best; drains and flexes | Low; clean and inspect annually, and check drainage beneath the tiles |
Mark Accurate Lines for Pickleball, Tennis, or Multi-Use Play
Once the surface is chosen, lay out the regulation markings before striping.
A regulation pickleball court measures 20 ft × 44 ft, with a 7-foot non-volley zone on each side of the net [20][21][22]. A standard tennis court is 78 ft long and 36 ft wide for doubles, or 27 ft wide for singles [23][24].
For both sports, all lines are 2 inches wide and measured to the outside edge of the line [20][21][22]. On a multi-use court, the cleanest setup is usually simple: paint the main sport’s lines in white, then use a second color like yellow or light blue for the other sport. That split makes the court easier to read and helps avoid a messy look.
There’s also an order to the work. Let concrete cure for 28 days, then apply the color coats, and paint the lines last.
Size Fencing and Lighting for Ball Control and Evening Play
Fence height mostly comes down to the sport and how much ball containment you want. Many homeowners go with 8 to 10 ft behind pickleball baselines. Tennis courts often work better with 10 to 12 ft fencing around the full court.
| Fence Configuration | Ball Containment | Visual Impact | Relative Cost |
|---|---|---|---|
| Full-perimeter 10–12 ft | High | High | Highest |
| 10 ft at baselines, 4–6 ft on sides | Medium–High | Medium | Moderate |
| End-only or partial fencing | Low–Medium | Low | Lowest |
For lighting, residential courts often use LED sports floodlights mounted at 16 to 20 ft for smaller pickleball courts and 20 to 30 ft for tennis courts [25][26][27][29]. The goal is 20 to 30 foot-candles of even light across the surface [28]. Put poles along the sides of the court, away from property lines, and use visors or shields to cut spill light. If you want a warmer backyard feel, 3,000–4,000K LEDs tend to look better than harsher, cooler lamps.
After the play specs are set, the next step is tying the court into paths, seating, and yard grading.
Connect the Court to Patios, Walkways, and the Rest of the Yard
Once the court is graded and surfaced, the next step is to finish the space around it. Paths, seating, and planting do more than make the yard look put together. They also help with drainage, cut down on mess, and make the court easier to use every day.
Add Clear Access Paths and Nearby Seating Areas
A 4–6 ft paver or flagstone walkway from the house to the court gives enough room for two people to walk side by side while carrying gear. In Maryland, that path should sit on 4–6 in of compacted gravel so it can handle freeze-thaw cycles. It also needs to slope away from the house by at least 2% to push water away from the foundation.[30][31]
Right at the court entry, add a small entry pad made of pavers, about 6–8 ft deep. It gives players a spot to wipe off shoes before stepping onto the surface, which helps keep mulch and soil off the court.
For seating, a 10–14 ft deep paver terrace along one long side of the court gives spectators space to sit without getting in the players’ way. Built-in seat walls, 18–22 in high and 12–16 in deep, work well here. They add permanent seating, mark the court edge, and help stop mulch and soil from washing onto the surface.[1][32] Keep loose gravel away from the court edge, since it can roll onto the playing area and become a hassle fast.
Use Retaining Walls, Planting, and Runoff Features on Sloped Sites
If the yard rises or falls around the court, the hardscape needs to deal with that slope in a clean, direct way.
On Maryland’s rolling lots, grade changes of more than 12–18 in usually call for a retaining wall or a terraced edge. For moderate slopes, low garden walls or terraced planting beds may be enough. When the cut-and-fill difference goes past 2–3 ft, a structural retaining wall with gravel backfill and a perforated drain pipe is often the safer move. That setup helps limit soil movement and protects the court edge. Walls taller than 3–4 ft often need engineering and a permit in many Maryland jurisdictions, so it’s smart to check local rules before building.[33]
Planting matters too. Trees with shallow, aggressive roots, such as silver maple, should stay at least 15–20+ ft away from the slab. Around the court perimeter, heat- and drought-tolerant shrubs, ornamental grasses, and compact groundcovers suited to USDA zones 6–7 tend to hold up well against reflected heat and the occasional stray ball. Drip irrigation is the better pick here because it waters the plants without soaking nearby soil.
Plan the Court as Part of a Full Backyard Layout
The court should feel tied into the rest of the yard, not dropped into it as a separate piece. One easy way to do that is with repeated materials. If you use a certain paver or stone border on the court access path, carry that same material over to the main patio and fire pit area.
A small 10×10 ft transition pad between the court and a fire pit or outdoor kitchen zone helps connect those spaces and keeps people from wearing dirt paths through the lawn. Lining up the court edge with a patio edge or seat wall also helps keep sightlines neat, so the whole yard feels planned instead of patched together.
In most cases, the best layout is the simplest one that fits the lot. That might mean a direct path, a seating terrace, or a court that blends into a larger hangout area. The main thing is to plan the court, patio, and walkways together so the total hardscape stays within local limits.
Conclusion: Build for Drainage, Durability, and Daily Use
Start with the site. Measure the usable space, the slope, and the access points before you choose a court size. Check zoning, setbacks, and impervious coverage limits before design work starts. If the site works, then the next job is the foundation under the court.
Drainage and base prep have a big effect on how long the court holds up. Get the slope, subbase, and runoff paths right before you pick the surface. If the base is done well, the rest of the court has a much better shot at holding up over time.
Then come the features that make the space easy to use every day. Fencing, lighting, paths, and seating can turn a court from a plain slab into something that fits how people actually live. On sloped or tricky lots, that finish work often depends on grading and hardscape design.
For sloped lots, drainage work, or hardscape tie-ins, Pro Landscapes MD handles grading, drainage, and court-adjacent hardscaping across central Maryland. When those parts work together, the court tends to perform better and last longer.
The best Maryland backyard courts drain cleanly, hold up through the seasons, and fit the yard. Plan from the ground up, follow local rules, and build for daily use along with long-term durability.
FAQs
Do I need a permit for a backyard court in Maryland?
It depends on where the property is, how big the job is, and what local zoning rules apply. In many cases, you’ll need a grading permit if the work disturbs more than 5,000 square feet or involves more than 100 cubic yards of fill.
You may also need permits if the project is in a sensitive area, such as the Chesapeake Bay Critical Area or a historic district. Before work starts, confirm setback rules, check any HOA restrictions, and contact Miss Utility to mark underground lines.
Which court surface holds up best in Maryland weather?
In Maryland weather, the backyard court surface that tends to last the longest is a properly built sand surface set over a compacted gravel base.
The big reason is drainage. When the court is graded the right way – usually with about a 1% to 2% slope – water can move off the surface instead of sitting there and causing pooling or washout.
Pro Landscapes MD also points to drainage work as a big part of the job. That can include French drains and a slightly elevated, graded install to help the court stay stable through the seasons.
How do I know if my yard drains well enough for a court?
Check your yard after a heavy rain. Standing water, soft or muddy spots, and visible erosion usually point to poor drainage.
In many Maryland yards, clay-heavy soil drains slowly. A formal soil test can help confirm what’s going on. If pooling or moisture issues keep coming back, you may need regrading or drainage fixes like French drains, berms, or swales.
Chat with Us