









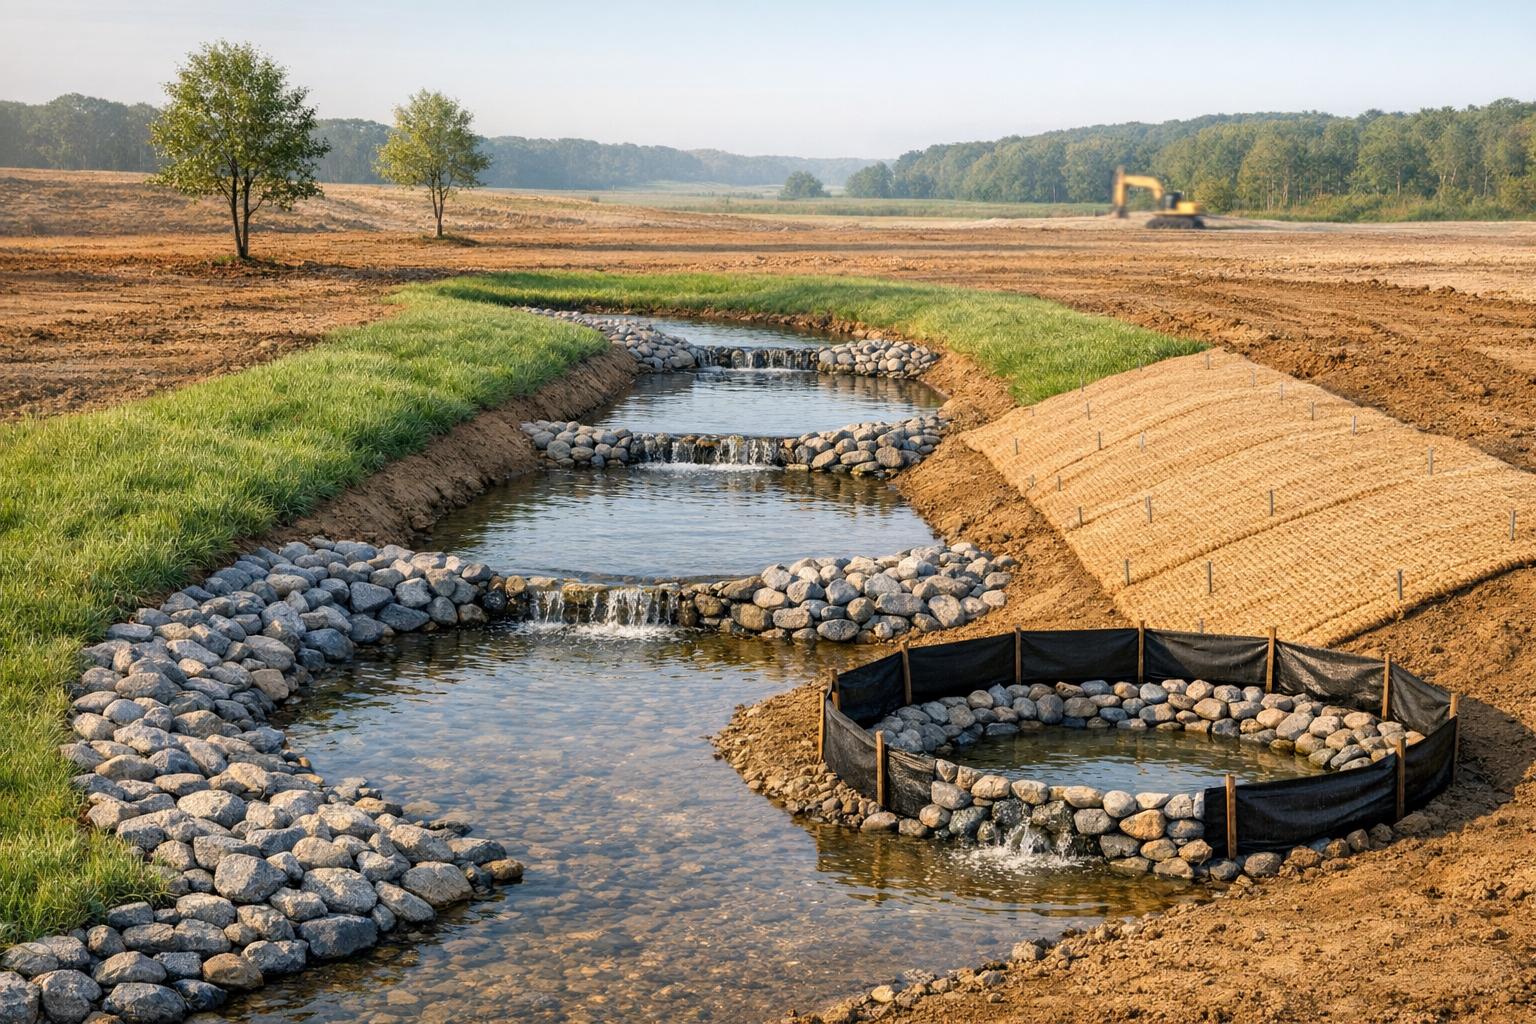
- bhavya gada
- No Comments
When managing stormwater runoff on construction sites, temporary diversion channels play a key role in preventing soil erosion. These channels redirect water flow safely around disturbed areas until permanent systems are in place. In Maryland, where heavy summer storms and clay-heavy soils increase erosion risks, following proper design and maintenance practices is essential. Here’s a quick breakdown of the best erosion control methods:
- Vegetated Channels: Cost-effective and blend well into landscaping, but require time for grass to establish.
- Rock-Lined Channels: Handle high-velocity flow on steep slopes but are more expensive upfront.
- Check Dams: Slow water flow and trap sediment; ideal for supporting other methods.
- Geotextile Linings: Provide immediate soil protection and work well with vegetation.
- Sediment Traps/Basins: Capture sediment at channel outlets to protect downstream areas.
- Final Stabilization: Transition temporary channels into permanent features like swales or rain gardens.
Each method has specific applications based on factors like slope, soil type, and flow velocity. Combining multiple practices often delivers the best results. Proper maintenance, including inspections after storms, ensures long-term effectiveness and compliance with regulations. For Maryland projects, local contractors like Pro Landscapes MD can help integrate these solutions into broader drainage plans.
Small River and Creek Diversion Strategy #ieca #erosion control
sbb-itb-843f8be
Key Design and Siting Principles for Temporary Diversion Channels
Temporary diversion channels are essential for managing runoff during construction. To work effectively, they need to be properly sized, positioned, and stabilized to minimize erosion risks.
Start with a site assessment. Begin by identifying the drainage area feeding into the channel, mapping flow paths, and evaluating the soil type. For example, in Maryland’s central counties like Howard, Montgomery, and Frederick, dense clay subsoils are common. These soils tend to repel water rather than absorb it, making them prone to erosion even on moderate slopes. A geotechnical review or on-site soil test can help determine if stabilization measures, such as turf reinforcement, riprap, or bare-soil stabilization, are necessary from the outset. These assessments guide decisions on the channel’s slope, depth, and flow velocity to ensure it performs as intended.
Key design parameters include slope, depth, and flow velocity. For vegetated or lightly reinforced channels, longitudinal slopes of 1–3% are ideal for keeping flow velocities within the non-erosive range of about 2–3 feet per second. Steeper slopes may require additional measures, like check dams or stepped profiles, to reduce flow energy. Channel depth should accommodate a 2-year design storm – or a 10-year storm if specified by local regulations – with an added freeboard of 0.5–1.0 feet to handle debris and sediment. Side slopes should be kept at a two-horizontal-to-one-vertical ratio or flatter, which improves bank stability and makes it easier to install erosion control measures like blankets or seeding.
The channel’s outlet should always direct flow to a sediment trap or basin rather than bare soil or natural streams during active construction. Use features like stabilized rock aprons or level spreaders at the inlet to reduce flow velocity and prevent scouring. Smooth grade transitions are crucial to avoid resuspending sediment. Additionally, ensure maintenance access is planned to address sediment buildup and maintain functionality. Properly integrating these routing strategies with overall project management is especially important for residential developments.
For residential projects in Maryland, these design considerations must align with broader grading and drainage strategies to protect nearby properties and public storm drains. Pro Landscapes MD emphasizes that "Drainage problems are complex and require a custom approach for each project." [1] This coordinated approach ensures that temporary diversion channels remain effective throughout all phases of construction.
1. Vegetated and Turf-Reinforced Diversion Channels
Vegetated diversion channels are shallow, graded pathways lined with grass, designed to slow and safely direct runoff on mild slopes ranging from 1–3%. These channels can handle flow velocities of 4–6 ft/s, making them an effective solution for managing water on gentle terrains.
For steeper slopes or areas with larger drainage needs, turf reinforcement mats (TRMs) are the go-to option. These mats are seeded to encourage root growth, significantly increasing erosion resistance. TRMs can manage flow velocities of 8–20 ft/s and shear stresses of 6–14 lb/ft², compared to the 2–4 lb/ft² capacity of unreinforced grass. Federal Highway Administration (FHWA) research highlights that vegetated TRM systems can offer 2–10 times the erosion resistance of unreinforced grass in high-flow conditions.
One of the great things about these channels is their practicality in residential settings. With gentle side slopes of 3H:1V or flatter, they’re easy to maintain – simple to mow, walk across, and integrate into landscaping. When dry, they resemble a shallow lawn swale, blending seamlessly into the yard. In areas with tough clay soils, these channels are especially effective at managing runoff from driveways, rooftops, or patios, directing water toward features like rain gardens or dry riverbeds without disrupting the property’s aesthetics. Pro Landscapes MD often incorporates these graded swales and turf-reinforced drainage paths into their residential design projects, combining functionality with erosion control. [2]
From a cost perspective, vegetated channels are a budget-friendly option. They typically cost 30–60% less than riprap-lined channels, while TRMs are 10–40% cheaper than fully rock-lined systems for extended sections. A smart approach is to use vegetation for most of the channel and reserve rock or concrete for high-stress points like inlets, outlets, or sharp bends, where vegetation alone might not hold up.
Maintenance is simple but essential. During the first growing season, inspect the channel monthly and after storms with over 0.5 inches of rain. Mow the grass to a height of 3–4 inches – a bit taller than a typical lawn – to protect the soil and promote deep root growth. Address any bare spots, re-secure any loose mat edges, and remove debris that could obstruct water flow. Once the vegetation is fully established, seasonal checks and post-storm inspections are usually all that’s needed to ensure the channel continues to perform as intended.
These vegetated systems offer a great foundation for erosion control, paving the way for more robust methods like rock-lined channels to handle even higher energy runoff.
2. Rock-Lined and Riprap-Stabilized Diversion Channels
When water flow reaches speeds above 5 ft/s, rock-lined and riprap-stabilized channels become necessary. These channels use angular, interlocking stones to armor the bed and side slopes, reducing the energy of flowing water and protecting the soil underneath from erosion. According to Colorado DOT‘s erosion control guidelines, riprap channels are effective for flow velocities between 8–15 ft/s, depending on the size of the rocks and the slope. This approach ensures durability and informs the construction and maintenance practices outlined here.
A key design consideration is selecting the right stone size for the specific site conditions. For smaller residential flows with gentle slopes, 3–6 in. angular stones typically work well. However, steeper slopes or higher runoff volumes require larger stones, ranging from 6–12 in., laid over a compacted subgrade or a nonwoven geotextile. This prevents fine soil from seeping through the gaps. The stone layer should be at least 1.5–2 times the D50 (median stone size) in thickness, and side slopes should not exceed a 2H:1V ratio. To ensure stability, inlets, outlets, and bends should be reinforced with hand-placed stones for a secure, interlocking fit. Combining these rock-lined sections with vegetated or turf-reinforced areas creates an effective and balanced drainage solution.
Rock-lined channels can also double as visually appealing landscape features. In Maryland, for instance, they are often designed as dry creek beds – curving, stone-lined swales that handle stormwater during rain but serve as decorative landscape elements the rest of the time. Companies like Pro Landscapes MD frequently integrate these channels with grading, French drains, and retaining walls to provide drainage solutions that not only protect properties but also enhance their curb appeal. [1]
Maintenance is crucial to keep these channels functioning properly. Inspections should occur after storms with more than 0.5 in. of rainfall and at least monthly during active construction periods. During inspections, watch for displaced stones, exposed soil, undercutting at inlets or outlets, and sediment buildup that could alter the flow path. Promptly reset any loose stones, and manage vegetation along the banks to prevent woody plants from destabilizing the rock. However, retaining low groundcover plants can help anchor the channel edges.
In terms of cost, riprap channels typically range from $30–$70 per linear foot. For decorative swales, costs are around $15–$40 per square foot. To manage expenses, use riprap for high-risk areas like bends, steep drops, inlets, and outlets to avoid expensive regrading or structural damage. For other sections, vegetated or turf-reinforced channels can help keep costs under control while maintaining functionality.
3. Check Dams within Diversion Channels
A check dam is a small structure built across a diversion channel to slow down water flow, encourage sediment to settle, and protect the channel bed from erosion. By creating shallow pools, these dams help dissipate water energy before it moves downstream. According to stormwater manuals, properly spaced rock check dams can reduce peak flow velocities in small channels by 30–60% [3]. This makes their design an important consideration for effective water management.
Key design elements include proper spacing and height. Check dams are typically arranged so that the crest of one dam aligns with the toe of the next, forming a staggered series of pools. Guidelines suggest keeping dam heights between 1 and 3 feet to prevent excessive ponding or structural issues. Additionally, the center of the dam should be 6 to 12 inches lower than the sides to act as a spillway. To prevent undercutting, each dam should be embedded at least 6 inches into the channel bed and banks.
In residential areas, where functionality and aesthetics often intersect, check dams offer a practical and visually appealing solution. Using natural materials like rock, boulders, or decorative cobble can help these structures blend into landscaped swales or dry creek beds. They are particularly effective on sloped properties, where runoff from features like patios, driveways, or retaining walls needs to be slowed before it reaches neighboring properties or newly planted areas. Pro Landscapes MD often incorporates check dams into comprehensive drainage systems.
Check dams also work well alongside vegetated and rock-lined channels, forming an essential part of erosion control strategies. Maintenance is relatively simple: these structures should be inspected weekly and within 24 hours of any significant storm. Sediment buildup must be removed once it reaches about half the dam’s height to maintain storage capacity and prevent bypass flow. Contractors should also check for displaced materials or erosion along the banks and base and address any issues promptly.
Cost-wise, check dams are an affordable option. Rock check dams typically cost $10–$30 per linear foot, while fiber rolls range from $25–$40 for 25–50 feet, excluding labor. Using locally sourced rock can reduce material costs, and their installation generally requires only a small crew and light equipment. By preventing channel erosion and sediment buildup, check dams help avoid expensive regrading and hardscape repairs down the line.
4. Geotextile Linings and Rolled Erosion Control Products
Geotextile linings and rolled erosion control products (RECPs) play a vital role in protecting bare soil within diversion channels. These protective blankets reduce water flow velocity, shield the soil, and provide time for newly planted vegetation to establish. Unlike bulkier solutions like rock linings or check dams, these products are discreet and blend well into residential settings where both performance and aesthetics are important. Proper installation is key to getting the most out of these materials.
RECPs are generally divided into two categories: biodegradable blankets and turf reinforcement mats (TRMs). Biodegradable blankets are made from natural fibers like straw, coconut (coir), jute, or blends of these, while TRMs are constructed from synthetic or composite materials. Choosing the right type depends on factors like the slope of the channel, expected water flow, and how long the product will be needed. According to guidance from the Federal Highway Administration (FHWA), straw blankets can handle shear stresses of about 1–2 lb/ft², coconut fiber blankets manage 2–2.5 lb/ft², and TRMs can withstand 4–8 lb/ft² or more [2]. For most residential settings with moderate slopes and lower water velocities, a biodegradable straw or straw/coconut blanket usually works well. However, steeper or faster-flowing channels may require the added durability of a TRM, sometimes combined with a temporary biodegradable blanket for initial protection.
Installation Tips
To ensure these materials perform effectively:
- Prepare the channel: Grade and seed the channel bed before placing the blankets.
- Lay the blankets properly: Roll them in the direction of water flow, overlapping upslope sections over downslope sections by 4–6 inches along the edges and 6–12 inches at the roll ends.
- Secure the blankets: Use anchor trenches at the top and bottom of the channel and pin the blankets with staples – about 2–3 staples per square yard, with closer spacing in bends and at the channel bottom.
Maintenance
Regular upkeep is essential to maintain their effectiveness. Inspect the blankets weekly and after storms, re-anchor any loose sections, and reseed exposed areas as needed. Once vegetation is established, keep mower blades high to avoid damaging the blankets or dislodging staples.
Costs
Costs vary depending on the type of blanket:
- Single-net straw blankets: $40–$70 per roll (approximately 100 square yards)
- Straw/coconut or all-coconut blankets: $70–$120 per roll
- Light-duty TRMs: $120–$250 per roll
These options are generally more affordable than concrete flumes or fully rock-lined channels when evaluated on a per-linear-foot basis.
For homeowners in central Maryland, Pro Landscapes MD offers a convenient solution by bundling grading, seeding, and erosion control blanket installation with other drainage and stormwater management services. This integrated approach ensures that temporary diversion channels transition seamlessly into permanent features like lawns, gardens, or dry creek beds once construction wraps up. This sets the stage for addressing the next key step: managing sediment at the channel outlets.
5. Sediment Traps and Basins at Diversion Channel Outlets
After a diversion channel redirects runoff from disturbed soil, the water often carries suspended sediments. If these aren’t captured, they can clog storm drains, spread into nearby yards, or contaminate streams. Sediment traps and basins act as a critical final step, slowing the water flow enough for particles to settle before leaving the site. This step works hand-in-hand with upstream erosion controls, ensuring sediment is effectively captured.
A sediment trap is a small, shallow impoundment – typically 2–5 feet deep – created using an earth or rock berm. These are ideal for smaller drainage areas (up to about 5 acres) and are relatively simple to construct. On the other hand, a sediment basin is a larger, engineered structure designed for bigger drainage areas. It includes features like a defined outlet structure (e.g., a perforated riser or skimmer) and an emergency spillway. Both traps and basins work by expanding the flow area, reducing water velocity, and allowing sediment to settle. When properly sized, they can remove 70–80% of suspended solids [2]. Together with other measures like vegetated channels and check dams, these systems form an effective erosion control plan.
At the outlet of a diversion channel, high flow energy can lead to scouring. To prevent this, features like riprap aprons, stilling pools, or rock pads are often added to absorb and dissipate the energy before it damages the basin floor or embankment. Additionally, the outlet must release water slowly – over 24–48 hours – to maximize sediment settling without causing prolonged pooling. For sediment traps, Maryland and other Mid-Atlantic states recommend a baseline of at least 1,800 cubic feet of storage per acre of disturbed drainage area [2].
Maintenance is key. After any rainfall exceeding 0.5 inches, inspect the traps and basins. Remove accumulated sediment once it reaches 50% of the designated storage depth. Neglecting maintenance can reduce efficiency and even lead to sediment being released during heavy storms. Regular upkeep ensures these structures perform effectively, supporting the success of diversion channels and aligning with stabilization and restoration efforts.
For residential lots in central Maryland, sediment traps are often a practical choice. These are usually small excavated depressions placed near the downslope property boundary, paired with a diversion channel along the upper edge of graded soil. Local contractors like Pro Landscapes MD incorporate these temporary measures into broader grading and drainage projects. In some cases, the temporary trap can later be repurposed into a permanent feature, such as a rain garden, dry pond, or decorative dry riverbed, providing ongoing benefits well beyond the construction phase.
6. Safe Removal and Final Stabilization of Diversion Channels
The last step in managing temporary diversion channels focuses on their safe removal and ensuring the area remains stable once permanent systems are operational. Timing is everything here – temporary channels should only be removed after the permanent drainage system is fully functional and downstream areas are secure. This careful approach helps minimize erosion risks during the critical period before vegetation fully establishes itself.
The removal process should follow a logical sequence. Begin by redirecting runoff into the permanent drainage system. Once this is in place, dismantle temporary structures – such as check dams, silt fences, and berms – preferably during dry weather and low-flow conditions. Work systematically from downstream to upstream. After clearing the channel, regrade the site to eliminate any low spots. Stabilize the area by adding 2–4 inches of topsoil, seeding with a mix of fast-growing cover crops and permanent turf, and covering slopes with erosion control blankets or 2–3 inches of shredded hardwood mulch. For steeper sections or areas prone to higher flow, consider using turf reinforcement mats or a riprap apron to provide extra protection while vegetation takes root [2].
The period immediately following removal – typically 3 to 12 weeks, depending on the season and climate – is critical. Inspect the area after any rainfall of about 0.5 inches or more. Quickly repair any erosion rills, re-anchor loose blankets, and replace washed-away mulch. Avoid driving heavy equipment over the site while the soil is wet to prevent compaction and rutting. Hold off on mowing until the new grass reaches a height of 3–4 inches [2].
In terms of expenses, basic seeding and mulching costs around $0.10–$0.25 per square foot for small residential projects, while sod ranges from $0.30–$0.80 per square foot, including soil preparation and labor. Erosion control blankets add an additional $0.15–$0.50 per square foot but can reduce soil loss by 70–95% during the establishment phase compared to bare or simply mulched areas [2]. To save on costs, plan the temporary diversion to closely match the footprint and grade of the permanent swale or landscape feature. This strategy reduces the amount of regrading needed when removing the temporary channel [2].
Rather than letting the former channel area go to waste, it can be transformed into a functional and attractive landscape feature. Options like grassed swales, planted bioswales, and decorative dry creek beds not only manage stormwater but also enhance the yard’s appearance. For example, in central Maryland, companies like Pro Landscapes MD specialize in these transitions. They handle everything from rerouting flows and regrading to installing permanent drainage features and restoring lawns, ensuring the former channel becomes a stable and visually appealing part of the property. Their expertise is particularly valuable when permanent elements like retaining walls or planting beds are part of the design [2].
Once vegetation is firmly established, maintaining the area becomes straightforward. Mow turf swales to a height of 3–4 inches – avoiding scalping – to protect root systems and maintain proper water infiltration. After heavy storms, clear debris and sediment from outlets and inspect for any rills, pooling, or settlement that could indicate grading issues. Addressing these problems early prevents them from escalating into larger, more expensive repairs later on.
Comparison Table
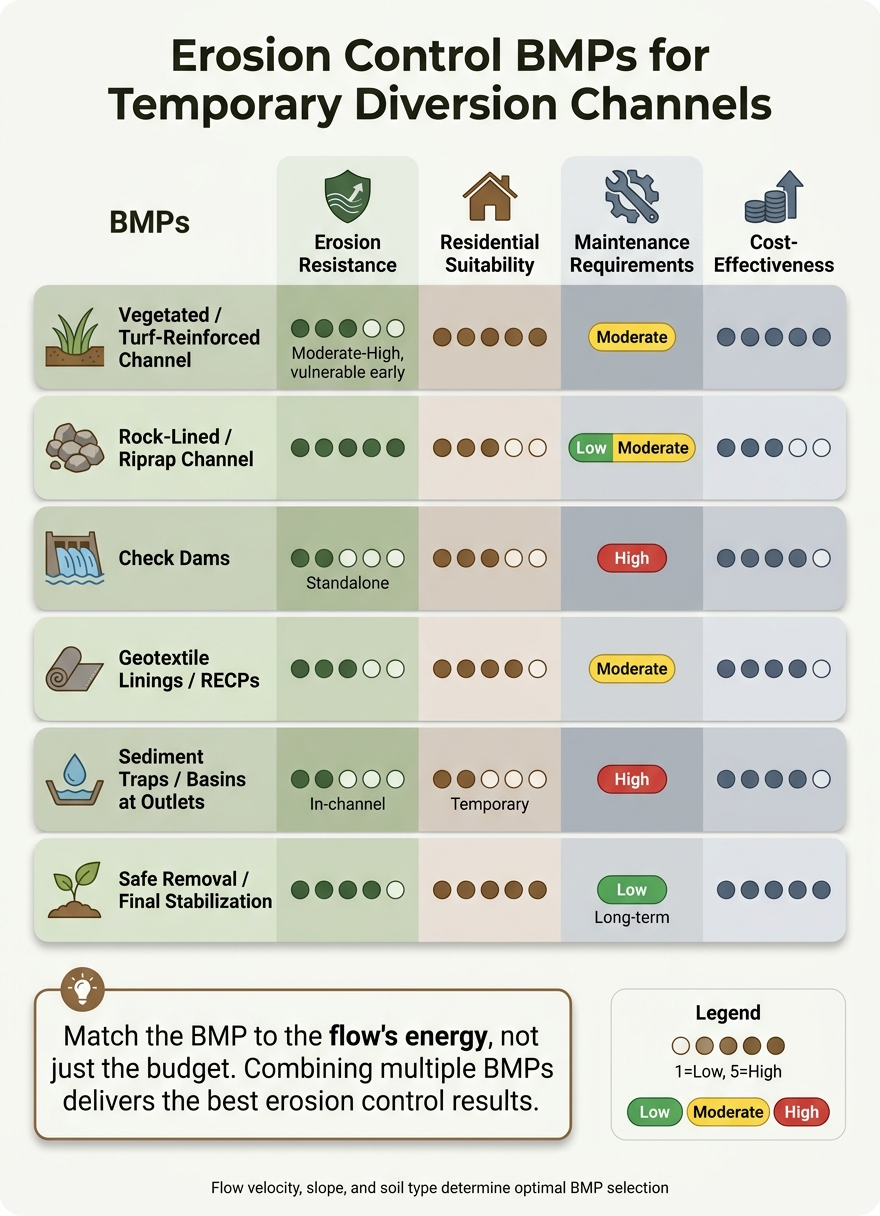
Erosion Control BMPs for Temporary Diversion Channels: Quick Comparison Guide
The table below breaks down the performance and tradeoffs for each BMP (Best Management Practice) discussed earlier. While none of these options is perfect across the board, each excels in specific areas and has its own drawbacks. This summary focuses on how these BMPs perform in key categories for typical U.S. residential or small commercial construction projects.
| BMP | Erosion Resistance | Residential Landscaping Suitability | Maintenance Requirements | Cost-Effectiveness |
|---|---|---|---|---|
| Vegetated / Turf-Reinforced Channel | Moderate–High (once established; vulnerable early on) | Blends into lawns, easy to mow, converts to permanent swales | Moderate – reseeding, post-storm inspections, occasional rill repairs | High when slopes are gentle and flows are modest |
| Rock-Lined / Riprap Channel | High–Very High – handles steep grades and high-velocity flow | Fair–Good – natural stone looks fine in beds; large angular riprap less appealing in front yards | Low–Moderate – spot repairs after major storms; check for displaced stones | Moderate – higher upfront material cost, but durable and rarely fails |
| Check Dams | Low–Moderate (as a standalone); better as a supplement that slows flow and traps sediment between structures | Moderate – small rock or log dams can look natural; larger industrial versions are clearly temporary | High – clear sediment when it reaches half the dam’s height; inspect after every storm | High for targeted, low-cost flow control; not sufficient alone on steep or high-energy channels |
| Geotextile Linings / RECPs | Moderate–High – immediate surface protection; performance depends on product type and flow loading | Moderate short-term (fabric is visible); High long-term once vegetation covers biodegradable mats | Moderate – re-anchor loose sections, repair tears, check overlaps after storms | High where moderate protection is needed without heavy rock work |
| Sediment Traps / Basins at Outlets | Low for in-channel erosion; High for sediment capture at the discharge point | Low as a temporary pit; Moderate if repurposed into a rain garden or detention basin post-construction | High – dredge sediment regularly, maintain outlet structures, inspect embankments after storms | High as outlet protection; complements upstream channel stabilization |
| Safe Removal / Final Stabilization | Depends on final treatment – fully vegetated swales: Moderate–High | High when restored with smooth grading, turf, and planting beds | Low once stabilization is complete; short-term monitoring needed in the first growing season | High – prevents long-term rework and protects the finished landscape investment |
Key Observations
- Vegetated channels and geotextile linings are the most suitable for residential areas, as they blend seamlessly into the landscape once established.
- Rock-lined channels are unmatched in durability but may require extra attention to appearance in visible locations like front yards.
- Check dams and sediment basins work best as supporting elements, enhancing the performance of upstream channels rather than serving as standalone solutions.
The bottom line? Match the BMP to the flow’s energy, not just the budget. For example, a low-cost vegetated channel won’t hold up on steep, high-velocity slopes, while fully lining a gentle residential swale with riprap would be overkill. When temporary channels transition into permanent features – like grassed swales or bioswales – the final stabilization phase offers the greatest long-term value, ensuring the landscape remains functional and visually appealing.
Conclusion
There isn’t a one-size-fits-all solution when it comes to Best Management Practices (BMPs) for temporary diversion channels. The right choice depends on factors like slope, soil type, flow velocity, and the duration of channel use. For instance, a low-slope residential swale handling light runoff requires a completely different strategy than a steep, high-energy channel managing drainage from a large construction site. The key to success lies in tailoring the BMP to the site’s specific conditions – not just the budget. This approach can mean the difference between a channel that withstands a storm and one that fails, leading to compliance issues.
Using a combination of BMPs often delivers the best results. For example, a vegetated or geotextile-lined channel reinforced with riprap at bends, combined with check dams along the length and a sediment trap at the outlet, creates a system with built-in redundancy. If one element becomes stressed, the others can pick up the slack. The U.S. EPA has noted that construction sites without proper erosion controls can experience erosion rates 10 to 20 times higher than pre-construction levels [2].
While layered systems enhance performance, regulatory compliance is equally critical. Adhering to state stormwater manuals, local MS4 permits, and NPDES Construction General Permit standards is non-negotiable. These regulations dictate specific requirements for diversion channel design, inspection schedules, and final stabilization. Inspectors will expect thorough documentation – photos, maintenance logs, and inspection reports – to verify that your Stormwater Pollution Prevention Plan (SWPPP) was properly implemented from start to finish.
This underscores the importance of involving experienced professionals.
"Drainage problems are complex and require a custom approach for each project. These issues can cause long-term damage to your property if not handled correctly, which is why hiring an experienced team is critical." – Pro Landscapes MD [1]
For projects in central Maryland and the Washington, DC area, partnering with a firm skilled in grading, drainage installation, stormwater management, and landscape restoration – such as Pro Landscapes MD – can ensure that temporary diversion channels are designed and maintained correctly. They can also help transition these temporary measures into permanent drainage solutions once construction is complete, turning short-term erosion control into long-term site stability.
FAQs
How do I choose the right BMP for my channel?
Selecting the right Best Management Practice (BMP) for drainage starts with understanding the specific needs of your property. At Pro Landscapes MD, factors like property layout, soil type, and water flow patterns are carefully evaluated. Depending on these details, solutions might include French drains to handle surface water, berms and swales to slow down runoff, or box and pipe systems for managing high-volume drainage. For more complex drainage challenges, a professional assessment is key to ensuring the solution works effectively over the long term.
When should I use riprap instead of grass?
Riprap is ideal for areas where water flow is too powerful or erosion risks are too severe for grass to handle effectively. While grass can often slow down and filter runoff, it may not withstand the intense water pressure that some channels experience. Riprap provides a sturdy and reliable solution in such cases. At Pro Landscapes MD, we assess your property to determine the best erosion control strategies, ensuring your landscape remains intact over time.
What inspections are required after storms?
Stormwater management systems, such as modular filtration units, need regular inspections and cleaning after storms to ensure they continue functioning properly and remain structurally sound. Pro Landscapes MD specializes in professional drainage and stormwater management solutions. Their services include installing berms, swales, and various drain systems, helping property owners in central Maryland and Washington, DC handle runoff efficiently and minimize erosion risks.
Chat with Us