


- bhavya gada
- No Comments
Erosion control fencing is a simple yet effective way to protect soil from washing away during construction or landscaping projects. In Maryland, where heavy rain and clay-heavy soils are common, proper fencing can prevent significant soil loss and protect nearby waterways like the Chesapeake Bay.
Key Points:
- Purpose: Prevent soil erosion, manage water flow, and minimize sediment runoff.
- How It Works: A geotextile fabric barrier slows water and traps sediment, especially useful during soil-disturbing activities.
- Types:
- Standard Silt Fence: Best for small projects and mild slopes.
- Reinforced Silt Fence: Ideal for steeper slopes or larger drainage areas.
- Compost Filter Sock: Great for sensitive areas like tree roots or uneven surfaces.
- Installation: Place fencing along slope contours, bury the fabric edge in a trench, and secure posts 6–8 feet apart.
- Maintenance: Inspect weekly, clear sediment buildup, and repair damage promptly.
- Regulations: Maryland requires permits for projects disturbing 5,000+ sq. ft., with strict guidelines for installation and materials.
Quick Tips:
- Plan Placement: Walk your property after rain to identify water flow patterns.
- Avoid Common Mistakes: Always dig a trench, avoid placing fences in active water channels, and ensure proper post spacing.
- Seasonal Care: Adjust maintenance for Maryland’s weather, from spring thaw to summer storms.
By following these steps, you can protect your property, comply with local regulations, and reduce sediment runoff into nearby waterways.
How to Install a Super Silt Fence Step
sbb-itb-843f8be
Erosion Control Fencing Basics
Types of Erosion Control Fencing: Which One Is Right for You?
Understanding how erosion control fencing works is essential when it comes to protecting soil from being washed away.
What Is Erosion Control Fencing?
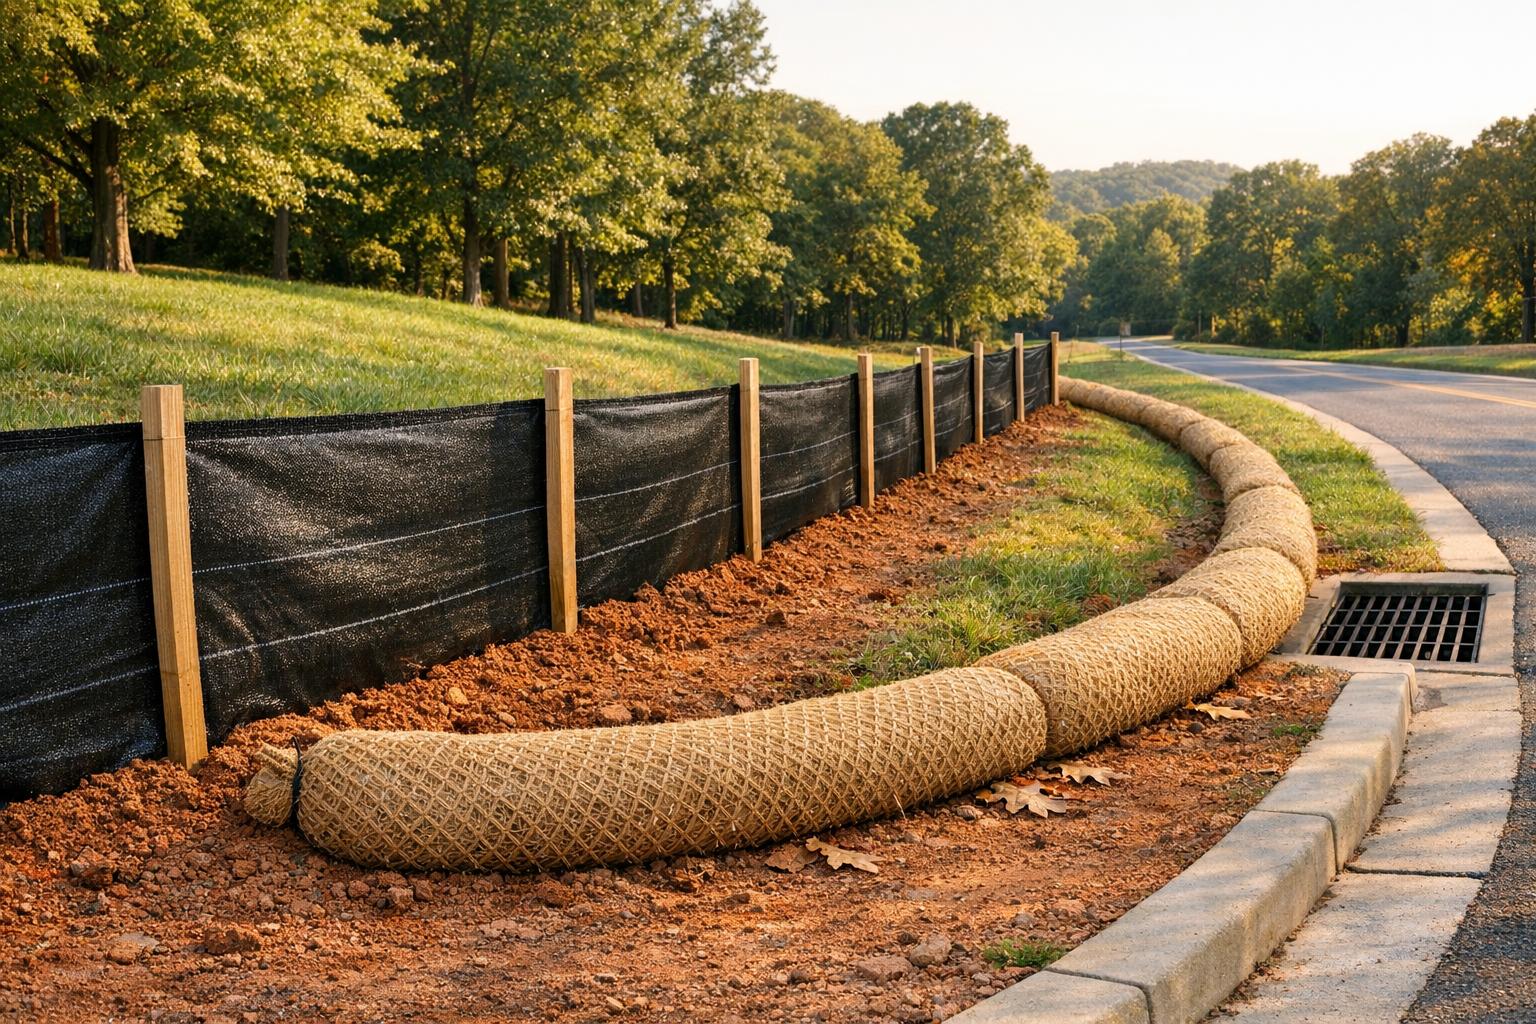
When rain falls, it can carry sediment with it. On a typical residential property in Maryland, this can mean losing valuable topsoil, creating muddy driveways and sidewalks, and leaving the land prone to further damage. Erosion control fencing acts as a temporary barrier to slow water runoff and hold soil in place. It’s mostly used during activities like grading, landscaping, or construction when the ground is exposed.
The setup is straightforward: geotextile fabric, usually 24–36 inches tall, is secured to wooden stakes or steel T-posts placed 6–8 feet apart. The bottom edge of the fabric is buried in a 6-inch trench, which is then backfilled to prevent water from eroding the base. This trenching step is critical – without it, the fence won’t work as intended. As water flows toward the fence, it slows down, allowing sediment to settle before the water seeps through the fabric.
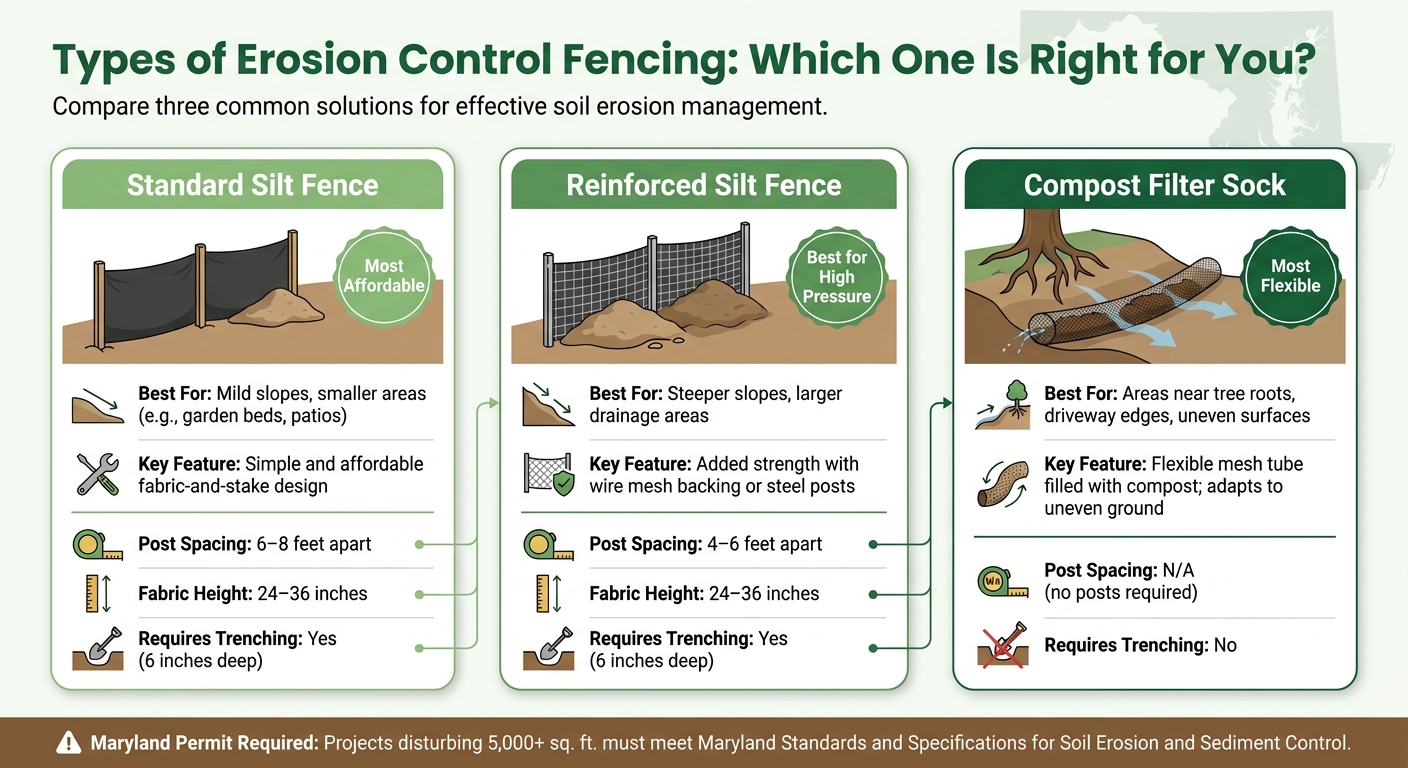
Common Types of Erosion Control Fencing
For residential projects, three main types of erosion control fencing are commonly used: standard silt fences, reinforced silt fences, and compost filter socks.
| Type | Best For | Key Feature |
|---|---|---|
| Standard silt fence | Mild slopes, smaller areas | Simple and affordable fabric-and-stake design |
| Reinforced silt fence | Steeper slopes, larger drainage areas | Added strength with wire mesh backing or steel posts |
| Compost filter sock | Areas near trees or inlets | Flexible mesh tube filled with compost; no trenching needed |
A standard silt fence is ideal for smaller projects, like setting up a garden bed or installing a patio. For steeper slopes or larger areas, a reinforced silt fence is better, as it includes wire mesh and stronger posts to withstand higher water pressure. Meanwhile, compost filter socks are great for protecting sensitive areas such as tree roots or driveway edges. These socks don’t require trenching and can adapt to uneven surfaces, making them a practical choice in spots where digging isn’t an option.
Each type of fencing is designed to handle specific challenges, so choosing the right one ensures the job gets done effectively.
Erosion Control Fencing in Maryland
Maryland’s soil conditions and unpredictable weather make erosion control fencing especially important. Many suburban areas, including Howard, Montgomery, and Frederick Counties, have clay-heavy subsoils with thin, more erosion-prone surface layers. Because clay doesn’t absorb water well, rainfall often leads to rapid runoff, which can quickly erode exposed soil.
The state’s weather patterns add to the challenge. Maryland frequently experiences intense thunderstorms, remnants of tropical storms, and nor’easters, all of which can dump large amounts of rain in a short time. Given these conditions, selecting the right materials is crucial. For steeper or more exposed sites, woven polypropylene fabric paired with steel posts offers better durability. On gentler slopes or smaller disturbed areas, wood stakes and standard geotextile fabric usually suffice. Matching the fencing to the specific site conditions is the key to protecting your property effectively.
Planning and Placing Your Erosion Control Fence
Getting your erosion control fence in the right spot starts with understanding how water moves across your property – not just where erosion is visible.
How to Assess Your Site
Start by walking your property during or right after a moderate rain. Watch for areas where water flows over bare soil, picks up speed, and cuts channels. These are your highest-risk spots. Keep an eye out for other signs of erosion too – mud accumulating on driveways or sidewalks, exposed tree roots, or patches of grass that won’t grow. These clues can tell you where soil is already on the move.
Once you’ve observed the water flow, sketch a basic site map. Include features like your house, driveway, walkways, slopes, and drainage points like downspouts or low spots. Mark the direction of water flow across different areas. Even a rough sketch can reveal patterns that aren’t obvious when the yard is dry.
Pay special attention to slope length and steepness. Longer and steeper slopes create faster water runoff, which carries more sediment and puts extra strain on your fence. In these cases, a single fence line might not be enough – you may need several shorter fences arranged in a terraced layout to slow the water and reduce its impact.
Where to Place Your Fence
Position your silt fence along the slope’s contour instead of running it straight up and down. A contour-aligned fence distributes water evenly along its length, allowing it to pool gently and filter through the fabric. A fence placed downhill, on the other hand, funnels water to a single spot, increasing the risk of failure.
Be sure to turn the ends of your fence upslope (a technique often called "J-hooks"). This prevents water from flowing around the edges and washing out the area. Avoid placing the fence directly in active swales or concentrated water channels – silt fences are designed for shallow, slow-moving water, not for handling fast currents. If your fence line crosses a swale, install it upslope and use short, overlapping segments instead of running it straight through the channel.
In Maryland’s suburban areas, common fence placements include the lower edge of newly graded lawns, around piles of topsoil, and above property lines where sediment might otherwise flow into a neighbor’s yard. If you have hardscaped features like patios, retaining walls, or stone steps, place the fence uphill of any disturbed areas to keep sediment from damaging those surfaces.
Maryland Regulations and Guidelines
Proper placement isn’t just about functionality – it’s also about following local rules. Maryland’s erosion and sediment control program, tied to Chesapeake Bay cleanup efforts, requires you to check if your project needs a permit before starting any significant grading or landscaping work. In many counties, disturbing 5,000 square feet or more triggers a permit requirement, though the threshold can be lower near streams, wetlands, or steep slopes.
If a permit is required, your fence installation must meet the Maryland Standards and Specifications for Soil Erosion and Sediment Control. These standards cover details like trench depth, post spacing, fabric height, and placement relative to slopes and drainage areas. Regulations can vary by county, so it’s a good idea to contact your local permitting office or Soil Conservation District early in the process.
For projects involving multiple elements – like erosion control fencing combined with grading, drainage work, or hardscaping – working with a contractor familiar with Maryland stormwater management can make a big difference. A professional, such as Pro Landscapes MD, can help ensure your fence meets both practical needs and local code requirements.
Materials and Tools You Will Need
Before you start installing your fence, make sure you’ve got everything you need. Having all your materials and tools ready beforehand will save you a lot of time and hassle.
Picking the Right Materials
The key material here is geotextile fabric. This fabric allows water to pass through while keeping sediment in place. When choosing, consider your site’s specific conditions. For example, if you’re dealing with steep or exposed slopes, go for a heavier-duty fabric that can handle those challenges. You’ll also need sturdy posts to hold the fabric in place. If you’re worried about water pooling, adding wire mesh backing is a smart move.
Tools You’ll Need for the Job
Once you’ve got your materials, make sure you have the right tools for a smooth installation. Here’s what you’ll need:
- Trenching spade: Perfect for digging a trench 6–8 inches deep to bury the bottom edge of the fabric.
- Post driver: Whether manual or mechanical, this tool helps set posts firmly, especially in clay-heavy soils.
- Zip ties or staple wire: These will fasten the fabric securely to the posts.
- Utility knife: Use this to trim the fabric neatly at corners or overlapping sections.
With the right materials and tools in hand, you’ll be well-prepared for a precise and efficient installation.
How to Install Erosion Control Fencing: Step by Step
Preparing the Site
Once you’ve assessed the area, it’s time to mark and clear the site. Make sure to mark your fence line so it follows the slope’s contour – not straight up or down the hill. A fence aligned across the slope acts like a small dam, slowing water and catching sediment. If it runs downhill, it will channel water faster and likely fail. Use marking flags or spray paint to outline the line, and ensure it’s roughly level by checking with a string line and a line level.
Next, clear a strip about 12–18 inches wide along the marked line. Trim low grass, remove rocks, and clear any debris to allow the fabric to sit flush against the soil. Then, dig a trench along the uphill side of the line. The trench should be at least 6 inches deep and wide. Keep the soil you remove on the upslope side – you’ll need it for backfilling later. Make sure the trench is free of roots or clumps that could prevent the fabric from sealing properly against the ground.
With the site cleared and the trench ready, you can move on to installing the fence.
Installing the Fence
When installing, remember to follow Maryland’s erosion control guidelines. Start by driving posts on the downhill side of the trench at intervals of 6 feet. For steeper slopes or areas with heavy runoff, reduce the spacing to 4 feet. Each post should be driven 18–24 inches into the ground, and in softer or wetter soil, you may need to go even deeper. Angle the posts slightly upslope to help them resist water pressure.
Unroll the fabric on the upslope side of the posts. Place the bottom 6–12 inches of the fabric into the trench, folding it toward the upslope in an "L" shape. This fold is crucial because it prevents water from seeping under the fence. Backfill the trench with the soil you set aside earlier, and compact it firmly using your foot or a hand tamper.
Secure the fabric to each post with 3–5 staples, nails with washers, or UV-resistant zip ties, spacing them evenly along the height of the post. Pull the fabric tight, but don’t overstretch it – the material needs some slack to handle the weight of water and sediment without tearing. When joining two sections of fabric, overlap them by 6–12 inches at a post, with the upstream piece on the inside. Never butt the edges together. At each end of the fence, turn the fabric upslope in a "J" shape to prevent runoff from bypassing the fence.
Once the fence is installed, check for potential issues that could reduce its effectiveness.
Common Installation Mistakes to Avoid
One of the most common mistakes is skipping the trench. If the fabric is simply stapled to the surface, heavy rain will undercut it, causing the fence to fail. Always dig and backfill the trench – it’s your first line of defense against blowouts. Another frequent issue is posts spaced too far apart. If posts are more than 8 feet apart, the fence can sag and collapse under pressure.
Two other errors are easy to miss. First, positioning the fence perpendicular to the slope instead of along the contour can turn the fence into a flow channel rather than a barrier. Second, placing the fence across a swale or concentrated flow path is a problem. Silt fencing is designed for sheet flow, not for areas where water is already channeled. For ditches or gullies, consider using check dams or other solutions instead. Proper placement and layout from the start can save you from costly repairs later.
Maintaining and Removing Erosion Control Fencing
Inspection and Maintenance Tips
Check your erosion control fence weekly, and always inspect it after heavy rainfall. Keep an eye out for sagging fabric, leaning posts, gaps at the bottom, or signs of undercutting and overtopping. If your property has steep slopes or is near streams, increase inspections to twice a week during periods of frequent storms.
Clear sediment buildup as soon as it reaches 33–50% of the fence’s height. For a standard 24-inch silt fence, this means removing sediment when it’s about 9–12 inches deep on the upslope side. Waiting too long can cause the fence to collapse or overflow. Spread the removed sediment evenly over stabilized ground – piling it near the fence can lead to further issues.
Make repairs as soon as you notice damage. For small fabric tears, patch them with an overlapping piece of fabric (18–24 inches) secured with heavy-duty zip ties or staples. Replace or re-drive leaning posts, and fill in any gaps between the fabric and soil immediately. Even minor gaps can allow sediment-filled water to escape during the next storm.
Adjust your maintenance schedule with the seasons to ensure the fence stays effective year-round.
Seasonal Maintenance for Maryland Properties
Maryland’s climate creates unique challenges for erosion control fencing.
- Spring: This season is tough on fences due to snowmelt and freeze-thaw cycles, which can shift posts and open gaps along the trench line. Once the ground thaws, re-drive any shifted posts, compact the soil at the base, and ensure the fabric remains securely anchored.
- Summer: Intense thunderstorms and tropical remnants can bring heavy rain in short bursts. Before a storm, tighten loose fabric and clear debris to prevent failure.
- Fall: Fallen leaves can block water flow, redirecting runoff around the fence. Clear leaf buildup regularly to maintain proper drainage.
- Winter: Snow can weigh down fences, pushing them over. Remove large snow drifts pressing against the fence, but avoid disturbing the soil at the base until the ground has thawed.
How to Remove and Dispose of Fencing
Once your site has stabilized with 70–80% vegetative cover, it’s time to consider removing the fence. Before removal, confirm the soil is stable – no visible signs of erosion like rills or gullies, and all drainage features should be functioning properly. On permitted construction sites in Maryland, wait for your local inspector to approve stabilization as part of the final erosion and sediment control sign-off.
Choose a dry day for removal to avoid disturbing soft soil. Spread any remaining sediment on stabilized ground. Roll up the fabric in sections without dragging it, and gently pull posts straight up to minimize soil disturbance. Fill in the trench and post holes with topsoil, tamp lightly, and immediately reseed or mulch any bare spots. Leaving exposed soil after fence removal can lead to erosion, undoing your hard work.
If you’re unsure whether your property is ready for fence removal, or if you’re dealing with complex grading or drainage issues, a professional like Pro Landscapes MD can help ensure your site is fully prepared to handle rainfall without the fence in place.
Conclusion: Key Steps for Effective Erosion Control
Setting up erosion control fencing that works starts with a solid plan and attention to detail. Begin by analyzing the site to understand how water flows. Place fencing along the contour lines at the downslope edge of disturbed areas, ensuring the fabric is trenched at least 6 inches into the ground. To stop water from flowing around the ends, make sure they are turned upslope. These steps create a solid foundation for managing erosion effectively.
Once installed, the fencing requires regular care. Check it after every heavy rain, fix any damage right away, and clear out sediment when it builds up to one-third or half the height of the fence. Without proper erosion controls, as much as 20–200 tons of soil per acre can be lost each year[1]. This highlights the importance of routine inspections – they’re one of the easiest and most affordable ways to protect your project.
Keep in mind that erosion control fencing is only a temporary solution. To ensure long-term protection, combine it with strategies like proper grading, managing drainage, and planting vegetation. Together, these measures strengthen each other and help safeguard your site even after the fencing is removed.
In Maryland, specific challenges like freeze-thaw cycles, heavy storms, and strict stormwater regulations for land-disturbing activities over 5,000 square feet make it essential to plan carefully. Consider your site’s slope, soil type, and local permit requirements when choosing materials and deciding on fence placement. These factors will help ensure your erosion control efforts are both effective and compliant.
FAQs
Do I need a permit for my project in Maryland?
Maryland has stringent rules when it comes to stormwater management and runoff, so permit requirements can vary based on the specifics of your project. Projects involving drainage, grading, or erosion control often come with complexities, making it a good idea to consult a professional. They can help determine whether you need formal approval. Pro Landscapes MD specializes in property assessments, ensuring that all drainage and erosion control solutions align with local environmental standards and regulations.
How do I choose between silt fence and compost socks?
Pro Landscapes MD offers expertise in various erosion control solutions, including berms, swales, French drains, and permeable paver systems. While the search results don’t directly compare silt fences and compost socks, choosing the right option depends on several factors. To determine the best materials for your property, it’s essential to consult a qualified professional who can assess your drainage requirements, soil conditions, and any applicable local regulations.
What should I do if water is going around or under the fence?
If water is seeping under or bypassing your erosion control fencing, it might be time to rethink your drainage and stormwater management approach. Pro Landscapes MD can evaluate your property and introduce solutions like berms, swales, or French drains to guide water flow more effectively. Proper grading and a well-thought-out drainage plan are crucial to protecting your foundation, minimizing soil erosion, and maintaining stability over time.
Chat with Us