









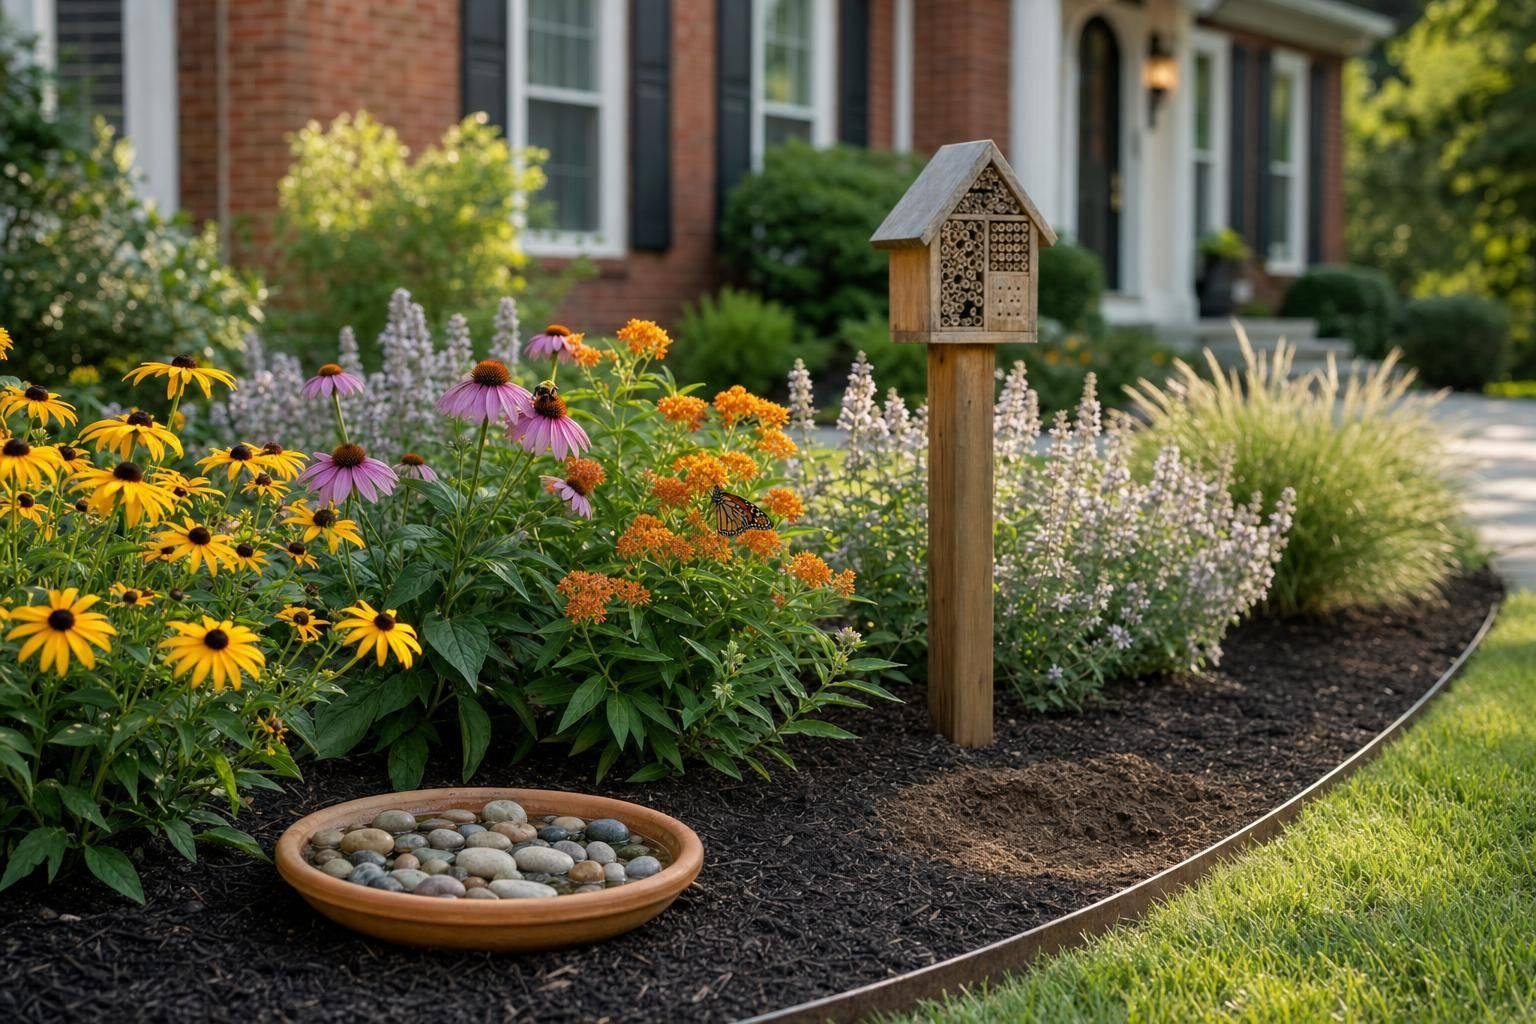
- bhavya gada
- No Comments
A Maryland pollinator garden works best when I plan for four things up front: sun, drainage, bloom timing, and habitat. If I get 4–6 hours of direct sun, fix spots that stay wet for more than 24–48 hours, plant at least three flower species in bloom from early spring through late fall, and leave space for nesting and water, the garden is set up to support bees and butterflies through more than one life stage.
Here’s the short version:
- I check sun, soil, and drainage before buying plants.
- I choose Maryland native plants with bloom spread from spring through fall.
- I include host plants such as milkweed, not just nectar flowers.
- I leave bare soil and standing stems for nesting bees.
- I add shallow water with stones so insects can land safely.
- I finish with edging, access space, and a visible sign so the bed looks planned.
A few numbers matter here. About 70% of native bees in North America nest in the ground. Maryland guidance also says I should aim for at least three flowering species in bloom across the growing season. That means flowers alone are not enough. The yard also needs places to nest, rest, and overwinter.
If I want a simple rule to follow, it’s this: match plants to the site first, then build the garden so something is blooming, nesting, or sheltering there from spring into fall.
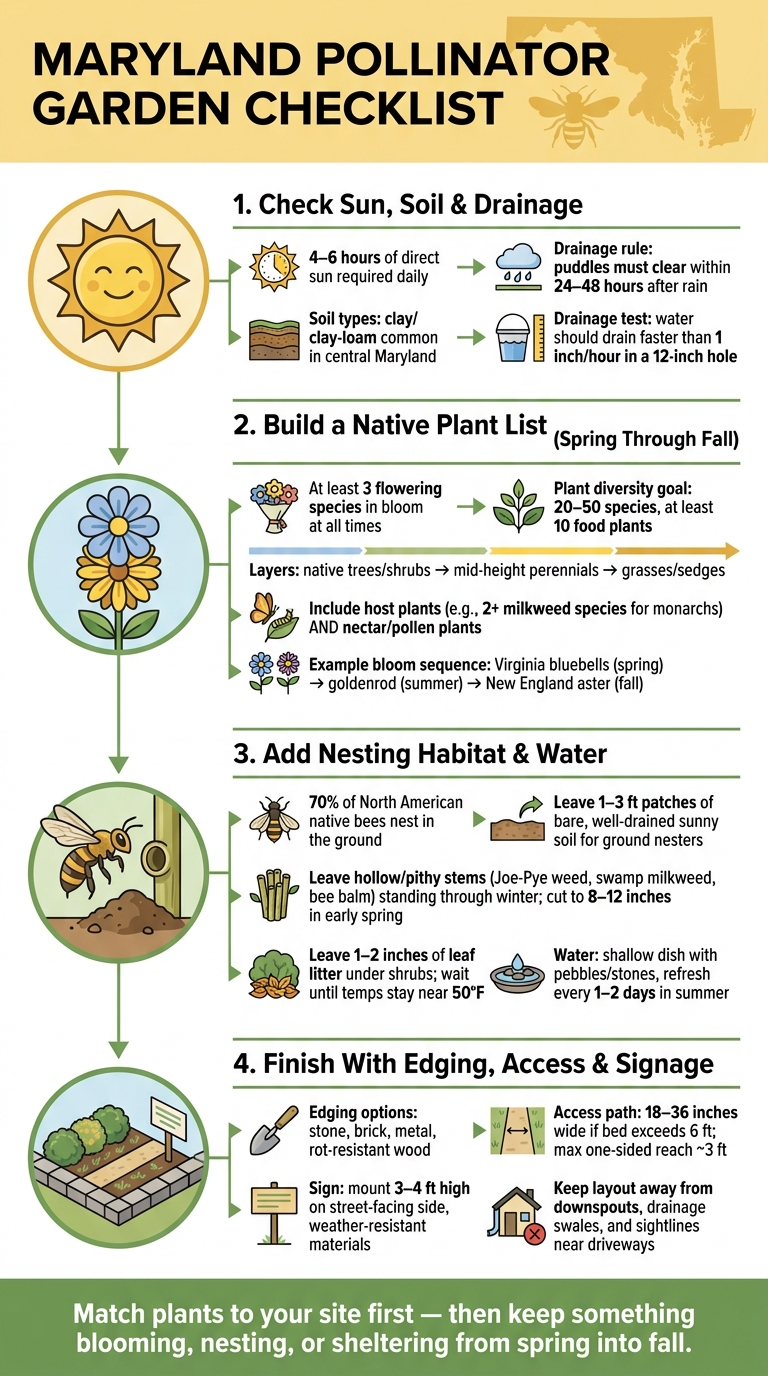
Maryland Pollinator Garden Checklist: 4 Steps to Success
Transforming a Maryland Landscape with AMAZING Native Plants!
sbb-itb-843f8be
1. Check Sun, Soil, and Drainage Before You Plant
Site conditions can make or break a pollinator garden. That’s why it pays to check the area before you spend money on plants.
Confirm at Least 4–6 Hours of Direct Sun Daily
Start by checking two or three possible planting spots on a clear day. Look at each one in mid-morning, midday, and late afternoon. Note when direct sun hits and when shade moves in. Maryland DNR defines full sun as 6 or more hours of direct sunlight per day, partial sun as about 3–6 hours, and shade as fewer than 3 hours.[4]
Then match your plant list to the sun you actually have. If the best area gets only partial sun, use plants that do well in partial sun. If it gets less than about 3 hours of direct sun, pick a different spot or use a shade-tolerant native mix. It also helps to check again in early spring and midsummer. A spot that looks sunny at one time of year can turn much shadier once trees leaf out.
Match Soil Type and Moisture to the Planting Area
In central Maryland, many yards have clay or clay-loam soil. That kind of soil compacts easily and often drains slowly. A simple feel test can give you a fast sense of what you’re working with. You can also use a jar test to separate sand, silt, and clay.
Soil type affects which plants will do well. The goal is simple: match plants to the soil that’s already there. Adding too much fertilizer or bringing in a lot of outside soil can lead to floppy growth and lower drought tolerance in native plants that are used to local conditions.[2]
Identify Drainage Problems, Runoff, and Low Spots
After it rains, walk the yard and look for signs of trouble. Puddles that stick around for more than 24–48 hours are a red flag. So are mossy or slick patches, mulch washed onto sidewalks, and little channels where water has cut through bare soil. In Maryland yards, downspouts that empty into beds and compacted clay near driveways are common problem areas.
For a more direct drainage test, dig a hole 12 inches deep and fill it with water. Let it drain, refill it the next day, and then watch how fast the water drops. If it drains slower than 1 inch per hour, that points to poor drainage caused by compaction, heavy clay, or a restrictive layer below the surface.[1][3]
Persistent soggy soil can lead to root rot, weak growth, and winter loss. If you spot drainage issues that keep coming back, low areas that hold water after storms, or slopes that wash out, fix those problems before planting.
Once the site drains the way it should, match your plants to the sun and moisture levels you measured. For grading, French drains, or stormwater fixes, Pro Landscapes MD serves central Maryland.
2. Build a Native Plant List With Bloom From Spring Through Fall
Once you’ve checked sun, soil, and drainage, it’s time to choose native plants that keep pollinators fed from early spring through late fall.
Use a Mix of Maryland Native Trees, Shrubs, Perennials, Grasses, and Sedges
Build the garden in layers. Maryland DNR recommends 20–50 plant species, with at least 10 food plants.[5] A layered planting usually works best: one or two small native trees or large shrubs, several mid-height shrubs and perennials, and a lower layer of shorter plants, grasses, and sedges.
For Maryland yards, good options include eastern redbud and serviceberry in the upper layer, arrowwood viburnum and highbush blueberry in the middle, and native sedges or little bluestem at the base. These lower-layer plants do more than fill space. Native grasses and sedges help hold soil in place, crowd out weeds, and give insects a place to shelter through winter.
Next, line those plants up with the bloom calendar.
Plan Overlapping Bloom From Early Spring to Late Fall
Aim to have at least three flowering species in bloom from early spring through late fall.[6] The goal is simple: no empty stretches in spring, summer, or fall.
An easy way to check is to list each plant and its bloom months, then scan for gaps. In early spring, Virginia bluebells, wild columbine, and redbud can bloom at the same time and feed emerging queen bumble bees. Later in the year, goldenrod, New England aster, and blue mistflower keep the garden going into fall. That late bloom window matters for migrating monarchs and native bees still active near the end of the season.
Include Host Plants Along With Nectar and Pollen Plants
Nectar plants feed adult pollinators. Host plants do a different job: they’re where insects lay eggs and where caterpillars grow. So if a garden has flowers but no host plants, it won’t support the full life cycle of many pollinators. Maryland guidance makes the point plainly: you need both on your checklist.
A solid starting point is to plant at least two milkweed species for monarchs, such as butterflyweed, common milkweed, or swamp milkweed, along with two more host plants that fit your site. White turtlehead is the primary larval host for Maryland’s state insect, the Baltimore checkerspot. Native violets support fritillary butterflies, and native grasses and sedges serve as larval hosts for skipper butterflies. In other words, host plants should be part of the plan from day one, not tucked in later as an afterthought.
3. Add Nesting Habitat and a Safe Water Source
Once you’ve covered bloom timing and host plants, there’s one more piece that keeps pollinators around: a place to live and a safe place to drink.
Flowers bring them in. Habitat helps them stay.
Leave Places for Ground and Stem Nesters
About 70% of North American native bee species nest in the ground[8][9]. That means a pollinator bed shouldn’t be packed edge to edge with mulch or dense plant cover. Leave a few small areas of bare or lightly planted, well-drained soil in a sunny spot.
Sweat bees, mining bees, and other native bees use small open patches, about 1–3 feet wide, with sandy or loamy soil. If bare dirt feels a little unfinished, that’s easy to fix. A stone border or low edging can make those patches look planned instead of forgotten.
Stem nesters need something different. Plants with hollow or pithy stems, such as Joe-Pye weed, swamp milkweed, and bee balm, give cavity-nesting bees places to nest. Leave those stems standing through winter. Then, in early spring, cut some back to about 8–12 inches[7] instead of cutting everything to the ground. You keep nesting space in place, and the bed still looks cared for.
Avoid Over-Tidying the Bed
A super-clean garden can be rough on pollinators. When beds are cleaned out too soon, winter shelter disappears. It can also remove insects that are still tucked inside stems or under leaf litter.
The fix is pretty simple:
- Wait to clean up until temperatures stay near 50°F
- Leave 1–2 inches of leaves under shrubs and perennials
- Keep mulch mostly at the front edge[12][14][15]
That way, pollinators still get cover, but the bed doesn’t look messy. Mowed lawn edges and clear paths go a long way here. They give the whole space a neat frame, which helps the garden read as maintained.
Provide Shallow Water With Landing Spots
Pollinators need water, but deep basins can turn into traps. A shallow dish or small birdbath works better, especially if you add pebbles or flat stones for landing spots.
Keep the water level just below the tops of the stones so insects can land, stand, and drink without slipping in.
Set the water source near flowers and somewhere with easy hose access. In summer, refresh it every 1–2 days[7][10][11] to help cut down on mosquitoes and algae. A spot with morning sun and afternoon shade helps keep the water cooler and slows evaporation.
After habitat and water are in place, define the bed with edging and a sign.
4. Finish the Garden With Edging, Access, and Sign Placement
Once the habitat and water features are set, the last step is to give the garden a clean frame and make it easy to care for over time.
Install Clear Edging to Define the Bed
A crisp edge does more than make the space look tidy. It helps hold mulch in place, slows grass from creeping into the bed, and shows that the planting is planned instead of ignored. Stone, brick, metal, and rot-resistant wood can all work well. The right pick depends on the look of the site, how much upkeep you want, and how water moves through the area.[19][20][22]
If the bed sits on a slope or near a drainage path, a low stone border or small retaining wall can help mark the edge and guide drainage at the same time. That border also gives taller native plants and dried seed heads a more intentional look.
Keep the Layout Simple for Maintenance and Plant Access
Simple shapes are easier to mow around, mulch, and manage through the year. Keep one-sided reach to about 3 ft.[18] If the bed is more than 6 ft wide, or if you can only reach it from one side, add a stepping-stone path or a narrow mulched strip about 18–36 in wide. That gives you room to weed and cut plants back without packing down the soil.[21][17]
It also helps to keep the layout away from spots that need to stay open, such as:
- sidewalks
- downspout outlets
- drainage swales
- sightlines near driveways or intersections
Place the Sign Near the Front Edge Where It Can Be Seen
A pollinator sign near the front edge quickly tells people the garden is there on purpose. That small detail can make a big difference, especially when the planting looks a little wild in peak season.
Mount the sign 3–4 ft high on the street-facing or entry-facing side, and make sure nearby plants won’t hide it as they grow. Use weather-resistant materials like metal, sealed wood, or UV-resistant composite.
Conclusion: A Simple Checklist for a Successful Maryland Pollinator Garden
Start with the basics: 4–6 hours of direct sun, soil that fits the planting area, and drainage that clears within 24 hours after rain.[13][16]
Once the site is set, fill it with native plants that bloom in sequence. A layered mix of Maryland native trees, shrubs, perennials, grasses, and sedges helps keep flowers going from early spring through late fall. It also helps to pair nectar and pollen plants with host plants, such as native milkweeds, so pollinators have what they need at each stage of life.
After planting, add the habitat features that make the garden work day to day. Leave some bare soil for ground nesters, keep stems standing through winter, then cut them back to about 8–12 inches in early spring. Set out a shallow dish with stones so insects can land and drink.[23][24] Small touches like these can help keep pollinators in the garden instead of just passing through.
To make the bed look planned – not accidental – finish with edging and a clear sign. Clean edges, simple access paths, and a sign near the front help people read the space as intentional. They also make upkeep easier from season to season. For drainage, grading, and edging help in central Maryland, Pro Landscapes MD can support the project.
FAQs
What if my yard gets less than 4 hours of sun?
If your yard gets less than 4 hours of sun, it’s a shade zone. A lot of pollinator plants do best in full sun. But that doesn’t mean you’re out of luck. You can still build a lively habitat by picking native plants that handle lower light well.
It helps to watch your yard through the growing season and note where the shade falls. Sunlight can shift quite a bit after trees leaf out, so a spot that looks bright in early spring may turn much darker later on.
Which Maryland native plants bloom across three seasons?
No single Maryland native plant flowers from spring through fall. The fix is succession planting: combine native plants with bloom times that overlap so pollinators have food across the seasons.
A simple way to do that is to layer your planting by season:
- In spring, start with Virginia bluebells or wild columbine
- In summer, bring in black-eyed Susans or purple coneflowers
- In fall, finish with goldenrods or asters
That mix helps provide nectar and pollen from March through November.
How do I make a pollinator garden look neat?
Keep a Maryland pollinator garden neat without making it look stiff. A simple way to do that is to plant natives in small groups of 3–5 and place them in loose drifts or gentle curves, not as single plants dotted all over the bed.
Add 2–3 inches of organic mulch, but keep it pulled back from plant stems. That helps the bed look clean while giving plants room to breathe.
For color and shape across the season, pick native perennials with bloom times that overlap from spring through fall. And skip pesticides. They can harm the very insects you’re trying to support.
When fall rolls around, hold off on a full cleanup. Leave stems and leaf litter in place, but pull invasive weeds so they don’t take over.
Chat with Us