









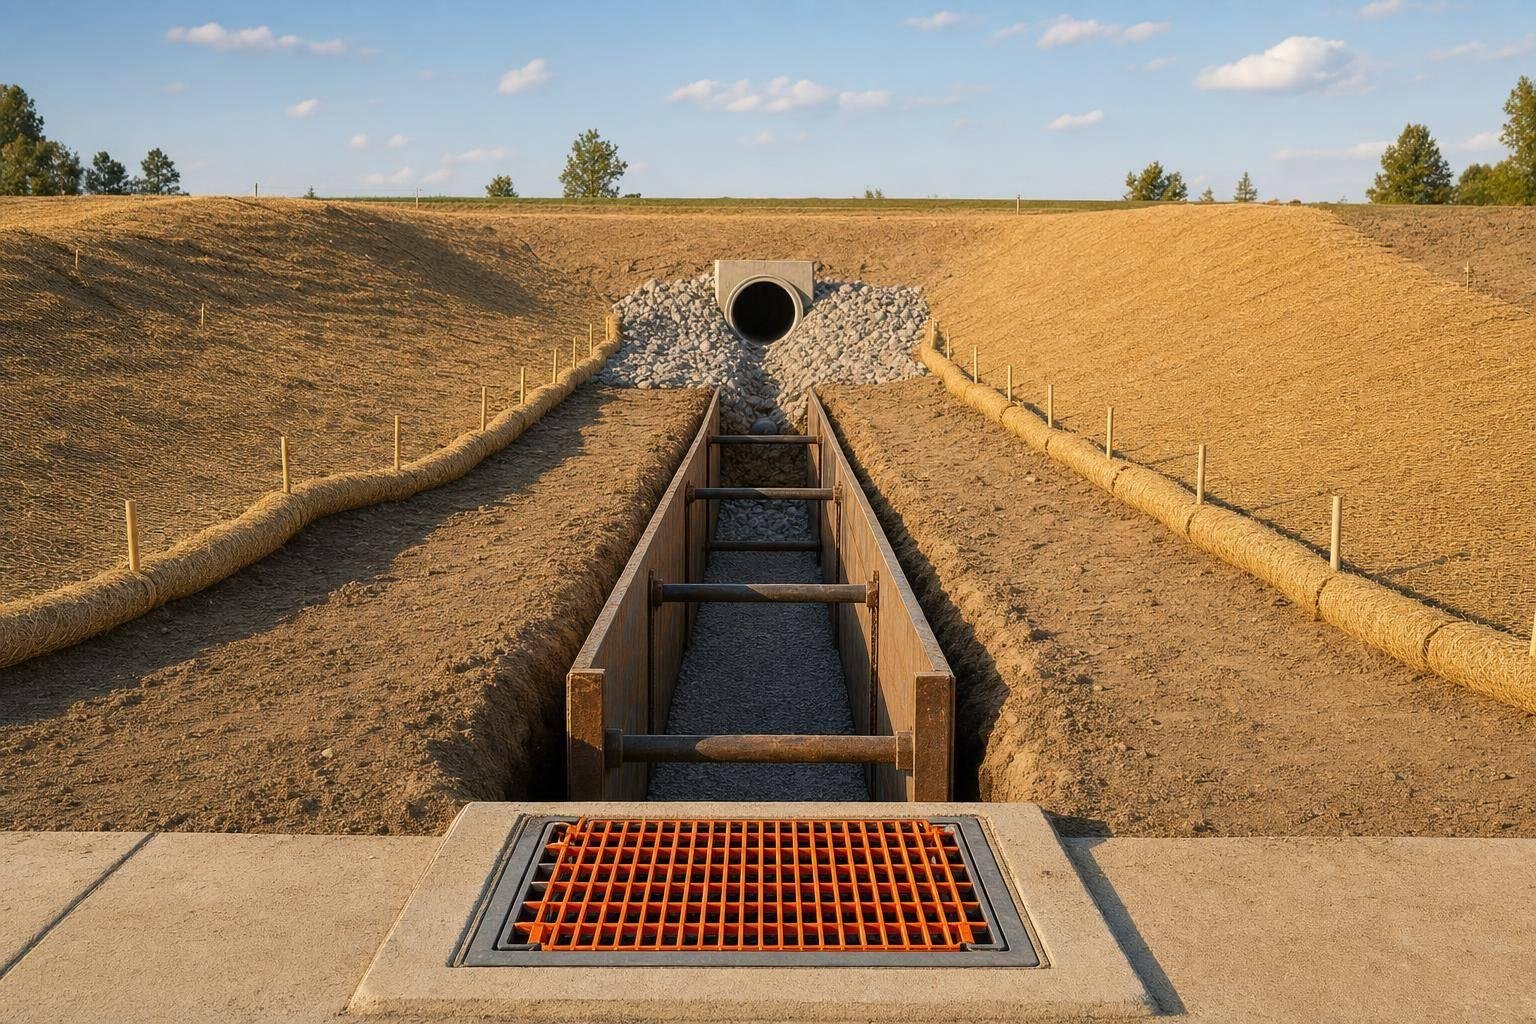
- bhavya gada
- No Comments
If I’m checking a drainage job under the EPA CGP, I focus on six things first: trench safety and dewatering, bare soil, runoff paths, inlet protection, slopes, and outlets. That’s the short answer.
If the job disturbs 1 acre or more of soil – or is part of a larger common plan – inspection rules can apply fast. On many sites, inspections happen every 7 days, or every 14 days plus within 24 hours after a storm of 0.25 inches or more. In Maryland, some sites near Tier II or impaired waters may need 2 inspections per week.
Here’s the plain-English version of what matters most:
- Start at the trench: check spoil setback, wall condition, and where pumped water goes
- Check bare soil next: inactive disturbed ground often needs cover within 14 days
- Follow the runoff path: make sure water stays in the planned swale, trench, or channel
- Inspect every downhill inlet: look for clogging, bypass, tears, gaps, and sediment buildup
- Walk the slopes: rills, gullies, and sediment fans show that soil is moving
- Finish at the outlet: scour, undercutting, and muddy discharge mean the system is not holding up
A few numbers stand out. Research cited in the article says unstabilized construction sites can lose 100 to 200 tons of sediment per acre per year. That’s why inspectors don’t just ask whether BMPs are present – they check whether sediment is staying on the property.
| Item | What I look for | Common fail sign |
|---|---|---|
| Trench & dewatering | Protected trench, treated pump discharge | Muddy water sent to street or inlet |
| Disturbed soil | Timely cover, no bare inactive areas | Exposed soil left too long |
| Runoff route | Stable, planned flow path | Water cutting a new shortcut |
| Inlet protection | Secure device, no bypass | Overtopping, clogging, tears |
| Slope protection | Covered slope, no washout | Rills, gullies, toe deposits |
| Outlet condition | Stable apron and downstream area | Scour, undercutting, sediment plume |
I read the article as a simple field order: trench, soil, flow path, inlet, slope, outlet. That sequence helps me spot failures before sediment leaves the site.
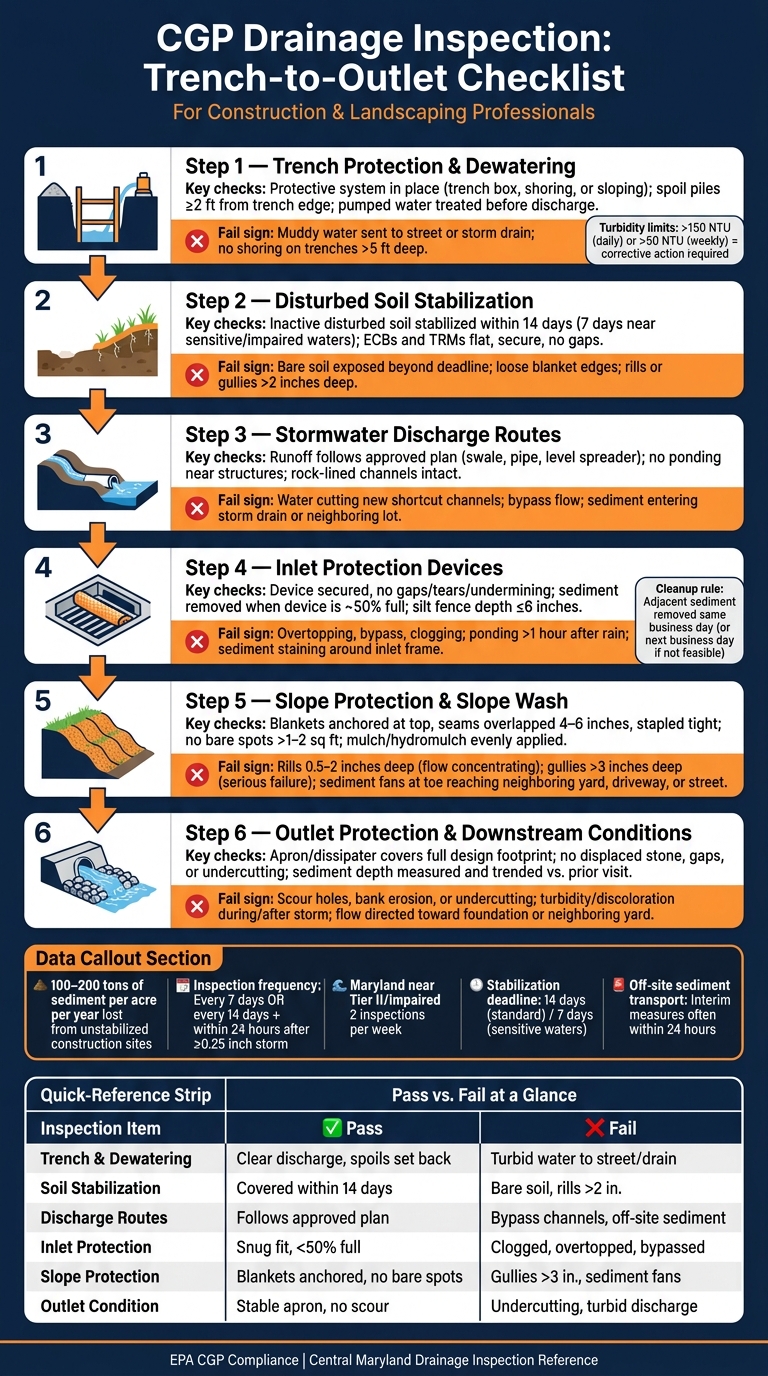
CGP Drainage Inspection Checklist: Trench to Outlet
2022 CGP Significant Changes
sbb-itb-843f8be
Why Drainage Inspection Items Matter on Residential Sites
Drainage work tears up soil right where runoff tends to collect. That’s a risky mix. Open trenches and bare topsoil can turn into sediment sources fast, especially after even one decent rain. If controls aren’t in place, soil can wash into a storm drain, a roadside ditch, or a nearby stream. Missouri Extension research estimates construction-site sediment loss at 100 to 200 tons per acre per year when erosion control is missing.[9][10]
At its core, every inspection is checking one thing: is sediment staying on the property? In plain terms, the goal is to make sure sediment stays contained before runoff gets to a discharge point.
EPA guidance describes storm drain inlet protection as the "final control point" before stormwater leaves the site.[5][6] That matters because inlet protection is the last line of defense, not the first. If runoff makes it that far loaded with sediment, upstream measures likely aren’t doing enough. Maryland inspection forms follow that same logic by reviewing storm drain inlet protection, erosion conditions, and outlet structures together.[8]
Maryland regulations also call for inspection of items such as trenches for enclosed storm drainage facilities and inlet/outlet structures during construction.[3] Catching problems early can save a lot of trouble. An unprotected trench spoil pile or a clogged inlet device might seem small at first, but it can quickly trigger a corrective-action notice.
That’s why the next inspection item starts with trench protection and dewatering controls. It follows the common-sense order of the job: stop exposure first, then deal with flow paths before sediment gets away. In practice, preventing exposed soil from washing out costs less than trying to trap it after it has already moved.
The checklist below follows that order: trench, soil, runoff path, inlet, slope, outlet.
1. Trench Protection and Dewatering Controls
Start with the trench itself. Inspect the protection, spoil placement, and dewatering setup before anything else.
For trenches deeper than 5 feet, inspectors need to confirm that a protective system is in place. That can be a trench box, shoring, or compliant sloping or benching. They also check that spoil piles sit at least 2 feet back from the trench edge. After heavy rain, this matters even more. Inspectors look for sloughing, cracking, or any other sign that the trench wall may be unstable. If water is being pumped out of the trench, the discharge area becomes the next place to inspect.
Pumped trench water has to be treated before discharge and sent to a stabilized area, not bare soil or a curb inlet.[13][4] Maryland requires corrective action if turbidity goes above 150 NTU in a daily reading or 50 NTU in a weekly reading.[15][16]
At the discharge point, inspectors should respond to any sediment plume, discoloration, odor, foam, or other visible change.[11][12] If trench water is discharging to a curb inlet, ditch, or unprotected ground, the control has failed.
Each trench and dewatering inspection should be logged with:
- Date and time
- Protective system used
- Dewatering setup
- Turbidity reading or visual observation
- Corrective actions taken[12][14][11]
Attach photos of the trench walls, discharge points, and nearby inlets to the report. Keep these records for the full permit term.
Once the trench is under control, move to the disturbed soil around it.
2. Disturbed Soil Stabilization Around Drainage Work
After trench controls, inspect the disturbed ground around the work area. Look closely at soil around trenches, swales, and spoil areas. If that soil is inactive, stabilize it within 14 days. For sensitive or impaired waters, the deadline is 7 days.
Inspectors should also check the BMPs already in place. Erosion control blankets (ECBs) and turf reinforcement mats (TRMs) need to sit flat and stay secure against the soil. If you see loose edges, lifted sections, or gaps in coverage, fix them.
Document the:
- location
- BMP
- condition
- corrective action
Next, check where runoff leaves the work area.
3. Stormwater Discharge Routes
Inspectors follow runoff from the drainage source all the way to the final discharge point. The goal is simple: make sure the graded flow path matches the approved plan and stays continuous, stable, and free of ponding near structures.
Along that route, they check features like swales, rock-lined channels, check dams, and level spreaders to make sure they’re intact and not blocked. In vegetated sections, dense cover matters. Bare spots in high-flow areas are a red flag. In rock-lined sections, inspectors confirm that the stone size matches the design and that the rock hasn’t shifted, settled, or washed out.
They also watch for trouble along the path, including:
- Sediment buildup
- Scouring
- Bypass flow
If sediment has moved off-site and is entering a storm drain, a neighboring lot, or a receiving channel, that’s an urgent deficiency. EPA guidance tells inspectors to review all discharge points from the site and record visible discharge conditions, including color, odor, floating or suspended solids, foam, or oil sheen.[18][20]
If runoff reaches a drain structure, the next stop is the inlet guard.
Major deficiencies should be fixed fast. When off-site sediment transport is likely, interim measures often begin within 24 hours. Inspectors should document the issue, weather, location, and repair deadline before moving on to check the inlet for blockage or failure.
4. Inlet Protection Devices
When runoff reaches a drain, the inlet protection device is the last checkpoint before discharge. Common types include inlet bags, gravel filters, and compost filter socks.
Start by checking every active storm drain inlet downhill from disturbed soil. Then make sure the device is in place, secured, and free of gaps, tears, or undermining.[21]
The clearest way to judge performance is to read the failure signs. Sediment piled up upstream usually means the BMP is doing its job and holding material back. Sediment at the inlet opening, or farther downstream, points to bypass. Also watch for ponding near driveways, sidewalks, or streets. If water sits there for more than about 1 hour after rain, the device may be clogged or may not have enough storage capacity.[24][7][17]
Fix clogged, damaged, or shifted devices right away. Clean out minor buildup before the next rain. EPA CGP guidance says adjacent sediment must be removed by the end of the same business day it is found, or by the end of the next business day if same-day removal isn’t feasible.[23] Many guidance documents also call for cleanout when the device is about half full, and for keeping silt fence used as inlet protection to no more than 6 inches of sediment depth.[7][17][22]
For each inlet, record:
- device type
- condition
- where sediment is located
- signs of bypass
- corrective-action deadline
Maryland’s inspection forms specifically prompt inspectors to note gaps, tears, and sediment buildup at storm drain inlet protection and to show whether maintenance is needed.[19] Add photos of the inlet, sediment buildup, and any damage.
If the inlet is loading with sediment, inspect the upslope source next.
5. Slope Protection and Slope Wash
Once you’ve confirmed inlet protection is holding, move upslope. Slopes near drainage work are some of the easiest places to lose soil on a residential site, especially after grading or trench backfill leaves the surface disturbed. Your job here is simple: check whether the slope protection BMPs are intact and working.
Common slope BMPs include erosion control blankets, straw mulch, hydroseeding, and sod. For each one, make sure it stays in place and fully covers the slope. Blankets should be anchored at the top, overlapped 4–6 inches at the seams, and stapled tight enough that runoff can’t slip underneath. Bare spots larger than 1 to 2 square feet are a clear sign the measure has failed. If mulch or hydromulch was used, look for even coverage with no exposed soil.[27][28]
Slope wash usually shows up as rills and gullies on the slope face. Rills are small channels about 1/2 to 2 inches deep. They mean flow is starting to concentrate, cut through the cover, and create a straight path for sediment to reach inlets, swales, or outlets. Gullies deeper than about 3 inches point to a more serious problem and may be undercutting blankets or exposing bare soil.[26][23]
At the toe of the slope, check for fan-shaped sediment deposits. If sediment has reached a neighboring yard, driveway, street, or storm drain, that counts as an off-site discharge.[25][23]
Give extra attention to slopes that drain to an inlet, swale, or outlet. Even minor rilling in those spots can overload downstream controls.[25][23] If erosion keeps showing up in the same place, that’s usually a sign the BMP is undersized and needs redesign, not another patch.
For documentation, record:
- Slope location
- BMP type and condition
- Sediment movement
- Rill or gully depth
- Sediment location
- Storm timing
- Corrective-action deadline
Then confirm the repair at the next inspection visit.[25][2][23] If sediment reaches the toe or discharge point, inspect the outlet next.
6. Outlet Protection and Downstream Conditions
After you check the slopes, move to the outlet. This is where water leaves the site, and it’s often where erosion shows up first. If runoff has already made it downslope, the outlet is usually the next place to fail. In plain terms, the outlet tells you whether the whole setup is still doing its job.
Start with the outlet structure itself. Check that the apron or dissipater is still in place, covers the full design footprint, and connects cleanly to the downstream channel or swale [29][30][33][38]. Watch for warning signs like displaced or undersized stone, gaps in coverage, exposed soil, cracked concrete, loose dissipater blocks, or undercutting along the edges. Those are all signs that the protection is breaking down and needs prompt repair [29][30][31][33].
Then check for sediment buildup on and around the outlet. Sediment collecting on the apron or filling stone voids usually points to erosion farther upstream [32][39]. Measure the sediment depth and compare it with past visits [32][39]. That simple step helps show whether conditions are getting worse or staying in check.
Next, follow the flow path below the outlet and inspect the receiving area. Look for widening, slumping, headcuts, or bare erosion below the discharge point [32][33][38]. Even if the apron looks fine, those signs mean outlet velocities are still too high for the area receiving the flow. Turbidity and discoloration during or shortly after a storm also show that the BMP is not performing adequately [34][37].
For documentation, record:
- The outlet BMP type and its physical condition
- Any sediment depth measured
- Erosion or scour observed downstream
- Turbidity and discoloration
- The corrective action needed and a clear deadline
Include the corrective deadline in the report. Active failures should move first, while minor damage should get a shorter repair window [34][35][36]. Use those notes in the inspection record for each drainage feature.
Next, record the outlet condition, sediment load, and repair deadline in the inspection log.
What to Record During Each Inspection
For each drainage feature you’ve already checked in the field – trench, inlet, slope, and outlet – stick to the same note format every time. That way, it’s much easier to spot changes from one inspection to the next.
Give each item one status: Acceptable, Needs maintenance, or Deficient/failed. Then support that call with a measurement. For example, saying sediment built up to about 2 in. deep across 60% of the fabric surface tells you a lot more than writing that there’s "some buildup" at the inlet.
Put discharge status on its own line. Note whether you saw flow and what kind it was – no flow, sheet flow, or bypass. Also add any visible clues, like staining along a fence line or grass pressed flat downslope.
You should also record what was done, what still needs to be done, and who owns the next step. Use a specific date for the correction deadline, not a loose timeframe. And name the responsible party so there’s no confusion about who needs to close the item out.
| Inspection Note Element | What to Capture |
|---|---|
| Date and time | U.S. format: MM/DD/YYYY, 12-hour clock (e.g., 09/02/2026, 2:30 PM) |
| Location | Street address plus site reference (e.g., rear yard, northeast corner near patio) |
| BMP type | French drain trench, inlet protection, silt fence, riprap apron, dry riverbed, etc. |
| Condition | Acceptable / Needs maintenance / Deficient/failed – with measurements |
| Sediment and erosion | Location, extent, depth, and trend compared with the prior inspection |
| Discharge status | Flow observed, offsite discharge, or none observed |
| Action taken | Action, quantity, and post-maintenance condition |
| Corrective deadline | Specific date and responsible party |
Maryland’s guidance on erosion and sediment control inspection reports says written records must include the date and location, whether the approved plan was properly implemented and maintained, any deficiencies found, and, if there is a violation, the type of enforcement action and the correction period.[40] This format helps support compliance and record retention.
Use these records to judge whether each item is passing or needs action in the table below.
Passing vs. Problem Conditions: A Quick Reference Table
Use the notes from the inspection to make a fast pass/fail call. Check each item in the same trench-to-outlet order covered in Sections 1–6. If site conditions line up with the middle column, the item generally passes. If they line up with the right column, fix them before the next inspection or storm event.
| Inspection Item | Passing Condition | Problem Condition |
|---|---|---|
| Trench Protection & Dewatering | Trenches are protected; pumped water is filtered or settled before discharge; water stays fairly clear. | Vertical trench walls in unstable soil with no shoring; pumps discharging turbid water straight to the street, storm drain, or a neighbor’s yard; spoils piled at the trench edge with no setback. |
| Disturbed Soil Stabilization | Inactive areas are stabilized within 14 days using seed, mulch, sod, erosion control blankets, or approved cover; stabilized to permit standard; no visible rills or gullies. | Bare soil left exposed more than 14 days; thin mulch with soil still showing through; rills or gullies deeper than about 2 inches; sediment tracking onto driveways, sidewalks, or adjacent properties. |
| Stormwater Discharge Routes | Runoff follows the planned conveyance – pipe, swale, or level spreader – to a stabilized outlet; no new erosion channels or sediment deposits at discharge points. | Flow bypasses the designed conveyance through muddy shortcuts; runoff cuts through planting beds; pipe discharges onto bare soil with no apron or rock protection. |
| Inlet Protection Devices | Inlet protection is the right size, fits snugly without gaps, and does not fully block flow; sediment is removed before it reaches half the device’s capacity; fabric remains intact and undamaged. | Inlets have no protection next to disturbed soil; devices are overtopped, bypassed, or clogged; makeshift barriers fail in the first storm; sediment staining shows around the inlet frame. |
| Slope Protection & Slope Wash | Slopes are seeded and mulched promptly; steeper grades are protected with erosion control blankets or similar measures; runoff is intercepted and routed to a stable outlet; no sediment fans at the toe. | Bare, smooth slopes left unstabilized on grades around 3:1 or steeper; mulch has moved downslope, leaving wash lines; small gullies form along concentrated flow paths; sediment fans reach sidewalks or neighboring yards. |
| Outlet Protection & Downstream Conditions | Energy dissipation is in place at the outlet; the outlet sits on stable, vegetated, or stone-covered ground; downstream areas show no new erosion or sediment buildup. | Pipe discharges straight onto bare soil or a steep bank; scour holes, bank erosion, or undercutting develop at the outlet; flow is directed toward a foundation, patio, or neighboring yard; fresh sediment deposits or new erosion channels appear downstream. |
For borderline cases, mark them as Watch/Improve in the inspection log. That includes thin but still working mulch, minor outlet wear, and early erosion marks that haven’t turned into bigger washouts. But if you see active rilling, scour, or sediment leaving the site, that’s not a watch item. It needs correction.
On Central Maryland sites, pay close attention to slopes and outlets. Clay and loam can hold together one day and then start breaking down fast after heavy rain.
Use this table to rank repairs before moving to site takeaways.
Practical Takeaways for Central Maryland Sites
In Central Maryland, the trench-to-outlet checklist matters even more. Rain, clay, and freeze-thaw cycles tend to turn small installation issues into bigger drainage problems fast. Clay-heavy soils across Central Maryland drain slowly, so even minor grading mistakes or outlet issues can lead to standing water, erosion, or soggy lawns.
Don’t wait only for the next scheduled inspection. After the next storm, go back and check the same trench, inlet, slope, and outlet points again. Look for blockage, washout, ponding, and sediment movement. A system can look fine on a dry day and still fail once heavy rain hits.
On steep lots, the runoff path often matters more than the yard as a whole. Water moves faster across sharp grade changes, which means trouble can show up first near the discharge point. If a lot drops toward a patio, driveway, or side yard, check slope protection and outlet discharge before anything else.
Pro Landscapes MD handles drainage repair, grading, French drains, yard leveling, and stormwater management across Central Maryland.
Conclusion
The CGP priorities are trench control, soil stabilization, runoff routing, inlet protection, slope protection, and outlet stability. Together, these checkpoints show whether the drainage system is still keeping sediment on-site before it moves off the property.
That’s why routine follow-up after storms matters so much. Inspections spot small problems before they turn into bigger ones, and fixing an issue early usually costs less than dealing with sediment after it has already left the site.
Maryland requires written inspection logs and prompt corrective action.[3][1] That simple routine – inspect, document, and fix – supports the trench-to-outlet review and helps keep the project compliant.
When drainage problems need repair, local help can make a big difference. For drainage installation, grading, French drains, and stormwater management across Central Maryland, Pro Landscapes MD can help address CGP-related drainage and erosion control needs.
On Central Maryland sites, walk the site after storms, check the same drainage points each time, and fix problems fast.
FAQs
What happens if sediment leaves the site?
If sediment leaves a construction site, stormwater management and erosion control measures have failed.
And that failure can cause a mess fast. Runoff can clog nearby waterways, lower water quality, and damage sensitive ecosystems.
Proper drainage installation, grading, and sediment controls help keep water moving where it should. They also help prevent erosion, support compliance, and protect the surrounding landscape.
How do I know if an inlet guard is failing?
An inlet guard is failing when it stops filtering stormwater the way it should.
Common warning signs include sediment buildup, debris blockages, or bypass flow that lets stormwater enter the drainage system without being filtered first.
You should also check for:
- Tears in the guard
- Dislodged filter fabric
- Sagging
- Major pooling around the guard
- Sediment visible downstream
If you notice any of these issues, the guard is no longer doing its job and needs immediate maintenance or replacement.
Which drainage problems need same-day action?
Same-day action is needed when drainage issues lead to active pooling or signs of structural water damage.
You should also deal with standing water or soil movement near hardscaping right away, especially around retaining walls. When water isn’t directed the right way, it can cause early failure and long-term damage across the landscape.
Chat with Us