


- bhavya gada
- No Comments
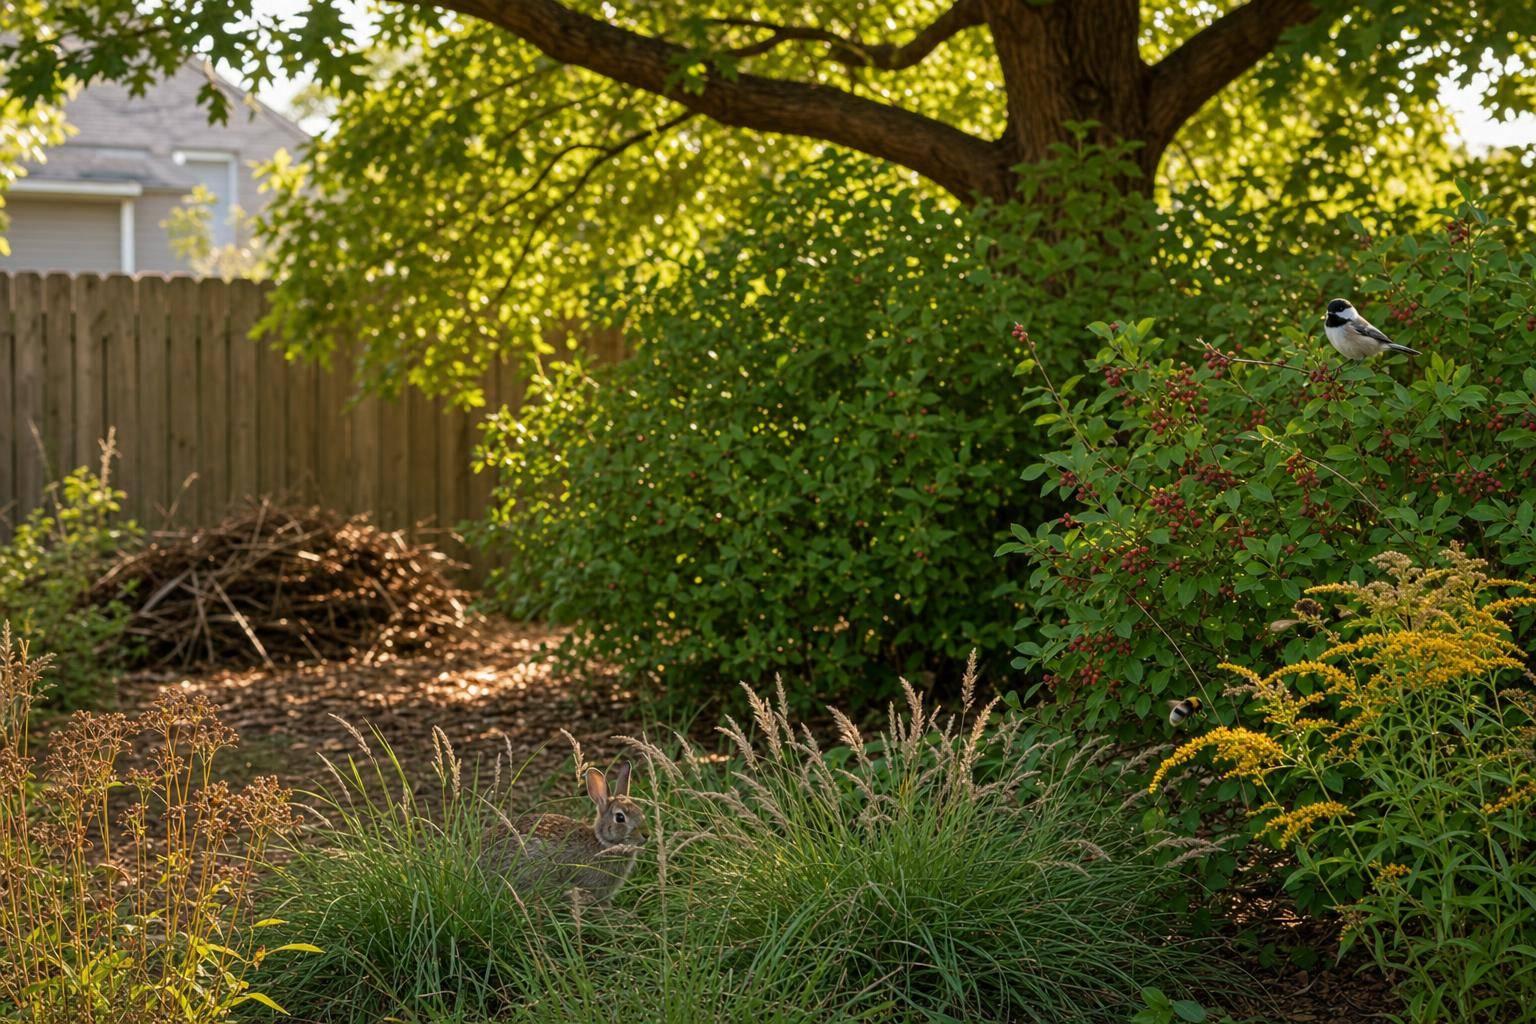
Most yards have plants. Far fewer have shelter. If I want birds, pollinators, and small animals to stay, I need to build cover they can use in every season.
Here’s the short version:
- I start by checking sun, soil, moisture, and thin cover
- I look for missing layers: trees, shrubs, and ground plants
- I aim for 70% native plants
- I group shrubs into thick clusters, not scattered singles
- I keep evergreen cover, leaf litter, and standing stems for winter use
- I connect beds with 3- to 6-foot edge strips
- I avoid over-pruning and protect young plants for 2 to 5 years
A few numbers matter most: 6+ hours of sun means full sun, shrubs often need 3 to 5 feet of spacing, and stepping-stone habitat clusters can sit about 100 to 300 feet apart.
If I had to sum it up in one line, it’s this: map the yard, fill shelter gaps, plant in layers, and leave some areas a little wild.
Create a Wildlife Habitat Garden (NWF)
sbb-itb-843f8be
Step 1: Assess Your Yard and Set Shelter Goals
Start with your yard map and use it to spot where cover is thin or missing. A site check helps you see where native plants can go and which parts of the yard don’t give wildlife enough shelter.
Map Existing Cover, Sun, Soil, and Moisture
Use your map to track current cover, site conditions, and any missing shelter layers. Mark every mature tree, shrub cluster, fence line, brushy edge, slope, low spot, and open lawn area.
A few things to note as you go:
- Mark sun exposure for each zone. Full sun = 6+ hours of direct light; full shade = 3 or fewer hours. [1]
- Record soil moisture as Dry, Medium, or Wet, especially in low spots or areas that stay soggy after rain. [1]
- Flag invasive plants for removal, such as English ivy or multiflora rose, before new natives go in. [3]
- Identify which vertical layers already exist: canopy trees, understory trees, shrubs, and groundcover. Missing layers are habitat gaps. [4]
Do a soil test before you lock in your plant list. Use the pH and nutrient results to match species to the site. [1]
Find Gaps in Year-Round Shelter
Once the map is finished, look for spots where cover drops off, especially near the ground and in winter, when deciduous plants lose their leaves.
Check the yard in winter and notice where you can see straight through to a neighbor’s property. That usually points to a need for thicker evergreen cover. [3]
Then pick at least one main shelter goal. You might want dense shrub cover for nesting songbirds, evergreen refuge for winter thermal protection, or leaf-litter and log habitat for overwintering insects and amphibians. [1][4]
Large lawn areas are also worth marking for conversion into refuge zones or thickets. [3]
Those bare spots become the blueprint for a layered shelter plan. Even on small lots, 30- to 100-foot shrub and tree clusters can still work as habitat nodes. [3]
Use those gaps to guide the layered plant plan in Step 2.
Step 2: Plan a Layered Shelter Design

Native Plant Shelter Layers for Wildlife: A Visual Guide
Use the gaps you found to shape a layered shelter plan with cover at the ground, shrub, and canopy levels.
Build Canopy, Shrub, and Ground Layers
Your plan should include at least three distinct vegetation layers. A simple way to do that is to combine canopy trees, shrubs, and groundcover. If you have the room, adding an understory layer gives wildlife even more places to hide, nest, and move through the yard.
| Layer | Height | Spacing Guide | Native Examples |
|---|---|---|---|
| Canopy | Large trees | 25–40 feet apart | White Oak, Red Maple, Tulip Poplar, Hickories |
| Understory | Small trees (15–30′) | 10–20 feet apart | Serviceberry, Eastern Redbud, Flowering Dogwood, Pawpaw |
| Shrubs | Medium to large (4–10′) | 4–5 feet apart | Spicebush, Winterberry Holly, Inkberry Holly, Red Chokeberry |
| Ground Layer | 1–2 feet | Varies by spread | Wild Ginger, Moss Phlox, Ferns, Little Bluestem |
Start with the canopy and understory, then add shrubs, then groundcover. That order helps you avoid trampling young plants while you work. [1]
For the ground layer, plant densely. Tight spacing helps suppress weeds, hold soil moisture, and create sheltered pockets for ground-dwelling wildlife. [4]
If you’re planting berrying shrubs, place male and female plants near each other. [1]
Group Plants Into Thickets and Refuge Zones
Instead of scattering shrubs one by one, group the same species into thick clusters. These thickets give birds and small mammals better cover from predators and rough weather. [3]
Set aside at least one part of the yard as a true refuge zone. In that space, stop mowing, keep raking to a minimum, and leave organic matter where it falls. Even a small corner with native shrubs and groundcover, left mostly undisturbed, can support nesting birds, overwintering insects, and small mammals through the year. [3][4]
If your yard doesn’t have enough room for one continuous planting corridor, build stepping-stone clusters of trees and shrubs instead. Space them about 100 to 300 feet apart so wildlife can move through the landscape with more cover. [3] Next, choose native plants that help each layer stay dense across the seasons.
Step 3: Choose Native Plants That Provide Real Shelter
Match each shelter layer with plants that hold their shape across the seasons. Your layer plan should guide plant choice, with the focus on dense, year-round cover. Pick native plants for structure first, not just for blooms.
Select Dense Shrubs, Evergreens, and Native Grasses
Aim to keep native plants at 70% or more.[1] When you choose plants, think about the job each one does: dense cover, thicket cover, ground refuge, or winter shelter.
| Plant | Cover Type | Site Conditions | Winter Value |
|---|---|---|---|
| Eastern Redcedar (Juniperus virginiana) | Winter protection / Nesting | Dry to medium soil; full sun | Evergreen; berries |
| American Holly (Ilex opaca) | Dense cover / Nesting | Variable; sun to part shade | Evergreen; berries |
| Inkberry Holly (Ilex glabra) | Quick hiding cover / Low nesting | Medium to wet soil; sun or shade | Evergreen |
| Northern Bayberry (Myrica pennsylvanica) | Thicket / Quick hiding cover | Dry to medium; full sun | Partly evergreen; berries |
| Arrowwood Viburnum (Viburnum dentatum) | Dense quick hiding cover | Variable | Deciduous |
| Silky Dogwood / Gray Dogwood | Thicket-forming cover | Medium to wet; sun or shade | Deciduous; berries |
| Little Bluestem (Schizachyrium scoparium) | Ground refuge / Overwintering | Dry to medium; full sun | Standing winter cover |
| Northern Sea Oats (Chasmanthium latifolium) | Shaded ground refuge | Shade tolerant | Standing winter cover |
Spacing matters more than many people think. If shrubs are too far apart, the shelter starts to break up, and those open gaps weaken the cover animals need.
- Small shrubs, 2 to 4 feet tall: plant 3 feet apart
- Medium shrubs, 4 to 6 feet tall: plant 4 feet apart
- Large shrubs, 6 to 10 feet tall: plant 5 feet apart[1]
Space plants for their mature width, not how they look in a nursery pot. Use the table to make sure each shelter area has at least one evergreen-dominant zone.
Keep Leaf Litter, Stems, and Other Organic Matter in Habitat Areas
Leave fallen leaves where they land, keep stems 12 to 18 inches tall through winter, and limit mulch to 3 inches.[1][4]
That loose, slightly messy layer does a lot of work. Leaves and standing stems give insects, birds, and small animals places to hide when cold weather hits.
Next, protect these habitat features during installation and seasonal maintenance.
Step 4: Install and Maintain Shelter Without Losing Habitat Value
Connect Native Beds With Drainage and Hardscape Features
After you plant your shelter layers, the next job is keeping them connected. Hardscape and drainage choices can split up habitat fast if you’re not careful.
Plant 3-to-6-foot-wide native edge strips along fences, driveways, and property lines to link habitat areas and soften sharp edges.[2] That small band does a lot of work. It helps wildlife move through the yard without crossing bare, exposed ground.
Where lawn meets woods, skip the sudden cutoff. Instead, move from shrubs into shade-tolerant ferns and groundcovers so the edge feels gradual, not harsh. That vertical transition gives wildlife steady cover from one zone to the next.[2]
Drainage areas need the same kind of planning. In the Chesapeake Bay watershed, pick native plants that can handle soil that swings from dry to wet.[1] Rain gardens near downspouts or low spots are a good fit for moisture-loving plants like Juncus effusus (soft rush), Iris versicolor (blue flag iris), and Chelone glabra (turtlehead).[2] If your plan includes grading, retaining walls, dry riverbeds, or environmental pavers, Pro Landscapes MD can help keep those shelter zones tied together.
Follow Wildlife-Safe Seasonal Maintenance Practices
Once the layout is set, the goal is simple: keep the shelter structure in place without overmanaging it.
Limit pruning to diseased limbs instead of trimming shrubs into neat shapes. For nesting birds, that dense inner growth isn’t messy. It’s shelter.[3] Young native plants may also need protection from deer and rodents with wire cages or tree shelters for the first 2 to 5 years.[3]
Stay on top of invasive plants, too. Pull English ivy, porcelainberry, and multiflora rose on a regular basis before they crowd out your shelter plantings.[3]
Each fall, check that your yard still includes:
- Thickets
- Evergreen cover
- Leaf litter
- Undisturbed shelter
Conclusion: Review the Checklist Before You Plant
Before you plant, review your site conditions, shelter goals, plant layers, species choices, habitat connections, and seasonal maintenance.
FAQs
How do I start if my yard is mostly lawn?
Start small instead of replanting your whole yard all at once. Pick one part of the lawn that feels easy to handle, and replace it with native woody and herbaceous plants.
Make a simple sketch of your property so you can map out where trees, shrubs, and perennial beds will go for wildlife shelter. Start with the largest plants and the spots closest to your home first. That helps you avoid soil compaction and cuts down on plant damage.
Which native plants provide the best winter shelter?
Evergreen trees and shrubs offer some of the best winter shelter. They help protect wildlife from wind, cold, and wet weather, while also giving animals safe places to rest.
In Maryland, strong native picks include common juniper, dwarf yaupon holly, dwarf Eastern redcedar, and inkberry holly.
It also helps to leave perennial stalks, seed heads, and leaf litter where they are. Those small, messy-looking parts of the garden give wildlife much-needed cover during winter.
How long does it take for a wildlife shelter to fill in?
It depends on your planting strategy. If you plant densely, especially at the ground layer, your wildlife shelter will fill in faster.
That thicker planting does a few helpful things at once:
- It helps suppress weeds
- It can discourage invasive species
- It helps the soil hold moisture
As the garden gets established, you can keep an eye on your perennials and ground covers, then move them around to fill any open spots.
Chat with Us