









- bhavya gada
- No Comments
If I want a pollinator garden in Maryland to work, I start with the site, not the plant list. I check sun, soil, drainage, and hard surfaces first. Then I pick native plants that fit those conditions, bloom from spring through fall, and support the pollinators I want people to see.
Here’s the short version:
- I track sunlight by area: full sun = 6+ hours, part sun = 4–6 hours, part shade = 2–4 hours, and full shade = 3 hours or less.
- I sort each planting area by moisture: dry, medium, or wet.
- I choose a clear teaching focus, such as host plants vs. nectar plants or season-long bloom.
- I group plants in drifts of 3–5 of the same species so pollinators can find them and visitors can read the bed fast.
- I leave some bare sunny soil because about 70% of native bee species nest in the ground.
- I keep mulch at 3 inches or less and wait until late spring for cleanup so insects can overwinter in stems and leaf litter.
- I put bloom time on the plan, not just flower color, so food is there from early spring to late fall.
A few plants do a lot of work in central Maryland. Serviceberry and redbud help early pollinators. Bee balm, butterfly weed, and foxglove beardtongue carry the garden into summer. Goldenrod, blue wood aster, and witchhazel help fill late-season gaps. If I need to cut the list, I keep goldenrod in the plan because late-season nectar matters.
Before I plant, I also map trees, patios, walkways, and walls, slopes, and downspouts. Those features change heat, light, root pressure, and water flow. That one step helps me avoid plant loss and cuts down on extra work later.
This article boils the process down to four steps: read the site, pick pollinator goals, match plants to place and bloom time, and lay out beds for viewing and upkeep.
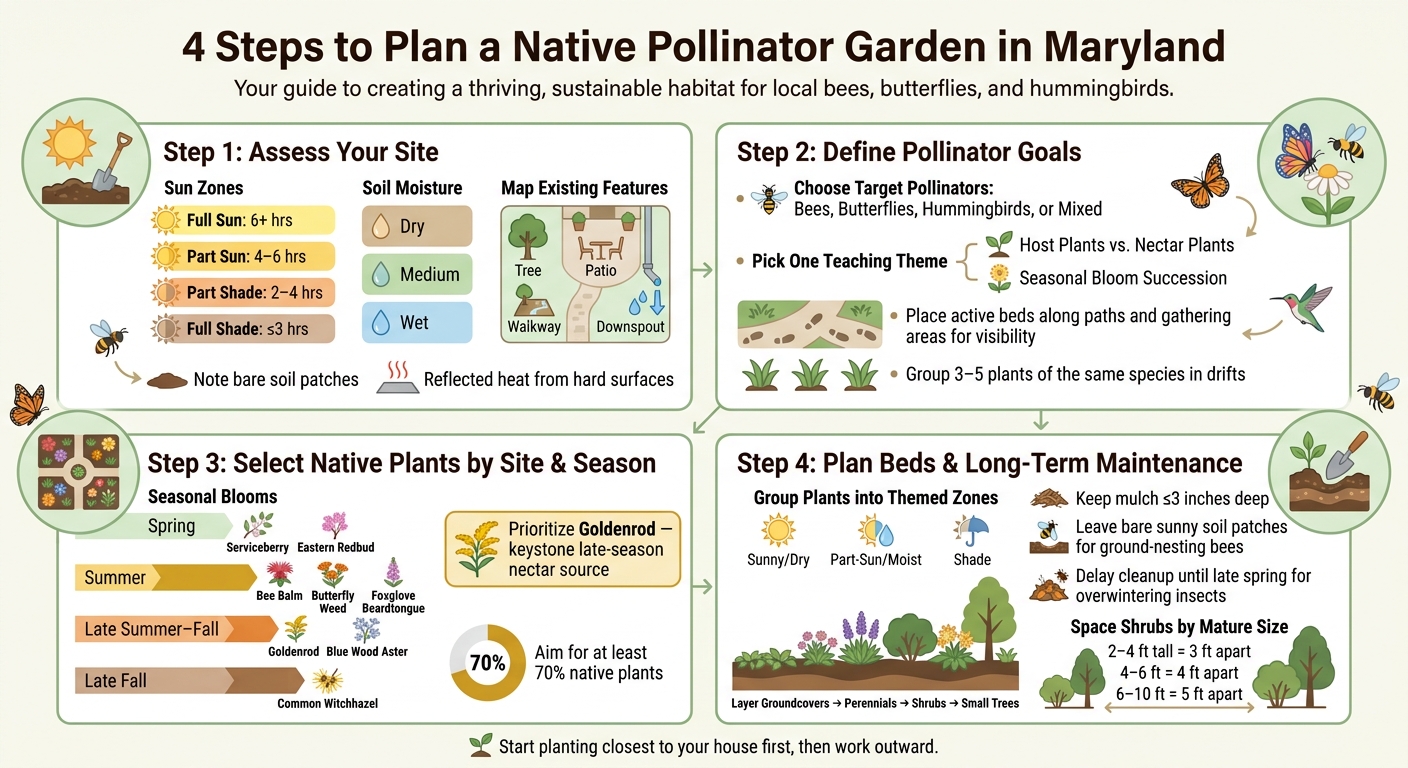
4 Steps to Plan a Native Pollinator Garden in Maryland
HOW TO: Transform Your Yard into Bee-Friendly Habitat! (Outdoors Maryland Digital Extra)
sbb-itb-843f8be
Step 1: Assess Sun, Soil, Drainage, and Existing Features
Start by walking the site and writing down what you see. The conditions above and below ground shape which native plants will live well over time and which ones will struggle right away.
Measure Sun and Shade Throughout the Day
Track direct sun in each planting area during the growing season. Add up how many hours of sun each zone gets per day. Full sun is 6 or more hours, part sun is 4–6 hours, part shade is 2–4 hours, and full shade is 3 or fewer hours [3].
The sun does not have to come in one uninterrupted block. Morning sun plus afternoon sun can still count toward the daily total [4].
Also watch for reflected heat and light. Patios, walls, and walkways can bounce both back onto nearby beds, which can make plants experience the spot as sunnier than it first appears [3].
Check Soil Type, Moisture, and Compaction
Before planting, get a professional soil test. It will show pH and nutrient levels, which helps you amend the soil with organic matter instead of taking a shot in the dark [3].
Next, label each area by moisture level: Dry (D), Medium (M), or Wet (W) [3]. Wet zones fit plants such as Winterberry holly or Spicebush [3]. If water tends to sit in place, fix that before planting by regrading, leveling, or adding a French drain.
Once you know the limits of the site, you can start matching plants to pollinators and bloom timing.
Map Trees, Lawn, Patios, Walkways, and Walls
Make a rough site sketch that shows everything already there: trees, lawn areas, patios, walkways, retaining walls, and downspouts. Do this before picking bed locations.
| Feature | How It Affects Plant Placement |
|---|---|
| Existing trees | Creates shade zones and root competition; helps determine which understory plants will work [3] |
| Patios & walkways | Reflects heat and light; nearby plants may need higher heat tolerance [3] |
| Downspouts & slopes | Affects soil moisture and can create dry or wet zones depending on water movement [3][4] |
| Lawn areas | Good candidates for conversion to native plant beds [3] |
Mark bare soil patches on the map too. Those problem spots help narrow your plant list in the next step.
Use the site map to set pollinator goals and teaching themes.
Step 2: Define Educational Goals and Target Pollinators
With your site map done, the next step is deciding what the garden should teach and which pollinators it should bring in.
Choose the Pollinators Your Garden Will Support
Maryland gardens can support bees, butterflies, hummingbirds, or a mix of all three. Each group looks for different flower traits. Butterflies and hummingbirds tend to like tubular flowers or open blooms. Native bees need pollen-rich flowers in different shapes, plus undisturbed bare soil where they can nest.
Here’s a simple way to match pollinator goals with plant traits and Maryland native plants:
| Pollinator Target | Preferred Flower Features | Native Plant Examples (MD) |
|---|---|---|
| Bees | Pollen-rich, varied shapes | Anise Hyssop, Foxglove Beardtongue, Goldenrod |
| Butterflies | Large blossoms, flat flower heads | Butterfly Weed, Joe-Pye Weed, Aster |
| Hummingbirds | Tubular shapes, bright colors | Eastern Redbud, Trumpet Honeysuckle, Beebalm |
| Mixed Pollinators | Overlapping bloom seasons | Serviceberry (spring), Summersweet (summer), witch-hazel (fall) |
Set Clear Teaching Themes for the Planting
After you decide which pollinators to support, pick one teaching theme and build the bed around it. A strong option is the difference between host plants and nectar plants.
Nectar plants feed adult pollinators. Host plants are where insects lay eggs and where larvae grow. That distinction matters. Milkweed (Asclepias) is a well-known host plant for Monarch caterpillars, and white turtlehead (Chelone glabra) supports the Baltimore Checkerspot butterfly [4].
"Many bees provision their nests with pollen from native plants, and butterflies and moths eat native species at the larval stage. Birds, in turn, feed an abundance of these caterpillars to their young. Going native supports this whole food web." – University of Maryland Extension [2]
Another good theme is seasonal bloom succession. This shows visitors that pollinators need food from spring through fall, not just during one short bloom window. Try to group plants by theme so each bed teaches one clear lesson instead of doing a little bit of everything.
Place Plants Where Visitors Can Observe Them
Put the most active beds where people will actually see them: along paths, near patios, or beside gathering areas. If pollinators are busy and close to eye level, people are much more likely to stop and pay attention.
Group at least 3–5 plants of the same species together in drifts. This helps pollinators find them more easily, and it also makes the planting easier for visitors to read at a glance [2].
Leave small patches of bare, sunny soil within or next to beds for ground-nesting bees. Those spots give bees a place to nest and give visitors something specific to notice. Simple signs also help. Include the plant name, bloom season, and the pollinators it supports.
Set up the signs, drifts, and bare-soil patches so they lead cleanly into the next step: choosing plants that fit the site.
Use these goals to narrow your native plant list in Step 3.
Step 3: Select Native Plants That Fit the Site and Bloom Across Seasons
Now that your pollinator goals are set, line up your plant choices with the site conditions you mapped in Step 1. That one move cuts down the list fast and makes the garden much easier to plan.
Match Plant Type to Sun, Soil, and Moisture
As Ashley Bodkins, Senior Agent Associate and Master Gardener Coordinator at University of Maryland Extension, puts it:
"The ‘right plant in the right place’ approach is equally important for native and non-native plants. In order for plants to thrive with the least amount of human help, we need to match their growing needs with the right location in our landscape." [4]
Start by pairing each part of the site with a few native plants known to do well there. For dry, sunny areas, use butterfly weed and false blue indigo. For average garden beds, bee balm and foxglove beardtongue are solid picks. Wet spots can handle summersweet and winterberry holly. In partial shade, spicebush and white turtlehead fit well.
It also helps to go beyond flowers. Add native grasses, sedges, shrubs, and small trees to give pollinators places to nest and shelter. A good target is at least 70% native plants [3].
Build a Bloom Schedule From Spring Through Fall
A strong pollinator garden offers nectar and pollen from early spring into late fall. That timing matters most at the edges of the season, when food is often hard to find.
One simple way to build that sequence is to begin with Amelanchier sp. (Serviceberry) and Cercis canadensis (Eastern Redbud) in spring. Then carry the garden into summer with Monarda fistulosa and Asclepias tuberosa. For late summer and fall, turn to Solidago sp. (Goldenrod) and Aster cordifolius (Blue Wood Aster). Hamamelis virginiana (Common Witchhazel) extends bloom even later and gives you a good winter-interest teaching point.
Plant height matters too. When you layer taller and shorter plants, the space feels more orderly and is easier for visitors to read at a glance.
Use the comparison table to narrow your list
Use the table below to compare site conditions, bloom timing, and teaching value side by side. When you can, choose straight species instead of cultivars for the best ecosystem value.
| Common Name | Scientific Name | Light | Moisture | Bloom Season | Pollinators Supported | Educational Value |
|---|---|---|---|---|---|---|
| Serviceberry | Amelanchier sp. | Sun/Part Shade | Medium | Early Spring | Early pollinators | Early nectar; edible berries |
| Eastern Redbud | Cercis canadensis | Sun/Part Shade | Medium | Spring | Early bees | High-visibility pink blooms; supports early bees |
| Foxglove Beardtongue | Penstemon digitalis | Full Sun | Medium | Late Spring | Bees, hummingbirds | Tubular flowers show hummingbird adaptations |
| Butterfly Weed | Asclepias tuberosa | Full Sun | Dry–Medium | Summer | Monarchs, bees | Monarch host plant; bright orange flowers are easy to spot |
| Bee Balm | Monarda fistulosa | Sun/Part Sun | Medium–Wet | Summer | Bees, butterflies | Use it to explain nectar plants versus host plants |
| White Turtlehead | Chelone glabra | Sun/Part Shade | Moist–Wet | Late Summer | Baltimore Checkerspot | Host plant for Maryland’s state butterfly |
| Summersweet | Clethra alnifolia | Sun/Part Sun | Medium–Wet | Summer | Bees, butterflies | Fragrant blooms that work well in wet spots |
| Goldenrod | Solidago sp. | Full Sun | Varies | Late Summer–Fall | Bees, butterflies | Keystone plant; critical late-season fuel |
| Blue Wood Aster | Aster cordifolius | Shade/Part Sun | Dry–Medium | Fall | Bees, butterflies | Late-season nectar for shade gardens |
| Common Witchhazel | Hamamelis virginiana | Shade/Part Sun | Dry–Wet | Late Fall | Late-season bees | Blooms after leaves drop; a useful winter-interest teaching point |
| Spicebush | Lindera benzoin | Shade/Part Sun | Medium–Wet | Spring | Spicebush Swallowtail | Host plant with early nectar; shade-tolerant shrub |
If you need to trim the list, prioritize goldenrod. It serves as a keystone late-season nectar source.
With the shortlist in place, the next job is to group those plants into beds, paths, and maintenance zones in Step 4.
Step 4: Organize the Planting Plan and Support Long-Term Success
Lay Out Beds, Paths, and Themed Planting Zones
Now that the plant list is set, turn your site map into a bed plan that works for both pollinators and people. Start by sketching in patios, walkways, buildings, fences, and other hardscape features. Then shape planting beds around those fixed parts of the site.
Next, group plants into themed zones based on the conditions you mapped in Step 1. A simple setup works well:
- Sunny, dry zone
- Part-sun, moist zone
- Shade zone
This makes planting and upkeep easier. It also gives visitors a clear way to understand how the garden is put together.
Repeat each species in small groups so plants are easier to spot and pollinators can use them more easily. Build in layers too, starting with groundcovers and moving up to perennials, shrubs, and small trees. That adds depth and mirrors the way plant communities are arranged in nature. Place labels and viewing spots along paths so people can learn without stepping into the beds.
One small tip can save a lot of hassle later: start planting closest to your house, patio, or walls first, then work outward. That helps protect newly prepared soil from compaction as later phases move across the site [3].
Plan for Maintenance, Weed Control, and Plant Replacement
The first year is the most hands-on. Even though native plants need less water and fertilizer once established, they still need steady watering and weed control early on.
Spacing matters more than people think. Follow mature-size guidelines from the start: small shrubs that grow 2 to 4 feet tall should be spaced about 3 feet apart, medium shrubs that reach 4 to 6 feet tall should be about 4 feet apart, and large shrubs in the 6 to 10 feet range should be about 5 feet apart. Get that right now, and you cut down on pruning later.
Keep mulch to no more than 3 inches deep. More than that can get in the way of ground-nesting bees, and about 70% of native bee species nest in the ground [2]. Leave a few bare soil patches along bed edges so those bees still have a place to nest.
Delay garden cleanup until late spring. Dead stalks and leaf litter give stem-nesting bees and other helpful insects a place to overwinter [1]. If stems near a walkway start to look messy, move the clippings to a quieter corner instead of tossing them out. It also helps to plan for replacement planting now, so empty spots don’t break up bloom coverage later.
Coordinate Pollinator Beds With Drainage and Landscape Design
In central Maryland, clay-heavy soil and poor grading can make or break a planting plan. Match wet areas with natives that can handle more moisture, or fix those drainage issues before planting. Low spots and spaces near downspouts are good fits for plants that like wetter soil. Slopes and drier ridges, on the other hand, are better for deep-rooted native plants that help hold soil in place and reduce erosion [2][4].
Patios, walkways, and retaining walls can change growing conditions too. Hard surfaces reflect heat and light, which can make nearby beds hotter and drier than you’d expect. In those edge areas, use species that can handle extra heat [3].
Hardscape can also help bring order to the garden. Clear paths protect bed soil from foot traffic, and small trees should be planted at least 20 feet from buildings, sidewalks, and walls [3]. If the yard has grading problems, compacted soil, or drainage trouble, deal with that before planting so the garden has a solid start.
Conclusion: A Simple Process for Choosing the Right Native Plants
Follow the four steps above, and choosing native plants gets a lot simpler. Start with the site first. Then match plants to pollinators and bloom timing.
When you do that well, a planned native garden supports pollinators, cuts down on maintenance, and helps stabilize soil.
For visitors, it can also work as a living outdoor classroom, where pollinators, host plant relationships, and seasonal bloom sequences are visible in action [1][2].
If drainage or grading could threaten plant survival, fix that before you plant. Pro Landscapes MD serves central Maryland with landscape and drainage services.
FAQs
How do I know which native plants fit my yard?
Start by looking at your yard’s growing conditions, especially sunlight and soil moisture. Then compare those conditions with what each plant needs, which you’ll usually find on care tags or seed packets.
It also helps to check the plant’s scientific name – the genus and species – so you know you’re picking the right native variety.
What should I plant for blooms from spring through fall?
Choose a mix of native plants with bloom times that overlap, so pollinators can find nectar and pollen from spring through fall.
- Spring: Eastern redbud, pussy willow, wild geranium
- Summer: butterfly milkweed, Joe Pye weed, mountain mint
- Fall: New England aster, seaside goldenrod
How can I support bees without making the garden messy?
Support bees with a tidy, well-planned layout. Pile old plant stalks in a neat stack in a less visible corner to give mason and leaf-cutter bees places to nest.
Plant native species in drifts, and add groundcovers to cut down on weeds. That helps the garden look intentional while still giving bees the habitat they need.
Chat with Us