


- bhavya gada
- No Comments
A shade sail can provide much-needed relief from the sun while enhancing your outdoor space. To pick the right one, focus on these key steps:
- Measure Your Space: Identify areas to shade, account for sun patterns, and map out anchor points.
- Choose the Right Shape and Size: Match the sail’s dimensions to your space and ensure proper coverage.
- Pick Durable Materials: Opt for UV-blocking HDPE mesh for airflow or waterproof fabrics for rain protection.
- Secure Anchor Points: Use sturdy structures like walls, pergola beams, or posts set in concrete.
- Plan for Slope and Tension: Install at a tilt for rain runoff and maintain proper tension to prevent sagging.
For areas with challenging layouts or unpredictable weather, careful planning is critical. Maryland’s climate requires durable materials and secure installation to withstand summer heat and storms. Follow these steps to create a comfortable, stylish outdoor retreat.

How to Choose the Right Shade Sail: 5-Step Guide
Installing your Shade Sail | The "How To" everyone needs to watch!
sbb-itb-843f8be
Assess Your Space and Sun Exposure
Before buying a shade sail, take some time to evaluate your outdoor space. Understanding where the sun hits hardest, when it happens, and what structures you can use to secure the sail is critical. Skipping this step often leads to placing the sail in the wrong spot.
Define the Area You Want to Shade
Start by identifying the zones you want to shade – whether it’s a dining patio, pool deck, play area, or outdoor kitchen. Consider when each area is used. For instance, a dining area might need shade during evening meals between 5–7 p.m., while a play area may require coverage during late-morning and afternoon hours. These timeframes will determine the sail’s size and positioning.
Walk through each zone and note what’s fixed, like furniture placement, doors, gates, and walkways. Make sure there’s a clearance of 7–8 feet and position anchor points about 10–12 inches outside the sail’s edge. If you have a grill or fire pit, keep it outside the shaded area to allow heat and smoke to dissipate safely.
Once you’ve mapped out these zones, study the sun patterns to figure out where shade is most needed.
Track Sun and Weather Patterns
On a sunny day, observe and record how the sun moves across your yard at 9 a.m., noon, and between 3–5 p.m. This will help you identify the areas with the most intense sun exposure. According to the EPA, UV radiation peaks between 10 a.m. and 4 p.m., so focus on midday and afternoon observations. These insights will guide the placement of both your shade sail and its anchor points.
At the latitude of Baltimore/DC (around 39° N), the sun’s position changes significantly with the seasons. In summer, it reaches a height of 74–76° above the horizon at solar noon, while in winter, it drops to just 27–30°. A sail designed to block the harsh July sun might cast little to no shade in October. Also, keep in mind that most woven sails need a noticeable slope to drain rainwater effectively, so plan the orientation accordingly.
Once you’ve mapped the sun’s path, the next step is to identify strong anchor points for your sail.
Find and Check Your Anchor Points
Choosing the right anchor points is crucial for safely securing your shade sail. Suitable options include structural walls, pergola beams, masonry columns, and heavy-duty posts set in concrete. Avoid using gutters, thin fence posts, decorative trellises, or rotted wood, as they can’t handle the tension or wind loads.
Here’s a quick guide to anchor options:
| Anchor Type | Suitable? | Notes |
|---|---|---|
| House structural wall (studs/rim joist) | ✅ Yes | Use stainless or galvanized lag bolts; avoid relying on vinyl siding alone |
| Steel or 6×6 pressure-treated post in concrete | ✅ Yes | Ensure posts are set below the frost line (approximately 30 inches in Maryland) |
| Pergola support post (professionally installed) | ✅ Yes | Inspect for rot and ensure secure footing |
| Large, healthy tree trunk | ⚠️ With caution | Use tree-friendly hardware and account for growth and movement |
| Fence posts or decorative trellises | ❌ No | These can’t handle lateral tension loads |
| Gutters or fascia boards | ❌ No | These will fail under wind stress |
If there aren’t any suitable anchors where you need them, you can install dedicated posts in concrete. Make sure these posts are set at least 30 inches deep to stay below the frost line. Align the anchor placements with existing structures to create a cohesive look.
Choose the Right Size and Shape
Once you’ve identified your anchor points and tracked how sunlight moves across your space, the next step is picking the right sail size and shape. Getting the dimensions wrong can either reduce the shade provided or put unnecessary strain on your anchors. Accurate measurements are key to ensuring a snug and effective fit.
How to Measure for the Right Fit
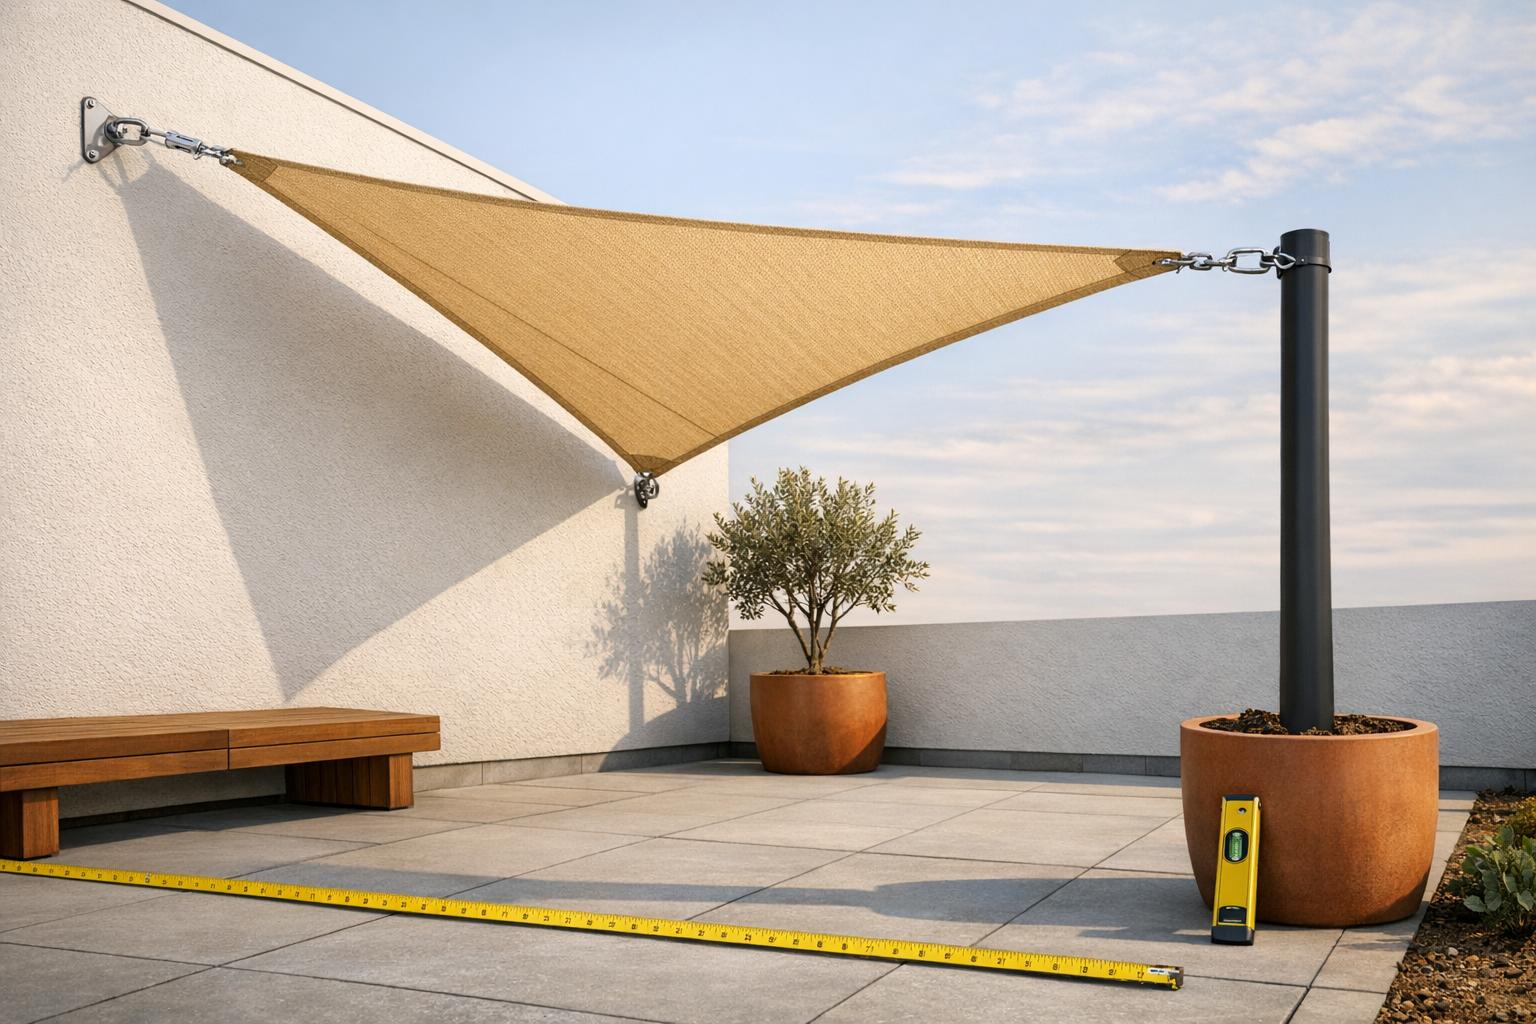
Start by measuring the straight-line distance between each anchor point – center to center – using a tape measure. Record the length of each side individually, and don’t forget to note any height differences between anchors. A higher corner not only improves shade coverage but also helps rainwater drain off the sail.
To account for hardware and the natural 2–4% stretch of HDPE material, subtract 10–12 inches from each side for smaller sails or up to 16–20 inches for larger ones. Double-check whether the manufacturer’s dimensions refer to the distance between corner rings or just the fabric’s edge, as this will impact how the sail and hardware fit together.
Match Size to Your Space and Needs
The sail size should fit both the area’s footprint and how you plan to use the space. For smaller areas like balconies or compact patios, a sail measuring 10–12 feet is a good choice. Larger spaces may need sails that are 12–16 feet or longer. If your space has an irregular shape, you might need multiple sails to achieve better coverage and reduce wind stress. Lastly, consider the various sail shapes to ensure they align with your aesthetic and functional goals.
Compare Common Sail Shapes
The shape of the sail influences not only the amount of shade but also the overall look of your space. Here’s a quick guide to common sail shapes:
| Shape | Best For | Coverage | Flexibility |
|---|---|---|---|
| Triangle | Irregular or multi-anchor layouts | Good; corners allow some light through | High; easy to angle steeply for water runoff |
| Square | Standard patios, seating areas | Excellent; even shade under the center | Moderate; works best with symmetrical anchor setups |
| Rectangle | Dining areas, driveways, narrow spaces | Excellent; maximizes coverage along straight edges | Moderate; ideal when two sides align with walls or property lines |
| Multi-sail layout | Large or irregular areas, divided zones | Very good; tailored shade per zone | Highest; mix shapes and heights for custom coverage |
Triangle sails work well in spaces with uneven anchor points, while square and rectangular sails offer more uniform shade. For areas with mixed landscaping – like a patio bordered by a garden and a retaining wall – combining a larger rectangular sail with a smaller accent triangle can create a balanced, cohesive look without overwhelming the space.
Pick Your Material, Color, and Design Details
Choose the Right Fabric
Once you’ve figured out the size and shape of your shade sail, the next step is choosing a fabric that fits both your practical needs and your style preferences. The two main options are breathable HDPE (high-density polyethylene) mesh and waterproof coated fabrics like PVC or polyurethane-coated polyester. Each has its strengths, and picking the right one ensures your sail performs as expected.
HDPE mesh is a popular choice for residential spaces like patios, pools, and play areas. It blocks 90–98% of UV rays, depending on the color and weight, while allowing hot air to escape through the fabric. This keeps the area underneath cooler and less stuffy. Plus, it handles wind better since air can pass through the material. On the other hand, waterproof fabrics are ideal for outdoor dining or grilling areas where staying dry is the priority. However, they trap heat, require a steep slope (at least 20°) to prevent water pooling, and put more strain on anchor points during storms.
When comparing fabric quality, look at the GSM (grams per square meter) rating. Heavier fabrics (185–340 GSM) tend to last longer and resist sagging. Also, check for a clearly stated UV block percentage and a warranty of at least 5–10 years to ensure durability. If your sail will be near a fire pit or grill, make sure it has a fire-retardant rating to comply with safety regulations.
| Aspect | Breathable HDPE Mesh | Waterproof / Coated Fabric |
|---|---|---|
| UV protection | 90–98% UV block | High UV block; near-opaque |
| Airflow | Hot air escapes through weave | Traps heat underneath |
| Rain behavior | Lets rain pass through | Sheds water with proper slope |
| Wind load | Lower; wind passes through | Higher; needs stronger hardware |
| Best for | Patios, pools, play areas | Dining areas, outdoor kitchens |
Choose Colors That Work for Your Space
The color of your shade sail affects not only how it looks but also the temperature and light under it. Darker shades like charcoal, navy, or forest green absorb more heat but block more visible light and glare, creating a cooler, more comfortable shade. Lighter colors like cream, sand, or light gray keep the area brighter and more open but allow more light to filter through. They also tend to show dirt, pollen, and mildew more easily.
A mid-tone neutral, such as taupe, slate, or warm gray, is often a good middle ground. It reduces glare without making the space feel dark, hides dirt better, and blends well with most siding, roofing, and patio materials. For example, if your patio has light-colored pavers or concrete, a slightly darker sail can cut down on reflected glare. Conversely, over a dark wood deck, a lighter sail can brighten the space and keep surface temperatures lower.
Before settling on a color, test a fabric swatch at the height where the sail will be installed. Check how it looks at different times of day, like midday and late afternoon, to ensure it complements your space in all lighting conditions.
Tie Your Shade Sail Into Your Landscape Design
After deciding on fabric and color, the next step is making sure your shade sail fits seamlessly into your outdoor space. A well-placed sail feels intentional when it aligns with the existing geometry of your yard. For example, you can run sail edges parallel to patios, facades, or walkways for a clean, cohesive look. If you’re aiming for something more modern, angling a triangular sail against these lines can add visual interest without looking out of place.
Color coordination is just as important as shape. Start by identifying the main tones in your exterior – like your siding, roof, or patio materials. Choose a sail color that either matches or complements these tones. For instance, a warm-toned flagstone patio pairs well with sand or taupe sails, while a cool-gray paver patio looks great under charcoal or slate.
If you live in central Maryland or the Washington, DC area, integrating a shade sail into a more complex outdoor setup – especially one with slopes, existing patios, or drainage systems – can get tricky. Pro Landscapes MD (prolandscapesmd.com) specializes in creating cohesive designs that tie together shade structures, patios, walkways, outdoor kitchens, and garden features for a unified look.
"Landscape designers are the visionaries, blending aesthetics with functionality to create a cohesive plan that suits your taste and lifestyle." – Pro Landscapes MD [1]
Plan Mounting, Height, and Setup Details
Set the Right Height, Slope, and Tension
To ensure proper headroom and effective shade, mount the lower anchor points at a height of 8–9 feet and the higher ones at 10–12 feet. For rain runoff and to minimize sag, tilt one corner of the sail 2–3 feet higher (for a 12-foot span), creating a slope of about 10–20°. Start by attaching the sail loosely with turnbuckles and shackles at each corner. Then, tighten everything evenly to achieve a slight upward curve in the sail without any sagging.
Once you’ve achieved the desired slope and tension, secure these adjustments using reliable hardware and support structures.
Hardware and Support Structures You Will Need
Choosing the right hardware is essential for maintaining proper tension and alignment. You’ll need four sturdy anchor points, such as structural walls, pergola beams, or heavy-duty posts. These points must be attached to framing members – not just siding or trim – for stability.
If existing structures aren’t ideally positioned, freestanding posts are a great solution. For smaller or mid-size sails (around 12×12 feet to 16×16 feet), 4×4 or 6×6 pressure-treated lumber or steel posts installed 3–4 feet deep in concrete are a solid choice. To counteract the tension from the sail, lean the posts slightly away from its center. For larger sails or areas exposed to high winds, consider engineered steel posts with deeper and wider footings.
A standard residential hardware kit typically includes pad eyes or wall plates, D-shackles, turnbuckles for fine-tuning tension, and stainless steel cables when anchor points aren’t directly aligned with the sail corners. If you live in a humid area or near the coast, opt for marine-grade 316 stainless steel hardware to prevent rust. And don’t forget to call 811 before digging post holes to check for underground utilities.
Safety, Drainage, and Local Weather Conditions
Beyond secure mounting, proper drainage is key to protecting your space from water damage. To handle wind gusts of 70–85 mph, ensure your sail has the right slope, tension, and strong supports. Direct water runoff from the sail’s lowest corner toward a lawn, planting bed, swale, or French drain. For areas with persistent drainage issues, you might need to incorporate grading or create dry riverbeds to prevent pooling water.
For example, in central Maryland, Pro Landscapes MD often combines shade structures with grading and drainage solutions to ensure that runoff from a new sail doesn’t cause problems elsewhere in the yard.
Shade Sail Selection Checklist
Use this checklist to ensure you’ve considered all the important details before installing your shade sail. It covers the essential steps for choosing and setting up the perfect sail for your space.
| Step | What to Confirm |
|---|---|
| Define the area | Measure the length, width, and diagonal spans in feet. Note any doors, walkways, or obstacles in the area. |
| Sun and weather | Observe shade needs at 9:00 a.m., noon, and 3:00 p.m. on a sunny day. Take note of the prevailing wind direction. |
| Anchor points | Identify at least three sturdy anchors, such as framing, masonry, or properly installed posts. Check for any overhead power lines. |
| Size and shape | Choose a sail that’s about 10% smaller than the anchor-to-anchor spans to allow space for turnbuckles and tensioners. |
| Fabric type | Select breathable HDPE mesh for hot or breezy conditions, or opt for waterproof fabric if rain protection is a priority. |
| UV rating | Ensure the fabric blocks 90–95% of UV rays and comes with a warranty for long-term UV stability. |
| Color | Pick lighter colors (like beige, cream, or light gray) for cooler shade, or darker colors (such as charcoal or navy) to reduce glare and create denser shade. |
| Mounting plan | Plan for a 12–18-inch height difference across the sail to allow proper water runoff. |
| Hardware list | Make a list of necessary hardware, including pad eyes, D-shackles, turnbuckles, and stainless steel or galvanized steel cables for each anchor point. |
| Local codes and permits | Check HOA regulations, permit requirements, and frost depth for footings. Confirm plans for seasonal removal, if needed. |
| Landscape fit | Verify that the sail won’t block important views, overly shade plants that need sunlight, or clash with your patio, house colors, or hardscape design. |
Go through each item to ensure your shade sail design is both functional and visually appealing. For more detailed information on any of these steps, refer to earlier sections.
For larger projects, plan post locations and footings early in the process. Companies like Pro Landscapes MD can help integrate shade structures with hardscaping and drainage for a well-coordinated outdoor space.
Conclusion
Choose a shade sail that combines coverage, comfort, safety, and style to create the perfect outdoor retreat. Pay attention to sun patterns, measure your space carefully, opt for HDPE fabric with 95–98% UV protection, and ensure you use secure anchors to make your outdoor area both functional and inviting.
The right shade sail can do more than just cool your patio by 10–20°F on those scorching afternoons – it can also add a sense of structure and style to your outdoor dining or lounge area. This combination of practical cooling and visual appeal makes it a great addition to your yard.
In Maryland, the summer heat, high humidity, and frequent thunderstorms require careful consideration. A well-designed sail with proper slope, strong anchors, and durable material is essential to handle these conditions. Many properties in areas like Howard, Montgomery, Frederick, and Baltimore counties feature sloped yards, patios, or retaining walls, which can influence where and how posts and hardware are installed. For larger projects or complete outdoor makeovers, reach out to Pro Landscapes MD for help integrating your shade sail with patios, outdoor kitchens, seating walls, or drainage systems.
Whether you’re planning a simple DIY project using the tips from this guide or envisioning a full outdoor transformation, start assessing your space today to bring your vision to life.
FAQs
Do I need a permit or HOA approval for a shade sail?
Whether you need a permit or approval from your HOA for a shade sail depends on local rules and your community’s specific guidelines. It’s a good idea to contact your local building department and Homeowners Association before kicking off your project. For help designing and incorporating outdoor structures that comply with regulations while matching your style, Pro Landscapes MD has you covered.
How do I choose between HDPE mesh and waterproof fabric?
When deciding between HDPE mesh and waterproof fabric, it all comes down to what you need most: airflow or weather protection.
- HDPE mesh is designed for breathability, allowing air to flow freely and helping to keep the space cooler – perfect for hot, sunny days.
- Waterproof fabric, on the other hand, provides complete rain protection, making it a better choice for keeping outdoor furniture and guests dry during wet weather.
Think about your local climate and how you plan to use your outdoor space. Whether you prioritize staying cool or staying dry will guide you toward the right choice.
Should I remove my shade sail for winter or storms?
Yes, it’s a good idea to take down your shade sail during winter or severe storms. Heavy snow and strong winds can put excessive stress on the fabric and mounting hardware, which might lead to damage. Removing it during harsh weather conditions can help preserve its condition and extend its life. For more guidance on caring for your outdoor spaces in Maryland’s unpredictable weather, reach out to Pro Landscapes MD for expert tips and professional advice.
Chat with Us