









- bhavya gada
- No Comments
You can turn one Maryland yard into habitat for birds, pollinators, frogs, and small mammals by giving each area a job. I’d keep the front yard neat with sunny native flowers, use side yards as planted paths, and make the back yard the main shelter and water zone.
Here’s the short version:
- Map the yard first: sun, shade, wet spots, slopes, fences, and trees
- Match each zone to wildlife needs:
- birds = layered edges
- pollinators = full sun
- frogs = cool, moist ground
- small mammals = dense shrubs and fence lines
- Plant in layers: trees, understory, shrubs, grasses, and groundcovers
- Cover all four wildlife needs: food, water, cover, and places to breed
- Add simple habitat features: shallow birdbaths, rain gardens, brush piles, logs, and stone gaps
- Maintain with a light touch: less mowing, no extra fertilizer, and leave stems and leaf litter through winter
A few numbers show why this matters. Lawns cover more than 3.8 million acres in the Chesapeake Bay watershed, and Maryland gets about 42 inches of rain per year. That means even a small yard can help slow runoff and give local wildlife more room to live.
I’d think of the yard as one linked system, not three separate spaces. The goal is simple: make it easy for wildlife to feed, move, hide, and nest across the whole property without turning the yard into a mess.
Step 1: Map Your Yard and Assign Habitat Zones by Species
Start with a simple property map. Mark the trees, shrubs, lawn areas, patios, fences, sheds, and any wet spots you already have. Then walk the yard three times – morning, midday, and late afternoon – and note what changes.
Watch where the sun hits, where water runs after rain, and where the ground stays soggy. That part matters more than people think. A full-sun, well-drained area is a much better spot for pollinator planting. A low, moist area makes more sense for frog habitat. Use the map to match each species to the part of the yard that fits it best.
Match Front, Side, and Back Yards to the Right Habitat Roles
Give each part of the yard a job. The front yard works well for visible planting beds. Side yards can act as movement corridors. Back yards usually have the space for thicker habitat.
A planted hedge or layered native border along a side fence can help birds and small mammals move from the front of the property to the back. Try to keep planting strips connected. Big stretches of lawn can block movement. Back corners are often the best place for brush piles and thicker cover that stays a bit out of sight.
Next, match those zones to the species that need them most.
Assign Zones for Birds, Pollinators, Frogs, and Small Mammals
Put birds along layered edges, pollinators in full sun, frogs in low moist areas, and small mammals near protected fence lines and shrub cover.
A few simple matches can guide the layout:
- Birds: layered edges
- Pollinators: full-sun areas
- Frogs: low, moist spots with some shade
- Small mammals: fence lines and dense shrubs
Pollinator zones work especially well along front walkways and side driveways, where native perennials can get at least 6 hours of direct light. Frog zones should stay cool and have some shade.
Before you add wet habitat, deal with pooling water, runoff, and erosion. You can do that with grading, drains, or stormwater features. Once your map shows the zones, paths, and trouble spots, you’re ready to place plants and habitat features in the next steps. That zoning map becomes your guide for layers, cover, water, and nesting structure.
sbb-itb-843f8be
Step 2: Build Layered Planting for Food, Cover, and Nesting
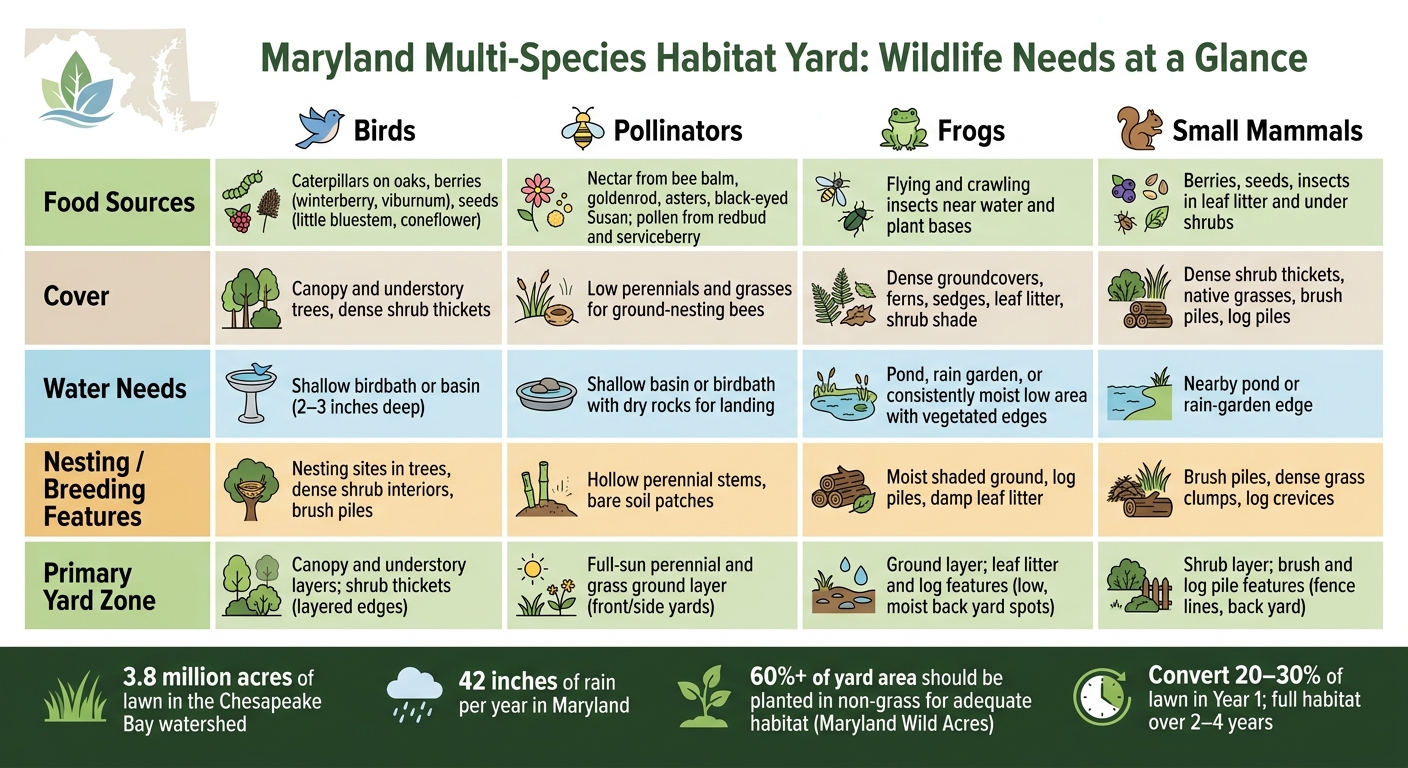
Maryland Wildlife Habitat Yard Zones: Species Needs at a Glance
Once your zones are mapped, layered planting turns them into habitat that actually works. The idea is simple: stack plants from the ground up so every level offers food, cover, or nesting space. That kind of vertical structure mirrors Maryland’s native habitats and gives wildlife something useful at every height. Use your zone map to decide where each area needs more food, thicker cover, or better nesting structure.
Use Native Plant Layers That Support Wildlife Year-Round
Each plant layer does a different job:
- Canopy trees: White oak (Quercus alba) hosts hundreds of caterpillar species. Black gum (Nyssa sylvatica) feeds birds and small mammals with its fruit.
- Understory trees: Serviceberry (Amelanchier canadensis) offers early blooms for pollinators and berries for birds. Eastern redbud (Cercis canadensis) feeds native bees in early spring.
- Shrubs: Winterberry holly (Ilex verticillata) and arrowwood viburnum (Viburnum dentatum) form dense thickets that shelter small birds and mammals while producing fruit and seeds across seasons.
- Ground layer: Native perennials and grasses fill the gaps. Black-eyed Susan, bee balm, and goldenrod supply nectar and draw in the insects frogs feed on. Little bluestem (Schizachyrium scoparium) and switchgrass (Panicum virgatum) stay standing through winter, holding seed heads for birds and cover for insects. Pennsylvania sedge (Carex pensylvanica), wild ginger (Asarum canadense), and retained leaf litter help keep soil moist and cool for amphibians and small mammals.
Instead of dotting single plants around the yard, plant them in drifts. Group 5–7 of the same shrub or perennial in curved sweeps. That makes flowers easier for pollinators to find, gives birds and small mammals a more continuous path under cover, and makes the planting look planned instead of random. That last part matters if you want the yard to look good from the street. Maryland’s Wild Acres program notes that about 60% or more of yard area, excluding the house, should be planted in something other than grass to provide adequate food and cover.[4]
Plan Bloom Times, Berries, Seeds, and Winter Cover
A good habitat planting doesn’t peak for two weeks and then go flat. It keeps working across the whole year.
In early spring (March–April), redbud and serviceberry bloom first and feed native bees as they come out of dormancy. In late spring to early summer (May–June), black-eyed Susan, penstemon, and wild geranium take over. Then mid- to late summer (July–August) brings bee balm, milkweed, and coneflower, which is prime nectar season for butterflies and for the insects frogs rely on. In fall (September–November), goldenrod and asters carry pollinators right up to frost, while viburnum and black gum drop berries for birds and small mammals.
Winter is where many yards come up short. Winterberry holly holds its red berries from August through February.[3] Little bluestem and switchgrass stay upright, keeping seed heads available for birds and giving insects cover through the cold months. NRCS pollinator habitat standards recommend at least three flowering species per season – spring, summer, and fall – and at least one native bunchgrass for a planting to work in a steady way.[5]
Habitat Comparison Table: Species Needs at a Glance
Use the table below to match each wildlife group with the layers and features it needs most.
| Species Group | Food Sources | Cover | Water Needs | Nesting / Breeding Features | Primary Layer / Feature |
|---|---|---|---|---|---|
| Birds | Caterpillars on oaks, berries (winterberry, viburnum), seeds (little bluestem, coneflower) | Canopy and understory trees, dense shrub thickets | Shallow birdbath or basin | Nesting sites in trees, dense shrub interiors, brush piles | Canopy and understory layers; shrub thickets |
| Pollinators | Nectar from bee balm, goldenrod, asters, black-eyed Susan; pollen from redbud and serviceberry | Low perennials and grasses for ground-nesting bees | Shallow basin or birdbath | Hollow perennial stems, bare soil patches | Perennial and grass ground layer |
| Frogs | Flying and crawling insects near water and plant bases | Dense groundcovers, ferns, sedges, leaf litter, shrub shade | Pond, rain garden, or consistently moist low area with vegetated edges | Moist shaded ground, log piles, damp leaf litter | Ground layer; leaf litter and log features |
| Small Mammals | Berries, seeds, insects in leaf litter and under shrubs | Dense shrub thickets, native grasses, brush piles, log piles | Nearby pond or rain-garden edge | Brush piles, dense grass clumps, log crevices | Shrub layer; brush and log pile features |
Step 3: Add Water, Shelter, and Breeding Features to Each Yard Zone
Layered planting gives wildlife food and cover. But food alone isn’t enough. Water, shelter, and places to nest are what make each zone in your yard usable habitat.
Place Water Features Where They Support Wildlife and Drainage
Start simple with a shallow birdbath. Aim for 2–3 inches deep, with a textured or sloped surface so birds and small mammals can drink without slipping.[6][8] Add a few flat rocks or pebbles so bees and butterflies have a dry place to land.[9] Set the birdbath within 10 feet of low shrubs so birds can dart into cover if a predator shows up.[6]
If you have the room and the site works for it, a small wildlife pond in the back yard can support frogs, toads, salamanders, and dragonflies.[7][8] Keep the edges gently sloped and build in more than one depth level.[8] And skip the fish. They eat amphibian eggs and larvae.[7]
For runoff, a rain garden can do double duty. Placed at a downspout outlet or a natural low spot, it catches water, filters pollutants, and creates a moist feeding area. Maryland guidelines say rain gardens should be 4–10 inches deep and set at least 10 feet from building foundations.[14] A dry riverbed can move overflow through a side yard and echo the look of a natural stream.[10]
Whatever kind of water feature you add, keep pesticides, herbicides, and algaecides away from it.[1][2]
Once water is in place, the next step is cover nearby so wildlife can feed, hide, and nest in the same zone.
Build Shelter with Brush Piles, Dense Shrubs, Stems, Logs, and Walls
Shelter works best when it comes in layers. A brush pile in a back corner gives small mammals, ground birds, and some reptiles and amphibians a place to hide fast and nest. Maryland DNR recommends building the base in a log-cabin pattern with logs 4–6 inches in diameter, spaced 6–10 inches apart, then piling branches on top until the structure reaches about 5 feet tall.[15][16] Keep brush piles at least 10 feet from the house, and along woodland edges, space them every 200–300 feet to help wildlife move with cover.[16]
Dead logs and coarse woody debris in shaded beds can draw salamanders, skinks, and helpful insects.[17][18] Standing perennial stems left up through winter give insects a place to live and birds a winter food source. For birds, dense evergreen shrubs and thickets add year-round hiding cover.
Stone walls can help too, whether they’re retaining walls, garden walls, or seat walls. The gaps between stones create mixed warm and cool spots that support insects, spiders, reptiles, amphibians, and nesting birds.[11][12][13] Dry-stacked natural stone usually offers more habitat than tightly mortared walls because the uneven openings stay open.
These features should support the roles you already set for each zone in Step 1, not fight against them.
Front vs. Side vs. Back Yard: Habitat Feature Comparison Table
Match each part of the yard to features that fit its visibility, moisture, and foot traffic. Front yards usually need the neatest look. Back yards usually have the most room for wilder habitat.
| Yard Area | Visual Formality | Best Habitat Features | Complexity | Best Fit For |
|---|---|---|---|---|
| Front yard | High – clean edges, visible structure | Shallow birdbath, layered native foundation planting, low stone garden wall or edging | Low to moderate | Birds, pollinators |
| Side yard | Moderate – functional, transitional | Narrow rain garden, dry riverbed, screening shrubs, standing stems | Moderate | Birds, pollinators, small mammals |
| Back yard | Low – naturalistic, less visible | Wildlife pond or basin, brush pile, log cluster, dense shrub thickets, larger rain garden | High | Birds, pollinators, frogs, small mammals |
Step 4: Install and Maintain the Landscape for Long-Term Habitat Value
Prepare the Site and Plant One Zone at a Time
Now that the zones are mapped, build them in phases. A good pace is to convert the yard over 2–4 years, starting with 20%–30% of the lawn in year one.[28]
Start with the first zone. Remove turf, loosen compacted soil, add 2 inches of compost, and top it with 2–3 inches of shredded hardwood mulch. Keep the mulch off stems and trunks.[25][28]
Do the site prep before adding new plants. Protect any native plants already on the property before you start clearing. Oak saplings, spicebush, serviceberry, and native sedges should be flagged or caged so they don’t get removed by mistake. At the same time, take out invasive plants such as English ivy, Japanese barberry, bush honeysuckle, Bradford pear, and multiflora rose. These plants crowd out natives and reduce food and cover for wildlife. It often makes sense to begin where native plants are already doing well, then move into the more worn-down parts of the yard.
When it’s time to plant, work from the top down:
- Trees and large shrubs first
- Mid-layer shrubs next
- Ground-layer perennials and grasses last
That order keeps access open during planting and makes early watering simpler. It’s also smart to expect up to 10% of plants to fail in the first year and set aside money for replacements.[28]
Maintain the Habitat Without Disrupting Wildlife
Once planting is done, the main job is to protect what you’ve built without disturbing the animals using it. Established native plants need less water, no fertilizer, and very little mowing.[25][26] New plantings should get the equivalent of 1 inch of water per week while they establish. After that, water only during droughts that last 10 days or more.[27]
Hold off on major pruning during nesting season, which is usually mid-March to mid-August.[21] For structural pruning, late winter before bud break is a good window. Late summer also works after nesting slows down. Before making cuts, check for active nests.
Leave stems, seedheads, and leaf litter in place through winter. Cut stems back to 12–18 inches in late winter or early spring – not fall – once temperatures start rising on a steady basis.[19][20] That leftover plant material does more than look messy. Hollow stems give shelter to cavity-nesting bees and overwintering insects. Leaf litter under shrubs and along woodland edges helps insulate frogs, insects, and small mammals, so let it stay where it falls inside habitat zones.
A 2–4-foot mowed edge around meadow plantings helps show that the area is intentional, while the habitat inside stays protected. The meadow itself only needs mowing once or twice a year, best in late winter or early spring, using a high blade setting.[21][24]
Be careful with pesticides, especially near water, drainage features, and active frog or pollinator zones. Amphibians absorb contaminants directly through their skin, which makes them especially at risk.
Conclusion: Connect Your Yard Zones into One Working Habitat
The point of all four steps is to turn separate beds and features into one connected system. Repeat native shrubs and perennials from the front yard to the side yard to the backyard so birds, pollinators, frogs, and small mammals can move across the property more easily. Side yards and fence lines are often the missing link. Even a narrow strip of layered native planting can connect larger habitat patches in front and back.
Drainage features help tie the whole layout together. A vegetated swale or dry riverbed that moves water through a side yard can also serve as frog and insect habitat while helping protect water quality. That matters in the Chesapeake Bay watershed, and it lines up with what Maryland programs like Bay-Wise and Rainscapes recognize.[22][23]
FAQs
How big does my yard need to be for a multi-species habitat?
You don’t need a big yard to support a multi-species habitat. Almost any yard can help local biodiversity when you use native plants that offer food and shelter.
Add layers of native vegetation, and bring in simple features like a water source or hardscaping, and even a small yard can become a space that supports birds, pollinators, and other local wildlife.
Which native plants are best for each yard zone?
Choose native plants that fit each zone’s light and moisture levels. That simple match makes a big difference. Put a moisture-loving plant in a dry patch, and it’ll struggle. Give a sun plant too much shade, and it won’t do much.
Here’s a simple way to group them:
- Wet areas: Swamp Milkweed, Cardinal Flower, Sweetbay Magnolia
- Dry, sunny spots: Butterfly Weed, Prairie Dropseed, Aromatic Aster
- Shaded zones: Wild Ginger, Foamflower, Christmas Fern
- Year-round resources: Purple Coneflower, Winterberry Holly, Joe-Pye Weed, Goldenrod
This kind of plant mix helps each part of the space do its job. Wet spots can handle plants that like damp soil. Sunny areas can support plants that handle heat and direct sun. Shade zones can stay full and green instead of looking bare. And plants that offer food or shelter across seasons help keep the garden active for more of the year.
How can I keep a wildlife-friendly yard looking neat?
Use a clear plan and steady upkeep. Group native plants into neat, well-defined zones so the space looks planted on purpose, not overgrown.
Add structure with clean-edged walkways, retaining walls, or stone borders. Keep vegetation trimmed back from structures, and clear debris from drain pipes or weep holes so the landscape stays healthy and orderly.
Chat with Us