









- bhavya gada
- No Comments
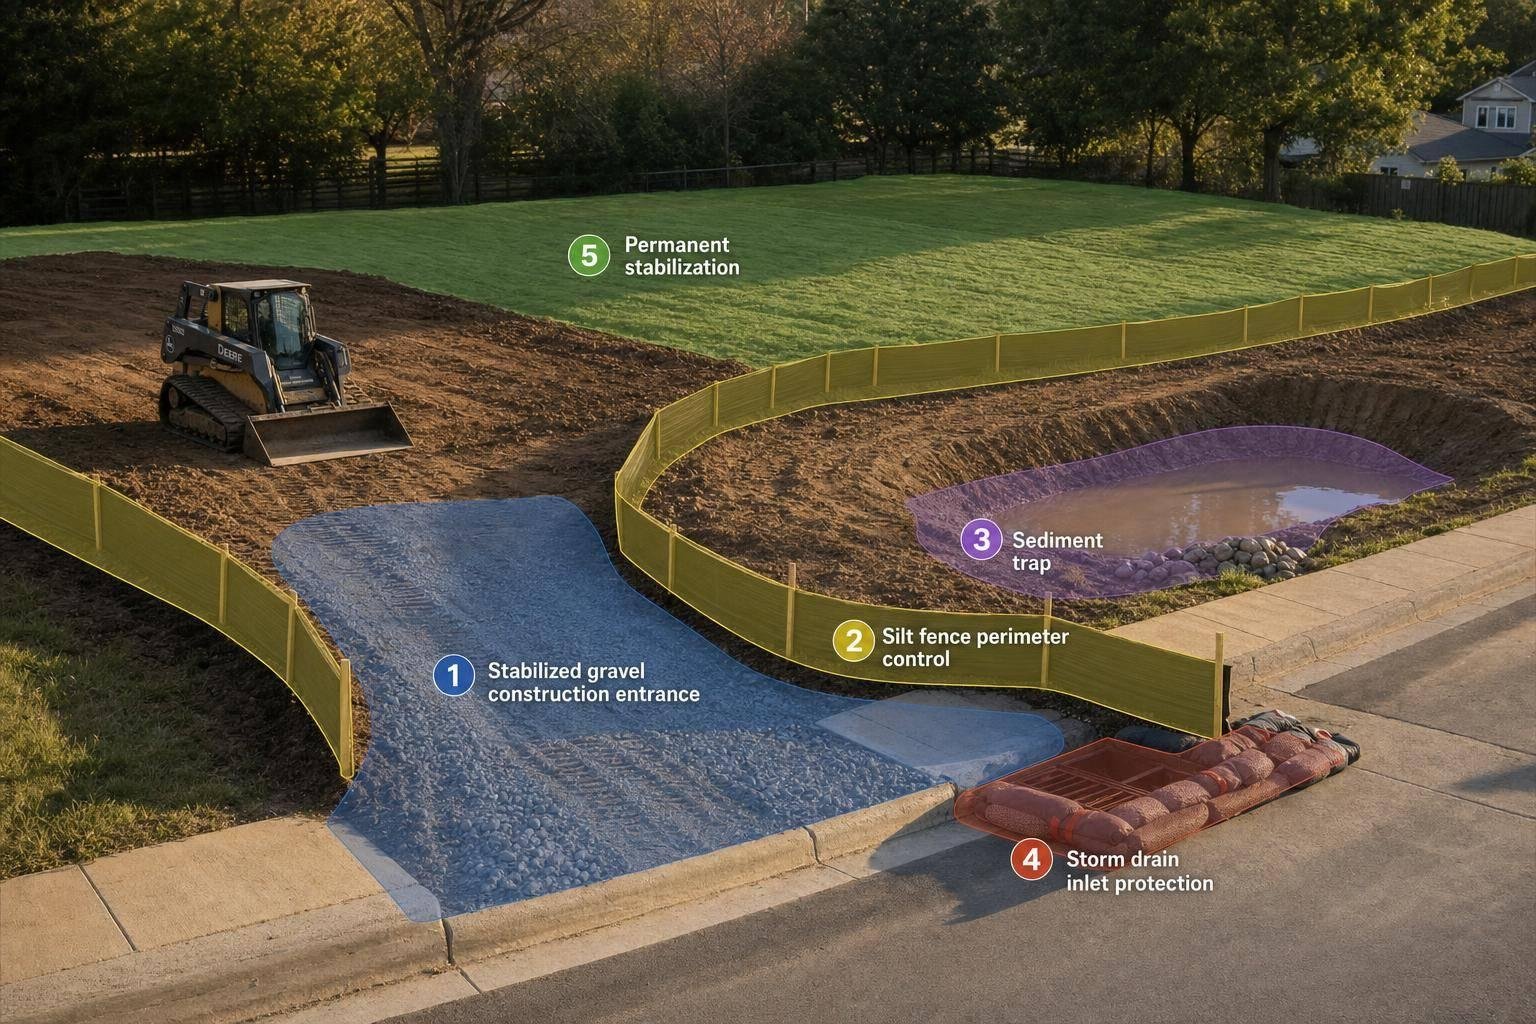
If I disturb soil before BMPs are in place, I’m already late. On a Maryland residential job, the setup order is simple: site access first, perimeter controls next, then sediment traps and inlet protection, then upkeep, then final stabilization, and only after that do temporary BMPs come out.
Here’s the short version I’d want in front of me before work starts:
- Install the stabilized construction entrance first so trucks don’t track mud onto roads.
- Set perimeter controls before clearing or grading along downslope edges, lot lines, and stockpiles.
- Add sediment traps before grading in each drainage area so runoff has a place to slow down and drop sediment.
- Protect every storm drain inlet before runoff can reach it because once sediment enters the drain system, the damage is done.
- Inspect at least weekly and after rain; small failures can turn into washouts after one storm.
- Stabilize idle disturbed areas fast: 3 days for perimeter controls and steep slopes, 7 days for other disturbed ground.
- Keep temporary BMPs in place until final grading and permanent cover are done.
- Remove temporary controls last, after the drainage area is stable and approval is given.
- Stabilize soil disturbed during BMP removal within 24 hours.
A few numbers matter here:
- Final stabilization usually means 70% perennial vegetation or equivalent cover.
- Inlet protection is often limited to about 1 acre of drainage unless runoff is treated first.
- Around foundations, the ground should fall about 6 inches in the first 10 feet away from the house, or about 5% slope.
If I had to boil the whole plan down to one line, it would be this: control runoff before grading, keep controls working during the job, and remove them only after the site is fully stable.
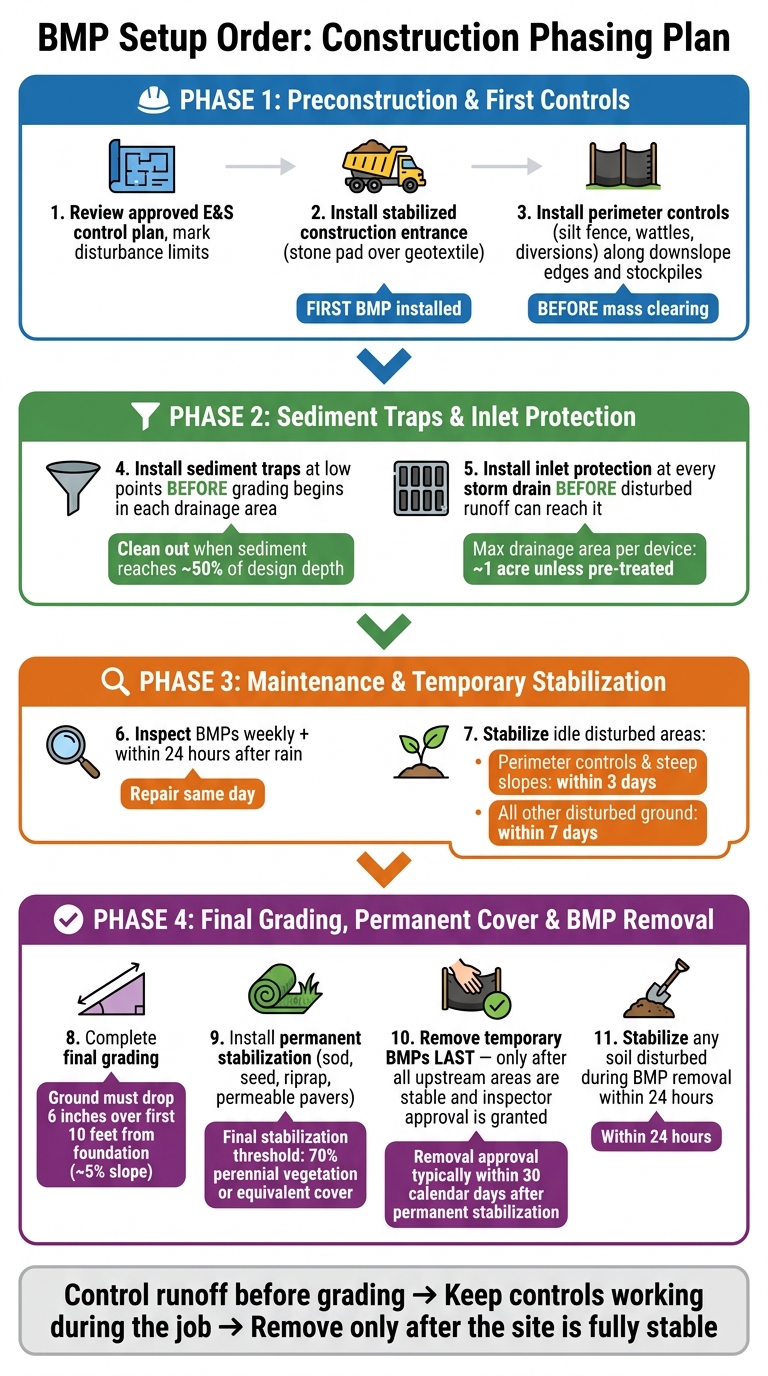
BMP Setup Order: Construction Phasing Plan from First Access to Final Cover
Construction BMPs – 2: Stormwater Runoff/Run On
sbb-itb-843f8be
Phase 1: Preconstruction planning and first controls to install
Before equipment shows up, verify the approved erosion and sediment control plan and field-mark the disturbance limits. Put controls in place before any earthwork starts, aside from the bare minimum needed to install those controls.[11][6]
Check the site plan, drainage paths, and disturbance limits
Start by reviewing the approved BMP sequence, disturbance limits, drainage patterns, inlet locations, stockpile areas, and any phasing notes. Then walk the site. Look for low spots, downslope edges, steep slopes, existing storm inlets, utility tie-ins, and nearby sensitive areas where runoff might collect or leave the site.[4][5] Maryland guidance says the limit of disturbance must be field-marked before clearing starts.[5]
Install the stabilized construction entrance before equipment begins regular access
The stabilized construction entrance should be the first BMP you install, before routine truck and equipment traffic begins.[1][13] Its job is simple: cut down on mud and sediment tracking onto public roads, driveways, and sidewalks. Use a stone pad over geotextile, or a similar separator, so every vehicle crosses it when entering and leaving the site.[3][7] Send all normal access through that entrance.
If ruts start to form, add more stone. If track-out keeps happening, make the pad longer. And sweep pavement before sediment gets into a storm drain.[7][9][14]
Set perimeter controls before mass clearing or grading starts
After the entrance is in place, install perimeter controls along downslope edges, property lines, and around stockpiles before mass clearing begins.[12][11] On residential sites, that often means silt fence, compost filter logs, wattles, and temporary diversions. The right choice depends on the slope, the drainage path, and what sits downslope.
For silt fence, trench the lower edge, key the fabric into the soil, then backfill and compact.[8] Turn the fence ends uphill so runoff can’t slip around the sides.[10] Securely anchor wattles and filter logs, and make sure the ends are closed.
Once the perimeter controls are in, add sediment traps in each drainage area and inlet protection at every storm drain as more of the site opens up.
Phase 2: Add sediment traps and inlet protection as the site opens up
After perimeter controls are in place, Phase 2 adds BMPs at drainage points and storm drain inlets. The idea is simple: put secondary controls where runoff starts to gather speed and volume.
Install sediment traps before grading in their drainage areas
Set each trap at a low point or outlet before grading starts uphill from it. Runoff should be directed into the trap on purpose, using earth dikes or swales, instead of letting water slip past it.
Each trap needs:
- enough storage for the drainage area
- a stable embankment
- a clear overflow path that sends extra water to a stable outlet instead of cutting into a slope or washing onto nearby property
When sediment buildup reaches about half the design depth, clean the trap out [16][17]. Move the removed sediment to a stable area well away from drainage paths.
Once runoff is being caught at drainage outlets, the next step is to protect any inlet that still takes flow.
Add inlet protection before disturbed runoff can reach each storm drain
Protect each inlet before soil disturbance begins upslope. If sediment-heavy water gets into a storm drain without filtering first, the problem has already happened.
The right setup depends on the inlet location. Existing street inlets in active roadways need low-profile, traffic-safe devices such as gravel bags, curb socks, or block-and-gravel setups. These let water pass without causing unsafe ponding. New inlets built as part of the project can use sump-type inlet protection, horseshoe-shaped berms, or framed fabric barriers where there’s room.
Every device should include a clear overflow path – a weir, gap, or bypass – so larger storms can move through without flooding the street. Many stormwater manuals cap each inlet protection device at a drainage area of about 1 acre unless runoff is pre-treated in a sediment trap first [15][17]. Check these devices often after rain. A clogged inlet barrier that ponds water in the street is a safety problem, not just a maintenance item.
BMP setup order reference table by phase
| BMP | When to Install | Primary Purpose | Temporary or Permanent? |
|---|---|---|---|
| Stabilized construction entrance | Before routine equipment and truck traffic begins | Reduce mud and sediment tracking onto roads | Temporary |
| Perimeter controls (silt fence, wattles, diversions) | Before mass clearing or grading starts | Intercept runoff at site boundary and downslope edges | Temporary |
| Sediment traps | Before grading begins in each trap’s drainage area | Capture and settle sediment from disturbed runoff | Temporary |
| Inlet protection | Before disturbed runoff can reach each storm drain | Filter sediment before it enters the storm drain system | Temporary; supports perimeter BMPs |
Next, keep these controls working as the site stays active.
Phase 3: Maintain controls during construction and stabilize idle areas
Once the BMPs are in place, the job shifts from setup to upkeep. That part matters more than many crews expect. A silt fence can fail after a single storm, and when that happens, sediment can leave the site fast.
Inspect and repair BMPs after storms and active work periods
Maryland guidance calls for inspections at least weekly and the day after any rain.[3] Use the same inspection path every time so nothing gets missed. Start at the stabilized entrance, follow the perimeter controls, check downhill lot lines, inspect sediment traps, and finish at inlet protection.
During each walk, look for:
- tears
- leaning posts
- undercutting
- clogging
- overtopping
- sediment buildup
Fix any problems the same day. That includes small issues that seem easy to put off. A minor tear or a bit of undercutting can turn into a failed control after the next storm.
If work has stopped in any disturbed area, cover that area before moving to the next phase. That routine helps keep the BMP setup order working as planned until the site is ready for final grading.
Apply temporary cover where work stops for a period
Maryland’s erosion and sediment control standards set short deadlines. Perimeter controls and steep slopes must be stabilized within 3 days after work stops, and all other disturbed areas within 7 days.[2]
On slopes steeper than about 3:1, use temporary seeding, mulch, and an erosion control blanket. Install blankets from top to bottom, with overlaps placed shingle-style downhill and staples spaced per manufacturer guidance.[18][12]
Early stabilization of finished portions can cut the amount of sediment that reaches traps and inlets. That usually means less cleanout work and fewer machine hours.
Phase 4: Final grading, permanent cover, and removal of temporary BMPs
Complete final grading and install permanent stabilization
Once bulk earthwork is done, it’s time to move from temporary controls to permanent stabilization. Finish grading comes first. Before you install any permanent cover, the site needs the right slope and drainage pattern, especially near the house.
IRC-based guidance says the ground should drop at least 6 inches over the first 10 feet away from the foundation. That comes out to about a 5% slope.[30][32][33] Hardscape can work with about a 1% slope, as long as water still drains away from the structure.[31][34][35]
For permanent cover, you can use seed, sod, mulch, riprap, or permeable hardscape. Each has its place:
- Sod gives you immediate cover where fast protection matters.
- Seed is a good fit for larger lawn areas, but it needs time to grow in.
- Permeable pavers let water soak through a gravel base and help manage runoff where it starts.[19][20][21][24][26]
Finish regrading, downspout extensions, French drains, and swale shaping before you remove any temporary BMPs. If water is still collecting in the wrong spot, even healthy turf can wash out.
Do not remove temporary BMPs until these permanent measures are installed and working.
Remove temporary BMPs only after the drainage area is stable
Temporary BMPs should come out last, and only after all upstream areas have permanent stabilization and removal has been approved. Final stabilization means 70% perennial vegetation or an equivalent nonvegetative cover, such as riprap, gravel, gabions, or geotextiles.[22][23][25]
In Maryland, temporary sediment controls can be removed only with approval from the MDE or WMA inspector. This usually happens within 30 calendar days after permanent stabilization is in place across all contributing drainage areas.[1][5][29]
Perimeter controls, sediment traps, and inlet protection should be the final items removed. They need to stay put until every upstream disturbed area has permanent cover and is no longer sending sediment downhill. Once removal starts, clean up those disturbed spots right away. Backfill silt-fence trenches and post holes at once. Then backfill, compact, regrade, and stabilize the area.
Maryland guidance says any ground disturbed during BMP removal must be stabilized within 24 hours.[5][27][28]
Conclusion: The correct BMP setup order from first access to final cover
The order is simple: final grade, permanent cover, then removal of temporary BMPs.
FAQs
What happens if grading starts before BMPs are installed?
Starting grading before BMPs are in place is a bad bet. It increases erosion and sediment runoff, and it can put the project out of compliance from day one.
Construction also can’t move forward until an inspector confirms that required erosion controls – like silt fences and sediment traps – have been installed.
If work starts too soon, the result can be permit violations, work stoppages, and penalties.
How do I know which areas need sediment traps or inlet protection first?
Start with a detailed site assessment before you break ground. Look closely at natural drainage paths, steep slopes, and any spots where runoff tends to gather.
Give first priority to every storm drain inlet within 50 feet of disturbed soil, along with other high-risk areas where runoff collects before it leaves the site. Concrete washouts and soil stockpiles should be protected early too, both to limit runoff problems and to stay compliant.
When is a site stable enough to remove temporary BMPs?
Remove temporary BMPs only after the entire site reaches final stabilization. In plain terms, every disturbed area needs permanent cover in place, such as established sod, deep-rooted seeding, or finished paving.
Before anything comes out, final grading must be done, any required as-built plans must be approved, and a final site inspection must confirm compliance. That inspection also needs to verify that all permanent stormwater measures are fully working.
Chat with Us