


- bhavya gada
- No Comments
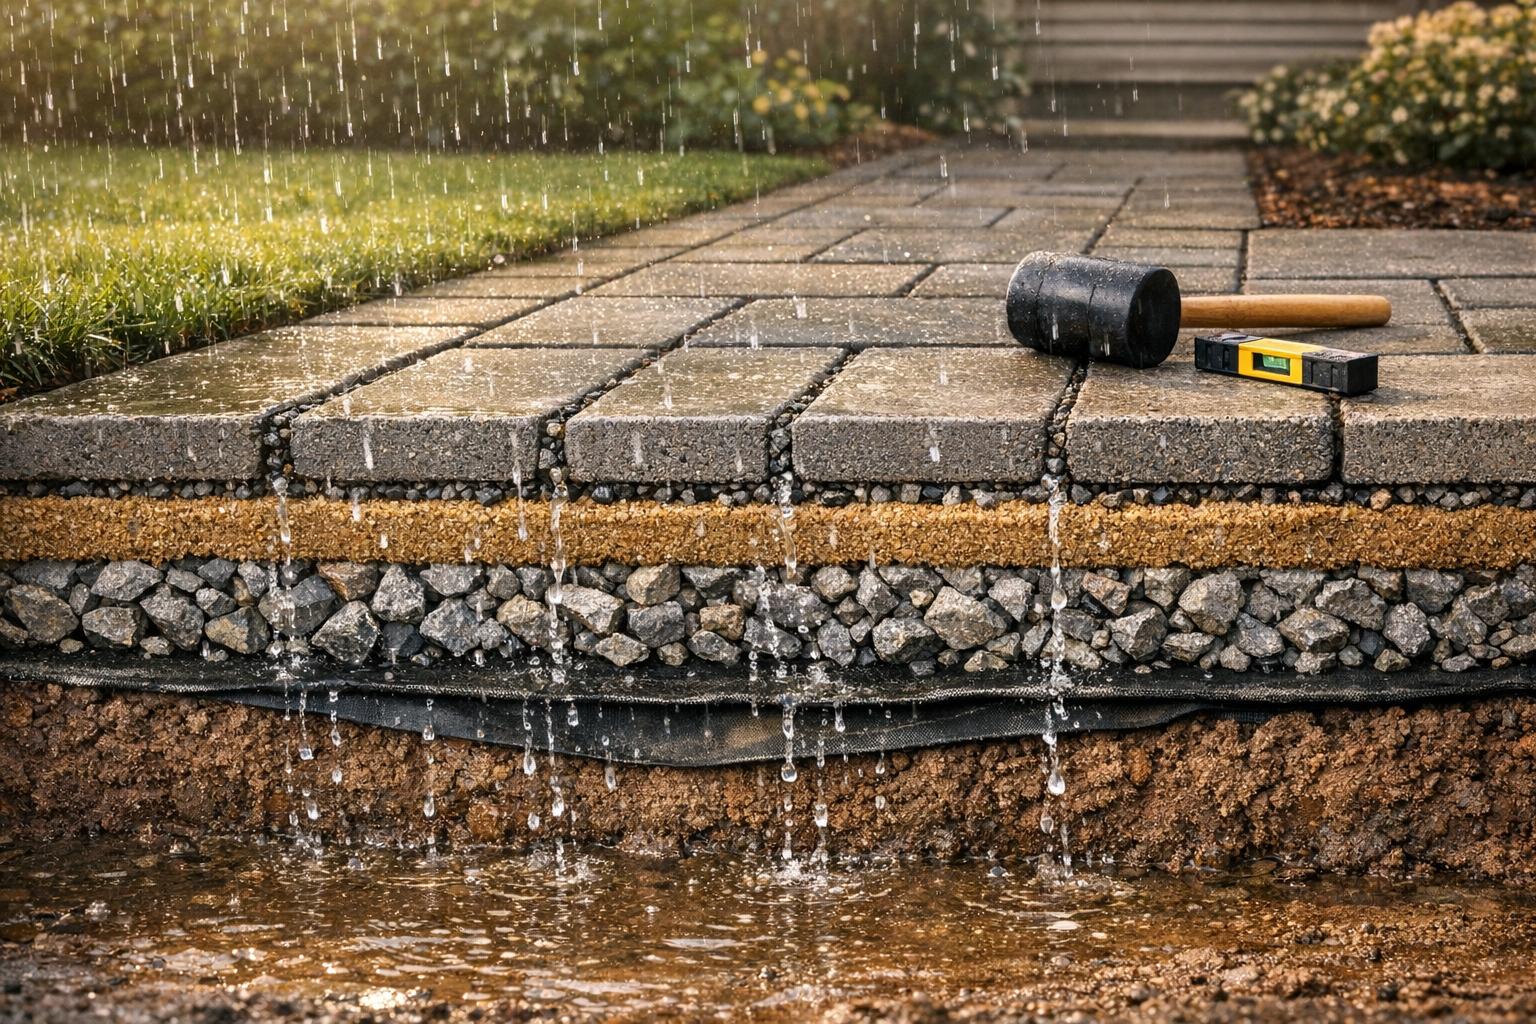
If water pools on your driveway or walkway after rain, permeable pavers could be your solution. These pavers let rainwater seep into the ground, reducing runoff, flooding, and erosion. Here’s what you need to know:
- What They Are: Permeable pavers are modular systems designed to allow water to pass through, built with layers of crushed stone and geotextile fabric for drainage.
- Why Use Them: They manage stormwater effectively, reduce standing water, and filter pollutants. Maryland’s clay-heavy soils benefit particularly well from these systems.
- Common Uses: Ideal for driveways, patios, walkways, and areas prone to water pooling.
- Installation Steps: Site preparation, excavation, layering crushed stone, laying pavers, and filling joints with angular stone.
- Maintenance: Regular sweeping, occasional joint refilling, and inspections for settling or damage.
For small, simple projects, DIY installation can save money. However, complex conditions like clay soils, steep slopes, or heavy traffic areas may require professional help to ensure long-term durability.
Permeable Pavers Installation Guide + PRO Tips
sbb-itb-843f8be
Tools and Materials You’ll Need
Having the right tools and materials from the start can make all the difference between a smooth project and a frustrating one. A little preparation goes a long way in saving time and avoiding costly missteps.
Basic Tools
To begin, you’ll need measuring tape, stakes, and a string line to outline your project area and check the slope. For excavation, grab a shovel, spade, and rake to remove soil to the proper depth. If you’re working on a driveway or a large patio, a plate compactor is a must to ensure the base is dense enough. For smaller jobs like garden paths, a hand tamper will do the trick [7][4].
To level the bedding layer, use screeding pipes, a screed board, and either a bubble level or laser level [6][7]. A rubber mallet is perfect for setting pavers without causing damage, and for cutting pavers, you’ll need a wet saw for concrete or stone. If you’re using plastic grid systems, a circular saw or reciprocating saw works well [1][4]. Finally, a push broom will help sweep angular stone into the joints efficiently [6][7].
Materials List
Start with a geotextile fabric layer to keep soil from mixing with your gravel, which can clog the system over time [1][7]. For the stone layers, follow these guidelines:
- ASTM No. 2 stone (1.5 to 2.5 inches) for the subbase.
- No. 57 stone (3/4-inch gravel) for the base.
- No. 8 stone (1/4 to 3/8 inch) for both the bedding layer and joint fill [7].
Always opt for angular stone instead of rounded gravel. The sharp edges of angular stone interlock under pressure, creating a stable surface that resists shifting or rutting [1][4]. Use clean, washed aggregate without fines (like dust or sand) to maintain high infiltration rates. Finally, select your permeable pavers, whether they’re perforated concrete blocks or modular grid systems.
Additional Equipment
To keep your installation in place, install edge restraints made of metal, plastic, or concrete. These are especially important to prevent movement during freeze-thaw cycles or under vehicle pressure [1][7]. For larger projects like driveways, renting a small excavator or skid steer can help manage the heavy lifting during soil removal and stone placement [1][3]. A wheelbarrow will also come in handy for transporting crushed stone and pavers from the delivery point to your work area [3]. On sloped areas, use extra anchors or stakes to secure the grid system [1].
With all your tools and materials ready, you’re set to move on to site evaluation and preparation.
How to Install Permeable Pavers
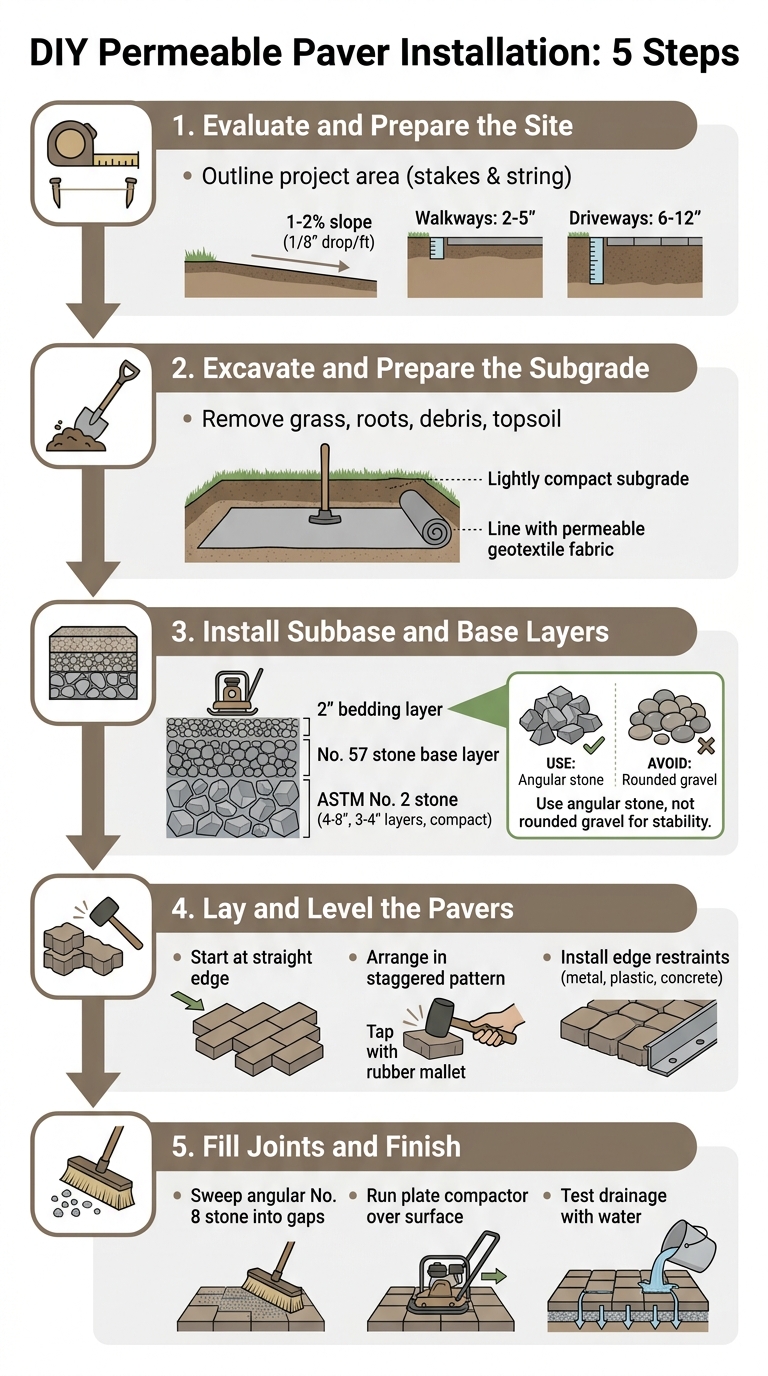
5-Step DIY Permeable Paver Installation Process
Step 1: Evaluate and Prepare the Site
Start by assessing your yard to understand the soil type and identify any drainage challenges. Pay close attention to areas where water tends to pool after rain – these spots will require extra care. Use stakes and a string line to outline the exact dimensions of your project, whether it’s a walkway, patio, or driveway. Make sure to establish a slight slope of 1–2% (about a 1/8 inch drop per foot) to direct water safely away from your home’s foundation [8]. If your soil is heavy clay, you may need to include additional drainage solutions in the sub-base.
Determine how deep you’ll need to excavate based on your project. Walkways and patios typically require 2–5 inches of depth, while driveways need 6–12 inches [4][8][1]. Mark these measurements clearly to avoid ordering the wrong amount of materials. Once the site is measured and sloped, clear the area and compact the subgrade.
Step 2: Excavate and Prepare the Subgrade
Dig down to the depth you calculated and remove all grass, roots, debris, and topsoil. The exposed subgrade should be firm enough to remain stable when walked on. Lightly compact the subgrade using a hand tamper or plate compactor, but don’t overdo it – this surface still needs to allow water to pass through [8][1].
Once the subgrade is ready, line the excavation’s bottom and sides with permeable geotextile fabric. This material keeps the clean stone layers from mixing with the soil while still allowing water to flow through [4][1]. Extend the fabric slightly above the edges of the excavation so you can trim it flush after the pavers are installed [4]. With the fabric in place, you’re ready to begin installing the stone layers.
Step 3: Install the Subbase and Base Layers
Start building the supportive stone layers on your prepared subgrade. Begin with a layer of coarse angular crushed stone, such as ASTM No. 2 stone, which ranges from 3/4 to 1.5 inches in size. Spread the stone in 3–4 inch layers and compact each layer thoroughly with a plate compactor until it feels stable [4][1]. Repeat this process until you’ve reached the full sub-base depth, which is usually 4–8 inches for driveways [8].
Next, add the base layer using No. 57 stone (around 3/4-inch gravel). Spread this in thin layers as well, compacting between each one. If you’re using block-style pavers, finish with a 2-inch bedding layer of sharp sand or grit, smoothing it with a screed to create a level surface [8]. Regularly check the slope with a level and string line to ensure proper drainage.
Step 4: Lay and Level the Pavers
Start laying the pavers along a straight edge or a snapped string line to keep rows aligned and square. For block pavers, arrange them in a staggered pattern, leaving consistent gaps between each one to allow water to pass through [8].
Gently tap each paver into place using a rubber mallet, and check the level frequently. If you need to fit pavers around curves or edges, use a wet saw for concrete or stone blocks, or a circular saw for plastic grid systems [4][1]. To keep the pavers secure, install edge restraints – these can be made of metal, plastic, or concrete – to prevent shifting due to freeze-thaw cycles or vehicle traffic [1].
Step 5: Fill Joints and Finish
Sweep angular No. 8 stone (sized between 1/4 and 3/8 inch) into the gaps between the pavers or into the cells of grid systems. Fill until the stone is level with the paver tops. Avoid using sand or rounded pea gravel, as these materials can block the drainage system [4][1]. Run a plate compactor over the surface one last time to settle the stone and lock the pavers securely in place.
Inspect the area for any uneven spots or low sections, adding more joint fill where needed. Double-check the slope with a level, and test the drainage by pouring a bucket of water onto the surface. If the water absorbs quickly, your permeable paver installation is complete.
Maintaining Your Permeable Pavers
Cleaning and Removing Debris
Keep your permeable pavers in great shape by sweeping them every few weeks. This simple step helps clear away leaves, soil, and debris that can form silt and clog the joints – especially important during the fall. If heavy rain leaves behind sediment, use a pressure washer carefully to clean out the joints.
"Permeable driveways are low-maintenance, but a little care goes a long way." – Ware Landscaping
Avoid using standard sealants on permeable pavers. These products create a waterproof barrier, disrupting the drainage system. Instead, every few years, add clean, angular stone (free of sand or fines) to the joints. This keeps the system stable and ensures proper water infiltration. Also, be proactive about removing weeds to prevent blockages.
Checking for Settling or Damage
After cleaning, take some time to inspect your pavers for any signs of settling or damage. Check twice a year for low spots where gravel may have shifted or settled. If you notice gaps, add angular stone until it’s level with the paver tops. Standing water or slow drainage can signal clogged joints or fine soil migration into the base layer.
Pay special attention to edge restraints, particularly after winter. Ensure they’re secure and rake any displaced gravel back into the joints. These seasonal checks help maintain a smooth surface and keep the drainage system working efficiently.
Seasonal Maintenance for Maryland
Maryland’s climate requires a bit of extra attention throughout the year. In the fall, frequent sweeping is key to clearing leaves. During spring, inspect for low spots and top off jointing stone as needed. Winter’s freeze-thaw cycles can cause shifting or settling, so monitor the pavers after heavy freezes. During the growing season, keep weeds in check to ensure the joints stay clear.
With Maryland’s heavy rainfall in spring and fall, combined with winter’s freezing and thawing, regular debris removal and inspections are crucial. Consistent upkeep protects your drainage system and ensures it continues to perform as intended over time.
When to Hire a Professional
Advantages of Professional Installation
While many homeowners can tackle straightforward installations, certain conditions make hiring a professional a smart choice. For example, dealing with heavy clay soils often requires a much deeper base layer. This is determined through a percolation test, which costs a few hundred dollars but can save you from investing tens of thousands in a system that might fail later on[5].
Steep slopes – anything over 12% – can also present major challenges and often demand specialized techniques[5]. Large excavation projects, especially those requiring heavy machinery, are usually beyond the scope of DIY work[1][3]. In high-traffic areas like driveways, professionals ensure the excavation depth is between 6 and 10+ inches and that base layers are compacted properly to avoid issues like rutting and shifting over time[1][4].
Complex projects, such as managing runoff from large areas like roofs, garages, or patios, add another layer of difficulty. For instance, a 4,000-square-foot runoff area might require deep base layers and expert grading to handle drainage effectively[5]. Professionals also help navigate permit requirements and may assist in qualifying for local incentive programs or reduced stormwater fees[3]. For these kinds of intricate situations, professional expertise ensures a durable and effective solution.
Pro Landscapes MD Services in Maryland

Pro Landscapes MD specializes in solving these advanced challenges with tailored solutions for difficult sites. They focus on permeable paver installation and comprehensive drainage systems throughout central Maryland, serving areas like Howard County, Montgomery County, Carroll County, Frederick County, Prince George’s County, and Baltimore County. Their team is experienced in managing poor soil drainage, steep slopes, and complex grading issues that can overwhelm even the most determined DIYer. With access to professional-grade tools and expertise in stormwater management, they design systems that hold up against Maryland’s heavy seasonal rainfall and freeze-thaw cycles.
Beyond installation, their services include French drains, grading, land leveling, and yard repair, offering solutions for a wide range of water-related challenges. Whether you’re dealing with clay soil in Ellicott City or steep slopes in Potomac, their experience ensures your permeable paver system will remain reliable for years to come.
Contact Pro Landscapes MD
If your project involves tricky drainage issues, difficult soil conditions, or significant slopes, Pro Landscapes MD can provide a professional evaluation. Visit their website at https://prolandscapesmd.com to learn more about their hardscaping and drainage services. You can also contact them directly for a custom quote tailored to your property needs in Maryland and Washington, DC.
Conclusion
Key Benefits Recap
Permeable pavers provide a practical fix for drainage issues while offering both environmental and visual advantages. These pavers allow rainwater to seep into the soil, helping to recharge groundwater supplies and naturally filtering out contaminants like oils and sediments before they can enter local waterways. Their open-cell design minimizes standing water and reduces the risk of ice during freeze-thaw cycles. Plus, many systems are made from 100% post-consumer recycled plastic, cutting down on environmental impact and mitigating the heat island effect commonly linked to asphalt and concrete surfaces[4].
DIY vs. Professional Installation
When deciding on installation, think about the scope of your project and the conditions of your site. For smaller, straightforward projects – like patios or walkways on level ground – DIY installation can be a cost-effective option, potentially saving 30% to 60% of total expenses[9]. For example, a 200-square-foot patio might cost $1,400–$2,200 if done yourself, compared to $3,200–$5,600 for professional installation[9]. However, the base layer is critical; if it isn’t compacted properly or is too shallow, the surface can shift, settle, or fail to drain as intended. Professionals ensure long-term durability by compacting stone bases to 98% proctor density, which is particularly important for driveways or areas that will bear heavy traffic[7]. For projects involving steep slopes, clay-rich soil, or intricate grading, professional expertise and specialized equipment are often necessary to achieve the desired results.
Your Next Steps
Now that you’ve reviewed the benefits and installation options, start by measuring your project area and calculating the amount of crushed stone and pavers required[1][2]. Check local regulations regarding stormwater management, and consider renting a plate compactor for larger DIY projects[1][4]. For more complex jobs – such as driveways, steep slopes, or poorly draining soil – reach out to Pro Landscapes MD for a professional assessment. Their team can evaluate soil conditions, grading, and drainage needs to design a system tailored to Maryland’s seasonal rain and freeze-thaw patterns. Visit https://prolandscapesmd.com to explore their permeable paver installation and drainage services across central Maryland and Washington, DC. With this guide, you’re ready to tackle drainage challenges and create a more sustainable outdoor space.
FAQs
How can I tell if my soil drains well enough for permeable pavers?
To determine if your soil is suitable for permeable pavers, you’ll need to test how well it drains. A simple infiltration test can help you measure how quickly water is absorbed into the soil – ideally, this should happen within 72 hours. For a more precise analysis, consider getting a geotechnical report or soil investigation to verify the soil’s hydraulic properties. If the soil drains too slowly, you might need to make adjustments or add drainage solutions to ensure the pavers function as intended.
How deep should the base be for my project?
For permeable paver installations, the base depth usually falls between 4 to 6 inches for patios and walkways. For driveways, it typically ranges from 6 to 12 inches. Be sure to adjust the depth based on the specific requirements and recommendations for your project.
Why can’t I use sand or pea gravel in the joints?
Permeable pavers require materials that ensure both stability and proper water drainage. Sand and pea gravel fall short because they lack the necessary stability and permeability, which can lead to issues like water pooling or erosion. To avoid these problems, opt for specialized jointing compounds. These materials are specifically designed to let water flow through while keeping the pavers structurally sound.
Chat with Us