









- bhavya gada
- No Comments
If a few driveway pavers have sunk or shifted, I don’t need to tear out the whole driveway. In many cases, I can fix the bad spot by removing the loose units, rebuilding the base, resetting the pavers, and refilling the joints so the area sits flat and drains the right way.
Here’s the short version:
- I check the damage and mark an area 12–16 inches past what I can see
- I remove the affected pavers and the nearby ones in order
- I clean out weak material and rebuild with 3/4-inch minus crushed stone in 4- to 6-inch layers
- I add about 1 inch of bedding sand
- I reset the pavers to match the old pattern and keep the slope at about 1/8–1/4 inch per foot
- I fill joints with sand, compact again, and keep cars off for 48–72 hours
- I finish by checking for dips, loose edges, and water that sits in place
Most paver failures come from the same few problems: base settlement, sand washing out, poor drainage, or edge restraint failure. And if I skip the base repair, the patch often sinks again under vehicle weight.
This guide walks through the full reset process in a simple 7-step order, with the key measurements, tools, and checks I need before I call the repair done.
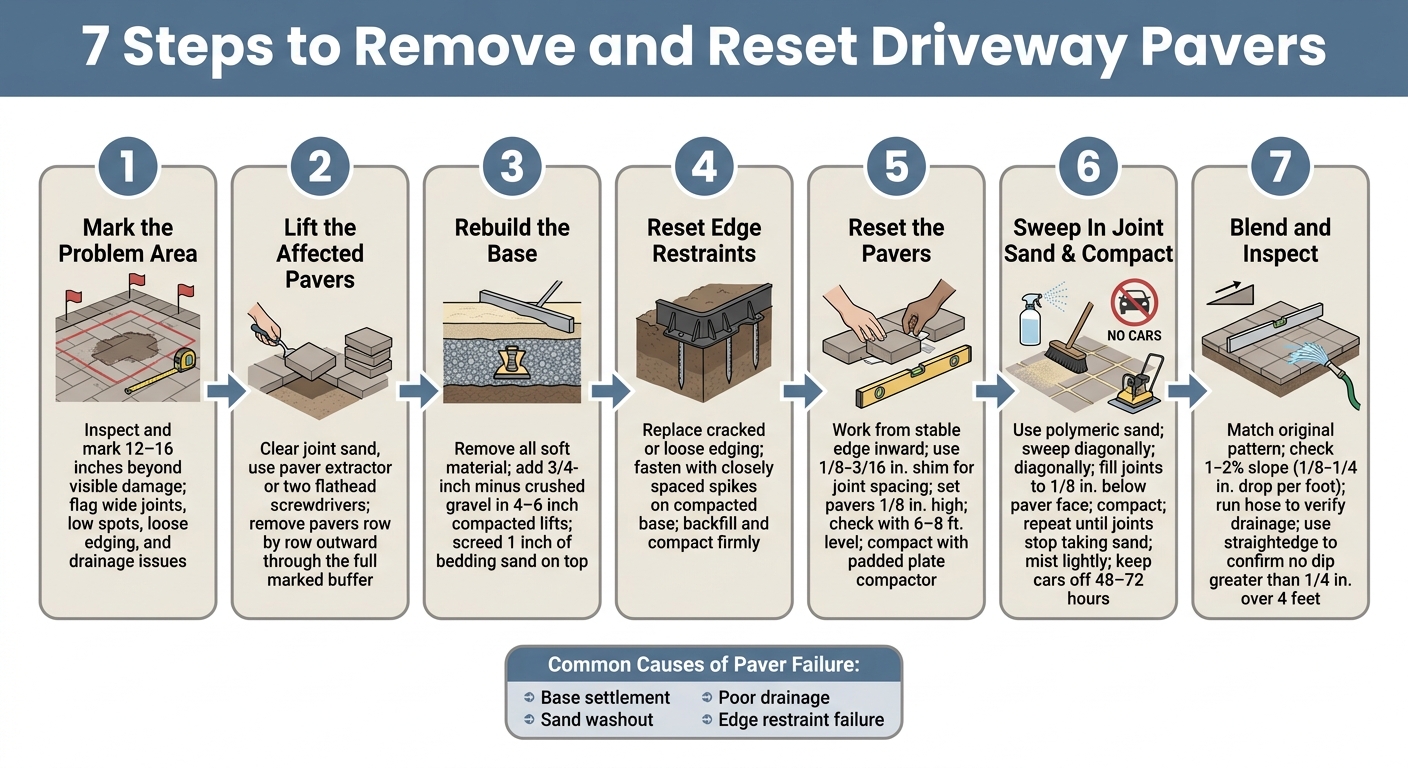
7 Steps to Remove and Reset Driveway Pavers
Steps 1–2: Inspect the Repair Area and Lift the Affected Pavers
Step 1: Mark the Problem Area, Joints, Edges, and Drainage Issues
Check 12–16 inches beyond the damage you can see. On a driveway, the weight from vehicles can spread settlement past the worst-looking paver, so the trouble spot is often bigger than it first appears [1].
As you walk the area, mark any trouble spots with chalk or painter’s tape:
- Wide or empty joints
- Low spots or lippage
- Loose edging or border creep
- Drainage problems near the repair area
Take clear photos of the pattern and border before you pull anything up. That small step can save a headache later when it’s time to reset the pavers. After you’ve marked the repair zone, start at the damaged paver and work outward.
Step 2: Loosen Joint Sand and Lift the Target and Nearby Pavers
Start by clearing the joints. This helps you avoid chipping the pavers next to the one you’re removing. Use a narrow joint knife, masonry trowel, or flat-blade screwdriver to scrape sand out from all four sides of the target paver. Work down a few millimeters so you break the bond between the paver and the bedding layer below.
Next, place two flathead screwdrivers or a paver extractor into opposite sides of the paver. Lift with even pressure and pull straight up. Don’t twist the paver or pry against the units beside it. A paver extractor usually makes for a straighter, cleaner lift.
If the paver is broken, drill 3/8-inch holes in the center and keep them at least 1 inch from the edges. Then split the piece from the center with a cold chisel.
After that, remove the nearby pavers in order, working outward row by row until you’ve opened the whole marked repair area plus the 12–16-inch buffer. Keep sound pavers in one pile and broken pieces in another. That makes Step 5 much easier when it’s time to put everything back.
If the damaged area keeps going past your markings, pause and reassess before you continue. Once the section is open, clean out the base and rebuild it in compacted layers.
sbb-itb-843f8be
Steps 3–4: Repair the Base and Fix Edge Movement
Step 3: Clean Out the Area and Rebuild the Base in Compacted Layers
Once the pavers are out, clear away all loose sand, dirt, roots, and failed bedding material until you hit firm, undisturbed soil or a stable base that’s still in good shape. If you leave soft spots, voids, standing water, or root growth behind, the repair can sink all over again.
Use 3/4-inch minus crushed gravel for support. Sand should only be used as a thin leveling bed. Add the gravel in 4- to 6-inch lifts, then compact each lift well before adding the next [2].
After you rebuild the base, screed about 1 inch of bedding sand across the repair area [2]. That sand layer is only there to bed the pavers, so keep it thin and even. Don’t use it to make up for deeper low spots. The finished surface should slope 1/4 inch per foot away from the house, garage, or any other structure.
Step 4: Reset or Replace Edge Restraints Before Reinstalling Border Pavers
With the base back in shape, check the edge restraints. If the edging is cracked, pulled loose, bent outward, or no longer resting on firm base material, take it out and replace it.
Set the new restraint on the compacted base, tight against the border pavers, and fasten it with closely spaced spikes. Then backfill and compact the area firmly so the edge can handle tire pressure and side-to-side movement. Once the edge is locked in place, reset the pavers in the original pattern.
Steps 5–7: Reset the Pavers, Refill Joints, and Blend the Repair
Step 5: Reset and Level the Removed Pavers in the Original Pattern
Now that the edge restraint is locked in, reset the pavers starting from the most stable edge and work inward. Stick to the original laying pattern exactly. Use a 1/8–3/16 in. shim or putty knife as a joint gauge so the spacing matches the rest of the driveway. That even spacing matters because sand-filled joints help spread weight across the pavers.
Set each paver a little high at first – about 1/8 in. above final grade – since compaction will bed them down. Check the height often with a long straightedge or a 6–8 ft. level laid across both the repaired area and the old surface. Tap each paver into place with a rubber mallet, and use a tight string line across the repair to keep the rows straight. For bigger repairs, make two passes with a padded plate compactor, working from the outside edges toward the center.
Step 6: Sweep In Joint Sand or Polymeric Sand and Compact Again
Once the pavers are level, sweep in the joint sand before the last round of compaction. For most driveway repairs, polymeric sand is the better pick because it holds joints more firmly under traffic and rain.
Sweep the sand diagonally across the surface. That helps it fall into the joints instead of getting pulled back out. Fill the joints to about 1/8 in. below the paver face, not all the way to the top. Then run the plate compactor over the area again. The vibration will work the sand deeper into the joints and show you any low spots.
At that point:
- Add more sand where the joints drop
- Compact again
- Repeat until the joints stop taking sand
Before you activate polymeric sand, blow or sweep off all dust and residue. If you skip this, you can end up with surface haze. Mist the area lightly in several passes, holding the nozzle 1–2 ft above the surface, instead of soaking it all at once. After that, keep cars off the driveway for 48–72 hours, and make sure no rain is expected during that time.
Step 7: Blend the Patched Area With the Rest of the Driveway
With the joints filled, shift your attention to making the repair blend in with the rest of the driveway. Keep the original pattern running through the patch without interruption. Pattern mismatch is more noticeable than slight color differences.
If you can’t get an exact paver match, there’s a simple fix. Pull a few older pavers from just outside the repair area and mix them in with the new ones. That spreads the color shift across a slightly bigger section, so it looks random instead of obvious.
Clean the nearby pavers with a broom or blower before you wrap up. Then check that the repaired section follows the same 1–2% slope as the rest of the driveway, which works out to about 1/8–1/4 in. drop per foot. Run a hose over the area and watch the water. It should flow to the planned drain point, not sit near the reset pavers.
How to Fix Sinking Pavers: Professional DIY Method
Conclusion: Review the Finished Repair and Know When to Call a Pro
Do one last inspection before you call the job done. The surface should look flat, the pavers should feel solid, the joints should stay tight, and the edge restraints should not move. Set a long straightedge across the repaired spot and the surrounding driveway. If you see a dip greater than 1/4 inch over 4 feet, it needs more work. Check the joints to make sure they’re filled and locked. Then press on the edge restraints. They should feel rigid, not loose. After that, step back to the street and compare the patch to the rest of the driveway.
If the surface checks out, move on to drainage. Run water over the area with a hose and watch where it goes. It should move toward the intended drain point, not sit in the repaired section or run toward the garage or foundation. If the area keeps settling, heaves, or drains poorly, that usually points to a structural problem below the surface. In that case, the fix calls for deeper base or drainage work. For recurring settlement, edge movement, or drainage issues in central Maryland, contact Pro Landscapes MD for paver repair, grading, and drainage work.
FAQs
How do I know if the damage is deeper than a simple reset?
If your inspection points to structural failure rather than minor surface shifting, the problem usually goes deeper than a simple reset.
Watch for visible cracks, standing water that doesn’t go away, pavers that separate or rock underfoot, or retaining walls that lean or bow. Those signs often mean the base has failed, the soil wasn’t compacted well, drainage is poor, or pressure has built up behind the wall.
Can I reuse old pavers after removing them?
Yes, you can often reuse old pavers if they’re still in good shape and don’t have cracks, chips, or heavy wear.
Lift them carefully, clean off old joint sand and debris, and check each paver before you set it back in place. If you’re working with a permeable system, make sure the pavers aren’t clogged, since that can affect drainage.
Reusing existing pavers also helps keep the look of your driveway consistent.
What happens if I skip repairing the base?
Skipping a failed base repair can lead to one driveway problem after another. If the foundation isn’t solid, pavers can settle, shift, or rock in place. Once that starts, the joints often take the hit too.
A weak or poorly compacted base can also leave the surface uneven and unstable. On top of that, drainage problems can stick around, which may cause more structural damage as time goes on.
Chat with Us