









- bhavya gada
- No Comments
If I install an erosion blanket on loose, uneven, or poorly anchored soil, it can fail after one hard rain. The main steps are simple: grade the slope, prep and firm the seedbed, seed first, lay the blanket in the direction of water flow, trench and staple it well, then inspect it right away and again after storms.
Here’s the short version I’d use on site:
- Prep the soil first: remove rocks and clods 1.5 inches or larger, loosen the top 2–3 inches, then firm it.
- Fix drainage before installation: water should flow in one smooth path, without pooling or cutting side channels.
- Seed before the blanket goes down: do both on the same day.
- Anchor the top and bottom: use 6 in. x 6 in. trenches at the crest and toe.
- Overlap the right way: install seams shingle-style so water flows over them, not under them.
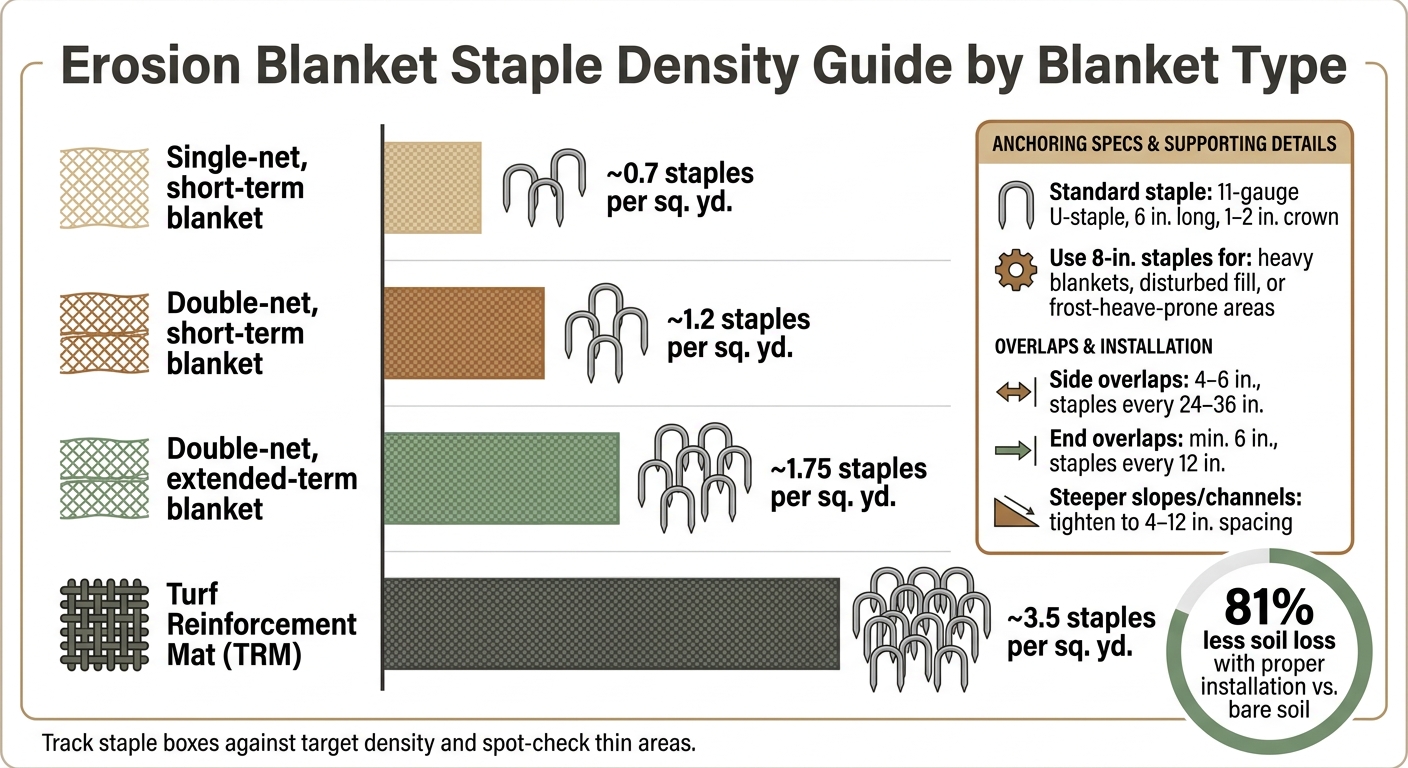
- Use enough staples: blanket type changes staple count, from about 0.7 to 3.5 staples per sq. yd.
- Check after rain: inspect within 24 hours after 0.5 inch or more of rain.
One stat stands out: a properly installed blanket cut soil loss by about 81% compared with bare soil. That only happens when the blanket stays tight to the ground from top to bottom.
This checklist walks me through the job in the order it should happen, so I can catch the small mistakes – like lifted seams, shallow trenches, or weak staple spacing – before they turn into washouts.
How to Install Erosion Control Blanket
sbb-itb-843f8be
Site Prep Checklist: Grading, Drainage, and Soil Preparation
Blankets fail on poorly prepared sites. That’s why you want to grade, drain, and seed the area before installation. If the prep work is sloppy, water can get under the blanket and start cutting channels or gullies.[3]
Check Slope Shape and Drainage Flow
The slope should drain from top to bottom in one smooth path, without low spots or sharp breaks in grade. If water pools or gets funneled into one area, it can slip under the blanket and weaken its hold.
Walk the full flow path from the top of the slope to the outlet. Check for rills, soft spots, and off-line channels. In swales, the shape and grade should stay even so water moves through cleanly instead of churning up the sides. If runoff from a roadway, outlet, or cross-slope drainage enters the area, intercept or divert it before the blanket goes down.[1][6][7]
Prepare a Clean, Firm Seedbed
Clear out rocks, roots, sticks, clods, and other debris. Many specs call for removing rocks or soil clods 1.5 inches or larger before installation.[8][12][13] That might sound picky, but even small obstructions can cause the blanket to bridge over the surface. When that happens, you get voids, poor seed contact, and a much higher chance of undercutting.
Loosen the top 2 to 3 inches of soil, then firm the surface so staples hold well and the blanket can lie flat.[9][2][11] A simple test helps here: walk the area. It should feel firm and smooth, not рыхлый or uneven, and ready for the blanket to sit tight against the soil.
Apply Soil Amendments Before Installation
If your plan or soil test calls for lime, compost, or fertilizer, apply and mix in those materials before seeding and before the blanket is installed.[4][5][10][2] Doing this later can disturb the blanket, leaving gaps, wrinkles, and seed out of place.
Finish grading and fix drainage issues first so the blanket goes onto a stable base.
Once the seedbed is ready, move to seeding and blanket placement.
Installation Sequence Checklist: Seed First, Then Lay the Blanket
Seed first, then install the blanket the same day. Once the seed is down, move right into blanket placement.
Confirm Seed Mix and Application Timing
Check that the seed mix matches the plan, then apply seed immediately before blanket placement.
Lay Rolls in the Correct Direction
Lay rolls up and down the slope, parallel to flow. Start at the top anchor trench and unroll each blanket downslope toward the toe.
As you unroll each roll, pull out slack without stretching the blanket, then press it into the contours. Walk the blanket into the soil before stapling. It should feel solid against the surface, not bouncy or lifting away. Fix any bridging, tenting, or air pockets before anchors go in.
Keep the first pass straight. The next step is edge alignment before fastening.
Align Blanket Edges Before Fastening
Dry-fit each roll before stapling. Set the leading edge in the top anchor trench, unroll several feet downslope, and check that the roll stays straight along the planned alignment. If the roll starts drifting sideways, roll it back up and shift the start point. Don’t try to twist it mid-slope. That leads to wrinkles and overlaps that don’t line up.
On long runs, snap a chalk line or mark a straight reference line on the soil to keep alignment steady across the full installation.
Next, secure the top trench, overlaps, and staple pattern.
Anchoring Checklist: Top Trench, Side Overlaps, End Joints, and Staple Count
Erosion Blanket Staple Density Guide by Blanket Type
Once the blanket is flat, lock it down before the first rain. This is where crews often slip up: the trench is too shallow, overlaps run the wrong way, staples are too short, or there just aren’t enough of them.
Install the Top Anchor Trench Correctly
Cut a 6 in. x 6 in. trench at the slope crest. Extend the blanket at least 12 in. upslope before stapling. Then staple at 12-in. centers in the trench, backfill and compact, and staple again 4–6 in. downslope of the crest.
If the trench is shallow, runoff can get under the blanket and peel it back. On sandy or loose fill soils, switch to 8-in. staples at the trench line for better pull-out resistance.
Once the top edge is locked in, check every seam and staple line.
Check Side Overlaps and End Overlaps
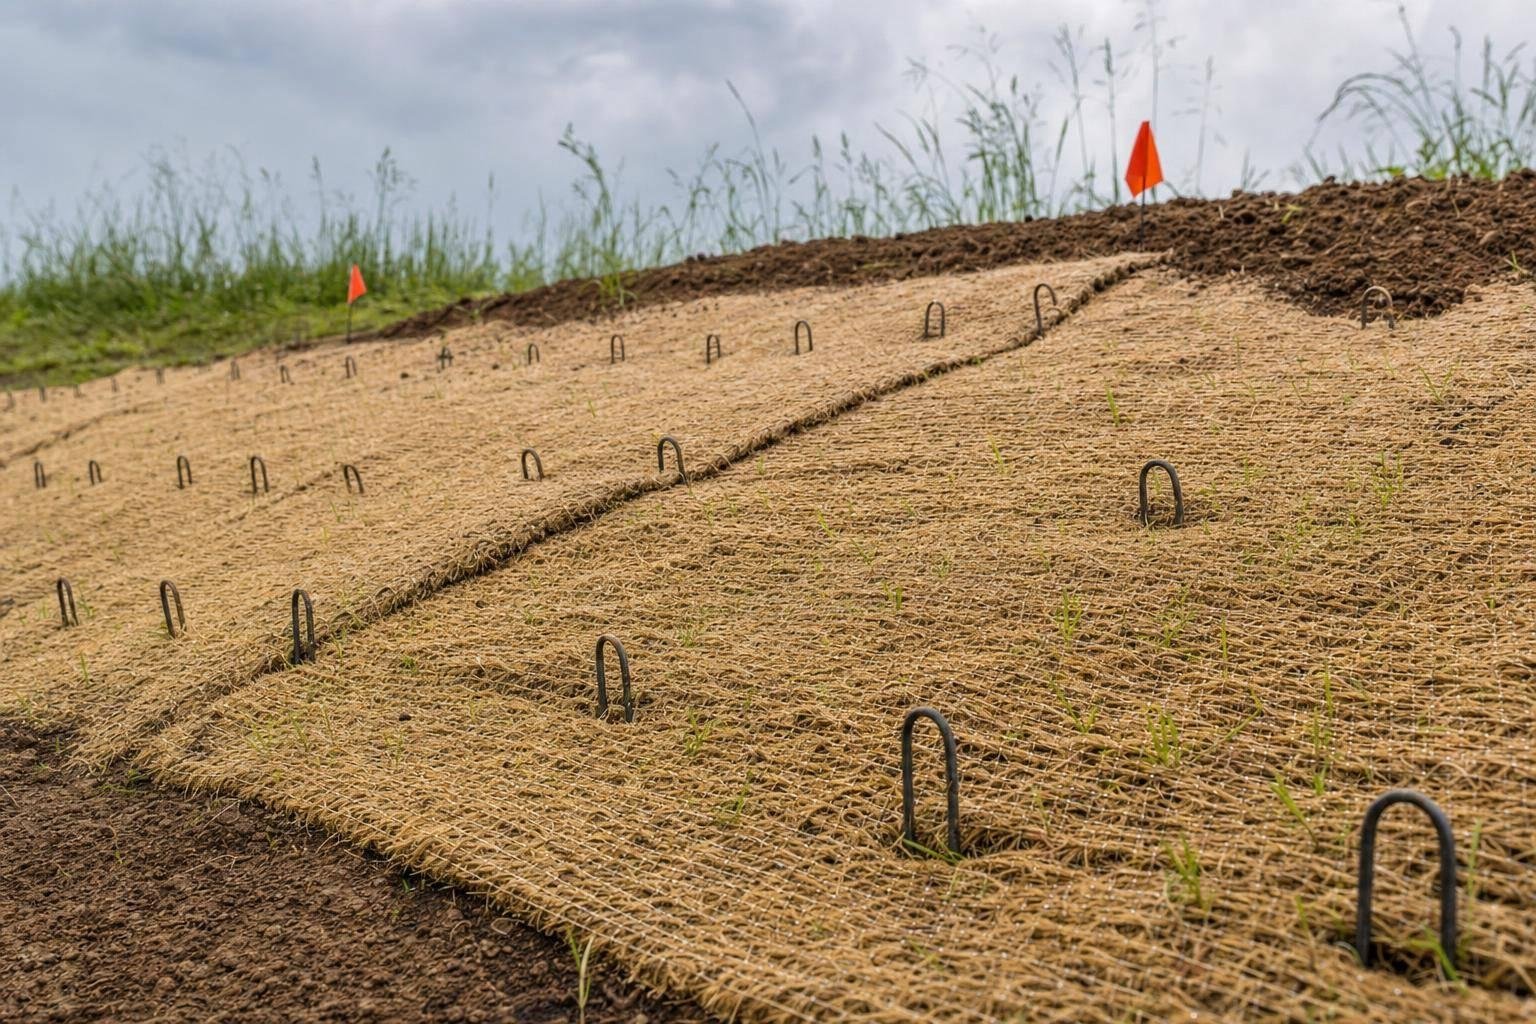
Install each seam shingle-style. The upslope blanket should sit over the downslope blanket so water runs over the seam, not under it.
Keep these overlap targets in mind:
- Side overlaps: 4–6 in., with staples every 24–36 in.
- End overlaps: at least 6 in., with staples every 12 in.
- On steeper slopes or in channels, tighten staple spacing to 4–12 in.
After the seams are in place, confirm the staple type and total anchor coverage.
Verify Staple Type, Spacing, and Total Anchor Count
Use 11-gauge U-staples, 6 in. long, with a 1–2 in. crown. That setup works well on Maryland‘s clay and silt loam slopes. Move to 8-in. staples for heavier blankets, disturbed fill, or spots prone to frost heave.
Staple density changes by blanket type. Use these field targets:
| Blanket Type | Min. Staples per Sq. Yd. |
|---|---|
| Single-net, short-term | ~0.7 |
| Double-net, short-term | ~1.2 |
| Double-net, extended-term | ~1.75 |
| Turf reinforcement mat (TRM) | ~3.5 |
Track staple boxes against the target density, and spot-check any thin areas.
Next, secure slope toes, swales, and outlet areas.
Special Areas and Final Inspection Checklist
Secure Slope Toes, Swales, and Outlet Areas
After the main slope is anchored, finish the spots that usually fail first: the high-flow areas.
That includes slope toes, channel bottoms, and outlets. Water tends to concentrate there, and once it gets under a loose edge, the blanket can peel back fast.
At the slope toe, dig a trench 6 in. deep by 6 in. wide. Extend the blanket into the trench, backfill it, compact the soil, and place staples in a staggered pattern about 6–8 in. on center.[10] If the toe runs into a curb, sidewalk, or riprap apron, press the blanket tight against that hard surface and staple along the transition edge.
In swales and channels, tighten the staple spacing compared with a standard slope. A common setup is:
- every 1–2 ft along the flow line
- every 2–3 ft up the banks
Around pipes, culvert ends, and drain outlets, lap the blanket shingle-style in the direction of flow. Cut it to fit snugly around round pipes, then staple it in a tight ring every 3–4 in. Where the blanket meets riprap, tuck it slightly under the first course of stone and staple heavily along that edge so water can’t slip into a gap.
Inspect Immediately After Installation
Once those higher-risk areas are locked down, inspect the full job before the crew leaves. This is the time to catch small flaws before they turn into washouts.
Look for:
- Exposed soil: widen the overlap or patch the area and restaple.
- Lifted seams: reset the overlap and tighten staple spacing.
- Staples sticking up: hammer them flush.
- Open trenches: refill, compact, and check the lock-in again.
- Wrinkles or air pockets: pull the blanket flat, restaple, and fix the subgrade.
Any spot that isn’t in full contact with the soil is a weak point. Fix it right then, not on the next visit.
Recheck After the First Rain and Note Next Steps
After the first rain, inspect the blanket within 24 hours of any rainfall of 0.5 in. or more until vegetation is established.[17] Start with the slope toe, channel edges, and outlet areas. Those spots usually show trouble first.
Watch for displacement like shifted overlaps or stretched staples, washout beneath the blanket such as voids or sunken sections, seam failures where laps have pulled apart, and bare scour holes. If sediment is building up at the low end of the blanket, treat that as a warning sign that water may be moving underneath it.[15] Regrade, reseed, restaple, and deepen the trench where needed.[10][16]
Post-rain checks help you spot grading, seeding, and anchor problems before the next storm hits.
If grading, drainage, or erosion control work is beyond your crew, Pro Landscapes MD serves central Maryland with installation and repair support.
FAQs
How do I know if a slope is ready for a blanket?
A slope is ready when the soil has been prepared the right way through grading or decompaction, and the grading plan meets the 2:1 horizontal-to-vertical slope ratio.
Before installation, clear the area of any unneeded disturbance. The site should also pass any required inspections under the sediment control plan. And the surface needs to be even, with no large rocks or debris, so the blanket can stay in direct contact with the soil.
What blanket type needs the most staples?
On steep slopes sharper than 3:1, biodegradable mats like straw or coconut coir need more staples to stay put.
Place staples every 2 to 3 feet.
What should I repair after the first storm?
After the first storm, inspect all erosion and sediment controls to make sure they’re doing their job. Look for sediment slipping past controls, barriers getting undercut, shifted or knocked-out controls, and scouring around outlets.
If any BMPs are damaged or not working, repair or replace them within 24 hours. Clear out sediment buildup, secure barriers that have moved, stabilize any exposed bare soil, and document every repair for compliance.
Chat with Us