


- bhavya gada
- No Comments
Erosion control matting helps protect exposed soil from erosion due to rain, runoff, and wind. Proper installation is key to preventing failures and ensuring soil stabilization until vegetation takes root. Here’s a quick guide:
- Site Preparation: Assess terrain, clear debris, and grade soil for smooth contact.
- Temporary Controls: Install silt fences or wattles to manage runoff before matting.
- Material Selection: Match mat type to slope, soil, and conditions (e.g., straw for gentle slopes, coir for steep areas, synthetic for high-stress zones).
- Installation Steps:
- Dig anchor trenches at the top and bottom of slopes.
- Overlap rolls (4–12 inches) and secure with staples.
- Ensure full soil contact and address seams and edges.
- Revegetation: Seed before or after matting, depending on material, and use starter fertilizer.
- Inspection & Maintenance: Check for loose edges, gaps, or damage after storms; reseed or repair as needed.
Pro Tip: Proper preparation, installation, and maintenance significantly reduce erosion risks, even in challenging conditions.
How to Install Erosion Control Blanket
sbb-itb-843f8be
Preparing the Site for Installation
Getting the site ready is crucial – no matter how high-quality your matting is, it won’t perform well if the ground beneath it isn’t properly prepared. Before laying out even a single roll, you need to tackle three key steps: assess the site, clear and grade the ground, and set up temporary sediment controls.
Assessing Site Conditions
Start by walking the entire disturbed area to get a sense of the terrain. Look for steep slopes, natural drainage paths, low spots, gullies, or areas where water tends to collect or flow quickly. Pay special attention to where runoff exits the site. If all the runoff is funneling into one spot, you may need additional measures beyond just matting to handle the flow.
Different site features call for different preparation efforts. For instance, a shallow residential swale might need careful shaping and added protection at entry and exit points, while a steep roadside embankment could require more intensive grading and tighter sediment controls along its length. Steeper slopes and drainage channels also typically need stronger matting products and closer attention to anchoring.
Before you start any work, check your project’s permit requirements and erosion and sediment control plan. In Maryland, for example, regulations can differ by county, so reviewing these documents early can save you from costly mistakes later [1]. Once you’ve completed your assessment, you’ll be ready to move on to clearing and grading the surface.
Clearing and Grading the Surface
Begin by clearing the area of any loose debris like rocks, sticks, dead vegetation, or trash. Then, grade the soil to match the intended contour. The surface should be smooth and free of bumps, ruts, or depressions. Be sure to level out equipment tracks and smooth any uneven spots to ensure the matting makes firm contact with the ground. If your site requires major regrading or drainage adjustments, consider hiring professionals like Pro Landscapes MD, who provide grading and drainage services throughout central Maryland.
Setting Up Erosion and Sediment Controls
Before you start clearing and grading, install temporary sediment controls, such as silt fences or wattles, at downslope areas or drainage exit points. Following the correct sequence is critical: first, set up perimeter controls; next, clear and grade the site; and finally, install the matting. Avoid exposing too large an area of bare soil at once, as this increases the risk of erosion before the matting is in place. With these sediment controls established, you’re ready to move forward with the installation process.
Materials and Tools You Will Need
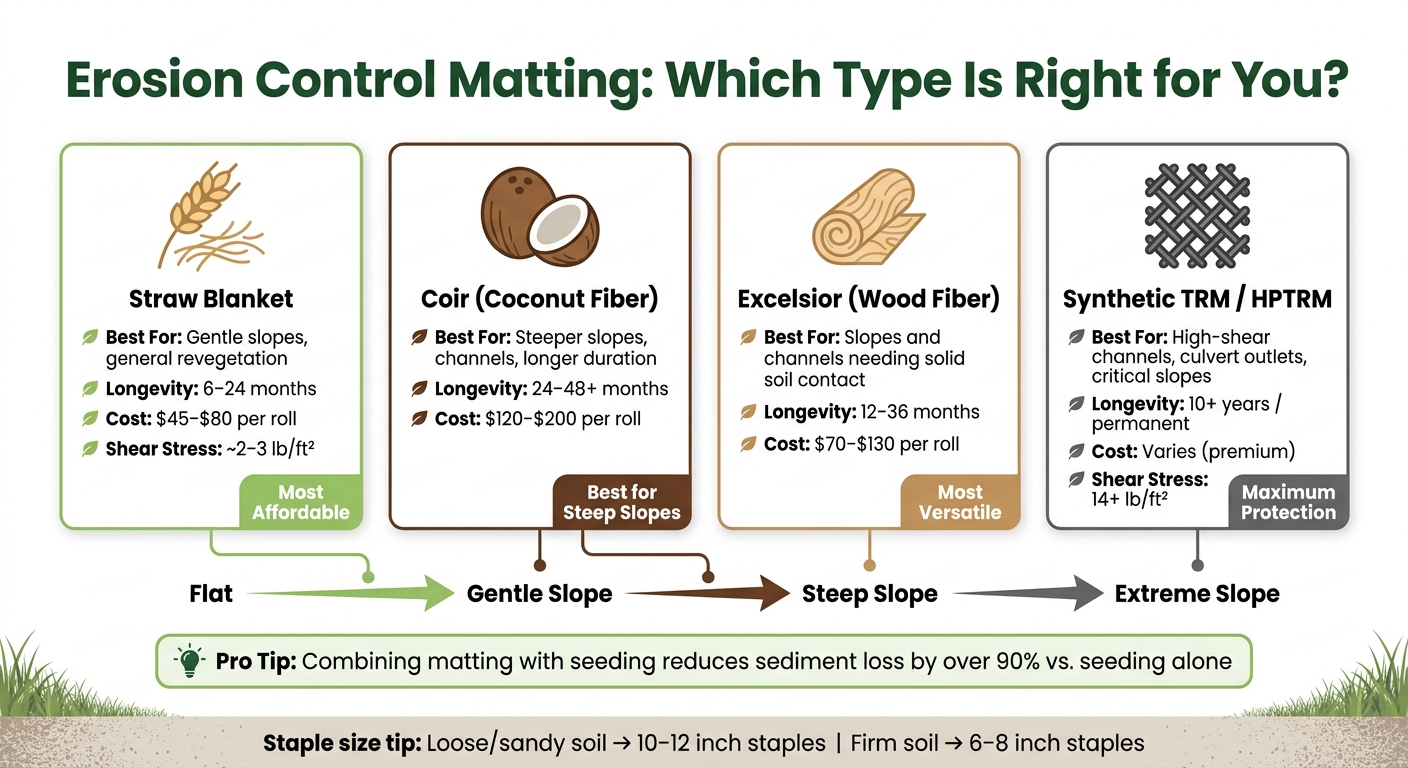
Erosion Control Matting Types: Cost, Longevity & Best Use Guide
Once your site is prepped, it’s time to gather the materials and tools needed for a smooth installation. Having everything ready not only saves time but also ensures the process goes off without a hitch. While the core list of supplies is straightforward, picking the right matting type for your site’s conditions is a crucial step.
Choosing the Right Matting Type
The matting you choose should suit your site’s slope, soil type, rainfall levels, and the duration of protection required.
- For gentle slopes and typical revegetation projects, a straw erosion control blanket is often enough. These blankets are cost-effective, breaking down naturally as vegetation takes hold (usually within 6 to 24 months). Prices range from $45 to $80 per roll (8 ft × 112.5 ft).
- On steeper slopes or in areas with faster water flow, a coir (coconut fiber) blanket is a better choice. It lasts 2 to 4 years – or even longer – and can handle more demanding conditions. Coir blankets typically cost between $120 and $200 per roll.
- Excelsior (wood fiber) blankets are a versatile option, providing solid soil contact on slopes and channels. They fall in the middle range, lasting 12 to 36 months, with costs around $70 to $130 per roll.
- For high-stress areas like culvert outlets, steep embankments, or channels with significant runoff, synthetic turf reinforcement mats (TRMs) are the go-to. Unlike straw blankets, which can handle about 2–3 lb/ft² of shear stress, high-performance TRMs can endure 14 lb/ft² or more, making them ideal for extreme conditions. These mats are designed to last 10 years or longer.
| Matting Type | Best For | Longevity | Approx. Cost (per roll) |
|---|---|---|---|
| Straw blanket | Gentle slopes, general revegetation | 6–24 months | $45–$80 |
| Coir (coconut fiber) | Steeper slopes, channels, longer duration | 24–48+ months | $120–$200 |
| Excelsior (wood fiber) | Slopes and channels needing soil contact | 12–36 months | $70–$130 |
| Synthetic TRM / HPTRM | High-shear channels, critical slopes | 10+ years / permanent | Varies |
Keep in mind that soil type also influences staple selection. In loose or sandy soils, use 10–12-inch staples with closer spacing. For firmer soils, 6–8-inch staples will usually do the job.
Tools and Supplies List
To get started, you’ll need more than just the matting rolls. Here’s a handy list of tools and supplies to have on hand:
- U-shaped steel staples or pins for securing the matting
- A flat shovel or trenching tool for site preparation
- A mallet or hammer to drive in staples
- Measuring tape and marking paint/flags for accurate placement
- A utility knife or shears for cutting the matting to size
For larger areas, using mechanical trenching equipment can save a lot of time. If your project involves revegetation, you’ll also need:
- Grass seed tailored to your site’s conditions
- Starter fertilizer
- A rake or landscape roller to firm up the seedbed
Combining matting with seeding is highly effective – it can reduce sediment loss by over 90% compared to seeding alone. Don’t forget a wheelbarrow for moving materials and consider buying extra staples to secure seams, overlaps, and high-stress areas. A little extra preparation goes a long way in ensuring a successful installation.
Step-by-Step Installation Process
Now that you’ve gathered your materials and prepped the site, it’s time to install your erosion control matting. Follow these steps carefully to ensure a secure and durable result. Each step plays a crucial role in achieving effective erosion control.
Trenching and Anchoring
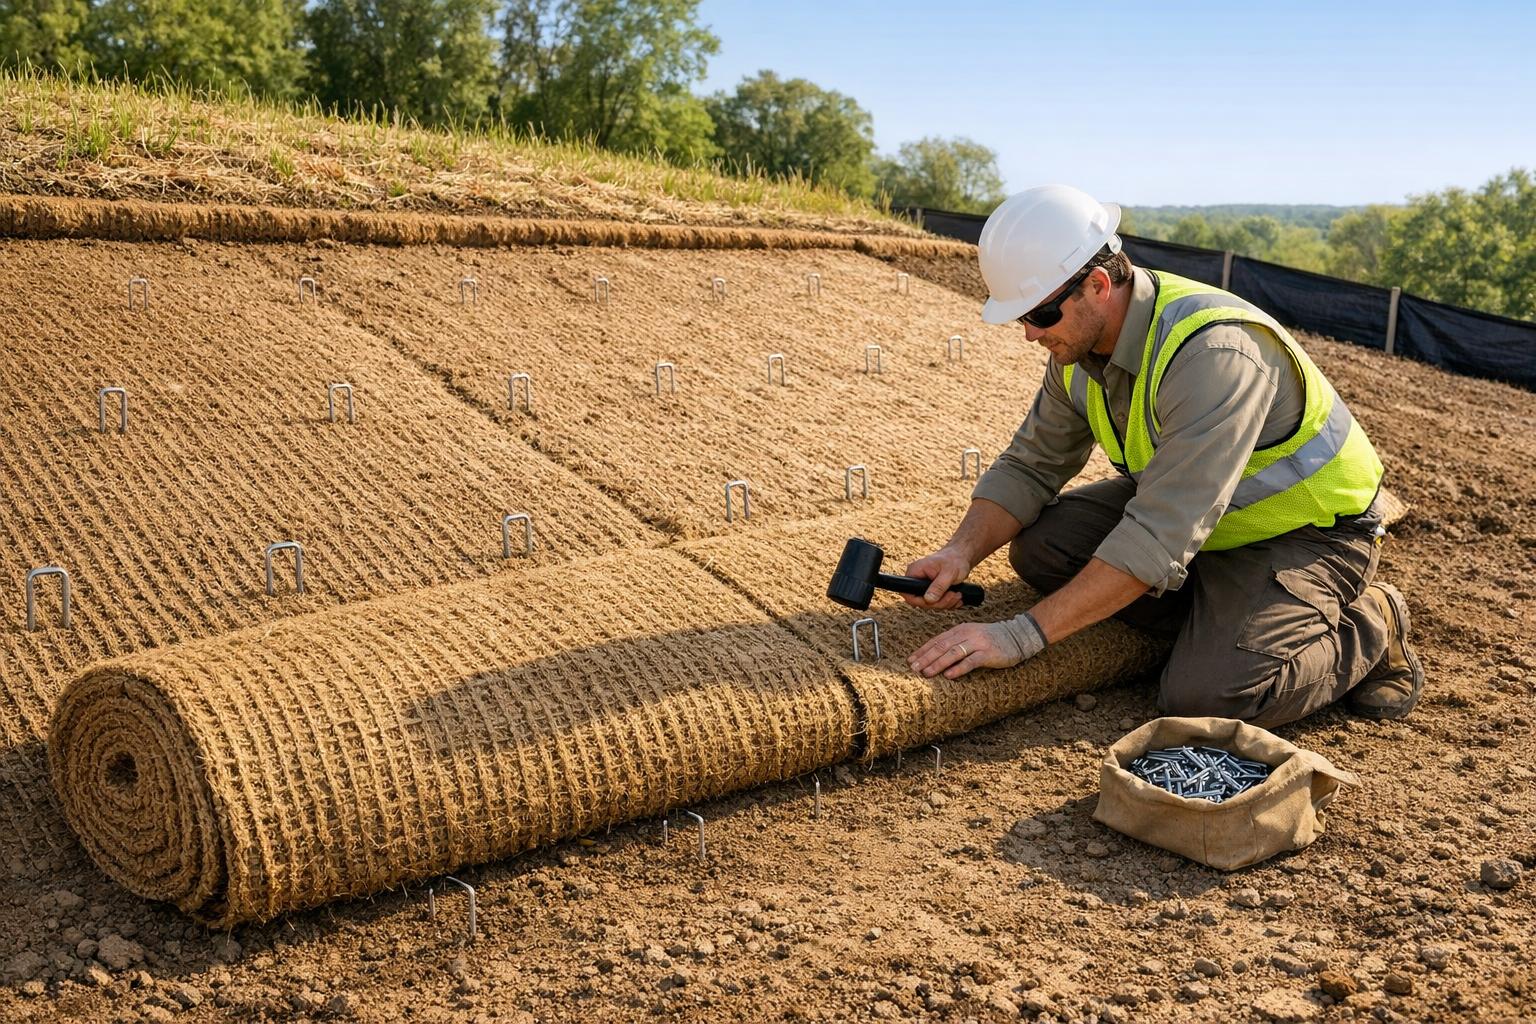
Begin at the top of the slope. Dig a trench across the width of the area you’re protecting. Make sure the trench is deep and wide enough to fit the matting as per the manufacturer’s instructions. Tuck the leading edge of the matting into the trench, backfill it with soil, and compact it firmly. Repeat this process at the bottom of the slope to anchor the downhill edge. Proper anchoring at both ends helps prevent water from undermining the matting.
Placing and Aligning the Matting
Once the top edge is secured, roll the matting downhill. Ensure the surface beneath is smooth and free of debris as you position the matting. Overlap the seams by 6 to 12 inches to provide complete soil coverage. For steeper slopes or areas with higher water flow, go with the full 12-inch overlap to minimize risks of exposed soil. Make sure the matting lies flat and stays in full contact with the ground.
Stapling and Securing the Matting
Follow the manufacturer’s guidelines for staple spacing and placement. Use staples to secure the edges, overlaps, and seams, keeping the matting tightly pressed against the soil. Drive the staples flush with the surface to avoid gaps. Pay extra attention to corners, drainage areas, and roll intersections, as these spots are more prone to lifting during heavy water flow. This is especially critical when integrating the matting into broader drainage solutions for the property. Once everything is firmly secured, you can move on to vegetation establishment.
Revegetation After Installation
With the matting in place, focus on revegetation to strengthen your erosion control system. If you’re using open-weave blankets, seed the soil before laying the matting so the vegetation can grow through it. For denser synthetic mats, broadcast the seed over the top of the installed matting. Choose a local grass seed mix and apply a starter fertilizer to encourage quick germination. As the vegetation grows, its roots will work alongside the matting to create a strong, long-lasting barrier against erosion.
Inspection and Maintenance Checklist
Post-Installation Inspections
After the matting is installed and vegetation is seeded, the work isn’t over yet. Start by inspecting the entire slope to ensure the matting lies flat, seams overlap properly, and no soil is left exposed. Even minor gaps can turn into major water flow paths during the next rainfall.
Follow up with another inspection within 24 hours after any heavy rain or storms. During these checks, keep an eye out for:
- Loose or missing staples and anchors
- Lifted edges or seams that have separated
- Bare soil visible through or around the mat
- Channels or ruts forming in the installation
- Sediment buildup that could alter water flow
Uneven vegetation growth can also signal that the matting has shifted or lost contact with the soil.
By addressing these issues quickly, you’ll set the foundation for smoother long-term maintenance.
Ongoing Maintenance Steps
Fix loose edges and seams by adding more staples, re-trenching edges, and smoothing out the soil. If any section is too damaged to repair effectively, replace it entirely. A mat that isn’t maintaining solid soil contact won’t perform as intended.
Keep a close watch on vegetation growth until the plant cover is fully established. If certain areas show thin or patchy germination, reseed those spots and, where allowed, apply a starter fertilizer. Strong root systems are key to transitioning the site from relying on the mat to achieving natural, long-term stabilization. For sites experiencing repeated washouts, concentrated water flow issues, or unstable subgrade conditions, it might be time to consult a landscaping and drainage specialist like Pro Landscapes MD. They can assist with more complex fixes, such as grading adjustments or stormwater management.
Maintain a detailed log that includes inspection dates, weather conditions, repairs, and vegetation progress. Take photos of repairs to track recurring issues and evaluate how well the installation is holding up.
Common Installation Mistakes to Avoid
Improper installation is the leading cause of mat failures. Most issues in the field are tied to recurring errors, not product defects. In fact, state DOT erosion control evaluations have shown that installation mistakes – such as poor trenching, insufficient stapling, and inadequate surface preparation – are responsible for most observed blanket failures, rather than flaws in the matting material itself. By steering clear of these common errors, you can significantly improve the success of your installation.
Poor Surface Preparation
A mat can only do its job if it maintains proper contact with the soil. When laid over rocks, clumps of soil, roots, or uneven terrain, the mat loses contact with the ground, creating voids underneath. Water runoff quickly finds these gaps, carving channels beneath the mat – sometimes after just one moderate rainfall.
To avoid this, follow the cleared and graded surface guidelines before installation. Compact loose or disturbed soil, fill in ruts, and apply topsoil as needed. Always check that the mat makes solid contact with the soil before proceeding. Never install over frozen ground or standing water, as these conditions lead to shifting and loss of soil contact as they change.
Skipping Trenching and Anchoring
Skipping or improperly executing trenching and anchoring is one of the most damaging shortcuts, especially on slopes. Proper anchor trenches are essential to secure the mat. More than 50% of blanket failures on steep slopes are traced back to issues with upslope anchoring and trenching, not the mat itself.
The standard process involves digging an anchor trench approximately 6 inches deep and 6 inches wide at the upslope edge. Lay the mat into the trench, staple it securely, then backfill and compact the soil over the top. This same method applies to channel inlets, grade breaks, and side edges. Any loose edges create a direct path for failure during the next storm.
Inadequate Overlap and Stapling
Proper overlapping and stapling are critical to prevent erosion, as outlined in the step-by-step guide. Even small gaps – just 1–2 inches between adjacent rolls – can lead to erosion channels during repeated storms. On slopes, rolls should overlap by at least 4–6 inches, while in channels, the overlap should increase to 6–12 inches. Always position the upslope roll over the downslope roll (shingle-style) to ensure water flows over the seams rather than into them.
Stapling is just as important. Using too few staples, or failing to drive them flush, allows the mat to lift and lose soil contact. For mild slopes, use 2–3 staples per square yard. On steeper slopes or in high-flow areas, increase this to 4–6 staples per square yard, with closer spacing along seams and edges. After stapling, inspect the installation thoroughly, pressing down any areas where the mat isn’t lying flat, and secure any lifted sections immediately.
| Mistake | What Goes Wrong | How to Fix It |
|---|---|---|
| Debris left on surface | Mat loses contact with uneven ground; water cuts channels underneath | Clear all rocks, roots, and clods; compact and fine-grade before installing |
| No upslope anchor trench | Blanket lifts and peels downslope after first storm | Dig 6 in. × 6 in. trench, staple mat into it, backfill and compact |
| Insufficient overlap | Water concentrates at seams and strips soil | Overlap 4–6 in. on slopes; 6–12 in. in channels; always shingle downslope |
| Too few or undriven staples | Causes the mat to lift and lose soil contact | Follow manufacturer pattern; increase density on steep slopes and at seams |
Conclusion: Getting Erosion Control Right
Effective erosion control starts with careful planning and proper execution. Each phase – site preparation, correct installation, and ongoing maintenance – plays a critical role. Skipping any step could lead to failure, especially after a single heavy storm.
The EPA highlights the urgency of erosion control, noting that unprotected construction sites can erode at rates 100–200 times higher than typical agricultural land. A properly installed erosion control mat – flat, securely anchored, with correct overlaps and stapling – can reduce erosion by more than 90%, even in areas prone to severe conditions.
Vegetation is the key to long-term stability. Treat seeding and mat installation as a single, unified process. This approach ensures resources and crew time are allocated effectively, setting the stage for success.
For those in central Maryland, where clay soils and intense thunderstorms present unique challenges, combining erosion control matting with enhanced drainage measures is essential. A company like Pro Landscapes MD can provide a comprehensive solution, integrating grading, land leveling, French drains, and stormwater management to complement matting installations. This ensures your project meets local codes and delivers lasting results.
To stay ahead of potential issues, use a project checklist, inspect the site after the first major rainfall, and address any problems immediately. Spending 30 minutes on a post-storm inspection can save you from the costly repairs that a slope failure would require.
FAQs
When do I need a TRM instead of a biodegradable blanket?
The search results don’t clarify when it’s better to use a Turf Reinforcement Mat (TRM) compared to a biodegradable erosion control blanket. If you’re dealing with challenging drainage or erosion problems, Pro Landscapes MD offers expert evaluations and tailored solutions to help stabilize landscapes and manage runoff effectively. They serve central Maryland and Washington, DC. Reach out to them for more details about their specialized services.
How do I choose staple length and spacing for my soil?
Choosing the correct staple length and spacing is crucial and depends on your soil type and slope. For loose or sandy soils, opt for longer staples to ensure they stay firmly anchored. On the other hand, shorter staples are better suited for compact or rocky ground. Proper spacing is equally important – it keeps the matting snug against the soil, reducing the risk of erosion. Always check the manufacturer’s recommendations or reach out to Pro Landscapes MD for expert guidance and installation services customized to your site’s needs.
What should I fix first if the mat lifts after a storm?
If erosion control matting comes loose after a storm, start by inspecting and re-securing the anchoring devices to make sure the mat is tightly pinned to the ground. If you notice that the soil beneath has been washed away or shifted, you’ll need to level and grade the area before re-anchoring the mat. For persistent problems with water runoff, you might want to look into professional drainage options, such as installing swales or regrading the site, to help avoid future issues.
Chat with Us