









- bhavya gada
- No Comments
If your garden edging looks straight in fall but crooked by March, freeze-thaw cycles are often the reason. In central Maryland, temperatures often swing above and below 32°F, and that repeated freeze-and-thaw movement pushes soil up, drops it back unevenly, and shifts edging out of place.
Here’s the short version:
- Water in the soil freezes and expands, which moves edging up and out
- Clay and loam soils hold more moisture, so they shift more than sandy soil
- Plastic edging usually fails first, while metal, stone, brick, and pavers often shift because the base moves
- Poor drainage, shallow trenches, and loose stakes are common causes of winter damage
- You can cut damage by using:
- 4–6 inch trenches for metal, plastic, or composite edging
- 6–8 inch trenches for brick, paver, or stone edging
- Compacted angular crushed stone, not pea gravel
- A slope of about 1–2% away from the bed edge
- Downspout extensions that carry water 5–10 feet away
- The best time to check and fix edging is late winter or early spring
A few signs I’d watch for are tilting, lifted sections, open joints, bent stakes, cracks, and exposed edging above grade. In most cases, the material is only part of the issue. The bigger problem is usually trapped water and a weak base underneath.
| Edging type | Common winter problem | Main weak point |
|---|---|---|
| Metal | Lifting, leaning, exposed top edge | Shallow or loose stakes |
| Plastic/composite | Bowing, cracking, stake pullout | Light weight, cold brittleness |
| Brick/paver | Joint separation, uneven sections | Base shift |
| Stone | Tilting, rocking | Uneven settling below |
| Timber | Gaps, warping, rot | Repeated wetting and freezing |
The main takeaway: edging lasts longer when water drains away, the base is compacted well, and the edging is anchored deep enough to resist soil movement.
How Freeze-Thaw Damage Shows Up in Different Edging Materials
That movement doesn’t look the same in every edging material. Each one tends to fail in its own way, and those failure patterns usually tell you where the weak spot is.
Metal edging: lifting, leaning, and exposed edges
Steel and aluminum edging usually handles cracking better than more rigid materials, but it can still shift when stakes are too shallow, spaced too far apart, or loosened by saturated soil. The most common warning signs are a raised lip along the top edge that catches mower blades or string trimmers, sections that start to lean, or pieces that end up sitting above grade. If a bed edge was straight in November but sits higher in March, frost heave is often the cause.[5][9][10]
Plastic and composite edging: heaving, brittleness, and stake failure
Plastic edging often fails first in freeze-thaw climates.[6][12][14] Because it’s light, expanding soil can push it out of place with less effort. After several freeze-thaw cycles, sections may bow outward, pull away from stakes, or drift out of line. Lower-grade plastic has another issue: cold weather can make it brittle, so it may crack when a shovel hits it, a mower wheel rolls over it, or ice shifts against it. Composites usually do better in cold conditions, but they still need solid anchoring.[7][8]
Stone, brick, paver, concrete, and timber edging: shifting, cracking, and rot
Heavier edging can still fail when the base moves. Brick and paver edging often starts to separate at the joints as the bedding layer shifts. Concrete may crack when water slips into small gaps and then freezes.[11] Natural stone can tilt or rock because the soil below settled unevenly, not because the stone itself broke. Timber edging doesn’t usually crack, but repeated wetting and freezing can speed up rot and loosen fasteners, which leaves boards gapped, warped, or no longer flush with the soil line.[2][4] In plain terms, weight by itself won’t fix poor drainage or a weak base.
These patterns usually point back to drainage or base problems.
sbb-itb-843f8be
Why Some Edging Fails Faster: Base Prep, Drainage, and Installation Errors
Base prep and drainage usually decide whether edging makes it through winter. When edging shifts, cracks, or pops up, the material itself often gets blamed first. But in a lot of cases, the main problem is underneath it: a weak base, trapped water, or sloppy anchoring.
Shallow trenches and weak base layers
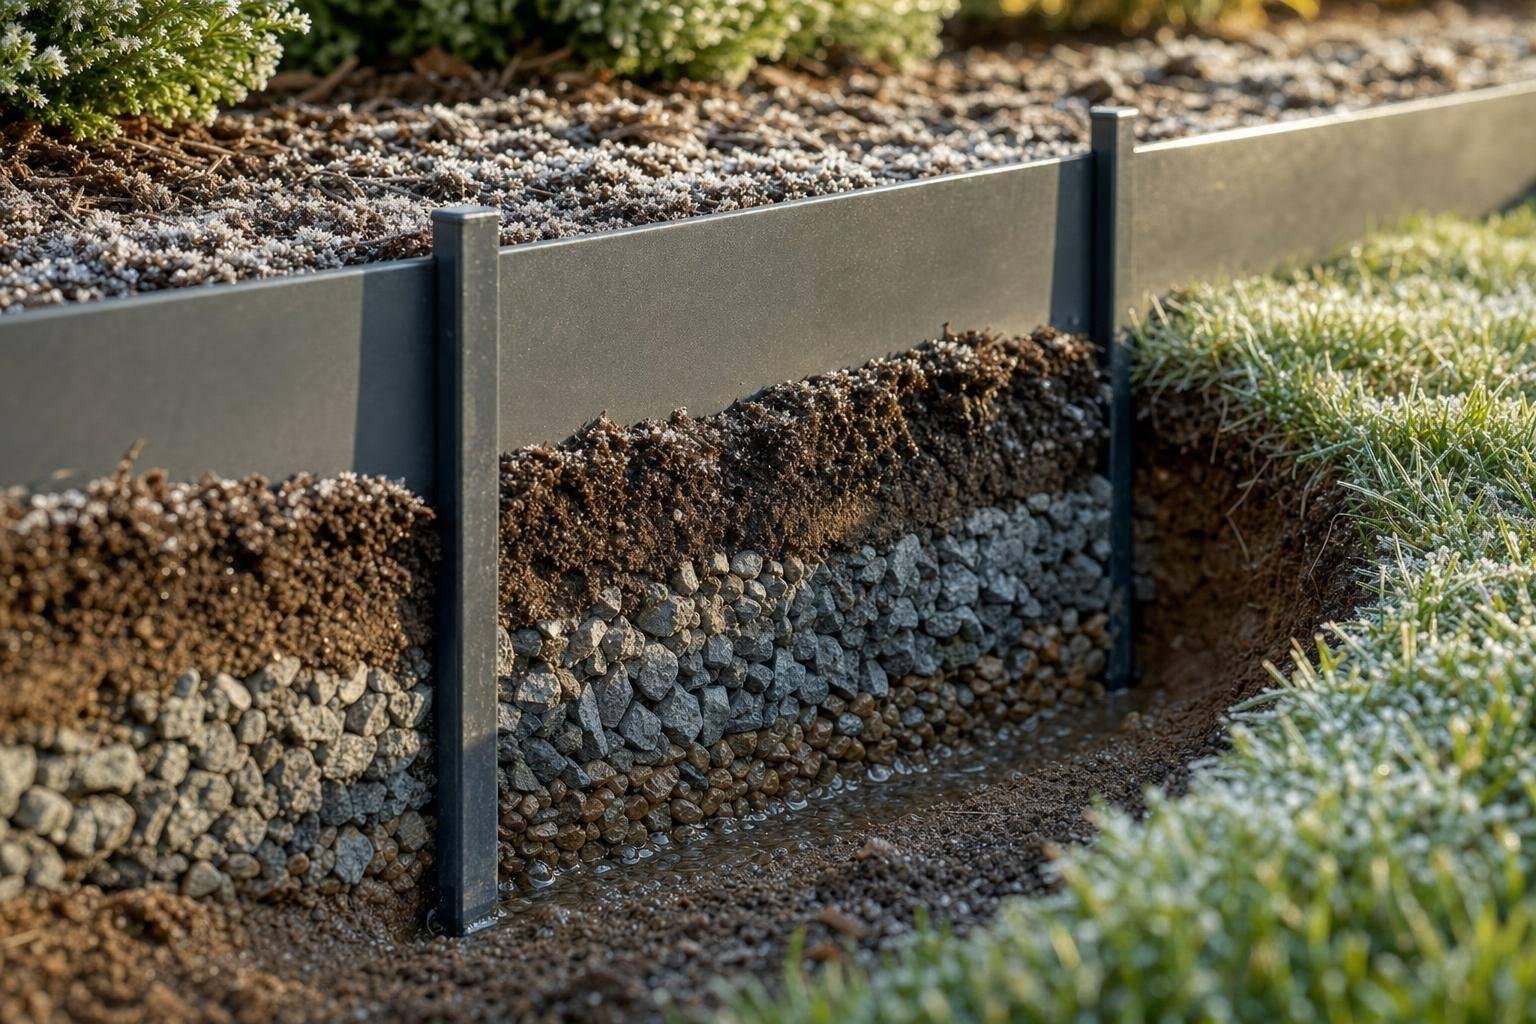
Start with the trench depth. Use a 4–6 inch trench for plastic, metal, or composite edging and a 6–8 inch trench for brick, paver, or stone borders.[27][18][28] If the trench is too shallow, the edging has very little support, which makes frost movement much more likely.
The base matters just as much. Build it with compacted angular crushed stone, not rounded pea gravel, which shifts more easily.[15][16][17][18] Then add a thin layer of coarse sand or stone dust to level the surface.[15][16][17][18] Think of it like setting a table on a wobbly floor. Even if the table is sturdy, it still won’t sit right.
One more detail makes a big difference: compact the crushed stone in 2-inch lifts instead of dumping it all in at once.[26][29] That helps stop hidden air pockets and weak spots from forming. If voids are left behind, they can fill with water, freeze, and kick off the same damage all over again.[26][29]
Once the base is stable, the next trouble spot is water.
Water buildup along beds, downspouts, and slopes
Even a strong base can fail if water keeps pooling beside the edging. The more water in the soil when a hard freeze hits, the more the ground can move. The worst damage often shows up in low spots where water sits, at the bottom of sloped beds where runoff gathers, and near downspout discharge points.[3][22][23]
Clay-heavy soils are a headache here. They can shift in volume by more than 10% when saturated, and that movement transfers straight into the edging if the base layer is too thin to buffer it.[25] That’s why drainage fixes can matter just as much as the edging itself.
A few trouble areas to watch:
- Low sections of the bed edge where water lingers
- Downspouts that dump roof runoff next to planting beds
- Slopes that send water toward the edging line
Downspout extensions that carry roof water at least 5–10 feet away from beds, along with a ground slope of about 1–2% away from the edging line, can cut down how much water builds up before a freeze.[22][23][24]
Loose stakes, failed restraints, and mixed-fill soils
A solid base won’t do much if the edging isn’t anchored well. Sparse stakes driven into soft topsoil don’t give frost heave much resistance. For metal or composite edging, stakes are often spaced about 24–36 inches apart on straight runs. For plastic edging, they may be placed every 7 inches, with extra stakes near seams.[30]
Stake angle matters too. Angling stakes slightly outward – away from the bed – helps resist the upward and sideways force created by freeze-thaw cycles.[9][19] It’s a small installation detail, but it can keep a straight line from turning into a mess by spring.
Soil conditions can make things even trickier, especially on newer lots. After construction, many properties end up with a thin layer of topsoil spread over compacted subsoil, construction fill, and sometimes rubble. That means one part of the edging may rest on stable fill while the next section sits on loose organic material.[20] Same install method, totally different support underneath.
That mismatch leads to uneven heave along the bed edge. Some sections lift, others sink, and gaps start to open even when the edging was installed the same way from end to end.[20] A simple way to help is to use geotextile fabric between native soil and the stone base. It keeps fines from migrating into the aggregate and weakening the base over time.[15][20]
How to Cut Freeze-Thaw Damage and Make Edging Last Longer
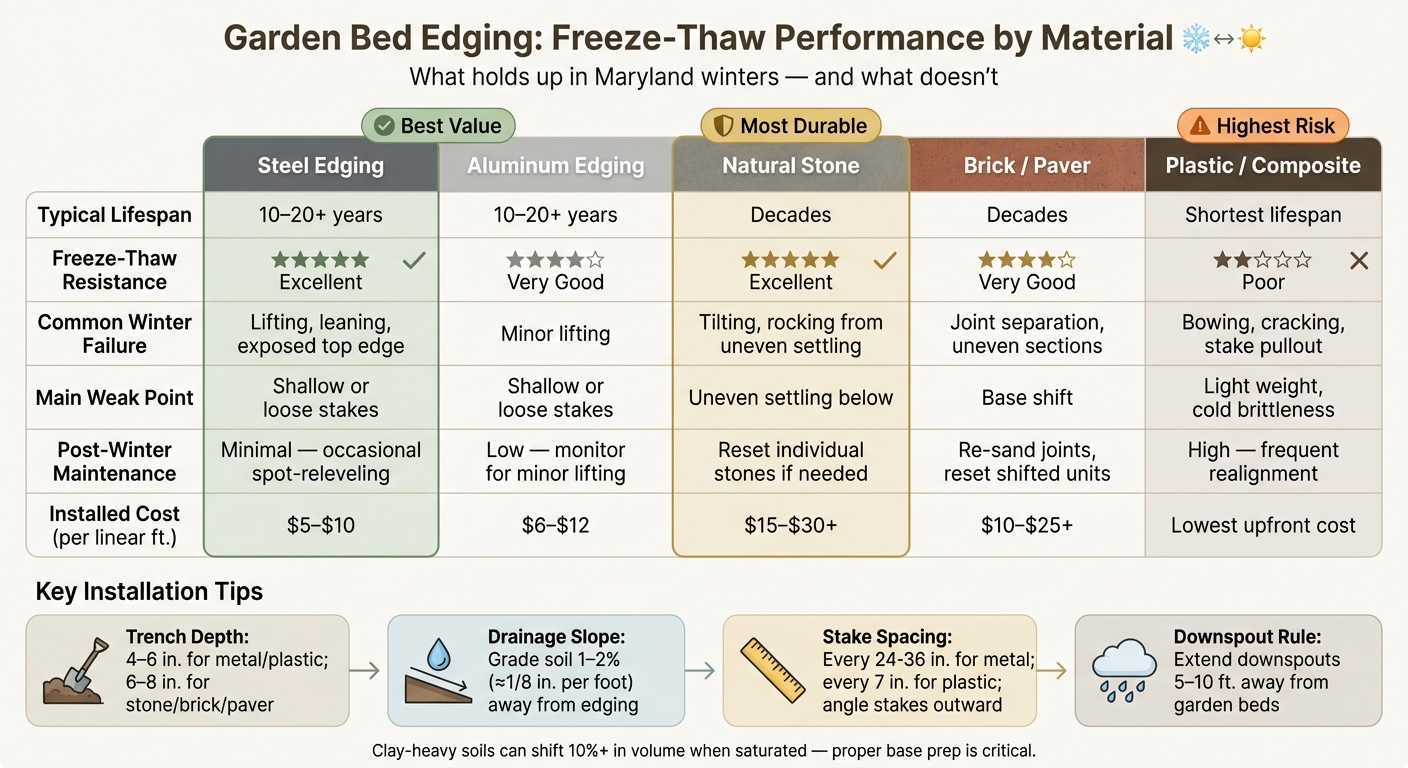
Garden Bed Edging: Freeze-Thaw Resistance by Material Type
Once you know what freeze-thaw does to edging, the fix is pretty straightforward: keep water out, build a stronger base, and fix small shifts early. Most freeze-thaw damage starts because water sits in the base. When that water freezes, it expands and pushes edging out of place. So the goal is simple – keep water moving instead of letting it collect.
Build a better base and improve drainage
Drainage is your first line of defense. For stone, brick, or paver borders, excavate at least 6–8 inches. For metal or composite edging, dig 4–6 inches deep.[43][45][46] Then build the base with 4 inches of compacted angular crushed rock and top it with 1–2 inches of coarse sand. Avoid fine sand here because it tends to hold water.[21][18][42]
If you’re working with clay-heavy Maryland soil, add geotextile fabric over the native subgrade before you put down gravel. That helps keep the base from mixing with the soil below. It also helps to slope the soil at least 1% away from the edging line, which works out to about 1/8 inch per foot.[37][40][41][42]
In flat or soggy areas, drainage may need more help. A 4-inch perforated French drain with at least 1 inch of fall per 8–10 feet can move water away from the bed before it has a chance to sit and freeze.[32][33][35]
Choose edging materials that hold up better in Maryland winters
Not all edging handles a Maryland winter the same way. Some materials shrug off freeze-thaw cycles. Others need more upkeep once winter lets go.
| Material | Typical Lifespan | Freeze-Thaw Resistance | Post-Winter Maintenance | Installed Cost (per linear ft.) | Best Use Case |
|---|---|---|---|---|---|
| Steel edging | Long-term; often 10–20+ years | Excellent | Minimal; occasional spot-releveling | $5–$10 | Clean, straight formal borders[34][9][38][5][39][13] |
| Aluminum edging | Long-term; often 10–20+ years | Very good | Low; monitor for minor lifting | $6–$12 | Curved or straight beds, corrosion-prone areas[34][9][38][5][39][13] |
| Natural stone | Decades | Excellent | Reset individual stones if needed | $15–$30+ | Permanent, decorative borders[36] |
| Brick/paver | Decades | Very good | Re-sand joints, reset shifted units | $10–$25+ | Formal gardens, wide borders[36] |
In many Maryland yards, steel and aluminum edging tend to perform best, especially when they’re set deep and staked into undisturbed soil. Driving the stakes at 45-degree angles helps them stay put when the ground starts moving.[9][38] Natural stone and concrete curbing can last for many years too, but they come at a higher price and usually call for professional installation on a deep, compacted base.[5][41][44]
Inspect, reset, and repair edging in late winter or early spring
When winter shifts edging, it’s best to deal with it early – before spring growth covers the problem up. The ideal time to inspect the edging line is late winter or early spring, after most of the ground has thawed but before new growth starts.[21][1]
At that point, reset any sections that lifted, add fresh angular gravel where the base has thinned out, compact the area again, and swap out cracked units.[9][31][34][36] A small repair in March is a lot easier than a full reset after the bed fills in.
Conclusion: Edging That Lasts Starts With the Right Materials and Site Prep
Freeze-thaw damage usually comes down to three things: drainage, base depth, and anchoring.
The fix stays pretty much the same no matter what material you use. Keep water moving and keep the base stable. A compacted crushed-stone base, drainable backfill, and tight anchoring help limit winter movement. Stone, brick, pavers, and well-anchored metal tend to hold up better than thin plastic.
Once the base is set up the right way, seasonal checks can stop small shifts from turning into bigger problems. Check edging in late winter or early spring, and reset any lifted sections before spring growth covers them up.
For drainage fixes or an edging system built for freeze-thaw conditions in central Maryland, Pro Landscapes MD designs and installs landscape beds, hardscaping, and drainage improvements.
Edging that lasts starts with the right base, the right drainage, and materials that fit the conditions on your property.
FAQs
Can frost heave ruin new edging in one winter?
Yes. In Maryland, wet winters and clay-heavy soil create a rough mix for new garden edging. Freeze-thaw cycles make the ground swell and shrink, and that back-and-forth movement can shift, crack, or loosen edging in just one winter.
That’s why site prep matters so much. Good drainage and a solid base give edging a much better shot at staying in place.
Which edging lasts longest in Maryland freeze-thaw weather?
Natural stone – like bluestone, fieldstone, flagstone, and river rock – is one of the longest-lasting picks for garden bed edging in Maryland. It holds up well over time and looks right at home in many yards.
If you go with brick, make sure it’s SW-rated for freeze-thaw conditions. That rating matters in Maryland, where winter can be rough on edging materials.
Pro Landscapes MD also points to durable manufactured options such as Techo-Bloc, Allen Block, El Dorado Stone, and Nickel Block. No matter which material you choose, proper base prep and gravel drainage go a long way toward helping prevent winter heaving and shifting.
When should I reset edging after winter damage?
Reset garden bed edging after the last hard freeze in spring. Once the ground has thawed, check for movement, cracks, or shifting caused by winter frost.
Taking care of this in spring helps keep the edging in place before the growing season starts. If you notice major leaning or bulging, that can point to deeper drainage or foundation problems and may need an evaluation from Pro Landscapes MD.
Chat with Us