









- bhavya gada
- No Comments
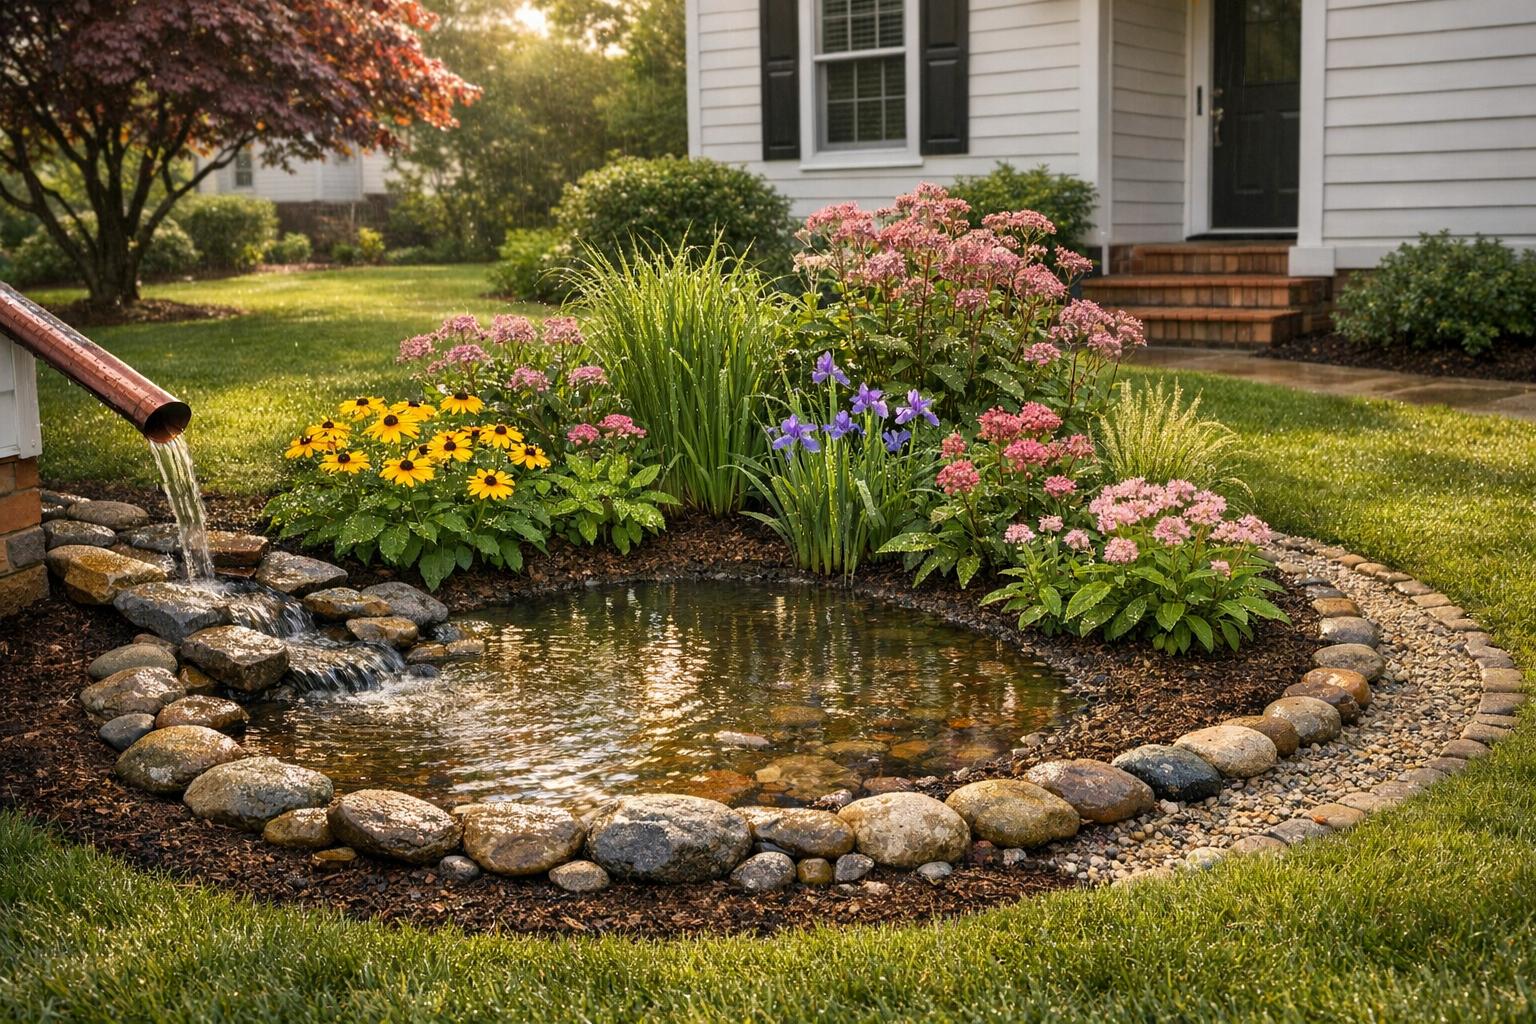
Rain gardens are a practical way to manage stormwater runoff while improving the look of your yard. Designed to collect and filter rainwater, they reduce pollution in waterways like the Chesapeake Bay, recharge groundwater, and prevent local flooding. Maryland’s varying soil types and climate make planning crucial for success. Here’s what you need to know:
- Site Selection: Choose a low-lying area at least 10 feet from your home. Test soil drainage and observe water flow during rain.
- Sizing: A rain garden should handle about 30% of your roof runoff. For a 500-square-foot roof, plan a 100-square-foot garden.
- Soil Prep: Amend clay-heavy soil with sand and compost for better drainage. Create zones for wet, transitional, and dry conditions.
- Plant Choices: Use native Maryland plants like swamp milkweed, Virginia blue flag, and black chokeberry to suit each moisture zone.
- Overflow Plan: Add a berm and an outlet to manage excess water during heavy storms.
- Maintenance: Regularly prune plants, refresh mulch, and clear sediment to keep it effective and visually appealing.
5-Step Guide to Creating a Rain Garden in Maryland
Rain Garden Step 1: Selecting a Site
sbb-itb-843f8be
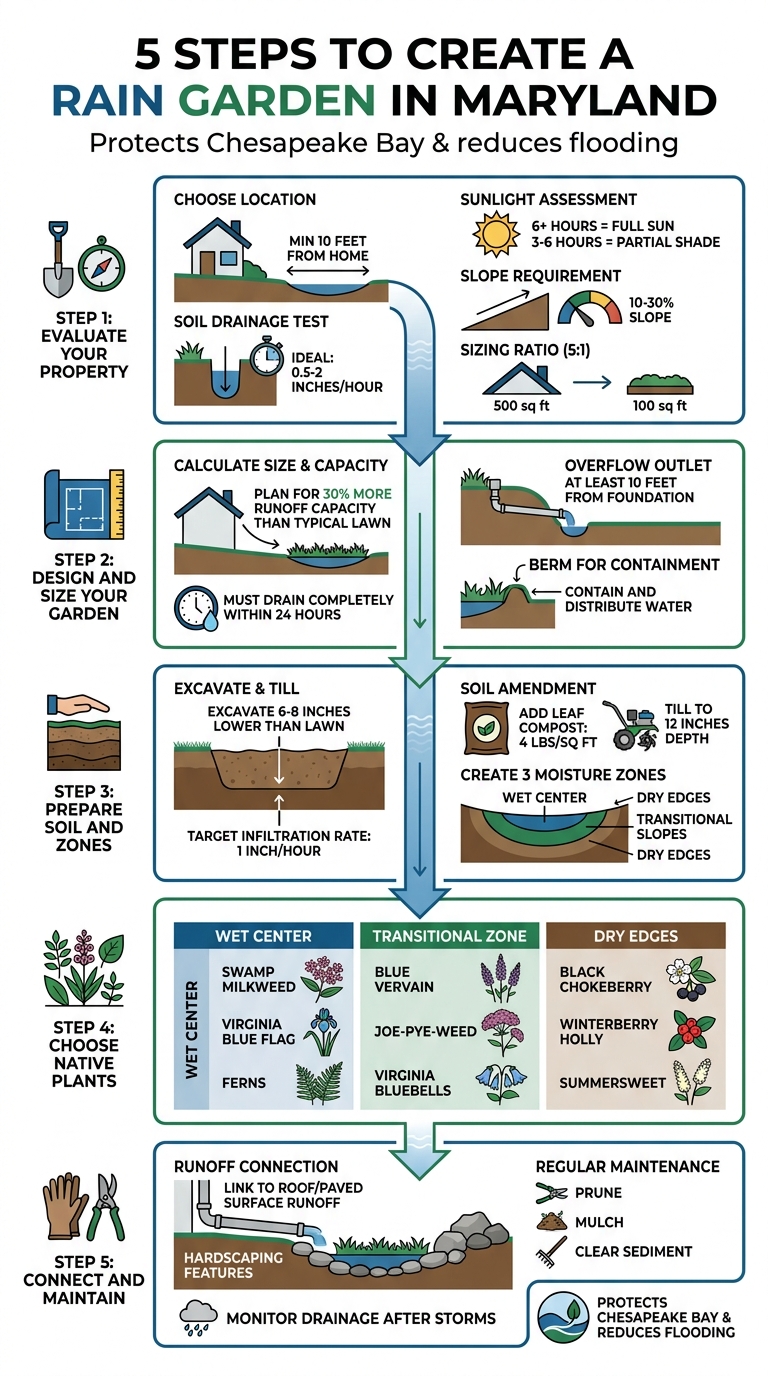
Step 1: Evaluate Your Property for Rain Garden Placement
Finding the right spot for your rain garden is key to its success. In Maryland, where soils range from clay-heavy in the east to sandy in the west, it’s important to assess your property’s specific conditions. Start by observing your yard during or just after a rainstorm to understand how water moves and where it collects.
Check Site Topography and Drainage Patterns
Watch how water flows from downspouts, driveways, and patios. Look for low areas where water naturally pools – these could be ideal spots for your rain garden. To measure the slope between your water source and the proposed site, use a line level or a smartphone app like Bubble Level. Aim for a slope of at least 10% but not more than 30%. This ensures runoff flows into the garden without causing erosion.
Keep your rain garden at least 10 feet away from your home’s foundation to avoid water damage. For reference, a 500-square-foot roof typically needs a 100-square-foot rain garden to manage runoff effectively (based on a 5:1 ratio). To map runoff paths more precisely, sprinkle flour or gravel near downspouts and driveways during light rain – the water will carry it along, showing you exactly where it flows.
Test Your Soil Drainage Capacity
Dig a hole about 12–18 inches deep and 6–12 inches wide at your proposed site. Fill it with 6 inches of water and let it drain overnight to saturate the surrounding soil. Refill the hole the next day and measure how long it takes to drain. Ideally, the water should drain at a rate of 0.5–2 inches per hour, meaning it disappears within 24–48 hours.
Maryland’s clay-heavy soils, especially Baltimore clay loams, often drain too slowly. If water remains after 48 hours, you’ll need to amend the soil with a 50% mix of sand and compost or find a better-draining location. Test multiple spots in your yard, as soil conditions can vary. While coastal areas often have compacted clay, western regions may have sandy soils that drain too quickly and require added organic material to retain moisture.
Assess Sunlight and Shade Levels
Maryland falls within USDA hardiness zones 5b to 8a and gets about 180–220 sunny days annually. To determine how much sunlight your proposed site receives, observe it at 9 AM, noon, and 3 PM. Locations with 6 or more hours of direct sunlight are considered full sun and work well for most native wet-tolerant plants. Partially shaded areas (3–6 hours of sunlight) will require shade-friendly plants like ferns or woodland species.
For accuracy, you can use a sun calculator app set to Maryland’s latitude (39°N). Avoid placing your rain garden under trees with shallow roots or in areas with compacted soil, as these conditions can interfere with water absorption and plant health. Once your site is thoroughly assessed, you’ll be ready to move on to designing and sizing your rain garden for maximum effectiveness.
| Soil Type Common in Maryland | Percolation Rate (in/hr) | Suitability for Rain Garden |
|---|---|---|
| Clay (Eastern MD) | <0.5 | Poor; amend with 50% sand/compost |
| Loam (Central MD) | 0.5–2 | Ideal |
| Sandy (Western MD) | >2 | Good; add organics to retain moisture |
Step 2: Design and Size Your Rain Garden
Once you’ve chosen the perfect spot, it’s time to design your rain garden so it can handle runoff effectively. A well-designed rain garden should drain completely within 24 hours, which helps avoid standing water problems [1]. These gardens are built to manage 30% more runoff than a typical lawn, making them a powerful tool for water management [1]. Be sure to adjust your plans based on Maryland’s diverse soil conditions to maximize water absorption.
Calculate the Required Rain Garden Size
Using the information from your site assessment, calculate the size of your rain garden to handle the runoff properly. Measure the drainage area – this could include your roof, driveway, or patio – and use those numbers to determine how big your garden needs to be.
Select a Shape That Fits Your Yard
When deciding on the layout, keep it simple and functional to encourage smooth water flow. If your yard has a slope, you can create a berm using the soil you dig up. This berm helps distribute runoff evenly and prepares your garden for effective water management in the next steps.
Plan for Water Overflow
Even with careful planning, heavy rainstorms can overwhelm your rain garden. That’s why it’s important to include an overflow plan. Create a low-point outlet in the berm to direct excess water safely away from your home. Aim the overflow toward an area that can handle it, like a lawn or a dry riverbed. To prevent erosion, line the overflow path with sturdy materials and make sure the outlet is at least 10 feet away from your foundation. After storms, check the garden and make any necessary adjustments to the overflow path. And don’t forget to call 811 before you dig to locate any underground utility lines.
If you’re looking for more help navigating Maryland’s specific drainage challenges, Pro Landscapes MD can offer expert advice tailored to your needs.
Step 3: Prepare the Soil and Set Up Planting Zones
With your rain garden design complete and an overflow plan ready, the next step is preparing the soil. This stage is crucial for achieving proper drainage. The goal is to reach an infiltration rate of 1 inch per hour, ensuring the garden drains fully within 8 hours after a storm [2]. Proper soil preparation also helps establish distinct planting zones that cater to varying water retention needs.
Create the Right Soil Mix for Rain Gardens
Start by excavating the area to the planned depth, shaping gentle slopes that lead toward the center, and building a berm around the edges to contain water. If your soil struggles with drainage – common in areas with heavy clay – use sand to improve the grade. For particularly poor drainage, amend the soil with a combination of compost and sand as needed [2].
After preparing the base, spread leaf compost at about 4 pounds per square foot across the surface and hand-till it into the soil to a depth of 12 inches. Make sure the bottom of the rain garden sits 6 to 8 inches lower than the surrounding lawn to effectively capture runoff [2].
Define Moisture Zones in the Garden
The way you mix and contour the soil naturally creates moisture gradients within your rain garden. These gradients form three main zones:
- Wet center zone: The lowest point of the garden, which stays damp the longest after rainfall.
- Transitional slopes: Middle areas that experience moderate moisture as water drains downward.
- Drier edges: Higher areas near the berm that remain mostly unsaturated.
Understanding these zones is essential for selecting plants that will thrive in their respective conditions.
Add Mulch and Finish the Surface
Once the soil is ready and moisture zones are identified, apply a layer of wood mulch over the garden bed. This step helps retain moisture between storms, reduces weed growth, and enhances the overall appearance of the garden. Keep the mulch a few inches away from plant stems to avoid rot, and refresh the layer each year to maintain its effectiveness [2].
Step 4: Choose Native Plants for Maryland Rain Gardens
Selecting native plants is a smart way to boost both the function and appearance of your rain garden. These plants are well-suited to Maryland’s climate, require minimal upkeep, and help support local ecosystems as part of your landscape projects in Maryland. To get the best results, match each plant species to the specific moisture zones in your garden. Here’s a breakdown of great options for each zone.
Plants for the Wet Center Zone
The center of your rain garden, where water collects the most, needs plants that can handle frequent flooding and consistently wet conditions.
- Swamp Milkweed (Asclepias incarnata): With its pink flowers, this plant not only thrives in wet soil but also attracts monarch butterflies.
- Virginia Blue Flag (Iris virginica): This iris adds elegance with its sword-like leaves and stunning purple blooms in late spring.
- Ferns: Both Royal Fern (Osmunda spectabilis) and Cinnamon Fern (Osmundastrum cinnamomeum) provide lush, lasting greenery.
- White Turtlehead (Chelone glabra): Unique white flowers appear in late summer, adding visual interest.
- Scarlet Beebalm (Monarda didyma): Its bold red blooms are a magnet for pollinators, adding vibrancy to the wettest part of your garden.
Plants for the Transitional Zone
The middle slopes of your rain garden experience a mix of wet and dry conditions, making them ideal for plants that can adapt to changing moisture levels.
- Blue Vervain (Verbena hastata) and Rough-stemmed Goldenrod (Solidago rugosa): Both thrive in variable conditions and produce tall, colorful blooms from summer through fall.
- Three-nerved Joe-pye-weed (Eutrochium dubium): Growing up to 4 feet tall, this plant features clusters of pinkish-purple flowers and serves as a natural divider between zones.
- Virginia Bluebells (Mertensia virginica): These early bloomers bring delicate pink and blue flowers in spring. They go dormant by summer, making room for later-blooming plants.
Shrubs and Trees for the Outer Edges
The drier edges of your rain garden are perfect for woody plants that provide structure and blend seamlessly with the surrounding landscape.
- Black Chokeberry (Aronia melanocarpa): Compact and versatile, this shrub offers white spring flowers and dark fruits, making it great for defining garden boundaries.
- Summersweet (Clethra alnifolia): Its fragrant white or pink flower spikes bloom in mid-summer, ideal for planting near patios or pathways.
- Winterberry Holly (Ilex verticillata): Bright red berries in winter provide food for wildlife and a pop of color during the colder months.
- Smooth Hydrangea (Hydrangea arborescens): This shrub thrives in partial shade and produces large, showy white flower clusters.
- Red Chokeberry (Aronia arbutifolia): With spring flowers, summer berries, and fiery fall foliage, this plant ensures your rain garden looks great year-round.
Step 5: Connect Your Rain Garden to the Existing Landscape
Now that your rain garden is designed and planted, it’s time to tie it into the rest of your yard. A well-integrated rain garden not only looks great but also works more effectively to filter stormwater. By adding thoughtful features, managing runoff wisely, and committing to regular maintenance, you can ensure your garden blends seamlessly with its surroundings.
Add Hardscaping Features
Incorporating hardscaping features can enhance both the functionality and appearance of your rain garden. Consider using decorative stones to outline the garden’s edges or improve filtration. For instance, a stone weir or strategically placed boulders near the inlet can help filter pollutants while adding visual interest. As the Anne Arundel County Watershed Stewards Academy explains, "A rain garden is a shallow depression that contains loose soil, mulch, and sometimes stone, and is planted with native plants" [3].
Link Rain Gardens with Existing Drainage
To maximize your rain garden’s effectiveness, connect it to nearby stormwater sources. Directing runoff from your roof or paved surfaces into the garden basin ensures it can do its job of managing stormwater. If you’re unsure how to integrate these systems, professionals like Pro Landscapes MD specialize in creating solutions tailored to Maryland’s specific needs. Once connected, your garden will be better equipped to handle rainwater efficiently.
Maintain Your Rain Garden Year-Round
A rain garden needs regular care to stay effective and attractive. Keep it in top shape by clearing out sediment, pruning perennials, and refreshing mulch when needed. This keeps drainage efficient and prevents weeds from taking over. As the Anne Arundel County Watershed Stewards Academy points out, "Rain gardens require seasonal maintenance similar to traditional landscapes" [3]. Other tasks include dividing overcrowded plants and removing invasive species promptly. Proper maintenance also ensures that water doesn’t linger long enough to become a breeding ground for mosquitoes.
Conclusion
Incorporating a rain garden into your Maryland landscape is a smart way to enhance both its look and functionality. By following the right steps, you can create a rain garden that effectively manages stormwater, addressing the unique challenges posed by Maryland’s varied soils and weather conditions. Rain gardens not only help with flooding and erosion but also filter pollutants, recharge groundwater, and provide a habitat for local wildlife. As Geoff Goll, President of Princeton Hydro, aptly puts it:
If everyone in my neighborhood installed a rain garden, imagine the positive reduction in stormwater and flooding that would occur downstream. Plus, we’d have some pretty awesome looking native flowers and grasses around for the pollinators and wildlife. [2]
Beyond their environmental benefits, rain gardens can increase property value while transforming ordinary lawns into dynamic, colorful plantings that thrive year-round. With regular care – like weeding, mulching, and monitoring drainage – your rain garden will continue to flourish and serve its purpose for years to come.
While many homeowners take the DIY route, consulting a professional can ensure your rain garden is designed for optimal performance and drainage.
For those looking for expert assistance, Pro Landscapes MD offers specialized stormwater management services throughout central Maryland. Their team provides custom rain garden designs and installations, combining expertise in drainage systems, grading, and native plant selection. Whether you need help with planning, installation, or ongoing maintenance, they can guide you in creating a rain garden that not only protects local waterways, including the Chesapeake Bay, but also enhances the beauty of your outdoor space.
FAQs
Do I need a permit for a rain garden in Maryland?
Permits are necessary for rain gardens in Maryland if they are part of stormwater management efforts that align with Environmental Site Design (ESD) criteria and require approval from local authorities. On the other hand, if you’re installing a rain garden voluntarily for personal use, no permit is needed.
What if my yard has heavy clay soil that drains slowly?
If your yard has dense clay soil, mixing in sandy or loamy soil can help improve drainage. Clay tends to compact easily, making it harder for water to soak in. Another option is to install an underdrain system, which can manage excess water and reduce pooling. These adjustments can make your rain garden more efficient and long-lasting.
Will a rain garden attract mosquitoes or cause standing water?
A well-designed rain garden won’t attract mosquitoes or lead to standing water issues. These gardens are specifically constructed to drain water within 12 to 48 hours, which prevents the stagnant conditions mosquitoes need to breed. When built properly, a rain garden is a safe and effective addition to your landscape without inviting unwanted pests.
Chat with Us