









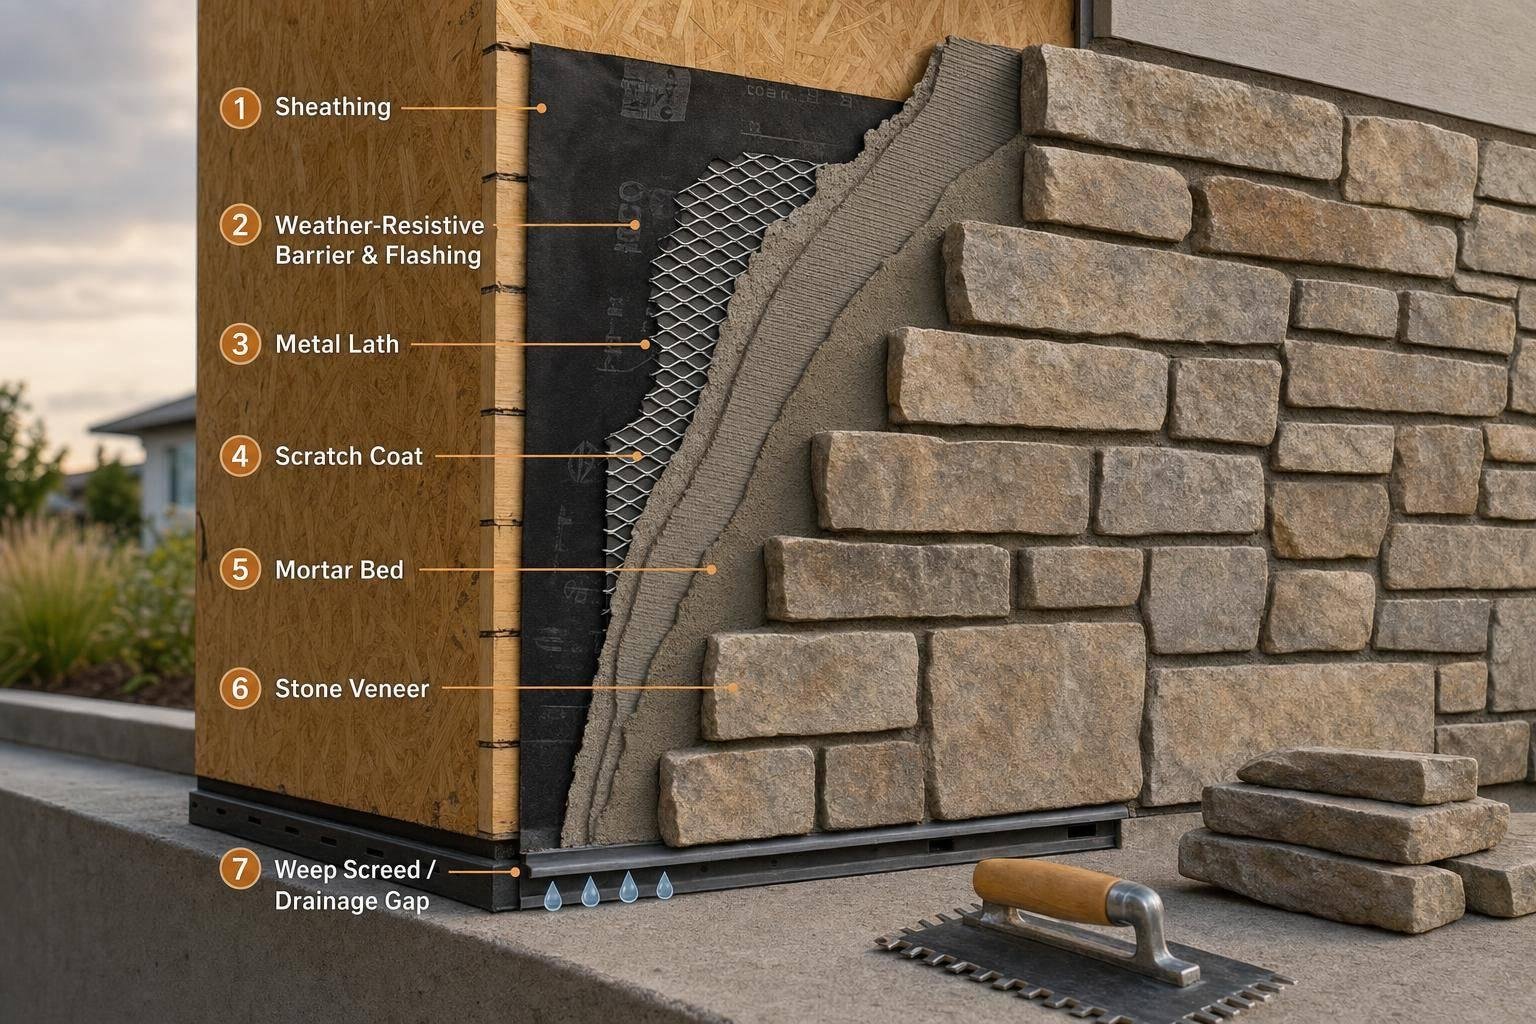
- bhavya gada
- No Comments
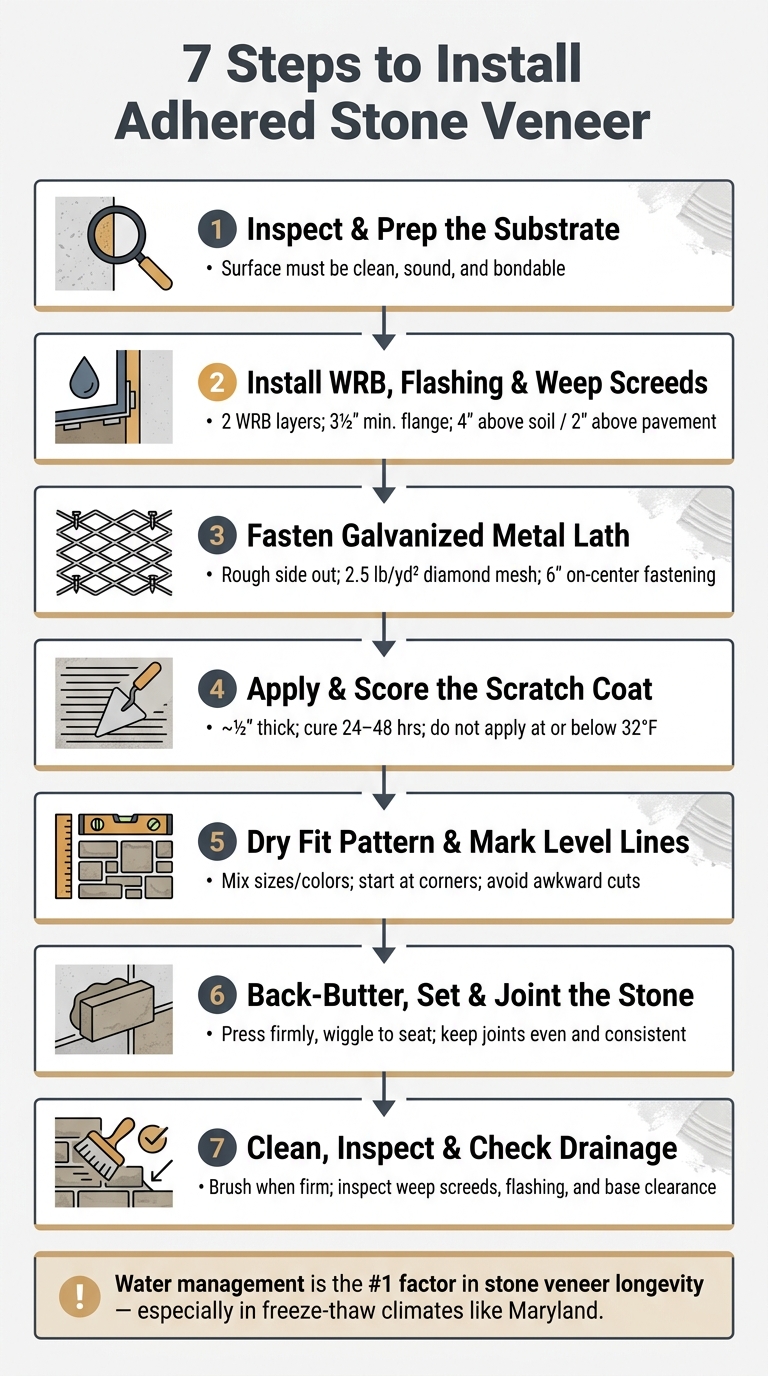
If stone veneer fails, water is usually the reason. In this guide, I’d boil the whole job down to 7 steps: check the wall, add moisture control, fasten lath, apply a scratch coat, plan the layout, set the stone, and clean and inspect the work.
Here’s the short version: adhered stone veneer is usually 1–2 inches thick, and it needs a clean, sound surface plus solid drainage details to last. On framed walls, that means two WRB layers, flashing, a 3½-inch minimum weep screed flange, and base clearance of about 4 inches above soil or 2 inches above pavement. On the mortar side, the scratch coat is about 1/2 inch thick, cures for 24–48 hours, and should not be applied if temperatures are 32°F or below or expected to drop there within 24 hours.
If I wanted a simple checklist before starting, it would be this:
- Step 1: Inspect and prep the substrate
- Step 2: Install WRB, flashing, and weep screeds
- Step 3: Fasten galvanized metal lath
- Step 4: Apply and score the scratch coat
- Step 5: Dry fit the pattern and mark level lines
- Step 6: Back-butter, set, and joint the stone
- Step 7: Clean, inspect, and keep drainage paths open
Quick Comparison
| Step | Main goal | Key detail |
|---|---|---|
| 1 | Check the wall | Surface must be clean, sound, and bondable |
| 2 | Control water | WRB laps, flashing, and weep screed matter |
| 3 | Install lath | Rough side out; correct fastening and overlap |
| 4 | Add scratch coat | About 1/2 inch thick; cure 24–48 hours |
| 5 | Plan layout | Mix sizes/colors and avoid awkward cuts |
| 6 | Set stone | Back-butter and keep joints even |
| 7 | Finish the job | Clean gently, inspect joints, check drainage |
I’d treat this process as part masonry work and part water-control work. If the wall stays dry behind the veneer and the bond is done right, the finished surface has a much better shot at holding up through Maryland rain, humidity, and freeze-thaw swings.
7 Steps to Install Adhered Stone Veneer
Proper Design, Detailing, and Installation of Adhered Manufactured Stone Veneer
sbb-itb-843f8be
Steps 1 and 2: Check the Surface and Control Moisture
These two steps set the base for everything that comes next. If the wall isn’t sound or can’t deal with water the right way, even a good stone veneer job can fail, especially during a Maryland winter.
Step 1: Inspect and Prepare the Substrate
Start by checking the wall for loose material, hollow spots, cracks, bulging, efflorescence, peeling paint, sealers, oil, and dust. In short, look for anything that can weaken the bond. Run a straightedge across the wall. If the surface flexes, sheds material, or sounds hollow, fix that first.
On concrete or CMU, direct bonding is okay only when the surface is clean, rough, and absorbent. Remove waterproofing coatings, form oils, and bituminous sealers before moving ahead. On framed walls, make sure the sheathing is dry and sound before you add WRB and lath. Once the wall is ready, move to WRB and flashing before any lath goes on.
For safety, wear eye protection, gloves, and a dust mask. If you’re working off the ground, use stable ladders or scaffolding.
Step 2: Install WRB, Flashing, and Weep Screeds
Next, shut water out before the veneer goes up. Install two WRB layers over sheathing in shingle fashion, with 6-inch vertical laps, 2-inch horizontal laps, and 16-inch corner overlaps.[4][2][5] That setup gives water a path to drain behind the veneer instead of getting trapped where it can do damage.
Add flashing at windows, doors, penetrations, and other transitions. At the base, install a corrosion-resistant weep screed with a 3½-inch minimum flange.[3][5] Set it at least 4 inches above grade or 2 inches above paved surfaces to help limit splashback and capillary wetting.[5]
Stone veneer can hold moisture. If that water can’t drain out, you’re asking for cracking, debonding, and deterioration. That’s a bigger issue in central Maryland, where freeze-thaw cycles are common in fall, winter, and early spring.[7]
Before installation, fix drainage problems around the wall, including:
- downspout discharge
- negative slope
- standing water or ponding at the base
Correct poor grading, downspout discharge, and ponding at the base before veneer work begins.
With the drainage layer in place, the wall is ready for metal lath and scratch coat.
Steps 3 and 4: Install Metal Lath and Apply the Scratch Coat
With the WRB and weep screed in place, the wall is ready for the lath and scratch coat. This is the part that gives stone veneer its grip. If this base is done well, the rest of the install goes a lot smoother.
Step 3: Fasten the Metal Lath Correctly
Use galvanized expanded metal lath rated for exterior stone veneer. For most residential walls, 2.5 lb/yd² diamond mesh lath is the standard pick. For taller walls or heavier stone, step up to 3.4 lb lath. On wood framing, use G60 hot-dip galvanized lath or better. On masonry, use corrosion-resistant lath that can handle moisture and mortar exposure.[12][13]
Install the lath with the rough side facing out. That way, the mortar can key behind it instead of sliding across the surface.
On wood framing, fasten the lath to studs with corrosion-resistant nails or screws spaced 6 inches on center, with at least 1 inch of penetration into the framing. On masonry, use corrosion-resistant masonry screws with wide heads and at least 3/4 inch of embedment. Don’t overdrive the fasteners. If the lath gets smashed or flattened, mortar won’t lock in as well.[12][10]
At seams, keep the overlaps tight and consistent:
- Overlap lath at least 1 inch at vertical joints and 1/2 inch at horizontal joints
- Stagger end joints so they don’t line up from one course to the next
- Wrap lath around outside corners at least 12 inches to help cut down on corner cracking[11][1]
Step 4: Trowel and Score the Scratch Coat
For the scratch coat, use a Type S or Type N cement-based mortar that meets ASTM C270. In many cases, Type S is preferred because it has higher strength. A common mix is 1 part portland cement to 2.5–3 parts clean, sharp sand by volume.
Trowel the mortar upward and press it through the lath so it keys on both sides. The scratch coat should be about 1/2 inch thick, and the lath should be fully covered. After you’re done, no metal should be visible.[2][14]
Once the mortar firms up enough to leave only a slight thumbprint, score it with a scarifier or notched trowel. Make horizontal grooves about 1/8–1/4 inch deep, spaced roughly 1/2–3/4 inch apart. Those grooves give the setting bed mortar a better mechanical bond.[2][9][6]
Let the scratch coat cure for 24–48 hours before you start setting stone. If you’re working with open-stud assemblies, use the longer end of that range.[2][8]
Weather matters here more than people think. In Maryland summers, protect the wall from direct sun and wind, and lightly mist the surface if it starts drying too fast. In cooler weather, follow cold-weather mortar practices below 40°F, and do not apply mortar when temperatures are at or below 32°F or expected to drop below 32°F within 24 hours.[2][14] If the coat freezes, cement hydration can stop, leaving behind a weak, powdery layer that won’t hold the stone the way it should.
After the scratch coat cures, mark your layout lines and dry fit the stone for Step 5.
Steps 5 and 6: Plan the Layout and Set the Stone
Step 5: Dry Fit the Pattern and Mark Level Courses
Lay the stone out on the ground first, then transfer that pattern to the wall with level chalk lines. This gives you a chance to spot odd gaps, adjust spacing, and make sure the wall won’t end up looking repetitive.
Mix different stone sizes and colors, avoid obvious repeats, and keep the joints even. Start with the corner pieces to lock in the layout. Once the pattern looks balanced and the courses are marked, begin setting stone from the corners and work outward.
Step 6: Back-Butter, Press, and Joint the Stone
Spread mortar on the back of each stone, press it firmly into the scratch coat, and give it a slight wiggle to seat it. Begin with the corner pieces, then keep working across the wall in courses. As you go, check for level, plumb, and consistent joint width.
Clean off mortar squeeze-out before it hardens. After the stone firms up, fill the joints to the depth you want and tool them neatly. When the joints are done, clean the face of the stone and inspect the work.
Step 7 and Conclusion: Clean the Veneer, Inspect the Work, and Plan for Long-Term Performance
Step 7: Final Cleanup and Post-Installation Inspection
Start cleanup when the mortar is firm, but not fully cured. At that point, a stiff, non-wire masonry brush can knock off smears and droppings without scratching the stone.
Then do a gentle rinse with clean water and a soft-bristle brush, working from top to bottom. If the rinse water turns cloudy, swap it out often. Otherwise, that residue can end up right back on the wall. Skip pressure washing here. It can force water into fresh joints and even pull mortar out before it has time to set.[16][18]
Only use acid cleaners if the manufacturer says they’re okay. If not, stay away from them. Acid can harm both the stone and the mortar.[17][18] And if efflorescence shows up, look at drainage and flashing first.[15][19]
Once the surface is clean, inspect the wall before the mortar fully cures. This is the moment to catch small misses while they’re still fixable.
- Loose or hollow stones: Tap each piece and reset anything that moves.
- Missed or shallow joints: Look closely around windows, doors, and transitions.
- Blocked drainage paths: Clear weep screeds and drainage openings.
- Flashing and transitions: Make sure visible flashing stays exposed and transitions are sealed where needed.
- Base clearance: Keep veneer about 4 inches above soil or mulch and 2 inches above paved surfaces.[20][21][22]
Key Takeaways for Maryland Homeowners
If the wall passes inspection, the next job is simple: keep water out and keep drainage paths open. That means the WRB, flashing, and working weep screeds do the heavy lifting to help stop water from reaching the structure behind the stone. In Maryland, that matters a lot because wet, humid summers and freeze–thaw winters can be tough on exterior walls.[20][21]
The rest comes down to sound prep and careful installation. A stable substrate helps limit cracking and bond failure. Secure lath and a well-cured scratch coat give the mortar a solid surface to grab. A planned layout helps avoid thin slivers and uneven joints. Proper back-buttering and full joints help limit paths where water can get in. Then cleanup and inspection help spot small issues before they turn into bigger repairs.
Water management around the wall matters too. Grading and downspout discharge should move water away from the house.
For projects that combine veneer with grading or drainage work, timing and coordination matter. Pro Landscapes MD installs stone veneer, retaining walls, patios, and drainage systems across central Maryland and Washington, DC.
FAQs
Can stone veneer be installed over painted walls?
No. You shouldn’t install adhered stone veneer directly over a painted wall. Paint gets in the way and keeps the mortar from bonding to the surface the way it needs to.
For a secure install, you need to either remove the paint completely or cover the wall with metal lath so the mortar has a proper mechanical bond. If you skip that step, the veneer can loosen, detach, and fail.
How long should I wait before setting stone on the scratch coat?
Wait until the scratch coat cures enough to form a firm, stable base for the stone veneer. There’s no exact wait time here.
Always follow the manufacturer instructions for your mortar, because cure times vary by product, temperature, and humidity. Before you install the stone, make sure the base is clean and structurally sound.
What causes adhered stone veneer to fail?
Adhered stone veneer usually fails for a few common reasons: poor drainage, wall movement, or mortar and adhesive failure after water gets in. Trapped moisture behind the veneer is one of the main reasons sections come loose.
Freeze-thaw cycles can make the problem worse. So can movement in the wall underneath, which often leads to cracking or loose pieces. If you notice bulging, leaning, or large structural cracks, that may signal a deeper foundation or drainage problem that needs a professional inspection.
Chat with Us