


- bhavya gada
- No Comments
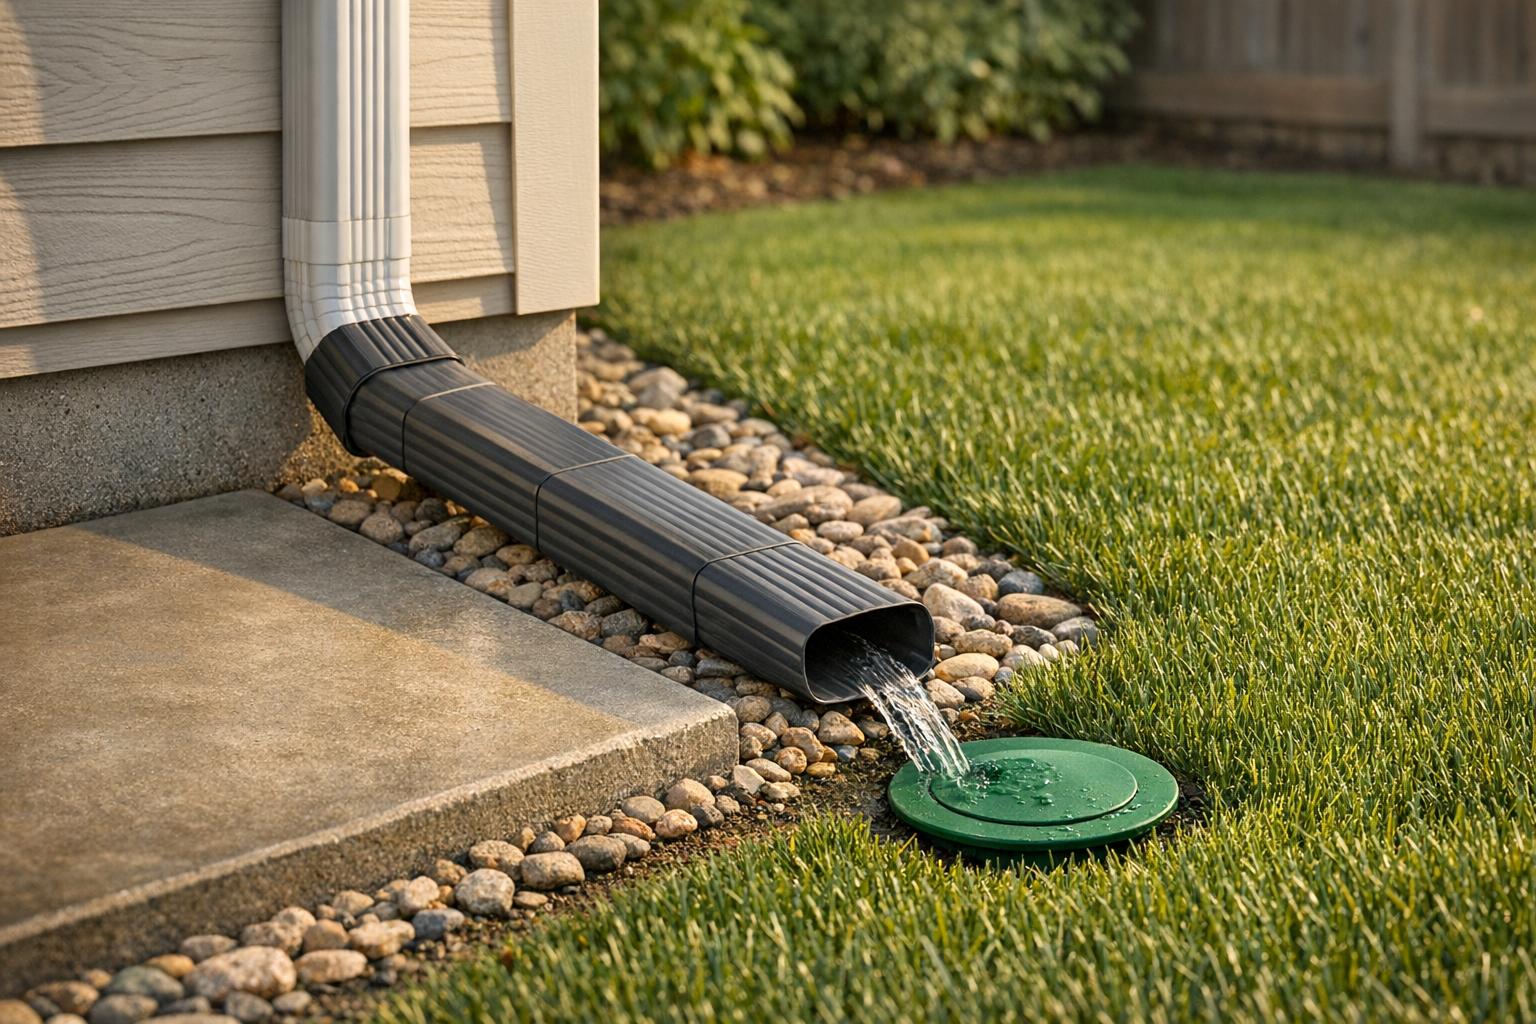
Gutter extensions are an easy way to prevent water from pooling on your patio and damaging your home’s foundation. These extensions attach to your downspouts and direct water away from your house. Here’s what you need to know:
- Types of Gutter Extensions: Choose between flexible, rigid, or underground options based on your yard’s layout and needs.
- Why It Matters: Standing water can lead to foundation cracks, patio wear, and even pest problems.
- DIY or Professional Help: Simple setups can be done on your own, but more complex drainage issues may require expert assistance.
- Installation Steps: Plan your drainage route, pick the right extension, ensure proper slope, and test the system.
- Maintenance Tips: Clean and inspect your system twice a year to keep it functioning properly.
If water pooling persists or your yard has tricky grading, combining extensions with other drainage solutions like French drains or regrading may be necessary. For Maryland homeowners, companies like Pro Landscapes MD can provide expert solutions for tougher problems.
Best Gutter Downspout Drain Extensions! How To Easily Install, Change, Replace, Tips, DIY! 🏠
sbb-itb-843f8be
Planning Your Gutter Extension Installation
Before diving into the installation, take a moment to plan. Start by identifying where water tends to collect and where it should ideally flow away from your home.
Assessing Your Patio’s Drainage
The best time to evaluate your patio’s drainage is during or right after a heavy rain. Watch for areas where water gathers, how long it stays there, and the direction it flows. Keep an eye out for signs like standing water, soggy or eroded soil, and splash marks or stains on your home’s siding near the ground.
"Signs of drainage issues include standing water, soggy areas, erosion, and water pooling near your home’s foundation." – Pro Landscapes MD [1]
Determine whether the pooling is caused by water pouring directly from the downspout or if it’s due to patio slope issues. Pinpointing the root cause will help you choose the right extension to solve the problem effectively.
Once you’ve identified the drainage challenges, you’re ready to select an extension that fits your yard’s specific needs.
Choosing the Right Gutter Extension Type
Selecting the right type of gutter extension can make the installation process much easier. Here’s a quick comparison to guide your choice:
| Extension Type | Best For | Key Consideration |
|---|---|---|
| Flexible | Navigating obstacles; quick DIY solutions | May sag or shift over time; less refined appearance |
| Rigid | Durable and neat above-ground runs | Requires a straight, clear path and precise measurements |
| Underground | Moving water farther out discreetly | Labor-intensive; needs proper slope and maintenance |
If you only need to redirect water a short distance and your yard naturally slopes away from the house, a flexible extension is a simple and effective option. For a more durable and polished look, rigid extensions are ideal, especially for straight runs along the house. If space is tight or you need to move water far away without creating a tripping hazard, an underground extension is the way to go.
Before purchasing, double-check your downspout dimensions (usually 2×3 in or 3×4 in) to ensure a snug, leak-proof fit.
Once you’ve selected the extension, it’s time to figure out the best discharge location.
Picking a Discharge Location
The discharge point is just as important as the extension itself. A well-chosen location prevents future pooling and ensures the water is absorbed naturally. Look for areas downhill from the patio where water can spread out safely, such as a garden bed, a swale, or an open lawn with well-draining soil.
Avoid directing runoff toward your foundation, retaining walls, paved walkways, or your neighbor’s property. On flat lots or in yards with heavy clay soil, extending the pipe to the lawn’s edge might not be enough. In such cases, consider adding a splash block, a dry well, or a more advanced drainage feature to avoid creating new problems.
If you’re unsure about the best discharge point or have limited space, reaching out to a drainage professional – like Pro Landscapes MD, which offers services such as grading, French drains, and stormwater management in central Maryland – can help you find the right solution for your yard.
Tools, Materials, and Safety
Getting everything ready before you start can make all the difference in a smooth installation process. Once you’ve decided on your discharge location, it’s time to gather the tools and materials you’ll need.
Tools and Materials You Will Need
Here’s a handy list of what to have on hand:
| Tool / Material | Purpose |
|---|---|
| Tape measure | Measure pipe length and distance to the discharge point |
| Drill/driver with bits | Attach adapters, straps, and brackets to siding or masonry |
| Pipe cutter (or hacksaw) | Trim rigid PVC or corrugated pipe to the correct length |
| Level | Ensure a 1–2% slope (around ⅛–¼ inch per foot) away from your home |
| Shovel or trenching spade | Dig trenches for underground pipe extensions |
| Rubber mallet | Secure fittings and splash blocks without damaging them |
| Downspout adapter | Connect the downspout to the extension pipe |
| PVC pipe or corrugated tubing | Direct water from the downspout to the discharge point |
| Splash block | Spread water at the outlet and protect soil from erosion |
| Gravel and landscape fabric | Surround underground pipes to improve drainage |
| Pipe straps or stakes | Secure above-ground extensions and minimize trip hazards |
| Gutter sealant or caulk | Seal joints and adapters for watertight connections |
When purchasing pipe, measure the full distance from the downspout to the discharge point, and then add 10–20% to account for bends and adjustments. For most homes, 3- to 4-inch diameter pipe is sufficient for typical water flow. If your roof covers a larger area or you’re combining multiple downspouts into one line, opt for a 4-inch pipe for better capacity.
Once you’ve gathered your tools and materials, take a moment to review these safety precautions.
Safety Steps to Follow
Call 811 before digging. This free service will send professionals to mark underground utility lines on your property, usually within a few business days. It’s not just a smart step – it’s often legally required, even for shallow trenches. Ignoring this could lead to serious risks or fines.
Wear gloves, safety glasses, and closed-toe boots to protect yourself from sharp edges and debris when cutting or drilling.
Keep trenches offset from patio edges. Digging too close to a paver base or concrete slab can cause settling or cracks over time. Use a tarp for excavated soil to prevent staining patios or damaging nearby plants. If your property has retaining walls, an outdoor kitchen, or other hardscaping, be extra cautious when digging near their foundations – disturbing the base layer could weaken the entire structure.
Step-by-Step Installation Guide
How to Install Gutter Extensions: Step-by-Step Guide
Before diving in, double-check your planning checklist and safety precautions. The process varies depending on whether you’re installing an above-ground extension, an underground extension, or a mix of both.
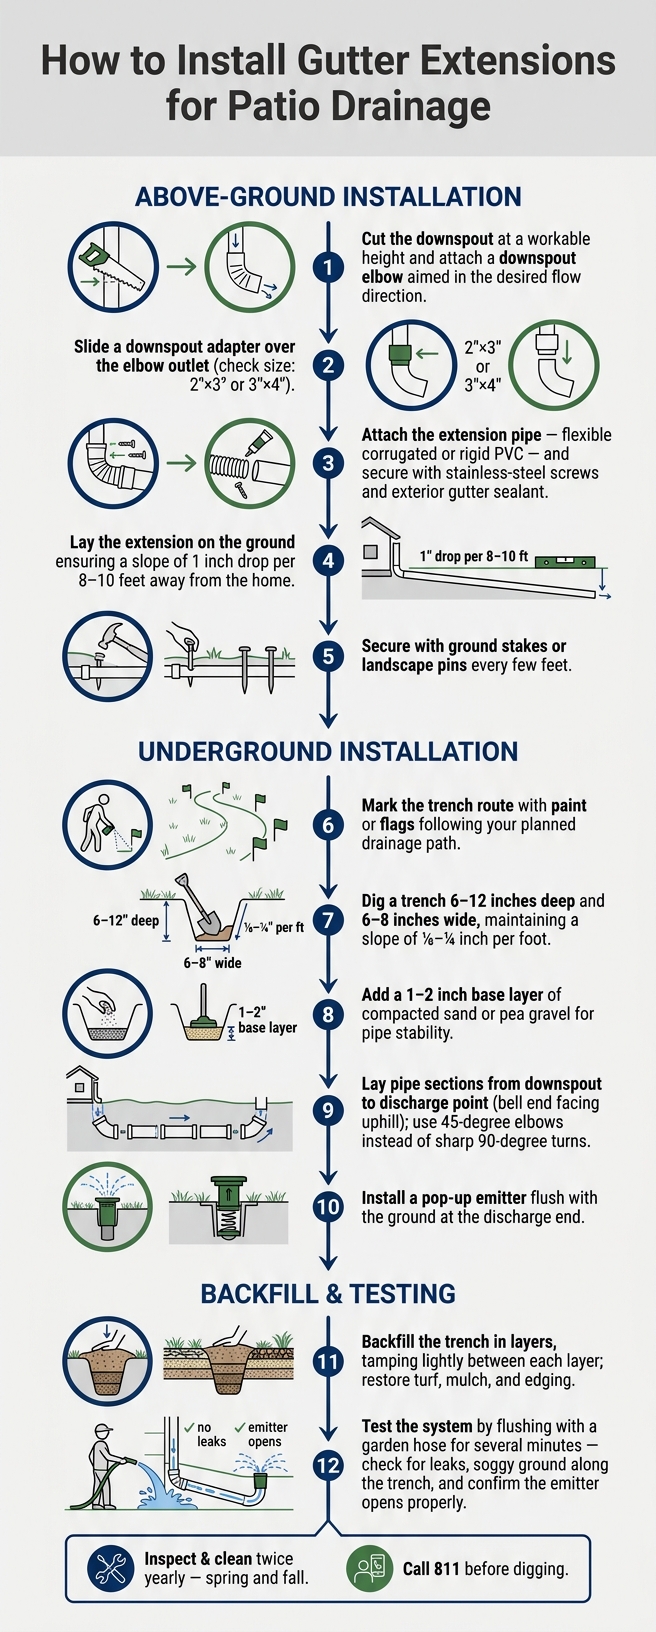
Installing Above-Ground Extensions
Start by cutting your downspout at a height that makes it easy to work with. Attach a downspout elbow aimed in the direction you want the water to flow. Next, slide a downspout adapter over the elbow outlet. Most residential downspouts are either 2"×3" or 3"×4", so make sure you know your size before purchasing. For flexible corrugated extensions, the wider end slides over the adapter. If you’re using rigid sections, snap or clamp the coupler into place. Secure the connection with stainless-steel sheet metal screws and apply a bead of exterior-grade gutter sealant around the joint to prevent leaks.
Lay the extension on the ground and ensure it slopes downward – aim for a drop of 1 inch for every 8–10 feet. Use a string line and level to check the slope, and adjust the soil beneath any low spots as needed. Secure the extension in place with ground stakes or landscape pins every few feet to keep it from shifting during storms or lawn care. For areas near walkways or patios, consider using a flip-up or hinged rigid extension. These can be raised out of the way when mowing or shoveling snow. From here, you can transition to an underground extension for a cleaner water flow away from your patio.
Installing Underground Extensions
For a more discreet solution, follow these steps to install underground extensions. Begin by marking your trench route using marking paint or flags, following the plan you created earlier. If your route crosses a lawn, cut and set aside turf strips so you can replace them later. Dig a trench 6–12 inches deep along the marked path, keeping it slightly wider than the pipe – about 6–8 inches wide for a 4-inch pipe. Maintain a consistent slope of ⅛–¼ inch per foot, checking with a string line and level as you go.
Smooth out the trench bottom and remove any sharp rocks. Add a 1–2 inch layer of compacted sand or pea gravel to create a stable base for the pipe. This step is especially important in areas with clay-heavy soil, like Maryland, where an unstable base could cause the pipe to shift and lose its slope over time. Lay the pipe sections starting at the downspout and working toward the discharge point. Make sure the bell end (the wider socket end) faces uphill. Use primer and cement to glue PVC joints, or tight couplers if you’re using corrugated pipe. Avoid sharp 90-degree turns – use two 45-degree elbows or long-sweep fittings instead to keep the flow smooth and reduce the risk of clogs. At the discharge end, install a pop-up emitter flush with the ground. These only open when water pressure builds up, keeping debris and animals out.
Backfilling and Final Checks
Once the pipe is in place, check the entire run to ensure there are no dips or upward bows. Backfill the trench in layers, adding a few inches of soil or gravel at a time and tamping lightly between layers. This helps prevent uneven settling and soft spots above the pipe. Replace the topsoil, re-sod or reseed any disturbed lawn areas, and restore any mulch or landscape edging you had to move.
Finally, test the system by flushing it with a garden hose for several minutes. Look for leaks at the joints, soggy ground along the trench (which could indicate a low spot), and confirm that the pop-up emitter or outlet opens and releases water properly. If possible, observe the system during a rainstorm to ensure water flows away from your patio as planned and exits at the discharge point without backing up. After confirming everything works as it should, you’re ready to move on to regular maintenance checks.
Maintenance and Troubleshooting
Routine Cleaning and Inspections
Even the best gutter extension system needs regular care to stay effective. Aim to clean and inspect your system twice a year – once in spring and again in fall. After major storms, it’s also a good idea to check things over. If your property has a lot of trees, you may need to clean three or four times a year.
Start by clearing out debris from the gutters and downspouts. Then, flush the system with a garden hose, working from the downspout end toward the outlet. For underground extensions, disconnect the downspout and run the hose at full pressure into the pipe, keeping an eye on the discharge end. A strong, steady flow means the line is clear. If water backs up or trickles out slowly, you’ll need a drain auger to break up blockages before flushing again. Don’t forget to inspect above-ground sections for loose connections, sagging, or areas where water pools instead of draining. Any section that isn’t draining properly can lead to bigger problems down the line.
Seasonal Upkeep in Maryland
Maryland’s climate brings its own set of challenges, so you’ll need to adjust your maintenance routine accordingly. The state’s mix of frequent freeze-thaw cycles and heavy storms makes drainage systems especially vulnerable. Maryland’s humid subtropical and humid continental climate means spring and summer thunderstorms often follow harsh winter conditions, putting extra stress on your system.
Before winter’s first hard freeze, clear out debris and make sure no water is trapped in the system. Frozen water expands and can crack fittings or split flexible sections overnight. Above-ground extensions are particularly at risk, so raise any low areas to ensure proper drainage before temperatures drop.
During winter thaws, check that meltwater is reaching the discharge point and not refreezing at the patio edge. In spring, look for signs of frost heave – this happens when the ground repeatedly freezes and thaws, causing buried pipes or above-ground sections to shift. Re-level or re-stake anything that’s moved, and make sure the slope still directs water away from your house. If you have extensions near driveways or walkways, be cautious about sections buried under plowed snow, as the weight can crush flexible pipes.
When to Call a Professional
Sometimes, even diligent maintenance isn’t enough to fix recurring drainage issues. While simple tasks like reattaching a loose section, resealing a joint, or extending a discharge point are manageable DIY fixes, certain problems require professional help.
If you notice persistent pooling after storms, water seeping toward your basement or foundation, or underground pipes that repeatedly clog or freeze in the same spot, it’s time to call in an expert. These issues often point to deeper problems, such as poor system design or grading, rather than just debris buildup. According to InterNACHI, 85% of foundation moisture problems stem from poor surface drainage or faulty downspout extensions, so ongoing water near your home’s foundation isn’t something to ignore.
For central Maryland residents, Pro Landscapes MD offers professional evaluations and solutions. Serving areas like Columbia, Ellicott City, Bethesda, and Silver Spring, they can assess how your gutter extensions interact with your yard’s grading and overall drainage system. They specialize in integrating extensions with features like French drains, dry riverbeds, or yard leveling to tackle chronic water issues. If your patio has settled due to poor drainage, they can also re-slope or rebuild paver and flagstone surfaces. Plus, with free estimates for custom drainage solutions, consulting a professional becomes an easy first step when DIY efforts fall short.
Conclusion
Gutter extensions are a practical way to protect your patio and home by channeling roof runoff at least 4–6 feet away from your foundation. This simple step helps prevent pooling water, soil erosion, patio settling, and moisture issues in your basement.
Here’s a quick recap to get the job done: evaluate your water flow, decide between above-ground or underground extensions, pick a safe discharge spot, install with the right slope, and test the system using a garden hose. Above-ground extensions are quick and budget-friendly, while underground options offer a cleaner look and work better for longer distances or high-value landscaping.
Keep your system in good shape with twice-yearly inspections and an annual hose test to catch clogs or issues early.
If water pooling continues after installation or if your yard has tricky grading, compacted clay soil, or multiple downspouts draining into the same area, a gutter extension alone might not solve the problem. In those cases, combining extensions with solutions like French drains, grading adjustments, or yard leveling can provide better results.
For more complex drainage challenges, Pro Landscapes MD offers expert evaluations and tailored solutions in central Maryland and Washington, DC. Their services cover everything from drain pipe installations and stormwater management to patio repair and yard leveling. Protect your outdoor spaces – if DIY fixes aren’t enough, reach out to Pro Landscapes MD for a professional, all-in-one approach.
FAQs
How far should a gutter extension drain from my foundation?
To keep your foundation safe and avoid water damage, gutter extensions need to channel runoff far enough away from your home to prevent water from pooling near the structure. The specific distance may differ depending on the property, but the key is ensuring water is effectively diverted. Pro Landscapes MD specializes in drainage solutions, offering services like pipe installation and grading to protect your property from water issues and preserve its structural health.
Should I choose an above-ground or underground gutter extension?
The right solution hinges on your property’s specific drainage needs, the amount of water involved, and the layout of your landscape. Above-ground extensions are a simple fix for smaller adjustments. However, if you’re dealing with more serious water management challenges, underground systems – like box drains or pipe drains – are often necessary to handle higher water volumes effectively. Pro Landscapes MD emphasizes that drainage solutions should be customized to manage water flow, grading, and erosion to ensure they work well over time.
What causes gutter extension lines to clog or freeze?
Gutter extension lines can become clogged when debris, trash, or other solids accumulate, often because there’s no pretreatment chamber in place to filter out these materials before they reach the pipes. Freezing is another issue, typically caused by standing water resulting from poor drainage or blockages, which is then exposed to cold temperatures. Pro Landscapes MD offers expert drainage solutions designed to address these problems, helping to prevent clogs, freezing, and the maintenance headaches that come with them.
Chat with Us