


- bhavya gada
- No Comments
A hydrological evaluation tells me one thing fast: where water goes on a Maryland property, and what to do about it. If I see soggy grass, mulch washing downhill, or water moving toward the house, I start with slopes, hard surfaces, soil drainage, and overflow paths. Even a 1-inch rain on a 1,500-square-foot roof can send out 900+ gallons of runoff, so small drainage problems can turn into big repair bills.
Here’s the short version:
- I watch how water moves during rain.
- I map roofs, driveways, patios, low spots, swales, and downspouts.
- I check soil drainage with a perc test when ponding features are being planned.
- I use the Rational Method for peak flow, like pipes and swales.
- I use TR-55 / Curve Number for runoff volume, like rain gardens and basins.
- I match the BMP to the lot’s soil, slope, space, and water load.
- I keep ponding areas away from the house and plan a safe overflow route.
- I call 811 before digging.
A few numbers shape most residential drainage choices in Maryland:
- Ponding features usually need to drain within 36 hours
- Rain gardens often hold 6–9 inches of water for a short time
- A CL+3 setup holds about 3 inches
- Ponding features should usually stay at least 10 feet from foundations
- These features are often limited to slopes under 12%
How to Calculate the Volume of Stormwater Runoff on Your Property | NDS Drainage Solutions

sbb-itb-843f8be
Quick comparison
| Item | Best for | Main check |
|---|---|---|
| Rational Method | Peak flow to pipes, inlets, swales | Rainfall intensity, area, runoff factor |
| TR-55 / Curve Number | Runoff volume for storage areas | Soil group, land cover, storm depth |
| Rain garden | Roof runoff in draining soil | Perc test must pass |
| CL+3 | Slower-draining soil | Needs more surface area |
| Dry well | Tight roof-drain spaces | Soil must drain well |
| Berms and swales | Moving surface flow | Grading and outlet path |
If I had to boil the article down to one point, it’s this: measure the site first, then pick the drainage fix. That keeps the plan tied to how water actually moves across the yard.
Site Assessment and Data Collection
Start by watching how water moves across the property. The best time to do this is during a rainstorm. Look for where water comes in, where it travels, where it sits, and where it leaves the site. Write down downspout discharge points, low areas, swales, and the slope around the foundation. It also helps to note exposed tree roots and spots that stay muddy long after the rain stops.
Slope plays a big role here. Stormwater features like rain gardens generally aren’t recommended on slopes steeper than 12%, so those areas may call for a different setup [1]. Before you dig anything, call Miss Utility at 811 so underground utility lines can be marked. You should also map septic tanks and large tree roots, since both can limit where drainage features can go [1]. These notes give you the starting point for runoff estimates and the drainage plan.
Identifying Impervious Surfaces and Soil Conditions
Next, measure the surfaces and soil that control how much water the property sheds and how much it can soak up. Hard surfaces like roofs, driveways, and patios are the main runoff sources on most residential lots. Use roof and paved-area measurements to estimate runoff volume before sizing any feature. Those numbers help show whether a rain garden, dry well, or detention feature makes sense [1].
Soil matters just as much. A common way to check drainage is a percolation, or perc, test: dig a hole 1 foot wide and 2 feet deep, fill it with water, and track how long it takes to drain. For infiltration-based planting features, the hole needs to drain fully within 36 hours after each filling [1]. If it doesn’t, a standard rain garden usually isn’t a good match.
Compaction can also change the picture. Soil that has been driven over or heavily walked on can lose much of its ability to absorb water, even when the soil type looks fine on paper. Any temporary storage feature should drain within 36 hours to help limit mosquito risk [1].
Using Maryland Rainfall and Storm Data for Design
Maryland storm data helps you check whether the drainage design fits local conditions. Use regional rainfall frequency data to identify the design storm the feature needs to handle. In many cases, that means the 1-inch, 2-year, or 10-year storm event, depending on the feature type and local rules. Once you have the drainage area, surface measurements, and soil conditions on hand, you can move into runoff calculations.
Hydrologic Calculation Methods for Residential Landscape Design
Once you’ve gathered the site data, the next job is to turn it into runoff numbers you can use for drainage design. For most Maryland residential projects, two methods handle the bulk of that work: the Rational Method and the NRCS TR-55 Curve Number Method. They don’t do the same thing, and that matters. Pick the right method for the right feature, and the design stays grounded in how water will move across the site.
Rational Method for Small Drainage Areas and Pipe Sizing
The Rational Method uses Q = CiA, where Q is peak runoff flow in cubic feet per second, C is the runoff coefficient based on surface type, i is rainfall intensity in inches per hour, and A is the drainage area in acres. In plain English, it estimates the highest runoff rate reaching a point during a storm.
This method works well for small drainage areas and is commonly used to size pipes, inlets, and swales. If you’re figuring out how much water a conveyance feature needs to move, this is usually the place to start. From there, you can move on to storage and ask a different question: not just how fast water arrives, but how much water needs to be held.
NRCS TR-55 and Curve Number Method for Runoff Volume and Basin Sizing
The Rational Method gives you peak flow. TR-55 gives you runoff volume. That’s the number you need when sizing a rain garden, detention basin, or micro-bioretention feature.
TR-55 assigns a Curve Number (CN) based on soil group and land cover type. Hard surfaces have higher curve numbers. Wooded areas with well-drained soils have lower ones. That setup helps estimate how much rainfall turns into runoff instead of soaking into the ground.
TR-55 uses rainfall depth from a design storm event to calculate how much runoff a feature must store. On a typical Maryland lot, that depth can produce a lot of water. Soil percolation results then help determine whether the site can support ponding at 6–9 inches in a standard rain garden or whether it needs a 3-inch Ponding Conservation Landscape with about twice the surface area. [1]
Rational Method vs. TR-55: Which to Use for Maryland Residential Projects
A simple rule works here: use the Rational Method for flow and TR-55 for storage. On many residential sites, you’ll use both. One helps size the conveyance system. The other helps size the treatment area.
| Factor | Rational Method (Q = CiA) | NRCS TR-55 / Curve Number |
|---|---|---|
| Primary Output | Peak flow rate (cfs) | Runoff volume |
| Key Inputs | Runoff coefficient, rainfall intensity, drainage area | Soil group, land cover, rainfall depth |
| Best Use | Pipes, inlets, swales | Rain gardens, detention basins, micro-bioretention |
That distinction is easy to miss, but it has real design impact. A peak-flow-only calculation may size a pipe just fine and still leave a BMP too small on storage volume. For storage features, TR-55 is the better match. Those numbers then feed straight into selecting the stormwater practice that fits the site.
Choosing Stormwater Solutions for Maryland Residential Landscapes
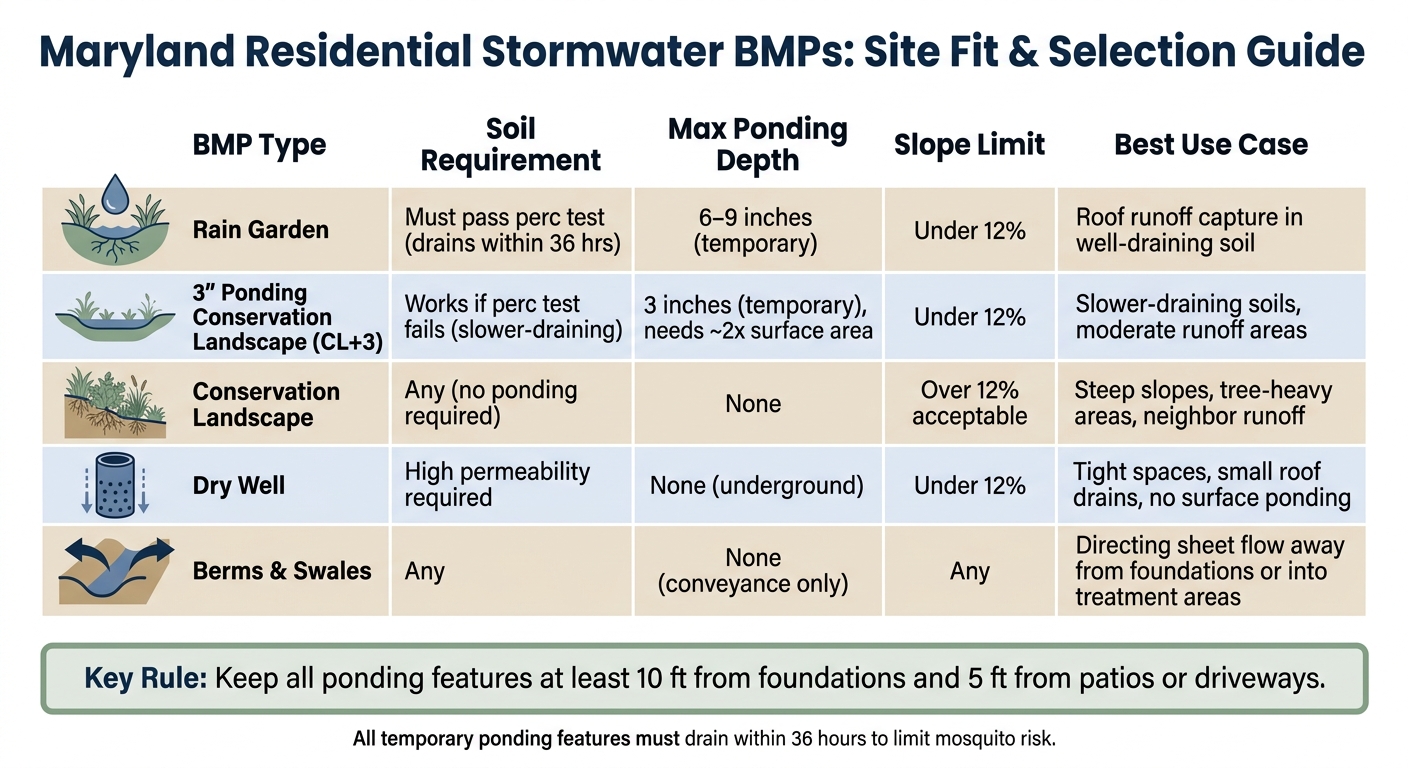
Maryland Residential Stormwater BMPs: Site Fit & Selection Guide
Use your calculation results to pick a BMP that matches the site’s soil, slope, and open space. Peak flow helps you choose conveyance. Runoff volume helps you choose storage.
Rain Gardens, Micro-Bioretention, Dry Wells, and Conservation Landscaping
A rain garden is a planted depression, usually 6–9 inches deep, that holds runoff long enough for water to soak into the ground. You’ll need a perc test to see if the soil can handle it. If the soil drains too slowly, move to another BMP. A 3-inch Ponding Conservation Landscape (CL+3) can hold up to 3 inches of water, but because it’s shallower, it needs more surface area to do the same job. Keep ponding features at least 10 feet from foundations and 5 feet from patios or driveways, and only place them on slopes under 12% [1].
A conservation landscape makes sense on steep slopes, near large roots, or in spots where runoff needs filtering but surface ponding won’t work. It filters and intercepts water without forming a pool.
Dry wells are a good fit for small roof drains in tight spaces where surface ponding isn’t practical. They work best in highly permeable soils.
Detention Basins, Retention Features, Grading, and Overflow Paths
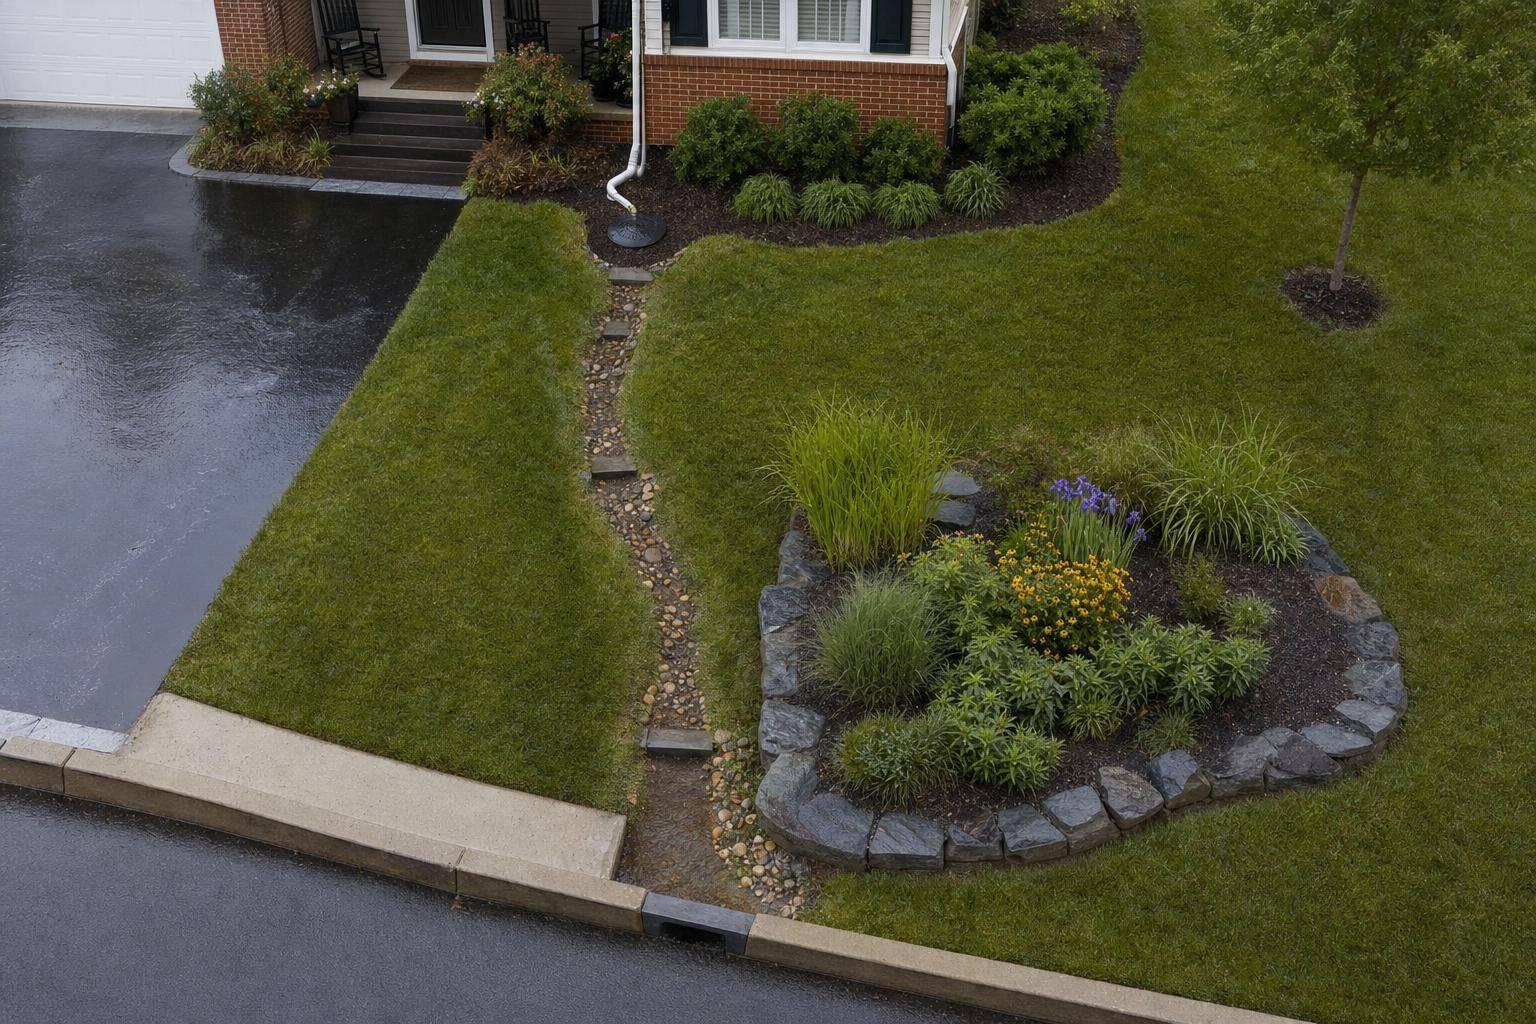
On residential sites, place the feature between the runoff source – like downspouts or driveway flow – and the spot where water leaves the property. Small grading shifts, berms, and swales can steer runoff into the treatment area.
If you’re using a ponding feature, a berm on the downhill side can form the basin. A weir notch lined with stones gives excess water a safe overflow route during extreme storms. On more complicated lots, grading, berms, and overflow paths need to work as a system so runoff reaches the treatment area safely.
Common Residential BMPs Compared by Site Fit and Maintenance
These site-fit rules make it easier to narrow your options.
| BMP | Suitable Drainage Area | Soil Fit | Visible Ponding | Maintenance Level | Typical Residential Use |
|---|---|---|---|---|---|
| Rain Garden | Small roof area | Must pass perc test | 6–9 inches (temporary) | Moderate (weeding, mulching) | Capturing roof runoff in well-draining soil |
| 3" Ponding Conservation Landscape | Moderate runoff area | Can be used if perc test fails | 3 inches (temporary) | Moderate | Slower-draining soils |
| Conservation Landscape | Larger or off-site runoff area | Any (no ponding) | None | Low to Moderate | Steep slopes over 12%, tree-heavy areas, neighbor runoff |
| Dry Well | Tight-space roof drain | High permeability required | None (underground) | Low | Tight spaces where surface ponding is not desired |
| Berms and swales | Surface sheet flow | Any | None (conveyance) | Low | Directing water to gardens or away from foundations |
Use 3 inches of shredded hardwood mulch, and water new plantings during the first year. Once you’ve chosen the BMP, the next step is sizing, grading, and installation.
Implementation, Compliance, and Final Takeaways
Step-by-Step Workflow from Evaluation to Installation
Once you’ve picked the BMP, the work shifts to layout, permits, and landscape projects. Use the mapped drainage area, soil test results, and runoff calculations to set the BMP’s footprint, depth, and overflow route. Check that the site can support the chosen feature before excavation. Then use the selected sizing method before any digging starts.
Before you break ground, call Miss Utility at 811 to mark underground utilities [1]. That step comes first, no shortcuts.
From there, the install usually follows a clear sequence:
- Stake the footprint
- Excavate to the design depth
- Build the berm and overflow notch
- Amend the soil
- Plant site-suitable native species
- Mulch with 3 inches of shredded hardwood
- Water during the first year [1]
If the site has steep grades, off-site runoff, or water pooling near the foundation, pass the design to a drainage professional before digging.
When to Bring in Professional Landscape and Drainage Help
Water has a way of exposing weak planning fast. When flow patterns get messy, grading changes, or overflow control starts to feel uncertain, drainage-focused help matters.
Steep slopes, steady pooling, and off-site runoff are the big warning signs. In those cases, Pro Landscapes MD provides drainage, grading, and yard-leveling help across central Maryland.
Key Points for Better Water Management on Maryland Properties
The main rule is simple: fit the feature to the site, not the other way around.
That means knowing how water moves across the lot, using the right calculation method for the size of the job, checking what the soil can handle, and planning overflow paths from the start. A solid hydrological review helps protect the foundation, limit erosion, and give the landscape a better shot at handling Maryland storms.
FAQs
How do I know if my yard needs a hydrological evaluation?
Watch what happens on your property when it rains. Pay attention to where the water falls, where it flows, and where it starts to pool.
Check for runoff coming off roofs, driveways, and patios. Also look for spots where stormwater sits instead of soaking into the soil. If you see drainage problems like these, Pro Landscapes MD can assess the site and recommend the right drainage fix.
Which drainage solution is best for slow-draining Maryland soil?
For slow-draining soil, the best fix often starts with professional grading so water flows away from your foundation instead of pooling near it. Pro Landscapes MD also installs French drains and dry riverbeds to help control runoff and protect your yard.
Since soil and groundwater conditions can change from one property to the next, it’s smart to get a professional assessment before choosing a drainage or stormwater management solution.
When should I call a drainage professional instead of DIY?
Consider bringing in a drainage pro, such as Pro Landscapes MD, if the job goes beyond basic DIY work.
That’s often the case when you’re dealing with:
- Steep slopes or major terracing
- Heavy tree roots that make digging hard
- Large volumes of off-site drainage or big storage setups like cisterns
It also makes sense to get help if you don’t have much hands-on experience or if the project needs to meet Maryland grading permit rules. That’s especially important for land disturbances over 5,000 square feet or work in sensitive places like the Chesapeake Bay Critical Area.
Chat with Us