


- bhavya gada
- No Comments
Erosion control blankets help prevent soil erosion, especially on slopes and in areas prone to heavy rain. Proper installation ensures they stay effective, providing soil stability and supporting vegetation growth. Here’s a quick summary of the process:
- Preparation: Clear debris, grade the soil, and dig 6×6-inch anchor trenches.
- Tools Needed: Shovel, rake, tiller, mallet, U-shaped staples, and utility knife.
- Installation: Unroll the blanket vertically from the top of the slope, secure it with staples, and overlap edges properly.
- Stapling Guidelines: Space staples 2–3 feet apart in general areas, 6–12 inches in high-stress zones.
- Maintenance: Inspect weekly and after rain, repair damage promptly, and support plant growth with watering.
Proper installation and maintenance ensure long-term soil protection and vegetation establishment. For complex projects, professional services may be worth considering.
Tools and Materials Needed
Before starting the installation, make sure you have all the necessary tools and materials ready to go. Being prepared keeps the process smooth and ensures the erosion control blankets properly adhere to the soil, which is essential for preventing erosion.
Required Tools and Materials
You’ll need a few key tools. Digging and grading tools are a must. A shovel is used to dig anchor trenches – typically 6 inches deep and 6 inches wide – at both ends of the blanket. A rake helps level the soil and clears away debris like rocks or large vegetation that could cause air pockets under the blanket [2].
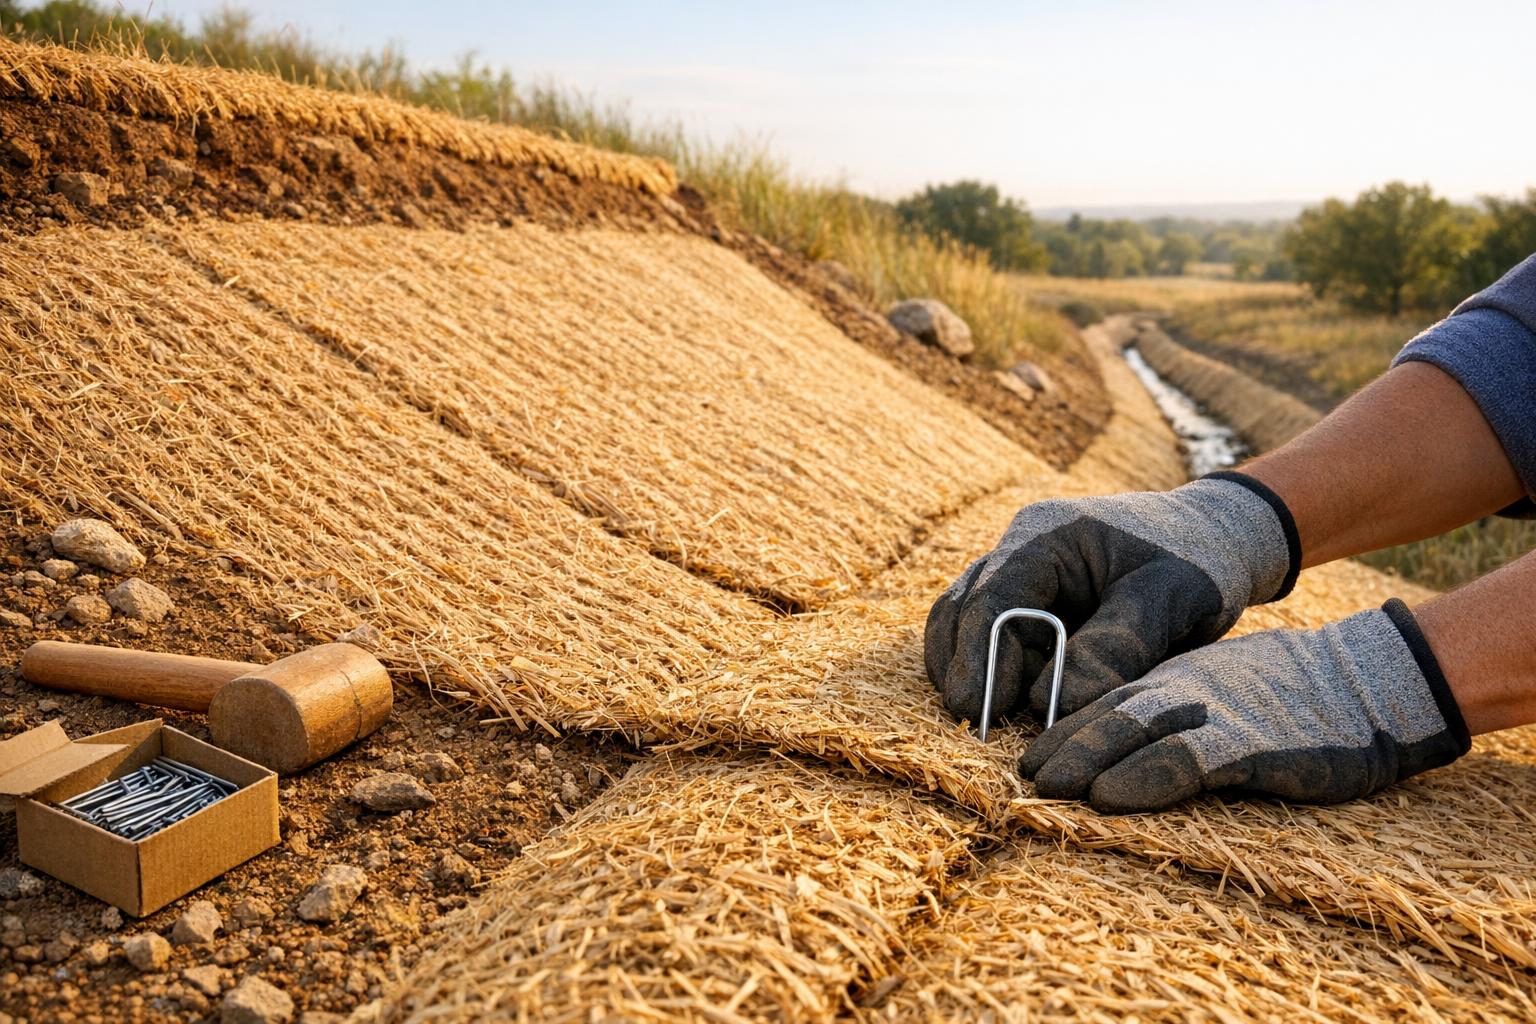
For preparing the soil, a tiller or aerator can loosen compacted ground, allowing the blanket to sit snugly against the surface. To secure the blanket, you’ll need a hammer or rubber mallet to drive U-shaped staples or stakes flush into the soil.
The materials you’ll work with include erosion control blankets (available in straw, coconut fiber, or synthetic varieties), U-shaped staples or stakes for securing the blankets, seed mix, and fertilizer. A pair of work gloves will protect your hands when handling rough materials, and a utility knife or shears will help you cut and trim the blankets as needed [3].
Stapling is crucial for keeping the blankets in place. Generally, place staples every 2–3 feet, but in anchor trenches or high-stress zones, increase the frequency to every 6–12 inches to prevent lifting [5]. For firm soil, 6-inch U-shaped metal staples work well, while loose or sandy ground may require longer stakes to ensure they stay put [7].
If you’re looking to minimize your environmental impact, there are sustainable material options to consider.
Eco-Friendly Material Options
For environmentally sensitive areas, biodegradable fasteners are an excellent choice. Options like hardwood stakes, pine pegs, and bio-plastic staples naturally decompose, leaving no metal remnants behind [1][5]. These pair well with natural fiber blankets made from materials such as straw, coir (coconut fiber), or jute.
The durability of natural fiber blankets varies based on your needs. Straw blankets typically last 6 to 12 months, while blends of straw and coconut can provide protection for 12 to 24 months. For longer-term applications, pure coir blankets can last 24 to 36 months or more [6]. In areas requiring permanent support, synthetic Turf Reinforcement Mats (TRMs) are a solid option for long-lasting erosion control.
In professional settings, particularly near watercourses, biodegradable double net coconut blankets have shown impressive results. They’ve been proven to reduce annual soil loss from 96 tons per acre to just 3.07 tons per acre – a 97% decrease [6]. When combined with effective vegetation, high-performance erosion control blankets can reduce the cover-management factor by over 90% [6].
sbb-itb-843f8be
Preparing the Installation Site
Getting the site ready is crucial to make sure your installation works effectively. A properly prepped surface ensures the blanket fits snugly against the soil, stopping water from sneaking underneath and washing away your topsoil. This step is essential for achieving the best results [3].
Clearing and Grading the Area
Start by removing all debris and marking any underground utilities to avoid damage. Then, grade the soil into a stable, even surface. Use a rake to smooth out any bumps, and if the ground is compacted, break it up with a tiller or aerator. Even small bits of debris can create gaps, leading to water seepage.
Next, dig anchor trenches – these are typically 6 inches deep and 6 inches wide – at the top and bottom of slopes to keep the blanket edges secure [2]. For channels, make sure the bed and sides are smooth with a consistent grade to allow water to flow evenly. Once everything is cleared and leveled, you can move on to preparing the soil with necessary amendments.
Adding Soil Amendments
After grading and smoothing the soil, but before laying down the blanket, apply seed, fertilizer, and lime. This step helps lock the amendments between the soil and the blanket, giving seeds the moisture and protection they need to sprout. If the area has lost a lot of topsoil, add fresh soil and tamp it down before seeding.
For construction sites, refer to your Storm Water Pollution Prevention Plan (SWPPP) for guidance on which amendments to use. Once the blanket is in place, lightly water the area to help settle the material into the soil and encourage seed germination. This final touch gets the process off to a strong start.
Installation Instructions
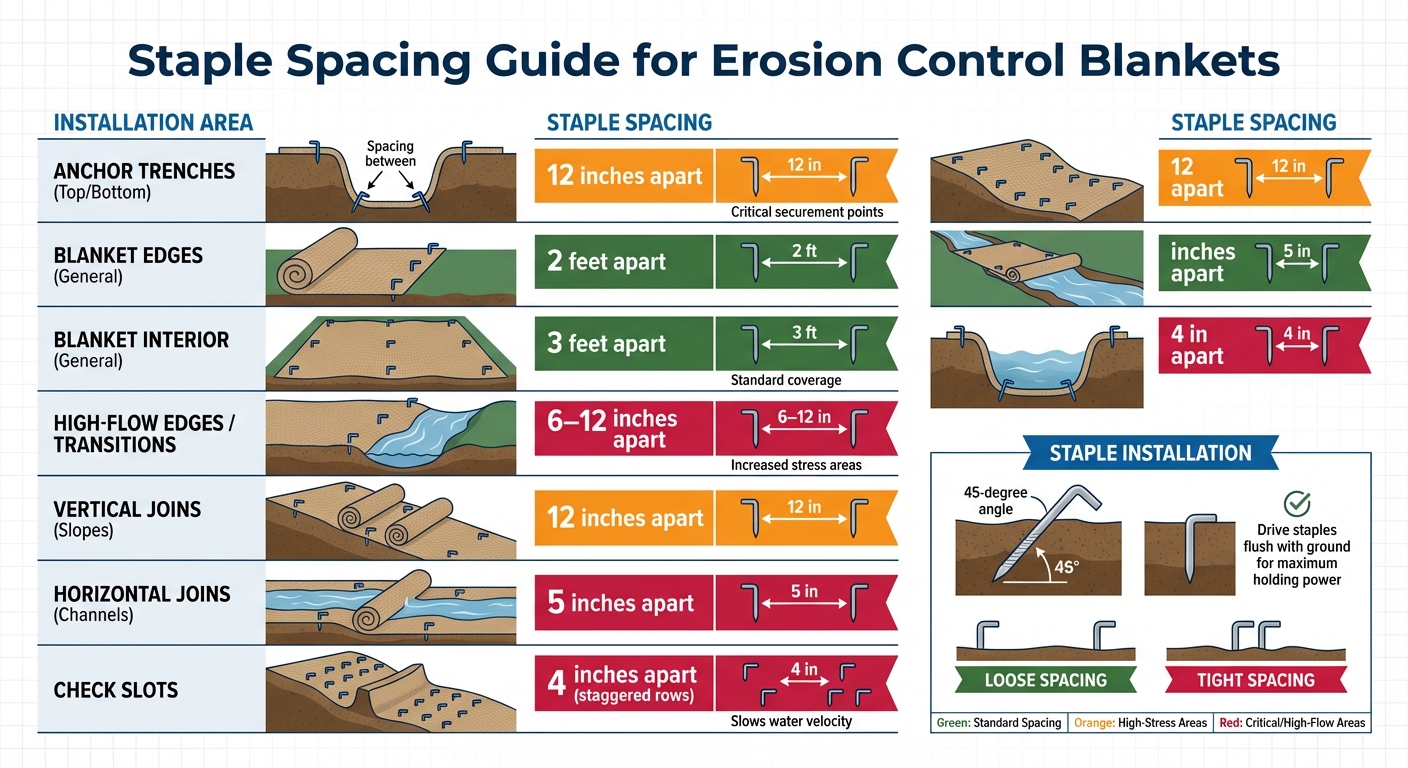
Erosion Control Blanket Staple Spacing Guide for Different Installation Areas
Once your site is prepared and seeded, it’s time to install the erosion control blanket. Always unroll the blanket vertically, starting from the top of the slope and moving downward – never lay it horizontally.
Installing on Slopes
Begin by placing the blanket’s leading edge 12 inches down-slope from the top anchor trench. Secure it in the trench with staples spaced 12 inches apart. After that, backfill the trench, compact the soil, and fold the blanket back over the compacted area. Unroll the blanket straight down the slope, allowing it to naturally conform to the ground without pulling it tight.
When joining blankets side-by-side, overlap the edges by 3 to 6 inches and secure them with staples every 3 feet. For end-to-end joins, use a "shingle-style" overlap, where the uphill blanket covers the downhill one by 8 to 12 inches. To prevent wind or water from lifting the material, anchor the bottom edge in a trench measuring 6 inches by 6 inches. Walk along the entire blanket to ensure firm contact with the soil and eliminate any gaps. These steps are essential for stabilizing the soil and preventing erosion.
Once the slope installation is complete, move on to installing blankets in channels.
Installing in Channels
For channels, position the blanket lengthwise, parallel to the water flow. Excavate 6×6-inch anchor trenches at the upstream inlet, downstream outlet, and along the top edges of the channel. Overlap adjoining blankets in a shingle style, ensuring the upstream blanket covers the downstream one. In channels longer than 40 feet or areas prone to high water flow, install check slots every 25 to 40 feet. To create a check slot, place a row of staples 4 inches apart across the entire width of the blanket and add a second staggered row 4 inches below the first. These measures help secure the blanket in place and protect against erosion.
Staple Spacing Requirements
Proper staple spacing is crucial for keeping the blanket secure. Follow these guidelines for different areas:
- Standard installations: Space staples every 2 feet along the edges and every 3 feet across the interior.
- High-stress areas: Use tighter spacing of 6 to 12 inches, especially at the top and bottom edges, to prevent displacement during storms.
Always drive staples into the ground at a 45-degree angle relative to the slope, ensuring they sit flush with the surface for maximum holding power. After installation, lightly water the area to help the blanket settle and support seed germination.
| Installation Area | Recommended Staple Spacing |
|---|---|
| Anchor Trenches (Top/Bottom) | 12 inches apart |
| Blanket Edges (General) | 2 feet apart |
| Blanket Interior (General) | 3 feet apart |
| High-Flow Edges/Transitions | 6–12 inches apart |
| Vertical Joins (Slopes) | 12 inches apart |
| Horizontal Joins (Channels) | 5 inches apart |
| Check Slots | 4 inches apart (staggered rows) |
Installation Mistakes to Avoid
Even with careful planning, common installation errors can undermine the performance of erosion control blankets. Rick Jackson from Earthworks Environmental emphasizes this point:
The improper installation of a blanket will result in a failure to stabilize the soil from potential erosion. The blankets are only as good as the installation. [3]
Poor Blanket Placement
Avoid stretching the blanket too tightly across the slope. When the material is pulled taut, it can’t conform to the natural contours of the ground, leaving gaps underneath. These gaps let water flow beneath the blanket, washing away soil and seeds. Instead, unroll the blanket vertically from the top of the slope to the bottom, allowing it to settle naturally along the terrain. Overlap adjacent pieces by 4–6 inches on the sides and 12 inches in a shingle pattern for proper coverage.
Inadequate Soil Preparation
To ensure the blanket works effectively, the soil must be free of rocks, clumps, or debris that could prevent direct contact with the topsoil. BMP Supplies highlights the risks:
Poor contact results in erosion beneath the surface and also causes lower seed germination rates. [5]
Clear away rocks larger than 2 inches, smooth out uneven areas, and break up large dirt clods. This ensures the blanket rests directly on prepared topsoil. After backfilling anchor trenches, tamp the soil firmly. Loose soil can wash away during heavy rain, which may release the blanket edges and weaken the installation.
Once the soil is prepared, focus on securing the blanket properly with the right stapling techniques.
Insufficient Stapling
Using too few staples or spacing them too far apart leaves the blanket vulnerable to lifting during storms. Stick to the recommended staple spacing – high-stress areas need staples every 6–12 inches. Pay special attention to the edges, as they are more susceptible to wind and water intrusion, and secure them at tighter intervals.
For maximum holding power, drive staples flush with the ground at a 45-degree angle. Staples that stick out or are incorrectly angled won’t hold the blanket securely. After installation, walk the entire area to press the blanket into the soil and check for sections that might need additional fasteners before the first rainstorm hits.
Maintaining Your Erosion Control Blankets
Keeping your erosion control blankets in good condition is key to ensuring they protect the soil effectively until vegetation takes hold. BMP Supplies suggests following a consistent maintenance routine:
Inspect the straw blanket weekly and after storm events until vegetation is established. [5]
Inspecting After Rain Events
Once installed, regular checks are crucial to maintain the blanket’s effectiveness. During the establishment period, inspect your blankets at least once a week [5][7]. After a rainfall, perform an inspection within 48 hours for normal events or within 24 hours if the precipitation exceeds ½ inch [7].
When inspecting, walk the entire area where the blanket is installed. Look for signs of damage, such as tears, displaced sections, loose edges, or areas where runoff may have caused the blanket to shift downhill. Also, check for air pockets or "tenting", where the blanket has lifted off the soil, as these gaps can lead to erosion [1][7]. Pay special attention to the anchor trenches at the tops of slopes, as soil in these areas may require recompaction if washed out.
Repairing Damaged Blankets
Fixing any issues promptly is critical to prevent further damage. If you notice erosion beneath the blanket:
- Remove the damaged section and refill the area with fresh soil.
- Reseed the exposed soil.
- Reinstall the blanket, following the original installation instructions, and ensure staples are flush with the ground [5].
For torn areas, cut out the damaged portion and patch it with new blanket material. Overlap the edges by 4–8 inches in a shingle pattern, placing the uphill layer over the downhill layer. If edges are loose, dig a 6×6-inch trench and secure the blanket with staples spaced every 12 inches. For sagging blankets on steep slopes, use longer anchors in a closer grid pattern to improve stability. Replace any broken or protruding staples.
By repairing damage quickly, you can restore the blanket’s protective function and create the ideal conditions for vegetation to thrive.
Supporting Plant Growth
Long-term erosion control depends on healthy vegetation, so helping seedlings grow through the blanket is essential. Water the seeded areas in the evening or on cloudy days to minimize evaporation [7]. If seedlings begin to push the blanket upward, creating bulges, secure the blanket every 18 inches to maintain firm contact with the soil. This ensures plants can grow through the mesh while reducing the risk of erosion beneath the blanket and improving seed germination rates [5].
Continue inspecting the blanket weekly until vegetation is fully established and the roots stabilize the soil [5][7]. Close monitoring during this phase ensures both the blanket and the plants work together to protect the area effectively.
Professional Installation with Pro Landscapes MD

Taking on a DIY project can be tempting, but when it comes to erosion control, professional installation saves you from potential missteps and expensive fixes. Pro Landscapes MD ensures your erosion control system is set up to perform right from the start. Their expertise lays the groundwork for the solutions outlined below.
Custom Solutions for Your Property
No two properties are the same when it comes to erosion challenges. Pro Landscapes MD takes the time to assess your property’s unique characteristics – like slope, soil type, and water runoff patterns – to recommend the best erosion control blanket and installation method [5]. They also carefully locate and safeguard underground utilities before starting any work, minimizing the risk of damage to your infrastructure.
Their team handles every detail, from thorough site preparation to advanced anchoring techniques. For example, they drive stakes at precise 45-degree angles and space staples about 2 to 3 feet apart along the edges to prevent the blanket from lifting or sagging [5]. In high-stress areas, such as channel inlets, they add extra reinforcements to ensure the system holds up under storm conditions.
Complete Drainage Services
Erosion control works best when paired with a well-thought-out drainage plan. Pro Landscapes MD offers a full range of drainage solutions, including grading, land leveling, French drains, stormwater management, and drainage system repairs, all across central Maryland. By addressing underlying causes of soil erosion, they help you avoid costly damage in the future. Combining erosion control with expert drainage ensures long-term protection for your property.
Schedule a Site Evaluation
Ready to protect your property? Schedule a site evaluation with Pro Landscapes MD. Their installations comply with Storm Water Pollution Prevention Plans and meet state-specific erosion control standards [3]. Visit their website at https://prolandscapesmd.com to get a detailed quote tailored to your project’s needs. With their professional approach, they’ll ensure your property remains protected during the 3 to 35 months it typically takes for vegetation to establish and stabilize the soil [4].
Conclusion
Installing erosion control blankets properly can make a big difference in stabilizing landscapes by securing soil and preventing erosion. As Rick Jackson from Earthworks Environmental explains:
The blankets are only as good as the installation [3].
Every detail counts – whether it’s rolling the blanket vertically, digging 6-inch trenches, or stapling it firmly to the ground. These steps ensure the blanket stays in full contact with the soil, preventing water from slipping underneath [5].
Once in place, regular upkeep is key to keeping these benefits intact. Inspections, especially after heavy rain, can help spot and fix problems early [1][5]. Maintaining that close soil contact is crucial for encouraging seed germination and long-term soil stability [1][4].
While it’s possible to tackle this as a DIY project, the level of precision required often makes professional installation a better choice [3]. Poor installation can lead to problems like weak seed growth and hidden erosion beneath the surface [5]. Getting it right the first time not only ensures effectiveness but can also save you from expensive fixes later on.
FAQs
Which blanket material should I use for my slope or channel?
For stabilizing slopes, straw or fiber blankets are great options. They help keep the terrain in place while promoting vegetation growth. For channels, it’s better to go with synthetic or plastic blankets since they can handle water flow more effectively.
To install these blankets properly, start by digging a trench at the top of the slope or channel. Overlap the edges of the blanket to ensure full coverage, and secure it firmly with staples or pins. This setup prevents erosion and keeps everything in place.
How do I know if my soil needs longer stakes instead of 6-inch staples?
When deciding whether longer stakes are necessary, take into account the slope and the condition of the soil. On steeper slopes, such as those with 4:1 or 3:1 ratios, or in areas with loose or unstable soil, longer stakes may be required to ensure proper stability. For gentler slopes with firm, compact soil, 6-inch staples can often work effectively, provided they are spaced correctly. Always adhere to installation guidelines, and adjust the length or density of stakes if needed to prevent the erosion blanket from shifting or failing.
When should I hire Pro Landscapes MD instead of doing this myself?
If you’re unsure about your skills or want top-notch results, consider hiring Pro Landscapes MD. Installing erosion control blankets properly is key to preventing soil erosion. Errors like poor staking or incorrect placement can cause the entire system to fail. With their expertise, you’ll get:
- Proper compliance with Maryland regulations.
- Effective installation, even on challenging terrains.
- Reliable, long-term results – especially for steep slopes or expansive areas.
Trust the professionals to get the job done right.
Chat with Us