


- bhavya gada
- No Comments
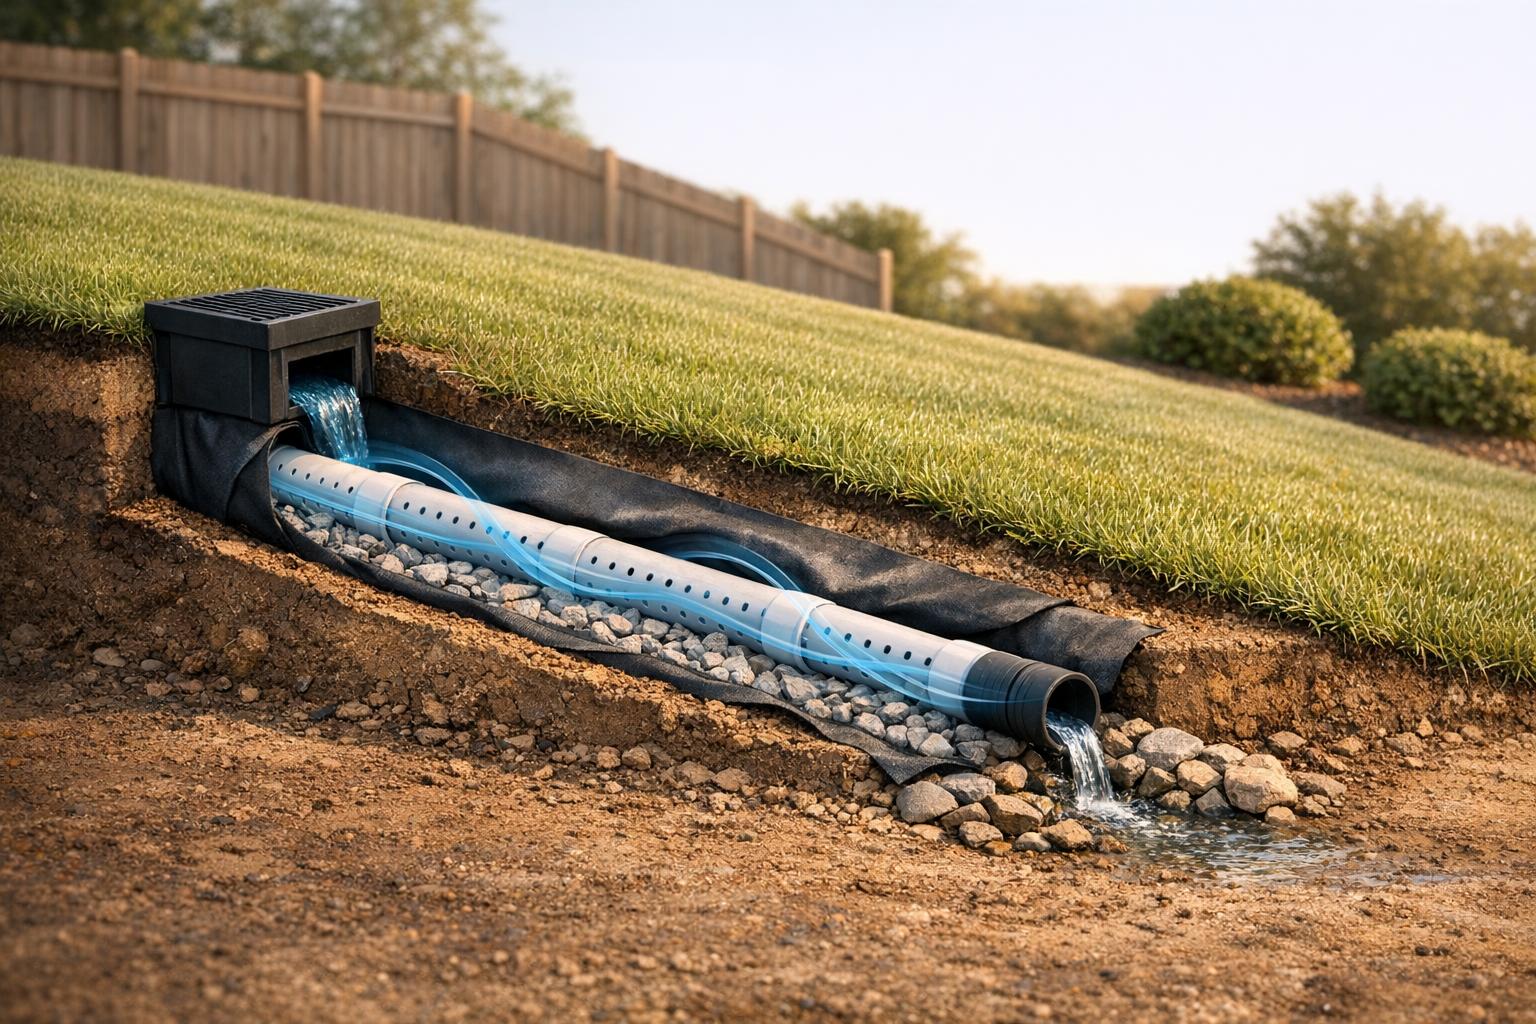
French drains are an effective way to manage water runoff on sloped properties. They prevent issues like soil erosion, landscaping damage, and water pooling near your home’s foundation. Here’s a quick breakdown of how they work and how to install them:
- What They Are: A trench filled with gravel and a perforated pipe that redirects water using gravity.
- Why They’re Needed: Sloped properties naturally direct water downhill, which can cause flooding, foundation cracks, and erosion.
- Installation Basics:
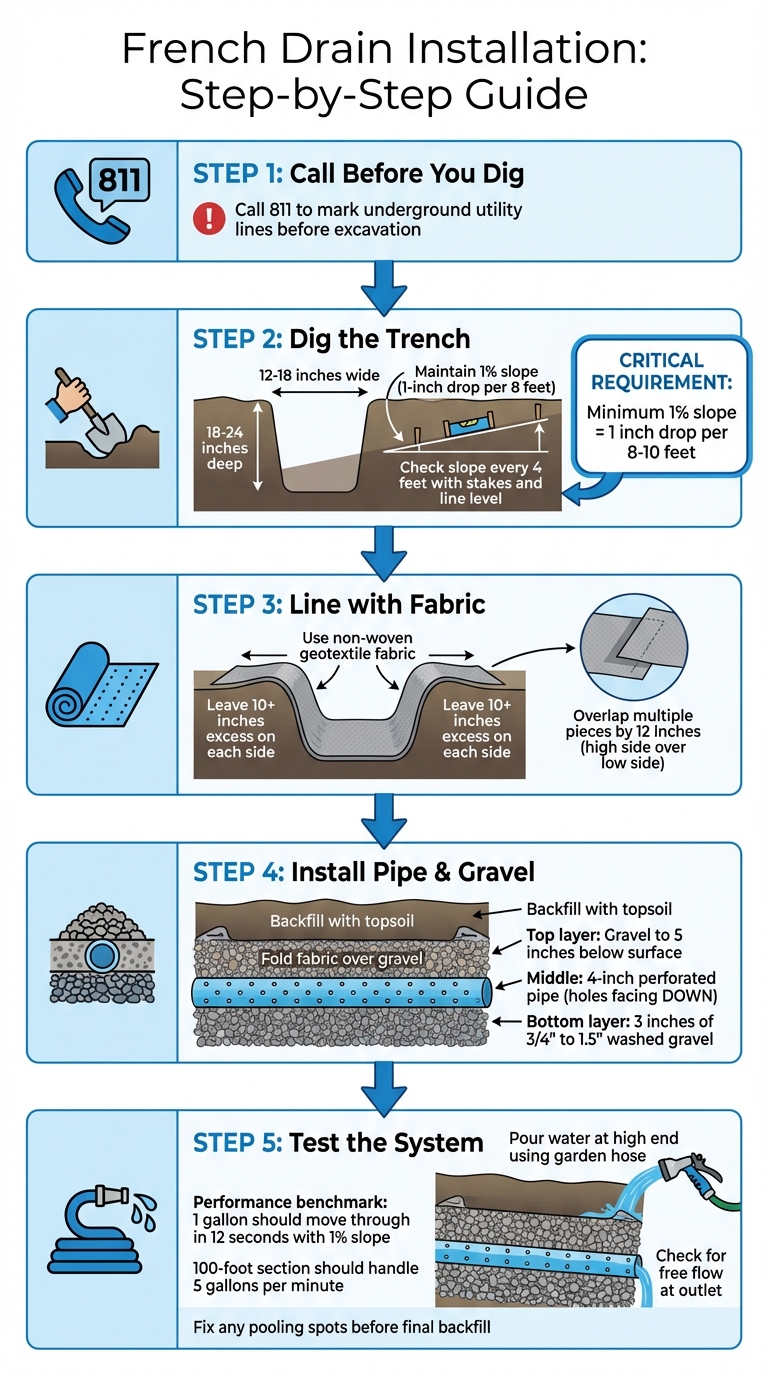
- Plan the Path: Identify problem areas and ensure a continuous slope of at least 1% (1-inch drop per 8-10 feet).
- Gather Tools and Materials: Use a trenching shovel, mason’s line, perforated pipe, geotextile fabric, and washed gravel.
- Dig the Trench: Make it 12-18 inches wide and 18-24 inches deep, maintaining the correct slope.
- Install the Pipe: Line the trench with fabric, add gravel, place the pipe (holes facing down), and cover with more gravel.
- Test the System: Run water through it to ensure proper flow before backfilling with topsoil.
For steep slopes, additional features like catch basins and slotted pipes can help manage faster water flow and prevent clogs. Proper planning and materials ensure your system lasts for years, protecting your property from water damage.
French Drain, Yard Drain, Off Steep Hill, DIY
sbb-itb-843f8be
Tools and Materials You’ll Need
Before diving into your project, make sure you have everything on hand to keep things running smoothly. You’ll need excavation tools for trench work and precise measurement equipment to maintain the correct slope outlined in your plans. These items are critical for ensuring accurate excavation and proper installation on sloped terrain.
Tools Checklist
For excavation, you’ll need a trenching shovel, pickaxe (or pick mattock), and a grub hoe to level the trench bottom effectively [3][2]. A wheelbarrow will help you transport soil and gravel, and placing plywood planks along your path can minimize lawn damage from compaction [3].
To measure and grade the slope, gather a 100-foot tape measure, wood stakes, mason’s line, and a line level. These tools will help you ensure the trench maintains the proper slope. Mark the trench using spray paint and flags for clear guidance [3][1]. While a standard line level works, a digital level can provide greater accuracy, especially on uneven ground, when calculating the required 1% to 2% grade [6]. Additional tools include a utility knife and hacksaw for cutting fabric and pipe, as well as a power drill with tile tape for securing connections [3].
Materials List
Once your tools are ready, focus on selecting durable, high-quality materials to ensure your drainage system performs well.
- 4-inch diameter perforated pipe: Choose HDPE or PVC for residential use. According to Damon Abdi from Louisiana State University:
Pipe sizing varies by the site conditions (i.e., soil texture, impervious surfaces, on-site drainage patterns), but generally a 4-inch diameter pipe (is) suitable for most home applications [3].
For sloped areas, rigid PVC is often a better choice than flexible corrugated pipe because it holds its grade more consistently and is easier to clean using professional equipment [7].
- Non-woven geotextile fabric: This fabric lines the trench, preventing soil particles from clogging the system while still allowing water to flow through. Avoid woven fabrics or standard weed barriers. Leave at least 10 inches of extra fabric on each side so you can fold it over the gravel like a "burrito" before backfilling [3][2][4].
- 3/4-inch to 1 1/2-inch washed gravel or crushed stone: Materials like crushed granite are ideal for surrounding the pipe and promoting water flow [5][1][3].
For properties with pooling water, consider adding a 9-inch x 9-inch catch basin at the lowest point to collect surface runoff effectively [3]. Other materials you’ll need include external couplers, waterproof silicone for sealing connections, and topsoil for the final backfill layer [3].
Planning the Drain Path
Before grabbing a shovel, take a close look at your property during or just after a heavy rainstorm. Pay attention to where water tends to gather. Are there spots with standing water, soggy patches, or areas where runoff is visible? These observations are key to figuring out where your drain should start and the direction it should flow. The goal is to understand how water naturally moves across your yard.
Evaluating Slope and Water Flow
After pinpointing the trouble spots, look for a natural low point where water can safely exit your property. This might be a street curb, a drainage ditch, or a dry well. Ensuring your planned drain path lines up with these natural exit points is crucial. To keep water flowing smoothly, your French drain needs a continuous slope of at least 1%. This gentle grade uses gravity to guide the water away [3].
If your property has steep hills, consider running the trench horizontally across the slope instead of straight downhill. This setup slows down water as it flows, preventing it from picking up too much speed. Before finalizing your plan, double-check that your drainage outlet won’t send water onto a neighbor’s property – nobody wants to create new problems while solving their own.
Marking the Path
Once you’ve mapped out the route, it’s time to mark it. Start by placing a wooden stake at the starting point and another at the endpoint. Stretch a mason’s line between the two stakes, pulling it tight, and use a line level to make sure the string is perfectly horizontal. Measure the distance from the string to the ground every 4 feet. These measurements will show the current slope of your yard and guide you in digging to achieve the necessary 1% grade.
For a 1% slope, the trench should drop about 1 inch for every 8 to 10 feet of length [3]. For example, if you’re installing a 50-foot drain, the endpoint should be roughly 6 inches lower than where you start [2]. Use spray paint and flags to clearly mark the entire path, making it easier to follow your plan when you start digging.
| Slope Percentage | Vertical Drop per Distance | Recommended Use |
|---|---|---|
| 1% (Minimum) | 1 inch per 8–10 feet | Standard residential yards [3][5] |
| 1% (Minimum) | 1 foot per 100 feet | Long-distance drainage [1] |
| 1% | 6 inches per 50 feet | General gravity-fed systems [2] |
Installation Steps
French Drain Installation Process: 5 Steps for Sloped Properties
With your drain path marked and the slope plan in place, you’re ready to begin the installation. By following these steps, you’ll ensure water is redirected efficiently away from your home.
Digging the Trench
Before digging, call 811 to have underground utility lines marked. Once you’ve received confirmation, you can start excavation.
The trench should be 12 to 18 inches wide and 18 to 24 inches deep. This width allows space for a gravel layer around the pipe, while the depth places the drain below the root zone and, in colder areas, below the frost line to prevent movement during freeze-thaw cycles. As you dig, check the slope regularly using stakes, mason’s line, and a line level. Aim for a 1% slope (approximately a 1-inch drop for every 8 feet) and verify it every 4 feet to maintain the proper gradient.
"A slight slope (1%, or roughly 1-inch drop per 8 feet) is the minimum recommended by many installers; however, the preferred slope may vary by the type of pipe being used." – Damon Abdi, Assistant Professor of Landscape Horticulture, Louisiana State University [3]
If you encounter low spots, fill and regrade them immediately to avoid water pooling.
Installing the Pipe and Backfilling
Start by lining the entire trench with non-woven geotextile fabric, leaving at least 10 inches of excess fabric on each side. This prevents soil and debris from clogging the system. If you need to use multiple pieces of fabric, overlap them by at least 12 inches in the direction of water flow, ensuring the fabric on the high side overlaps the lower side.
Next, pour a 3-inch base layer of washed gravel (sized between 3/4 and 1 1/2 inches) along the bottom of the trench. This creates a stable foundation for the pipe. Place a 4-inch perforated pipe (HDPE or PVC) on the gravel, with the holes facing downward. This setup allows water to enter the pipe as the water table rises. Cover the pipe with another layer of gravel, stopping about 5 inches below the surface. Then, fold the excess fabric over the gravel to act as a filter for debris. Finally, backfill the remaining space with topsoil or sod to restore the lawn.
Once the pipe is installed and backfilled, move on to testing the system before completing surface restoration.
Testing the System
Before finishing the backfill, test the drain to ensure it’s functioning properly. Use a garden hose on a high-flow setting to pour water into the high end of the system, simulating heavy rainfall. Check for free flow at the outlet. With a 1% slope, you should see 1 gallon of water move through in about 12 seconds, and a 100-foot section of 4-inch pipe should handle about 5 gallons per minute.
If you find water pooling along the pipe, it could indicate a low spot that needs regrading. For systems with a catch basin at the inlet, confirm that water flows smoothly into the basin without leaks at the connections. Once the system passes the test, complete the backfilling and restore the surface as needed.
Special Considerations for Steep Slopes
When working with steep slopes, managing water runoff becomes even more critical. Water flows much faster on these inclines, which increases the risk of erosion and clogged pipes. Without proper planning, the rapid movement of water can erode discharge areas and leave behind debris that may block the system.
"Too Much Slope: Water flows too fast, leaving debris behind, risking clogs, and potentially causing erosion at the outlet." – Harley Grandone, Landscape Designer [3]
The trick is to control water velocity before it becomes a problem. Instead of directing your trench straight down the slope, run it horizontally across the incline. This layout slows the water, giving it more time to enter the drainage system rather than rushing past it.
To handle fast-moving water more effectively, you can incorporate additional design features.
Adding Catch Basins and Cleanouts
For steep slopes, catch basins aren’t just helpful – they’re essential. These small units, typically 9 inches by 9 inches for residential use, are designed to collect surface runoff before it bypasses your French drain or causes erosion. Place them strategically at natural low points or at the bottom of the slope where water tends to pool.
Each basin includes a sump area to trap sediment and debris, which helps prevent clogs in your perforated pipes. To ensure optimal performance, set the grate 1/4 to 1/2 inch above the surrounding grade. This positioning captures larger debris while maintaining efficient water flow. For stability, install the basin on a 2-to-4-inch base of compacted 3/4-inch crushed stone. Regular maintenance is key – clean out sediment at least twice a year to keep the system running smoothly. These basins are a critical foundation for managing steep slopes and can be paired with other features like slotted pipes.
Using Slotted Pipes
For slopes steeper than 5%, slotted pipes are a game-changer. Unlike standard perforated pipes, which have holes that must face downward, 4-inch HDPE double-wall corrugated pre-slit (slotted) pipes have openings on all sides. This design simplifies installation on uneven terrain and improves water collection from multiple directions. Slotted pipes are particularly effective for capturing fast-moving runoff, making them ideal for steep grades.
At the discharge point, it’s a good idea to add a bed of stones or a rain garden. These features help dissipate the energy of high-velocity water, reducing the risk of soil erosion and protecting your landscape. By incorporating these strategies, you can ensure your drainage system handles steep slopes effectively and lasts for years.
Conclusion
Key Takeaways
For proper drainage, maintain a minimum slope of 1% – this means about a 1-inch drop for every 8 to 10 feet of pipe. This slope ensures gravity effectively moves water through the system [3]. When installing, line the trench with non-woven geotextile fabric, lay a base layer of washed gravel, position the perforated pipe, cover it with more gravel, and fold the fabric over before backfilling. On steeper slopes, catch basins should be installed at natural low points to trap debris, and 4-inch HDPE or PVC pipes are recommended [3]. A properly installed drainage system can last for decades. Simple maintenance, such as flushing the system with a garden hose, helps keep it functioning well over time [3]. For more complex installations, professional expertise is crucial to ensure durability and compliance with local codes.
Professional Help from Pro Landscapes MD

Handling challenging terrain or digging deep trenches often requires specialized equipment and skills. Professional installers not only have the tools but also ensure the system meets local building codes, which often include specific requirements for drainage systems near foundations [3].
Pro Landscapes MD provides expert drainage solutions across central Maryland, including services like French drain installation, grading, stormwater management, and land leveling. Their team serves areas such as Howard County, Montgomery County, Carroll County, Frederick County, Prince George’s County, and Baltimore County. With a solid understanding of Maryland’s frost line and unique drainage challenges, they can design the right system for your property – whether you’re managing runoff in Bethesda or tackling a steep slope in Ellicott City.
FAQs
Where should a French drain discharge on a sloped yard?
A French drain installed on a sloped yard should release water at a lower elevation, allowing it to flow away without issues. The best approach is to direct the water downhill to a safe drainage point, like a stormwater basin, a dry creek bed, or an area designed to absorb water. This setup uses gravity to keep water moving, prevents pooling, and helps avoid problems like erosion or water damage.
How do I know if I need a catch basin or cleanout on a steep slope?
A catch basin is a practical solution for areas where surface water tends to gather or pool, as it helps redirect water and minimizes the risk of flooding. For longer or more intricate drainage systems, a cleanout is essential for maintenance, making it easier to clear debris or remove blockages. On steep slopes, catch basins positioned at low points effectively handle runoff, while cleanouts help prevent clogs and keep the system working efficiently.
What are the most common causes of French drain clogs on hillsides?
The main culprits behind French drain clogs on hillsides are soil and debris infiltration, root intrusion, an incorrect slope, and the accumulation of sediment or organic material within the perforated pipe or gravel. To minimize these problems, focus on regular upkeep and ensuring the drain is installed correctly.
Chat with Us