









- bhavya gada
- No Comments
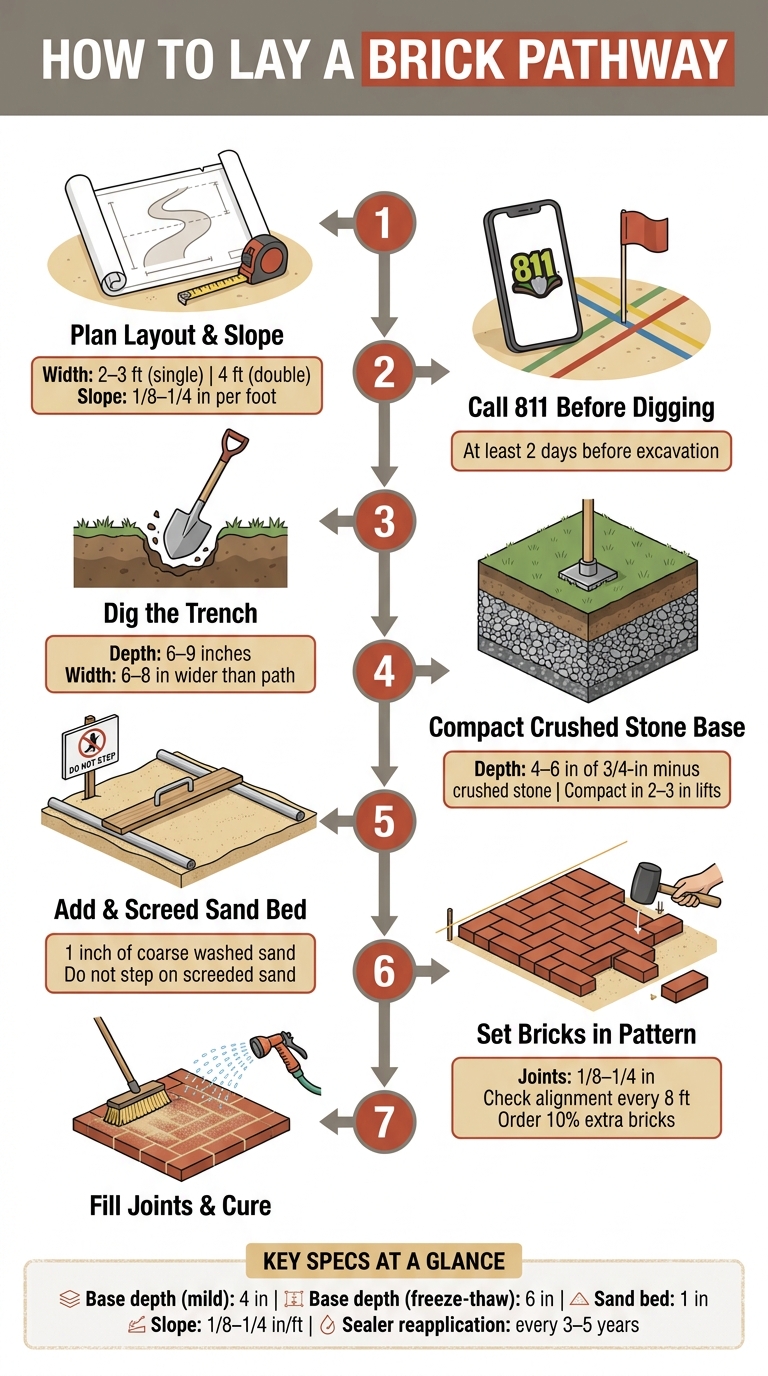
If I want a brick path to last, I need to get the base, slope, and drainage right first. The short version is simple: I plan the route, dig about 6 to 9 inches deep, build a 4- to 6-inch compacted crushed-stone base, add 1 inch of sand, set the bricks with 1/8- to 1/4-inch joints, then compact and fill the joints with polymeric sand.
Here’s what matters most:
- Width: 2 to 3 feet for one person, 4 feet for two people
- Slope: 1/8 to 1/4 inch per foot away from the house
- Base depth: 4 inches in mild conditions, often 6 inches where freeze-thaw is a problem
- Base material: 3/4-inch minus crushed stone
- Sand bed: 1 inch of coarse washed sand
- Extra brick to order: about 10%
- Cure time after joint sand: 24 hours
I also need to avoid a common mistake: skipping base prep. That’s what leads to shifting, heaving, and low spots after a few seasons. In places like Maryland, where winter freeze-thaw cycles are common, that risk is higher.
If I’m choosing between materials, clay brick gives me a classic look and steady color, while concrete pavers give me more shapes and layout choices. Either way, the long-term result depends less on the surface and more on what sits below it.
This guide walks through the full job in plain steps, from layout and digging to brick setting, joint filling, and basic upkeep.
How to Lay a Brick Pathway: Step-by-Step Guide
How to Lay a Brick Paver Walkway | This Old House

sbb-itb-843f8be
Plan the Layout, Slope, and Materials Before You Dig
Before you dig, lock in the path width, route, pattern, slope, and materials. Those choices shape how well the path drains and how long it lasts.
Measure the Path and Pick a Brick Pattern
For width, use 2 to 3 feet for a single-file garden path and 4 feet if you want two people to walk side by side [6][2].
A straight path is simpler to excavate and install. Curves can make the yard feel softer, but keep them broad. If a bend is tighter than 5 feet, you can end up with awkward gaps along the outside edge [3].
Once the route is set, pick a brick pattern that fits how the path will be used and how much foot traffic it will get.
| Pattern | Difficulty | Stability | Best For |
|---|---|---|---|
| Running Bond | Easy | Good | Simple, linear garden paths |
| Herringbone | Moderate–High | Excellent | High-traffic areas; resists shifting |
| Basketweave | Moderate | Very Stable | Patios and wider, rustic paths |
After that, set the slope before any digging starts.
Set the Grade for Drainage and Check Local Rules
Every brick path needs a slight slope so water can drain off. Aim for 1/8 to 1/4 inch of drop per foot away from your house or other structures [2][7]. On a 4-foot walk, that works out to about 1 inch from one edge to the other [3]. If the surface sits flat, water can pool and work down into the joints.
Before you break ground, call 811 at least two days ahead of time so underground utility lines can be marked [3][2].
Tools and Base Materials You Will Need
You’ll usually need a shovel, rake, tape measure, string line with a line level, rubber mallet, plate compactor, and a masonry saw or brick chisel for border cuts and curves.
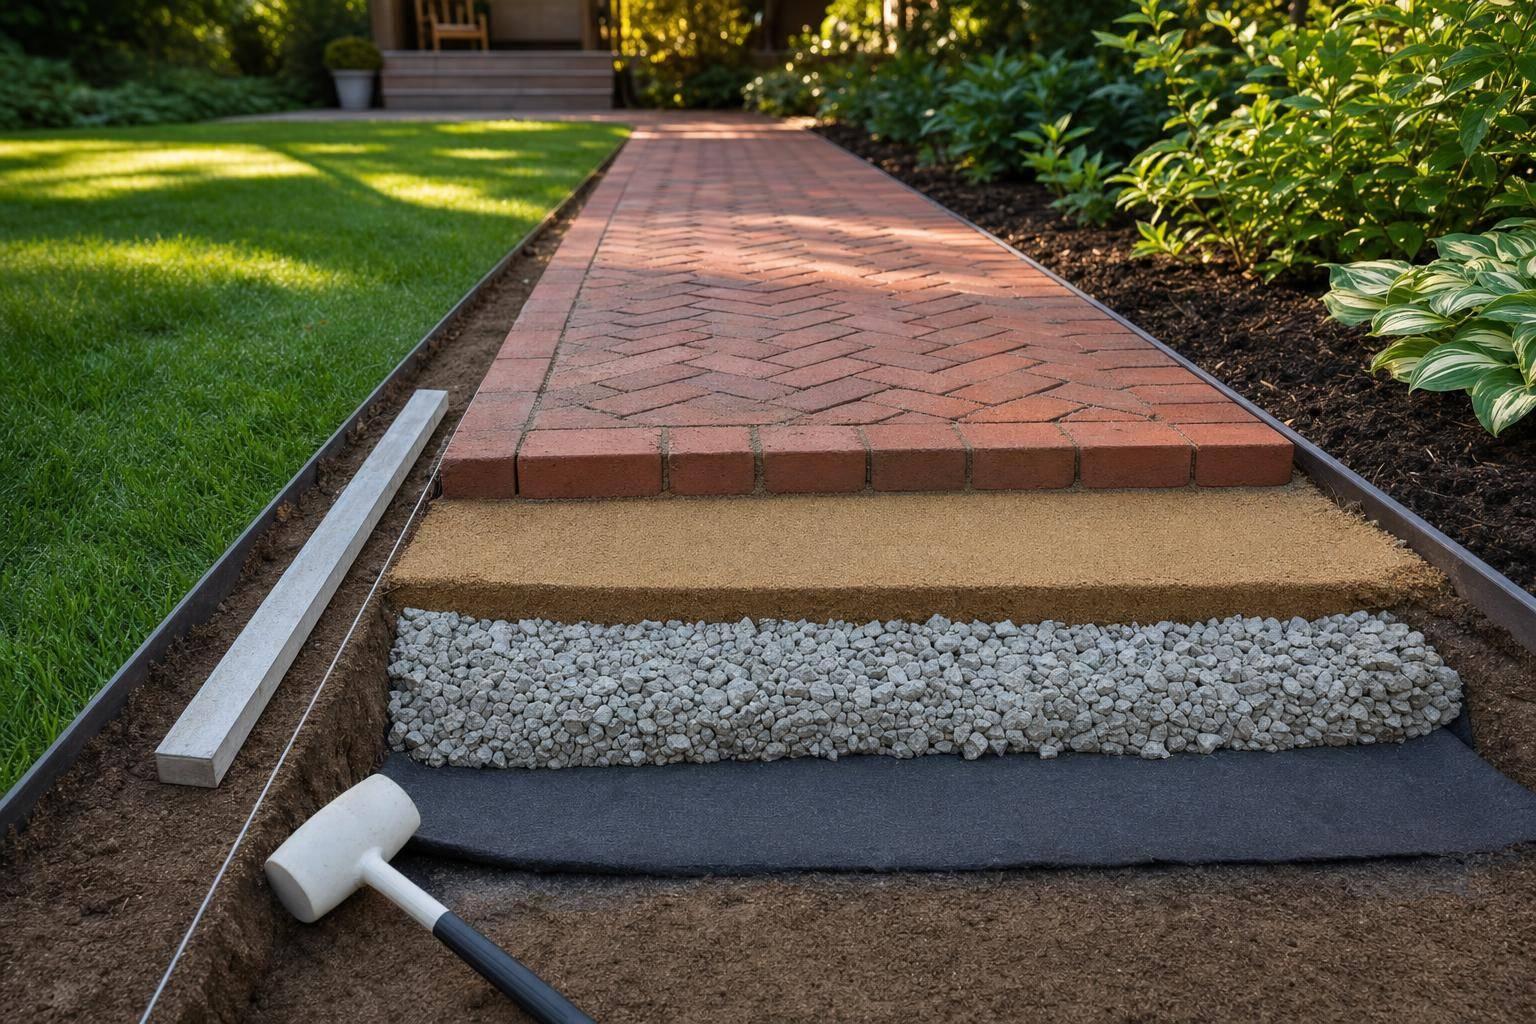
For the base, plan on 4 to 6 inches of compacted 3/4-inch minus crushed stone, then a 1-inch bedding layer of coarse washed concrete sand. Use walkway-rated clay pavers or concrete pavers, plus rigid edge restraints made of plastic, composite, or metal. Secure those restraints with 10-inch spikes every 12 inches. Add polymeric sand for the joints and landscape fabric between the native soil and the gravel base to keep the layers from mixing and help slow weed growth [2][4][8].
It’s also smart to order 10% extra bricks for cuts and breakage [7][8].
With the layout marked and materials on hand, the next step is to excavate to the right depth and build the base.
How to Prepare a Stable Base for Your Walkway
A solid base is what keeps a brick walkway flat, steady, and less likely to sink or shift as the seasons change.
Excavate to the Right Depth and Shape the Subgrade
Once your layout and slope are set, it’s time to build from the ground up. Run mason’s twine between stakes, mark the cut line with spray paint, and dig along that outline. Your trench depth should match the combined thickness of the brick, bedding sand, and base.
In most cases, that means digging 6 to 9 inches deep, with the deeper end better for walkways that will see heavier use.
Make the trench 6 to 8 inches wider than the finished path so there’s room for edge restraints [2][3]. Clear out all organic material, then compact the subgrade until it feels firm and even.
Place and Compact the Crushed Stone Base
With the trench cleaned out, add the stone base in layers. Before you place any gravel, roll out a heavy-duty woven stabilization fabric over the compacted soil. This helps stop the stone from blending into the soil below, which matters a lot in soft ground or clay-heavy soils.
Then add 3/4-inch minus crushed stone in 2- to 3-inch lifts instead of dumping the whole base in at once [2][4]. Compact each 2- to 3-inch lift with four passes. If the site gets heavy foot traffic or deals with frost, use the deeper base depth.
Screed the Sand Bed and Install Edge Restraints
After the base is compacted, you can set the bedding layer and lock down the edges. Place two 1-inch outside-diameter steel pipes on top of the compacted stone, parallel to each other and spaced about as wide as your screed board [2][4]. Spread coarse, washed sand between the pipes. Then drag a straight 2×4 across the pipe tops to shape the sand into a level bed that’s 1 inch thick.
Pull out the pipes, fill the shallow troughs with sand, and smooth them with a trowel.
Do not step on the screeded sand.
Before laying any brick, install the edge restraints. Use a trowel to pull the sand back around the perimeter until you reach the gravel layer, so the edging rests on solid ground instead of sand [2]. Anchor the edging firmly to the gravel base. Use flat edging strips, not coiled rolls.
Lay the Bricks, Cut the Edges, and Fill the Joints
Set Bricks in Pattern and Keep Lines Straight
Once the base is screeded and the edge restraints are in, start laying bricks from the straightest edge. Before that first brick goes down, check that your first course is square with a framing square or the 3-4-5 rule.
Run string lines the full length of the area so you can track both height and alignment. Set each brick into the sand and tap it down with a rubber mallet until it sits snug against the bricks beside it and lines up with the string. Leave 1/8 to 1/4 inch between bricks for joint sand. Every 8 feet, lay a straight 2×4 across the surface to catch any drift, and adjust bricks by up to 1/8 inch if needed [2]. Work outward from the bricks you’ve already placed so you don’t mess up the sand bed.
Cut Border Pieces and Fit Curves Cleanly
For cuts, place the brick over the gap and mark the cut line right on the brick. Then use a square to mark all four sides before cutting. If you want a clean edge, use a wet masonry saw with a diamond blade. If the cut doesn’t need to look perfect, score the brick about 1/2 inch deep with an angle grinder, then split it with a chisel and hammer.
Try not to use pieces smaller than 1.5 inches. Small slivers tend to loosen over time [3]. On curves, if a gap opens to 1.5 inches, shift the nearby pavers a bit instead of stuffing in a thin brick piece [3].
Compact the Surface and Fill the Joints with Sand
Once all the full bricks and cut pieces are set, compact the surface and lock everything in place. Cover the plate compactor with carpet or a rubber mat to help prevent scuffs and chips [2].
After the first pass, sweep polymeric sand diagonally across the joints in both directions so it works deeper into the seams [1]. The bricks need to be completely dry before you do this. If they aren’t, the sand can stick to the surface and leave stains [2].
Run the compactor again to seat both the bricks and the sand, then mist the surface lightly to set the polymeric sand [1][8]. Go easy with the water. Too much can wash sand out of the joints [1][8]. Let the path cure for 24 hours before walking on it [8].
Maintain Your Brick Pathway and Know When to Call a Pro
Seasonal Maintenance and Minor Repairs
Once your walkway is in use, a little routine care goes a long way.
Sweep it weekly. Then rinse it with a garden hose once or twice each season to clear off dirt and debris that can lead to stains or moss growth [2][5]. It’s simple stuff, but it helps keep the surface looking clean and cuts down on small issues before they turn into bigger ones.
Joint sand needs attention too. Add more once a year and after major storms so the bricks stay locked in place [2][3][5]. Every 3 to 5 years, apply a breathable masonry sealer to help limit staining and freeze-thaw damage [5]. In the spring, give the walkway a close look for shifted or sunken bricks, refill any low joint sand, reset loose bricks, and skip harsh de-icers [7].
Clay Brick vs. Concrete Paver: Which Should You Choose?
If you’re still deciding on materials, compare the look, upkeep, and drainage needs before you begin. That choice will shape how the walkway looks now and how it holds up later.
| Feature | Clay Brick Pathways | Concrete Paver Pathways |
|---|---|---|
| Durability (Freeze-Thaw) | High, if rated "Severe Weather" (SW) | High; engineered for climate |
| Upkeep | Low; occasional re-sanding | Low; may require periodic sealing |
| Appearance | Classic, natural, "aged" look | Versatile; wide range of shapes and textures |
| Color Consistency | Excellent; color is fired through the brick | Variable; surface pigments may fade over time |
| Installation | Standard; requires cutting and compaction | Standard; highly consistent dimensions |
Clay brick is a strong pick if you care most about long-term color stability and that classic, timeworn look. Concrete pavers make more sense if you want more layout options or plan to build a permeable drainage system.
When to Use Pro Landscapes MD for Your Walkway Project

Some walkway issues are easy to handle. Others need a pro.
If your yard has tricky grading, drainage problems that keep coming back, or needs a French drain, dry riverbed, or stormwater management system worked into the walkway design, it’s smart to bring in help [2][7]. Pro Landscapes MD handles walkway installation, grading, and drainage solutions across central Maryland and Washington, DC.
FAQs
How do I know if my yard needs a deeper base?
If your yard has soft soil, or you live somewhere that gets frost, make the base 2 to 4 inches deeper than the usual 4 to 6 inches of compacted gravel.
That extra depth matters. A deeper, tightly compacted base helps keep the walkway from shifting, settling, or heaving as time goes on.
What type of bricks work best for freeze-thaw climates?
Choose bricks rated as pavers for ground use. If you live in a freeze-thaw climate, look for a severe weather rating. That means the bricks are built to handle freezing temperatures without breaking down.
Installation matters too. Use edge restraints with spikes every 8 to 12 inches. Then build a base with enough depth and drainage so water drains away instead of sitting under the pavers.
Can I lay a brick path without a plate compactor?
Yes. For smaller or simpler projects, you can lay a brick path without a plate compactor.
A hand tamper works as a solid backup, but it takes more elbow grease to get the base firm and level. If you’re building a larger path or want it to last longer, a plate compactor is still the better pick.
Chat with Us