









- bhavya gada
- No Comments
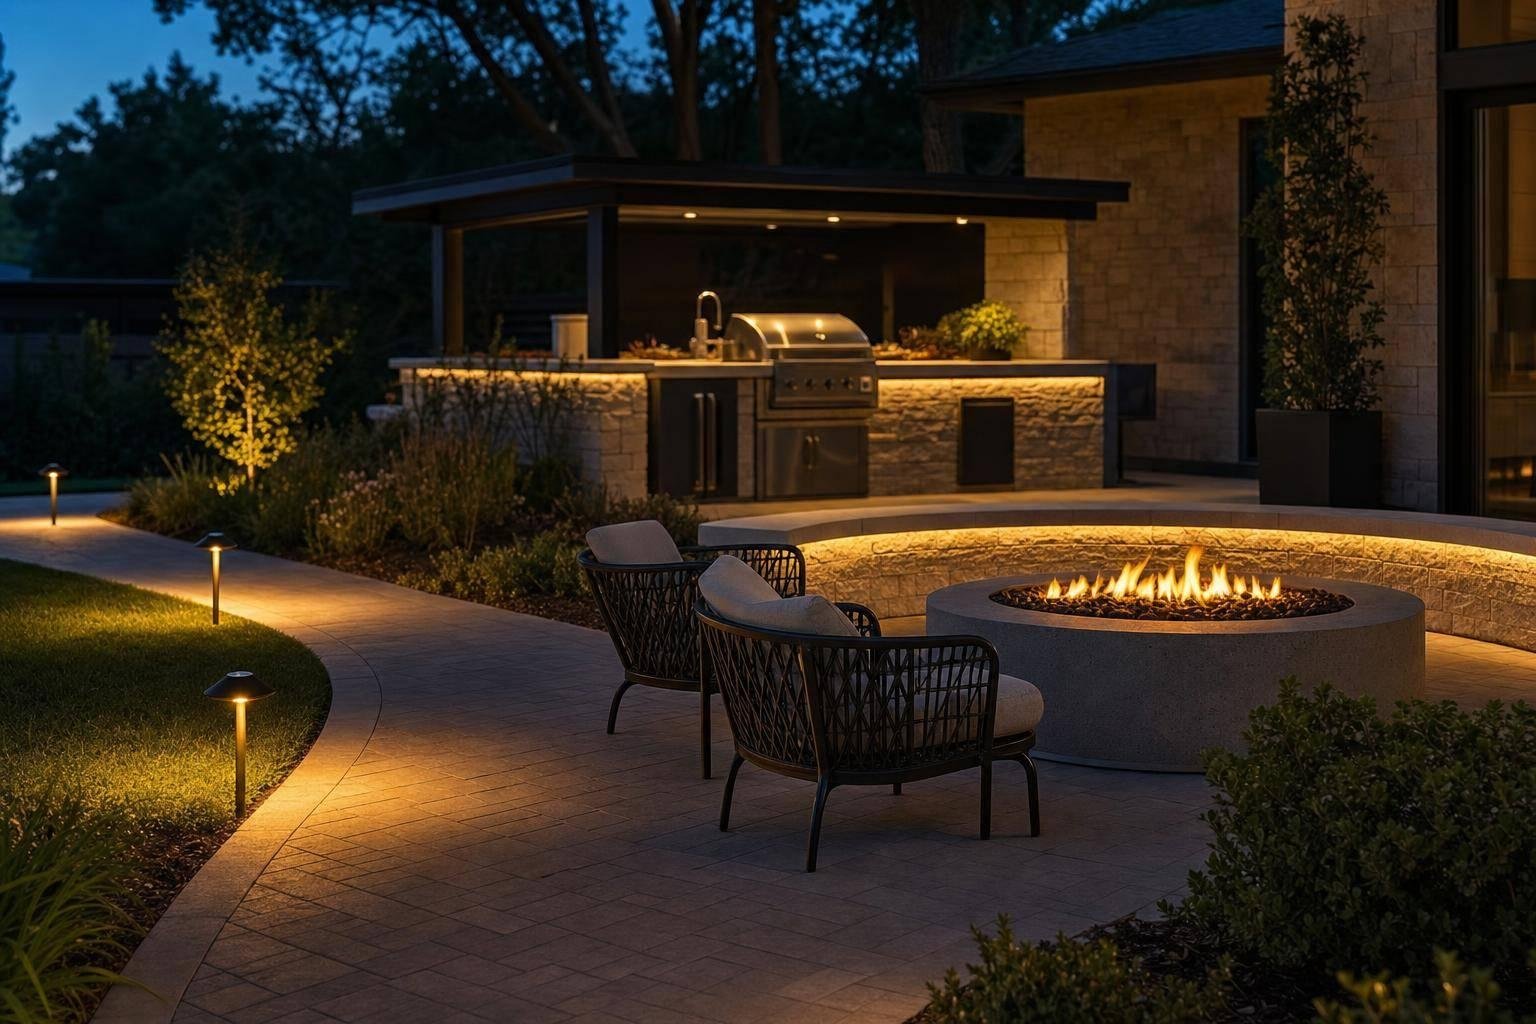
A fire pit does not light a patio well enough on its own. If I want the area to feel safe and easy to use after dark, I need a low-voltage plan that covers power load, wire runs, fixture type, heat clearance, drainage, and dimming from the start.
Here’s the short version:
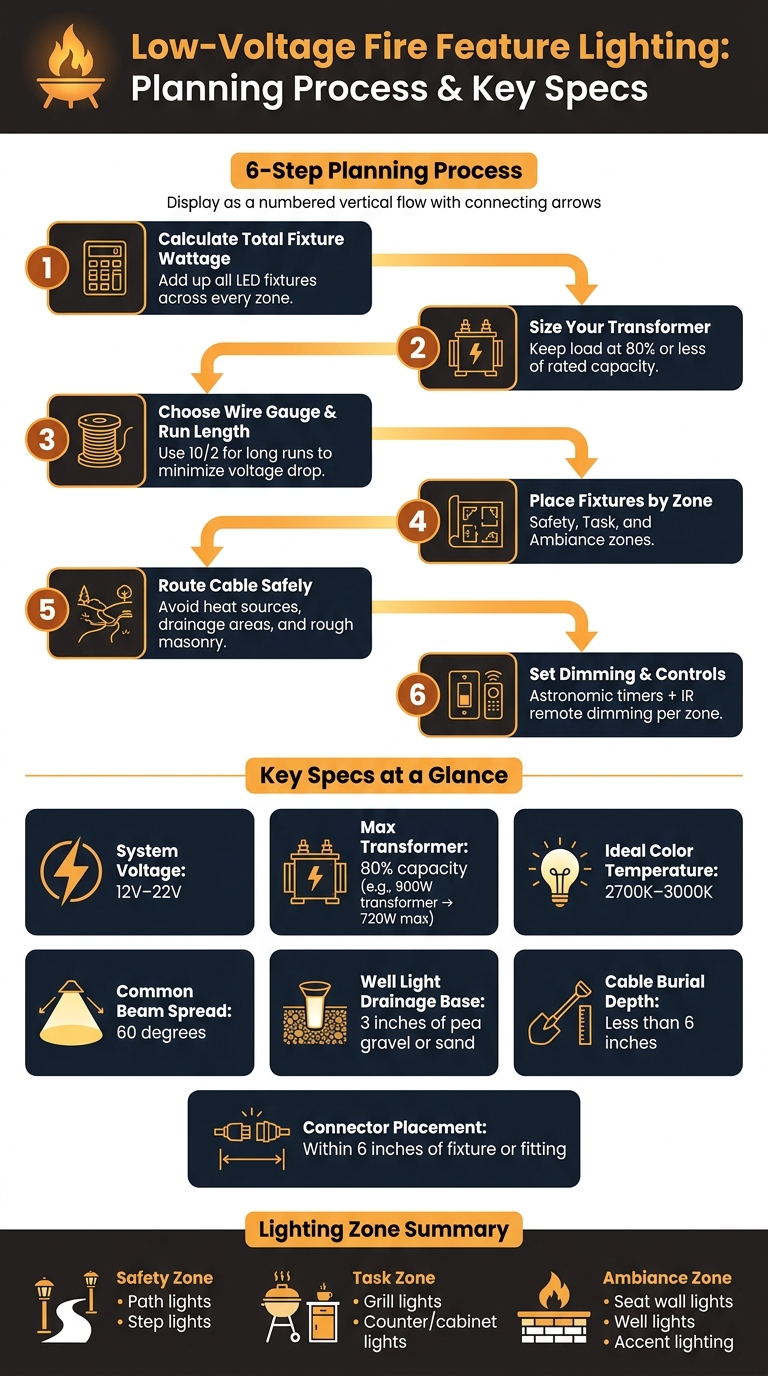
- I size the transformer by total fixture wattage and keep the load at 80% or less
- I use wire runs and cable gauge that limit voltage drop, especially on long runs
- I split lighting into safety, task, and ambiance zones
- I place fixtures where the flame does not help much: steps, seat walls, paths, counters, and wall edges
- I keep cables and connectors away from heat, water trouble spots, and rough masonry
- I plan lighting before the patio, wall, fire pit, or outdoor kitchen is finished
A few numbers matter right away:
- Most low-voltage systems run at 12V, with some transformer taps going up to 22V
- Low-voltage cable is often buried at less than 6 inches
- Fire feature lighting usually looks best at 2700K to 3000K
- A 60-degree beam spread is common for well lights
- Well lights often need about 3 inches of gravel or sand below for drainage
If I had to boil the whole guide down to one point, it would be this: the flame is the focal point, but the lighting plan makes the space usable. That means even light on walking and seating areas, brighter light where people cook, and lower light near the fire so the scene does not feel harsh.
| Area | What I focus on |
|---|---|
| Fire pit seating | Soft wall or accent lighting with dimming |
| Walkways and steps | Path and safety lighting |
| Seat walls and garden walls | Under-cap hardscape lighting |
| Fireplace masonry | Ground-level accent or well lighting |
| Outdoor kitchen | Brighter task lighting for prep and grill use |
In Maryland, I also need to think about rain, humidity, drainage, and corrosion. That affects fixture sealing, transformer housing, and where I run cable.
Below, I’ll walk through the parts that matter most so the system works well and looks even at night.
Low-Voltage Fire Feature Lighting: Planning Process & Key Specs
System Basics: Transformers, Load Calculations, and Voltage Drop
Main Components of a Fire Feature Lighting System
Every low-voltage lighting setup around a fire feature uses the same basic parts. The transformer takes standard 120V household power and steps it down to a safer 12V–22V range for outdoor use [4]. Then low-voltage cable – usually 10/2 or 12/2 – carries power from the transformer to each fixture zone [1][3].
Fixtures connect with UL-listed, waterproof connectors made for outdoor conditions [1][6]. For automatic control, systems often use photocells and astronomical timers, which rely on geographic data to adjust for seasonal sunrise and sunset shifts [4]. Optional smart controls can also add dimming and zone control [1][3].
How to Size a Transformer for Multiple Lighting Zones
Transformer sizing starts with total wattage, not fixture type. Add the wattage of every LED fixture across each planned zone, including the fire pit area, seat walls, outdoor kitchen, and path lights. Then keep the working load at no more than 80% of the transformer’s rated capacity [4].
A 900-watt transformer, for example, should handle no more than 720 watts of connected load [4]. If your layout includes multiple zones at different distances from the power source, a multi-tap transformer with 12V to 22V taps can help offset voltage drop on longer wire runs [4].
| Transformer Capacity | 80% Load Limit |
|---|---|
| 150 watts | 120 watts |
| 300 watts | 240 watts |
| 600 watts | 480 watts |
| 900 watts | 720 watts |
After you set capacity, the next thing to watch is wire length. That’s what shapes voltage drop and how evenly each zone lights up.
Wire Gauge and Run Length: Managing Voltage Drop
Voltage drop is the loss of electrical potential as current moves through a wire. Longer runs and heavier loads mean more voltage is lost before power reaches the fixture [4]. On a large patio, that can show up fast. If the outdoor kitchen sits 150 feet from the transformer, fixtures at the far end may look dimmer than the ones closer to the source [4].
Wire gauge plays a big role here. A 10/2 cable handles long runs better than 12/2 because its thicker conductor loses less voltage over distance [4]. On a 150-foot run of 10/2 cable, a 22V tap on a multi-tap transformer can support up to 140 watts of LED fixtures while still delivering the right voltage at the fixture end [4].
Once the transformer size and wire runs are dialed in, fixture placement starts to shape how the light looks around each fire feature.
sbb-itb-843f8be
Hardscape Lighting Installation | How to Install Low Voltage Lighting Outdoors
Fixture Types for Fire Pits, Fireplaces, Patios, Walls, and Outdoor Kitchens
Once you’ve set transformer load and voltage drop, the next step is simple: pair each fixture with the right job and the right spot.
Hardscape and Under-Cap Lighting for Seat Walls and Garden Walls
Hardscape lights installed under seat wall caps cast a soft wash of light onto seating and paving. That helps keep edges easy to see and gives the wall a clean, built-in look [8].
Path, Accent, and Task Lighting by Area
Path lights help guide guests through patios, walkways, and garden paths near the fire feature [5][8]. They do the basic safety work, but they also help the space feel more inviting after dark.
Well lights are a good fit for accenting fireplaces and stone veneer from ground level. They draw attention to the masonry that frames the fire feature without putting the fixture itself front and center [3][8].
If you’re installing well lights in hardscape, leave about 3 inches around the fixture housing and fill that space with pea gravel or sand so water can drain the way it should [3].
In an outdoor kitchen, under-counter or cabinet-mounted fixtures above a grill or prep counter help with safe food prep at night [2][8]. Dimmable LEDs are a smart pick here because they can go from bright prep lighting to softer ambient light when the cooking is done [1][3].
| Fixture Type | Best Use Case | Primary Benefit |
|---|---|---|
| Hardscape/Wall Light | Seat walls, garden walls | Lights seating edges and paving near the fire feature [8] |
| Path/Area Light | Patios, walkways, garden paths | Safe circulation around the fire feature [5][8] |
| Well Light | Fireplace accents, stone veneer accent lighting | Discreet ground-level accenting of fire feature masonry [3][8] |
| Task Light | Grills, outdoor kitchen counters | Visibility for cooking and prep near the fire feature [2][8] |
Color Temperature and Heat-Safe Fixture Placement
For fire feature areas, 2700K to 3000K is the preferred LED range because it gives off a warm white look that works well with natural firelight [1][3][4]. It feels right for the space. Too cool, and the lighting can fight the flame instead of supporting it.
Keep fixtures, lenses, and connectors clear of combustible materials, and follow manufacturer clearance ratings [1][3][5][6]. Heat changes the equation fast, so placement matters just as much as fixture choice.
A 60-degree beam spread is a common option for well lights because it gives broad coverage without a harsh spotlight effect [1][3].
Next, group these fixtures into zones and route cable around heat, masonry, and drainage constraints.
Wire Routing, Zone Planning, and Dimming Controls
After you place the fixtures, the next job is to run cable, group the controls, and dial in the dimming.
How to Route Cable Safely Around Heat, Masonry, and Drainage Areas
Low-voltage cable is buried close to the surface, so the route matters a lot. Keep it away from fire pits, fireplaces, and any area that may be opened up later for drainage work. Near seat walls and outdoor kitchens, use built-in wire channels to shield cable from rough masonry edges [7].
This is most important where cable passes across masonry, seating walls, or kitchen runs. Keep connectors within 6 inches of a structure, fixture, or fitting so fixes are easier later on [1][5][6].
Coordinate lighting routes with drainage work before any hardscape is poured or set.
Once the cable path is locked in, split the lighting into working zones.
How to Divide Lighting into Functional Zones
Use three zones: safety, task, and ambiance. Safety includes path and step lighting. Task covers grills and prep counters. Ambiance handles fire pit seating, seat walls, and masonry accents [1][2][3].
The fixtures can stay the same as in the previous section. What changes is how you control them. Separate zones let you keep kitchen lights at full output while the fire pit seating area stays low and calm.
After the zones are mapped out, dimming helps balance visibility with mood.
Dimming Options for Ambiance and Visibility
Near a fire feature, keep the flame area softer and make walkways or cooking zones brighter. Some modern low-voltage LED fixtures come with built-in dimming or IR remote control, so you can fine-tune brightness without swapping hardware [1][3].
Astronomic timers adjust on their own to local dusk and dawn. That helps in Maryland, where daylight hours shift a lot through the year [4]. In fire pit seating areas, fixtures with IR remote dimming let you change brightness right where you are instead of walking back to the transformer. That helps keep the fire as the focal point [1][3]. The goal is simple: let the flame stand out while still keeping the area safe to move through.
| Control Option | Best Application | Primary Benefit |
|---|---|---|
| Astronomic Timer | General patio and path lighting | Automatically adjusts for seasonal dusk and dawn changes [4] |
| IR Remote Dimming | Fire pit seating and accent lighting | On-the-fly brightness control near flames [1][3] |
| Multi-Tap Transformer | Large systems with long wire runs | Helps compensate for voltage drop across zones [4] |
Lighting Integration for Maryland Hardscapes and Final Planning Notes
Plan Lighting Before Patio, Wall, Fire Pit, and Outdoor Kitchen Work Is Finished
Once you’ve picked your zones and fixture types, lock the lighting plan in before the hardscape is done. Lighting should be part of the hardscape design from the start, not something tacked on at the end.
That means planning fixture locations, wire runs, and conduit sleeves before patio, wall, fire pit, or outdoor kitchen work wraps up. When you do this early, wire routes can stay hidden during construction instead of being exposed or awkwardly patched in later. It also keeps the system easier to reach for service.
In-ground fixtures need prep work too. Well lights, for example, need a hole with about 3 inches of pea gravel or sand underneath for drainage [3]. That’s much easier to handle before the surrounding patio is finished.
Maryland Site Conditions That Affect Fire Feature Lighting
After the layout is set, site protection becomes the next big issue, especially drainage, sealing, and corrosion resistance.
Heavy rain can flood in-ground fixtures if drainage wasn’t built in from the start [3]. In hard or compacted soil, it’s smart to cut the ground first with a flat shovel before driving stakes [5][7]. It’s a small step, but it can save a lot of hassle during install.
Maryland’s humidity also makes sealing a bigger deal. Reinstall lenses immediately after servicing to preserve the seal [5][6][7]. And if the transformer is exposed, use weather-resistant, corrosion-resistant transformer enclosures to help prevent corrosion over the life of the system [4].
Conclusion: Key Elements of a Well-Planned Low-Voltage Fire Feature Lighting System
The best setups come from matching transformer size, wire routing, fixture placement, and dimming to the site before construction ends. In plain terms, a solid system depends on:
- A right-sized transformer loaded to no more than 80% of capacity [4]
- Safe cable routing around heat sources and drainage areas
- Zone-based control that keeps the fire feature as the focal point while the surrounding space stays safe and easy to use
For Maryland and Washington, DC properties, Pro Landscapes MD can coordinate the hardscape and drainage work that supports a clean lighting layout.
FAQs
How do I know what transformer size I need?
Add up the wattage of every light fixture on your low-voltage lighting system. Then choose a transformer that can handle that total load. Some models are built for 300 watts or more, which can be a good fit for bigger setups.
If your system is large, your wire runs are long, or your circuits carry a heavy load, a multi-tap transformer can help. These units often offer outputs from 12 to 22 volts, which helps offset voltage drop and keep lighting more even from one fixture to the next.
What low-voltage fixtures work best around a fire pit?
Choose low-voltage fixtures that add warmth to the space while still keeping the required 3-foot clear zone around the fire feature.
Hardscape and area lights are a good fit for nearby seat walls, patios, and walkways. They help shape the area and make it safer to move through at night. Just keep fixtures, wiring, and connections away from high-heat spots and combustible materials, and make sure they’re shielded from moisture and dust.
When should fire feature lighting be planned during construction?
Fire feature lighting should be planned during the initial design phase of your hardscaping project.
When you plan it alongside seat walls, patios, and outdoor kitchens, it’s much easier to hide wiring and place fixtures before stone or masonry is set. That helps you avoid messy retrofits later and gives the whole installation a cleaner, more polished look.
Chat with Us